🧢 Beautiful ✨ Detailed πŸ’ Adorable

Vintage Style Drawstring Bag Pattern

Vintage Style Drawstring Bag Pattern
4.2β˜… Rating
8-10 Hours Time Needed
1.1K Made This
βœ‚οΈ

Intermediate Level

Ideal for those with basic knitting experience, featuring slightly more advanced stitches and techniques to expand your skills.

⏱️

All-Day Adventure

Requires 8-10 hours, ideal for a full day of immersive knitting.

🎁

Charming Critter

Delightful animal designs with sweet details that capture the essence of your favorite woodland and farmyard friends.

About This Vintage Style Drawstring Bag Pattern

This Vintage Style Drawstring Bag pattern is an engaging project for those wanting to explore intermediate crochet techniques. The design is versatile and practical, perfect for storing items or as a stylish accessory. With clear instructions, you’ll find joy in every stitch as you create a piece that showcases your craftsmanship.

Vintage Style Drawstring Bag Pattern crochet pattern - detailed view of completed project

Create a stunning bag with a unique vintage style that adds charm to any outfit! This pattern is fun and rewarding to work through.

Why You'll Love This Vintage Style Drawstring Bag Pattern

I love this pattern for its blend of style and functionality! Crocheting this bag allows me to express my creativity while making something useful. Watching the design come together is truly satisfying, and I appreciate how it highlights my crochet skills. It's a joy to have a finished piece that I can be proud of!

Vintage Style Drawstring Bag Pattern step 1 - construction progress Vintage Style Drawstring Bag Pattern step 2 - assembly progress Vintage Style Drawstring Bag Pattern step 3 - details and accessories Vintage Style Drawstring Bag Pattern step 4 - final assembly and finishing

Switch Things Up

I absolutely enjoyed creating this Vintage Style Drawstring Bag! The blend of different stitches made it an engaging challenge.

While working on it, I was able to experiment with various yarn textures, bringing my own personal spin to the design.

The finished product holds a nostalgic beauty, reminding me of crafted treasures from yesteryears, and I believe you will love it too.

Common Mistakes & How to Fix Them

βœ— Using the wrong hook size can affect your bag's size; always double-check before beginning. βœ— Forgetting to join rounds properly can lead to uneven bag shape; count your stitches carefully. βœ— Neglecting to secure loose yarn at the start can cause unraveling later; make sure to secure your start. βœ— Skipping fringe details can result in a less polished look; don't rush through finishing touches.

Vintage Style Drawstring Bag Pattern

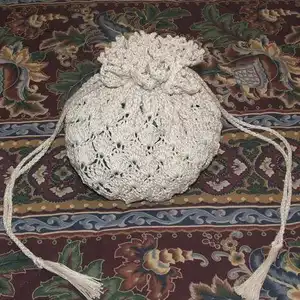
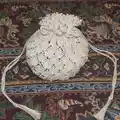
Embrace the beauty of crochet with this Vintage Style Drawstring Bag pattern! Perfect for intermediate crafters, this design combines vintage charm with modern practicality. You'll learn various stitches while creating a stunning bag that measures 14-16" in diameter, ideal for all your storing needs. Get ready to enjoy the satisfying process of crocheting while crafting a beautiful accessory that showcases your talent!

Intermediate 8-10 Hours

Materials Needed for Vintage Style Drawstring Bag Pattern

β€” Main Fabric

  • 01
    Size 0 steel crochet hook (or size C aluminum crochet hook)
  • 02
    450 yards size 10 cotton crochet thread

β€” Tools Required

  • 01
    Scissors
  • 02
    Stitch markers
  • 03
    Yarn needle
  • 04
    Tape measure
  • 05
    Cardboard square for fringe (4 inch)

Progress Tracker

0% Complete

β€” Directions:

Rnd. 1 :

ch 4, join with sl st to form ring, ch 3 (counts as first dc of next rnd).

Rnd. 2 :

work 15 dc in ring, join to top of beginning ch 3, ch 3, do not turn. 16 dc

Rnd. 3 :

dc in same st, *2 dc in next dc*, repeat from asterisks 14 times, join with sl st to top of beginning ch 3, ch 3, do not turn. 32 dc

Rnd. 4 :

dc in first st, *2 dc in next dc*, repeat from asterisks 30 times, join with sl st to top of beginning ch 3, ch 3, do not turn. 64 dc

Rnd. 5 :

skip next dc, 3 dc, ch 1, 3 dc in next dc, skip next dc, *dc in next dc, skip next dc, 3 dc, ch 1 in next dc, skip next dc*, repeat from asterisks 14 times, join with sl st to beginning ch 3, ch 1, do not turn. 16 shells

Rnd. 6 :

sc in same st, 7 tr in next ch 1 sp, *sc in next dc, 7 tr in next ch 1 sp*, repeat from asterisks 14 times, join to beginning sc, ch 4 (counts as first tr of next rnd), turn. 16-7 tr groups

Rnd. 7 :

6 tr in same sc, sc in center tr of next 7 tr group, *7 tr in next sc, sc in center tr of next 7 tr group*, repeat from asterisks 14 times, join with slst to top of beginning ch 4, ch 1, turn. 16-7 tr groups

Rnd. 8 :

7 tr in first sc, sc in center tr of next 7 tr group, *7 tr in next sc, sc in center tr of next 7 tr group*, repeat from asterisks 14 times, join to top of beginning tr, ch 1, turn.

Rnds. 9-11 :

repeat rnd. 8.

Rnd. 12 :

tr, ch 1 in first sc (7 times), sc, ch 1 in center tr of next 7 tr group, *tr, ch 1 (7 times) in next sc, sc, ch 1 in center tr of next 7 tr group*, repeat from asterisks 14 times, join with sl st to beginning tr, ch 1, turn.

Rnd. 13 :

repeat rnd. 12, join with sl st to beginning tr, ch 1, do not turn.

Rnd. 14 :

sc in each st and in each ch 1 sp around, join with sl st to beginning sc, ch 1, do not turn. 256 sc

Rnd. 15 :

sc in first 4 sc, sdec over next 2 sc, *sc in next 4 sc, sdec over next 2 sc*, repeat from * to * around, join with sl st to beginning sc, ch 5, do not turn. 215 sc

Rnd. 16 :

skip next sc, *tr, ch 1 in next sc, skip next 2 sc*, repeat from asterisks around, join with sl st to beginning ch 5, sl st to next ch 1 sp, ch 1, do not turn. 72-ch 1 spaces

Rnd. 17 :

sc in same sp, skip next ch 1 sp, 7 tr in next ch 1 sp, skip next ch 1 sp, *sc in next ch 1 sp, 7 tr in next ch 1 sp, skip next ch 1 sp*, repeat from asterisks around, join with slst to next ch 1 sp, ch 1, do not turn. 18-7 tr groups

Rnd. 18 :

sc, ch 1 in first sc, tr, ch 1 in next tr (7 times), *sc, ch 1 in next sc, tr, ch 1 in next tr (7 times)*, repeat from asterisk around, join with slst to beginning sc, ch 1, do not turn. 18 7-tr, ch 1 groups

Rnd. 19 :

sc in first sc, sc, picot in next ch 1 sp, *sc in next tr, sc, picot in next ch 1 sp*, repeat from asterisks 6 times, [sc in next sc, sc, picot in next ch 1 sp, **sc in next tr, sc, picot in next ch 1 sp**, repeat from ** 6 times], repeat from brackets around, join with sl st to beginning sc, fasten off.

β€” Drawstrings:

Make 2

Rnd. 1: leaving 4 inch tail, ch 151, sl st in 2nd ch from hook and in each ch across, being careful not to twist, fasten off leaving 4 inch tail.

Weave

drawstring through ch 1 spaces at rnd. 16, pull 2 strands of tail through the end sl of drawstring, tie to secure drawstring closed.

Starting

at opposite side of bag, weave 2nd drawstring through ch 1 spaces on rnd. 16, secure as done with first drawstring.

β€” Fringe:

Make 2: Wrap double strand of thread 12 times around 4" cardboard square, cut in half. Attach tassel on secured end of drawstring, trim if necessary.

Assembly Instructions

  • Attach the drawstring to the top of the bag after completing the body rounds.
  • Weave in all loose ends securely to maintain the integrity of your bag.
  • Ensure to pull the strings firmly to gather the top neatly for the drawstring effect.
  • If desired, add beads to the drawstrings for an extra decorative touch.

Important Notes

  • πŸ’‘Always keep track of your rounds to avoid losing your place.
  • πŸ’‘Using two strands helps achieve a more durable fabric; ensure they're snug together.
  • πŸ’‘When making the fringe, do not cut the strands too short to avoid a thin appearance.
  • πŸ’‘Keep your tension consistent for an even finish throughout your work.

Create this beautiful Vintage Style Drawstring Bag pattern to showcase your crochet skills! Perfect for crafts or everyday use, it combines style and utility beautifully. 🌸🧢✨

You ask,

we answer.

FAQs

What is the finished size of the drawstring bag?

The finished bag will measure approximately 14-16 inches in diameter, perfect for various uses.

Can I use different types of yarn for this bag?

Yes, you can use any weight yarn; just ensure to adjust your hook size accordingly.

What should I do if my tension is too tight?

If your tension feels too tight, try using a larger hook size to achieve a looser fabric.

Is this pattern suitable for beginners?

This pattern is intended for intermediate crocheters, as it involves more complex stitches and techniques.