🧢 Beautiful ✨ Detailed πŸ’ Adorable

Cascading Ripples Blanket Pattern

Cascading Ripples Blanket Pattern
4.0β˜… Rating
12-15 Hours Time Needed
1.9K Made This
βœ‚οΈ

Beginner Friendly Level

Perfect for those just starting their crochet journey, with clear instructions and simple techniques

⏱️

Multi-Day Project

A rewarding 12+ hour journeyβ€”perfect for dedicated crafters who love detailed work.

πŸ€—

Soft Hug

Gentle, plush, and full of warmth, creating a sense of comfort and coziness wherever they find a home.

About This Cascading Ripples Blanket Pattern

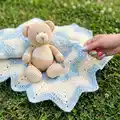
This pattern creates an approx 36in [91.5 cm] square Cascading Ripples blanket using Bernat Baby Coordinates yarn held as two strands together. The ripple pattern forms from a 24-row cascading repeat, producing a soft, textured surface with gentle waves. It includes full row-by-row instructions and a simple single crochet edging to finish the blanket neatly.

Cascading Ripples Blanket Pattern crochet pattern - detailed view of completed project

Worked holding two strands together, the blanket achieves a squishy, cozy drape while remaining easy to stitch. The pattern is labelled easy and is excellent for practicing consistent tension and stitch counting.

Why You'll Love This Cascading Ripples Blanket Pattern

I absolutely love this pattern because its simple yet yields a beautifully textured blanket that feels luxurious to the touch. I enjoy holding two strands together to create a plush fabric that works up faster and feels extra soft. The cascading ripple repeat is calming to crochet and gives a professional-looking result without complicated stitches. I also love that the pattern is easy to customise by changing color sequences or yarn weight to make different sizes and feels. Sharing this blanket as a baby gift or cozy lap throw always brings compliments and makes me proud.

Cascading Ripples Blanket Pattern step 1 - construction progress Cascading Ripples Blanket Pattern step 2 - assembly progress Cascading Ripples Blanket Pattern step 3 - details and accessories Cascading Ripples Blanket Pattern step 4 - final assembly and finishing

Switch Things Up

I love how easy it is to customise this blanket by changing the color order; try alternating wider color stripes or ombre shades for a different look.

You can make the blanket larger by chaining more foundation chains in multiples that fit the pattern, then repeat the 24-row Cascading Ripple Pat until you reach the desired length.

If you want a chunkier blanket, I often hold a bulky yarn with a larger hook while still checking the gauge to keep the ripple proportions balanced.

For a lighter, more delicate version, try using a DK weight yarn and a smaller hook to create a drapier ripple throw.

I sometimes add a contrasting border color for a pop of contrast; a few rounds of single crochet in a bold hue frames the ripples beautifully.

Try mixing solid and variegated shades to add depth β€” variegated yarns paired with solids make the ripples sing without extra effort.

I also like to change the edging: a scalloped shell edge softens the look, while a crab stitch edge gives a neat, sturdy finish.

Want to personalise it as a baby gift? Embroider a small name or initial on one corner using duplicate stitch after finishing the edging.

Combine this pattern with a matching set by crocheting a smaller lap or stroller blanket using the same color palette for coordinated gifting.

Don’t be afraid to experiment with holding a textured yarn as one of the two strands for added visual interest and tactile contrast.

Common Mistakes & How to Fix Them

βœ— Not marking every 50th chain makes the starting chain hard to count; mark every 50th chain as instructed to maintain accurate stitch counts. βœ— Working with uneven tension when holding two strands together can create wavy or distorted rows; practise keeping both strands aligned and maintain consistent tension. βœ— Forgetting to leave the first and last sc of each row unworked will change the edge shaping; always skip the first and last sc as noted to keep clean edges. βœ— Skipping the fasten off and turning steps at the end of the row directions can leave you with incorrect stitch counts; follow the fasten off and turn instructions precisely to reach the stated stitch counts. βœ— Changing hook size without checking gauge will alter the finished size considerably; check the gauge (12 sc and 13 rows = 4 ins with 2 strands) and adjust hook to obtain gauge.

Cascading Ripples Blanket Pattern

Make a cozy, textured cascading ripples blanket that is perfect for baby snuggles or a lap throw. This easy pattern uses two strands held together to create a soft, cushy fabric and a gentle ripple texture. Youll enjoy the simple repeating rows and the calm rhythm as the colors cascade across the blanket. Clear instructions and an edging finish make this a satisfying project for makers of many skill levels.

Beginner Friendly 12-15 Hours

Materials Needed for Cascading Ripples Blanket Pattern

β€” Main Fabric

  • 01
    Bernat Baby Coordinates (160 g / 5.6 oz) - Main Color (MC) (09131 Blue BonBon) - 2 balls
  • 02
    Bernat Baby Coordinates - Contrast A (01005 Sky) - 2 balls
  • 03
    Bernat Baby Coordinates - Contrast B (01009 Soft Blue) - 2 balls
  • 04
    Bernat Baby Coordinates - Contrast C (01000 White) - 2 balls
  • 05
    Hold 2 strands together throughout the blanket (use two balls in rotation per color as needed)

β€” Tools Required

  • 01
    Crochet hook size 5.5 mm (U.S. I or 9) or size needed to obtain gauge
  • 02
    Stitch markers (mark every 50th chain for easier counting)

Progress Tracker

0% Complete

β€” Instructions :

Info :

Note: Entire blanket is worked holding 2 strands of yarn tog. β€’ First and last sc of each row is left unworked.

Info :

Cascading Ripple Pat

Info :

With MC, work 1 row.

Info :

With A, work 1 row.

Info :

Rep last 2 rows once more.

Info :

With B, work 1 row.

Info :

With A, work 1 row.

Info :

Rep last 2 rows twice more.

Info :

With B, work 1 row.

Info :

With C, work 1 row.

Info :

Rep last 2 rows 3 times more.

Info :

With B, work 1 row.

Info :

With A, work 1 row.

Info :

Rep last 2 rows twice more.

Info :

These 24 rows form Cascading Ripple Pat.

Info :

With 2 strands of MC, ch 167. Mark every 50th ch for easier counting.

Round 1 :

1st row: 1 sc in 2nd ch from hook. *(Ch 1. Miss next ch. 1 sc in next ch) 6 times. Ch 2. (1 sc in next ch. Ch 1. Miss next ch) 6 times. 1 sc in next ch.** Miss next 2 ch. 1 sc in next ch. Rep from * 4 times more, then from * to ** once more. Fasten off. Turn. 166 sts.

Round 2 :

2nd row: Join 2 strands of A, with sl st to first ch-1 sp. Ch 1. 1 sc in same sp as sl st. (Ch 1. Miss next sc. 1 sc in next ch-1 sp) 5 times. Ch 1. *(1 sc. Ch 2. 1 sc) in next ch-2 sp. (Ch 1. Miss next sc. 1 sc in next ch-1 sp) 6 times. **Miss next 2 sc. (1 sc in next ch-1 sp. Ch 1. Miss next sc) 6 times. Rep from * 4 times more, then from * to ** once more. Fasten off. Turn. First 2 rows of Cascading Ripple Pat are complete.

Info :

Keeping cont of Cascading Ripple Pat, rep last row until Cascading Ripple Pat has been worked 5 times.

Info :

With MC, work 1 row.

Info :

With A, work 1 row.

Info :

With MC, work 1 row. Do not turn.

β€” Edging :

Info :

With 2 strands of MC, working along side edge of Blanket, proceed as follows: Ch 1. 1 sc in side of each sc down side of blanket. Fasten off.

Info :

Join 2 strands of MC with sl st to first sc on other side of Blanket. Ch 1. 1 sc in side of each sc up side of Blanket. Fasten off.

Assembly Instructions

  • Mark every 50th chain when chaining 167 with two strands of MC to make counting easier and to ensure correct stitch placement.
  • Fasten off and turn after completing the 1st row as instructed to create the correct stitch base (resulting in 166 sts).
  • After joining yarn for row 2, fasten off and turn where specified so the first two rows of the Cascading Ripple Pat are complete and can be repeated.
  • Work the edging with 2 strands of MC by making Ch 1 and 1 sc in the side of each sc down one side, fasten off, then join and sc up the opposite side; fasten off to finish neatly.

Important Notes

  • πŸ’‘Entire blanket is worked holding 2 strands of yarn together; be consistent with tension when holding both strands.
  • πŸ’‘First and last single crochet of each row is left unworked to create the proper ripple edge; do not crochet into those stitches.
  • πŸ’‘Mark every 50th chain in the starting chain for easier counting and to keep stitch placement accurate during the pattern.
  • πŸ’‘Check gauge (12 sc and 13 rows = 4 ins [10 cm] with 2 strands held together) and change hook size if necessary to obtain correct size.

This Cascading Ripples Blanket is a soft, textured throw worked holding two strands together for extra squish and warmth. Perfect for gifting or keeping on your lap during cozy evenings. The easy ripple repeat and tidy single-crochet edging make it a satisfyingly quick but lasting make. 🧢🫢

You ask,

we answer.

FAQs

What size will the finished piece be?

The finished blanket measures approximately 36 ins [91.5 cm] square when using the recommended yarn and hook size and holding two strands together.

Can I use different yarn weights for this pattern?

Yes, you can use different yarn weights, but this will change the final size and drape; make sure to check gauge and adjust the hook size to obtain the recommended gauge of 12 sc and 13 rows = 4 ins with 2 strands held together.

Do I need stitch markers or any special tools?

It is recommended to mark every 50th chain for easier counting during the starting chain; a 5.5 mm (U.S. I or 9) hook or size to obtain gauge is specified.

How long does this project typically take to complete?

Most crocheters complete this blanket in multiple sessions; estimate around 12-15 hours overall depending on your speed and any colour changes.