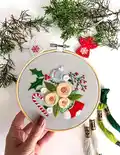
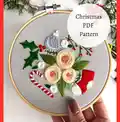
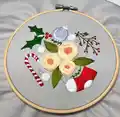
About This Christmas Embroidery Hoop Pattern
This pattern creates a 15 cm Christmas-themed embroidery hoop featuring roses, holly leaves, a candy cane and a tiny stocking. You will learn satin stitch, fishbone stitch, chain stitch, backstitch, woven wheel stitch and French knots to build layered floral and foliage details. The pattern includes a printable transfer page, detailed stitch descriptions and step-by-step photos to guide you through the process.

Ideal for beginners and all skill levels, this design uses DMC embroidery threads and natural fabric for crisp stitch definition. The finishing instructions show how to back the hoop neatly with felt or craft cardboard for a polished final piece.
Why You'll Love This Christmas Embroidery Hoop Pattern
I absolutely love this pattern because it brings classic embroidery stitches together into a compact, festive design that looks impressive but is easy to stitch. I enjoy how the woven wheel flowers and satin-filled leaves add depth and texture with simple techniques. The printable template makes transferring the design effortless, and I find the finishing steps give a professional result every time. Stitching this hoop feels relaxing and celebratory, perfect for gifting or seasonal decor.
Switch Things Up
I love to change colors to give this hoop a different mood; try pastel roses for a soft spring version or jewel tones for a rich holiday look.
I often swap DMC colors and experiment with metallic thread for small accents to add shimmer to berries or ornaments.
If you want a smaller or larger piece, simply change the hoop size; a 10 cm hoop gives a miniature ornament while 20 cm creates a statement piece.
You can replace woven wheel flowers with small bullion knots for a textured floral center if you prefer more raised detail.
I sometimes add tiny seed beads at the center of woven wheels or on berry clusters to catch the light and add contrast.
Try a dark-colored fabric background like navy or deep green to make the satin stitches pop and create a dramatic effect.
For a modern twist, use variegated floss for the satin fills so each petal has subtle color shifts without changing threads mid-stitch.
I also like framing finished hoops in shadow boxes or mounting them on card fronts to create wearable or giftable art pieces.
If you prefer less sewing on the back, glue a pre-cut felt circle after stitching instead of overstitching, but only use a thin layer to avoid lumps.
To personalize, embroider a name or year in backstitch near the edge and make a set of matching hoops in different sizes for seasonal wall displays.
Common Mistakes & How to Fix Them
✗ Not transferring the pattern accurately can lead to misaligned elements; use carbon paper or tape the printed pattern to a window and trace carefully.
✗ Using the wrong thread thickness can flatten texture and hide details; use stranded DMC cotton and separate strands as recommended for satin and woven wheel stitches.
✗ Pulling satin stitches too tight will pucker the fabric and distort shapes; keep stitches smooth and moderate tension for an even surface.
✗ Skipping anchoring stitches or not securing thread ends can cause unraveling; always secure thread tails neatly on the back and weave ends under nearby stitches.
✗ Overfilling woven wheel stitches too quickly can bunch the center; weave gradually and adjust tension as you build up the rounds for a neat finish.