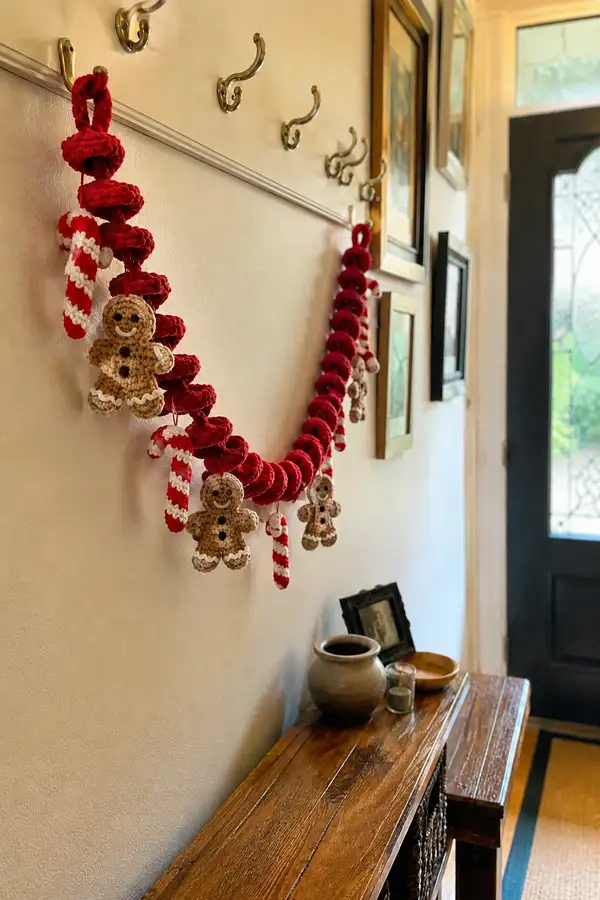
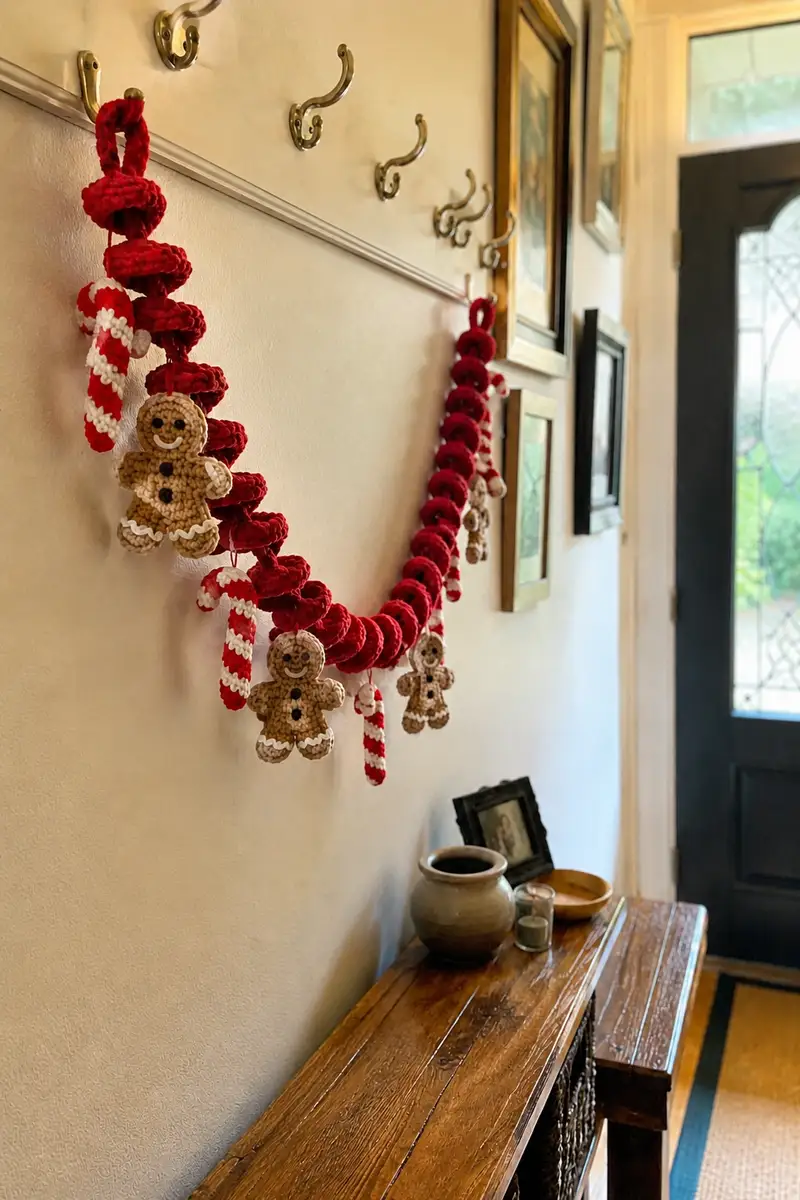
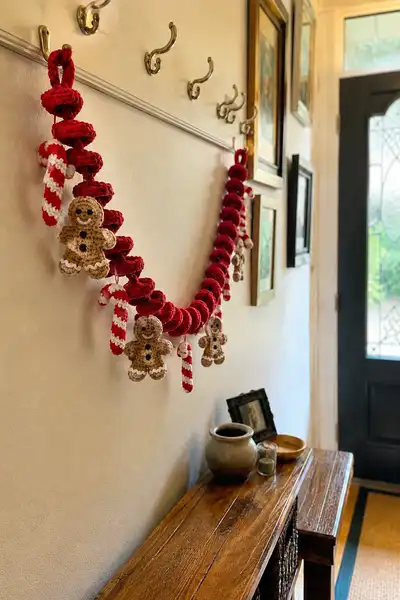
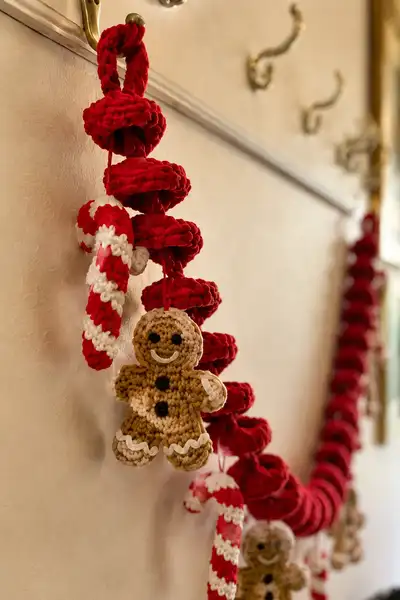
Create a warm, festive spiral garland strung with tiny crocheted gingerbread men and candy canes. This pattern recreates the deep red plush spiral cord, soft tan gingerbread figures with white icing details, and striped red-and-white candy canes. Perfect for doorways, mantels, or as a holiday accent, each element is written in step-by-step rounds with tips for stuffing, assembly, and finishing.
Progress Tracker
0% Complete
— Spiral Garland Cord :
Info :
This spiral cord is made from plush/chenille yarn to create large soft rings that stack into a spiral. Work each ring as a flat spiral motif attached to a sturdy foundation chain to make them sit in a row. Use a 6.5mm or appropriate hook for your plush yarn to keep stitches from being too tight. Make approximately 28 large rings per 1 meter of garland; adjust to desired length.
Foundation Chain :
Ch 140 (or length desired; chain should be even). This chain will serve as the central cord that rings will be worked around or anchored to. If you want a thicker cord, chain fewer and create multiple strands twisted together later.
Round 1 :
Join plush yarn to ch 2 from hook (counts as first hdc), work 2 hdc in same ch, 3 hdc in next ch, *skip 1 ch, 5 hdc in next ch; rep from * along chain to end, ending with 3 hdc in last ch and join with sl st to first st (approx shell motif across chain, shell counts will vary depending on chain length). The shells create puffy disc shapes.
Info :
Work shells firmly but not overly tight. If using very plush yarn, a single hdc cluster into each chain makes a rounded petal; the goal is 3-5 hdc per shell to create a thick petal. Count shell groups as motifs rather than single stitches.
Round 2 :
Sl st into the center top of the first shell, ch 2, (2 hdc, 3 hdc, 2 hdc) into center of same shell to create a raised rosette; sl st into center of next shell and repeat rosette across. Join and fasten off leaving long tail for weaving if needed.
Info :
Each shell-rosette pair forms a ring that will stack. Make as many rings as necessary to obtain the curved spiral look. For continuous spiral, do not fasten off between rings; instead slip st to next chain space and continue repeating motifs to create joined rings.
Rounds 3-80 :
Rep Round 2 across the chain, spacing rosettes evenly to form 80 total rosettes (or desired number). Leave approx 10-15 cm of chain free at each end to form hanging loops. Fasten off and weave in ends. Trim any long stray fibers carefully.
Info :
To accentuate spiral, twist the prepared cord gently and allow rings to stack; you can secure the tops of rings with small stitches through the inner chain to hold spacing. If you prefer a more tubular cord, work a second identical cord and twist together, sewing at intervals.
— Gingerbread — Front Panel :
Round 1 :
With light brown/tan yarn, mr, 6 sc in mr (6)
Round 3 :
(1 sc, inc) x 6 (18)
Round 4 :
(2 sc, inc) x 6 (24)
Round 5 :
(3 sc, inc) x 6 (30)
Info :
These early rounds form the head dome. Place a stitch marker at the beginning of each round to maintain orientation. Eyes will be placed between Rounds 7-9 depending on expression desired.
Round 6 :
1 sc in each st around (30)
Round 7 :
1 sc in each st around (30)
Round 8 :
1 sc in each st around (30)
Info :
Place two small black French knot-style embroideries or 4mm safety eyes between Rounds 7 and 8, approximately 6-8 stitches apart (for these dimensions use embroidery to avoid safety-eye bulk). Secure before adding more stuffing or layers.
Round 9 :
(4 sc, inc) x 6 (36)
Round 10 :
1 sc in each st around (36)
Round 11 :
(5 sc, inc) x 6 (42)
Round 12 :
1 sc in each st around (42)
Info :
Round 9-12 create the shoulder and upper torso breadth. At the end of Round 12 you will begin shaping the waist and lower body. Keep your tension consistent to avoid wavy edges.
Round 13 :
1 sc in each st around (42)
Round 14 :
(6 sc, inc) x 6 (48)
Round 15 :
1 sc in each st around (48)
Round 16 :
1 sc in each st around (48)
Info :
To create arm notches, we will work slight shaping over the next rounds so the sides pinch in to create the look of separate arms and torso. Make small picots for arm separation if you prefer perforated arm openings (optional).
Round 17 :
(7 sc, dec) x 6 (42)
Round 18 :
(6 sc, dec) x 6 (36)
Round 19 :
1 sc in each st around (36)
Round 20 :
(3 sc, dec) x 6 (30)
Info :
Round 17-20 reduce to create the waist. At this stage, leave the panel flat—do not fasten off. We will create leg and hand bumps by working short rounds to form protrusions before closing.
Round 21 :
Work 6 sc (across front lower body) then ch 3, skip 3 sts (this chain will form a small foot separation), 6 sc across next portion, ch 3, skip 3 sts, sc in remaining stitches to finish round (30). This creates small chain spaces where legs will sit as bumps. If you prefer filled legs, work bumps separately and sew on later.
Round 22 :
1 sc in each st around (30)
Round 23 :
(2 sc, dec) x 6 (24)
Round 24 :
(1 sc, dec) x 6 (18)
Round 25 :
(1 sc, inc) x 6 (24)
Info :
These rounds create a shallow belly curve and define the lower silhouette. Do not stuff the front panel yet; stuffing will be done after joining front and back. If you prefer a completely flat ornament, fasten off and weave ends.
Round 26 :
1 sc in each st around (24)
Round 27 :
(2 sc, dec) x 6 (18)
Round 28 :
(1 sc, dec) x 6 (12)
Round 30 :
Fasten off leaving long tail for joining and stuffing. Weave tail through remaining 6 sts and pull closed slightly — leave opening for stuffing when joined to back panel (6)
Info :
Repeat this front panel to create one front for each gingerbread ornament (pattern makes 6). Make note of stitch counts if you adjust size. Embroidery details will be added after joining and stuffing.
— Gingerbread — Back Panel :
Round 1 :
With same light brown yarn, mr, 6 sc in mr (6)
Round 3 :
(1 sc, inc) x 6 (18)
Round 4 :
(2 sc, inc) x 6 (24)
Round 5 :
(3 sc, inc) x 6 (30)
Round 6 :
1 sc in each st around (30)
Round 7 :
1 sc in each st around (30)
Info :
Back panel mirrors front through Round 12. The back will be slightly shallower so the front shows the decorative icing. Place marker for starting point to match front when joining.
Round 8 :
(4 sc, inc) x 6 (36)
Round 9 :
1 sc in each st around (36)
Round 10 :
(5 sc, inc) x 6 (42)
Round 11 :
1 sc in each st around (42)
Round 12 :
1 sc in each st around (42)
Round 13 :
(7 sc, dec) x 6 (36)
Round 14 :
(6 sc, dec) x 6 (30)
Round 15 :
1 sc in each st around (30)
Round 16 :
(3 sc, dec) x 6 (24)
Round 17 :
(2 sc, dec) x 6 (18)
Round 18 :
(1 sc, dec) x 6 (12)
Round 20 :
Fasten off leaving long tail for joining. Do not stuff back separately.
Info :
Make identical back panels for every gingerbread. Keep stitch marker placement consistent so front and back align when joined. Back remains plain to show icing on front side.
— Gingerbread — Arms (Make 2 per figure) :
Round 1 :
With tan yarn, mr, 6 sc in mr (6)
Round 3 :
1 sc in each st around (12)
Round 4 :
(2 sc, inc) x 3 (15)
Round 5 :
1 sc in each st around (15)
Info :
Arms are small bumps attached to the side rounds of the front panel. Work two per figure. For a slightly flat appearance, work rounds in BLO on the first 2 rounds to create a flatter inner seam.
Round 6 :
(3 sc, dec) x 3 (12)
Round 7 :
1 sc in each st around (12)
Round 9 :
Fasten off leaving tail for sewing to panel. Stuff lightly if desired (6)
Info :
Sew arms into arm notches on front panel before joining front and back (see assembly). Use small invisible stitches and align so icing trim does not obscure seam.
— Gingerbread — Legs / Foot Bumps (Make 2 per figure) :
Round 1 :
With tan yarn, mr, 6 sc in mr (6)
Round 3 :
(1 sc, inc) x 6 (18)
Round 4 :
1 sc in each st around (18)
Round 5 :
(2 sc, dec) x 4, 2 sc (14)
Round 6 :
1 sc in each st around (14)
Round 7 :
(1 sc, dec) x 4, 2 sc (10)
Round 9 :
Fasten off leaving tail for sewing. Stuff very lightly to keep foot bump rounded but flat (5)
Info :
Sew legs into the lower chain spaces created on the front panel (Round 21 front) before joining. Space legs about 8-10 stitches apart depending on size of front panel.
— Gingerbread — Assembly & Icing Detail :
Info :
Place front and back together RS facing out (right sides outward) so that icing will show on front. Align beginning rounds and stitch counts. Start sewing at the neck top with the long tail from front panel, using whip stitch or invisible ladder stitch to join edges leaving a 1.5-2 cm gap to add stuffing if needed.
Round 1 (Join) :
Sew front to back around perimeter until you reach the lower belly area. Before finishing, insert small amount of polyester fiberfill so the figure is slightly puffy but still flat (do not overstuff; aim for 80-90% firmness). Finish sewing remaining stitches and close completely.
Round 2 (Icing Trim) :
With cream yarn and 3.25mm hook, join at the edge of each arm and foot and work: *ch 3, sl st back into the same st to form a small loop (picot); sl st into next st; rep across edges of arms and feet to create rickrack icing effect. Alternatively: (sc, ch2, sc) across edges for small scallops.
Round 3 (Buttons & Face) :
Use black yarn to embroider two small dots down the center of torso for buttons and a small smiling mouth (white or cream yarn) for icing-smile. Use French knots or small satin stitch for eyes and buttons. Sew on three tiny black yarn knots equally spaced on torso.
Info :
If you want raised icing, use surface slip stitch in cream yarn to pipe along arms and feet. For a neater finish, go around each edge twice and weave tails securely into body interior.
— Candy Cane Ornament (Make 6) :
Info :
These are small tubular candy canes made with alternating red and white stripes. They are worked in continuous rounds in the round for a tube, then shaped into a hook by working a short hooked section at the end. You can work them with two strands for a chunkier look or single strand for smaller size.
Round 1 :
With red yarn, mr, 6 sc in mr (6)
Round 3 :
1 sc in each st around (12)
Round 4 :
(1 sc, inc) x 6 (18)
Round 5 :
1 sc in each st around (18)
Info :
Begin stripe sequence now. For candy-cane stripes change color every 2 rounds to create diagonal effect when worked while turning the tube slightly between rounds. Use loose tails at color changes and weave in later.
Round 6 :
Change to white. 1 sc in each st around (18)
Round 7 :
Change to red. 1 sc in each st around (18)
Round 8 :
Change to white. 1 sc in each st around (18)
Round 9 :
Change to red. 1 sc in each st around (18)
Round 10 :
1 sc in each st around (18)
Info :
Continue striping for desired length of straight portion of cane (approx 10-12 rounds of stripes). To create the hook end, we will taper and bend by using increases and working in short rounds.
Round 11 :
(2 sc, dec) x 4, 2 sc (14)
Round 12 :
1 sc in each st around (14)
Round 13 :
(1 sc, dec) x 4, 2 sc (10)
Round 14 :
1 sc in each st around (10)
Round 15 (Hook Formation) :
Work 6 sc across the next 6 sts, turn work and in same 6 sts work 6 sc back (this creates a short folded section). Sl st to next st and repeat once to make a gentle hook. Fasten off leaving tail for sewing (10)
Info :
Stuff only slightly if you want a slightly plump cane; most examples are lightly stuffed to hold a curve. Use yarn needle to push stuffing into narrow tube. If using chenille for striped effect, carry the white yarn inside the tube when changing colors to avoid bulk.
Round 16 :
Sew the cast hook seam closed lightly and weave in ends. For extra stability, run a small length of thin craft wire into larger canes and fold the ends under before sewing closed to keep the shape.
— Small Decorative Icing Puff (Optional) :
Round 1 :
With cream yarn, mr, 6 sc in mr (6)
Round 3 :
(1 sc, inc) x 6 (18)
Round 4 :
Sc around in BLO to make a ruffled edge (18)
Round 5 :
Fasten off leaving tail to sew to candy cane or spiral cord as tiny dollop of icing decoration
Info :
These small puffs are decorative accents along the cord between rings. Make several to space between gingerbread and candy canes for interest.
— Assembly and Hanging Loops :
Info :
Decide placement of gingerbread men and candy canes along spiral cord. The garland in photograph alternates segments of three to four spiral rings between ornaments. Each ornament is attached by a short loop of yarn (6-8 ch) sewn securely through the inner chain so rings are not pulled apart.
Step 1 :
Using long tails left on gingerbread figures, sew a 6-8 ch loop at top center of the head (through Rounds 9-12 region) and secure with several stitches to the inner chain of the garland. Alternatively, use a small yarn loop that slips over a ring for removable placement.
Step 2 :
Sew candy cane loops similarly; position canes between ring clusters so they dangle freely. Reinforce each attachment with at least 6 stitches through inner cord loop and knot securely.
Step 3 :
Space ornaments evenly: suggested spacing is one ornament every 6-10 rings. For the pictured effect, alternate gingerbread, candy cane, gingerbread, leaving 6-8 rings between similar ornaments.
Info :
Securely weave in and hide all tails inside the plush rings or into the ornament interior. If garland will be handled frequently, add a dab of fabric glue to knot ends to prevent slippage from humidity or weight.
— Finishing Touches and Stabilizing :
Step 1 :
Make hanging loops at both ends of the prepared garland by chaining 20 and slip-stitching back into the cord to form a large loop; reinforce with 3-4 rows of sc around loop if desired for weight-bearing.
Step 2 :
Gently shape gingerbread faces by adding a small surface sl st smile in cream yarn. Add tiny white rickrack around feet and hands. For buttons, sew 2-3 black embroidery dots down the torso front and secure tightly.
Step 3 :
Suspend garland on hooks and allow any plush yarn to relax overnight so rings settle into a natural spiral. If any rings are twisted incorrectly, adjust by manipulating inner chain and re-securing with a few stitches.
Info :
Store garland flat or rolled with tissue to protect plush rings. Spot clean any marks with damp cloth; avoid soaking chenille yarn as it can mat.
This festive garland combines plush texture and classic holiday motifs to make a heartwarming decoration perfect for any home. Each tiny gingerbread and candy cane is a labor of love — stitch by stitch they come together into a joyful display. Hang it on a mantel, doorway, or stair rail to add a handmade holiday touch that will be admired each season. 🧶🎁 Enjoy every cozy minute of the creative process and share your garland proudly! 🎄