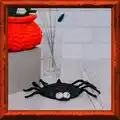
About This Coaster Spider Amigurumi Pattern
This pattern creates a flat spider-shaped coaster crocheted in raffia yarn with stuffed eyes and embroidered details. It uses simple double crochet rounds to build the base, a decorative trim with stitch markers, and short crocheted legs. The piece is shaped with steam and finished with sewn eyes and a few embroidery stitches for personality.
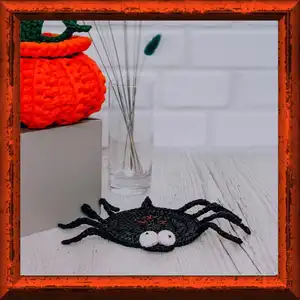
Designed for beginners, the instructions include clear rounds, photos, and video reference for elongated chain stitches. The finished coaster measures about 4.5 inches (11 cm) across, with legs about 9 inches (22 cm) long.
Why You'll Love This Coaster Spider Amigurumi Pattern
I absolutely love this pattern because it turns inexpensive raffia yarn into a striking seasonal accent that looks much more complex than it actually is. I enjoy how quickly the base rounds come together and how the steam shaping transforms the coaster into a neat, polished piece. The tiny stuffed eyes and simple red embroidery add so much character with very little extra work. Making a set of these takes a couple of afternoons and always sparks compliments when I use them or gift them. It's a joyful, tactile project that blends easy crochet with small finishing touches.
Switch Things Up
I love customizing this coaster by changing yarn and color to suit seasons; try natural raffia for a rustic look or bright colors for a playful version.
If you want a smaller or larger coaster, adjust your hook size and yarn weight; a thicker yarn with a larger hook gives a chunkier coaster, while thin cotton makes a delicate mini.
I often add felt pads under the coaster for extra stability and protection; cut small felt circles and glue or stitch them to the back.
Try making a whole set in alternating colors to create a themed table display for parties or holidays.
I sometimes replace the stuffed eyes with safety eyes or embroidered eyes for different expressions; experiment with placement to change personality.
For a sturdier finish, lightly starch the coaster instead of steaming, then shape and press flat until dry.
I like to trim the legs shorter for a subtler look, or braid two strands of raffia together for thicker, more dramatic legs.
Add tiny crocheted accessories like a mini bow or hat on the spider for a cute gift-ready touch.
I recommend experimenting with embroidered details; red stitches create spooky marks, while white highlights give a cartoonish charm.
Don't be afraid to mix fibers—combining raffia with a bit of cotton for eyes or accents gives contrast and helps details pop.
Common Mistakes & How to Fix Them
✗ Not straightening the raffia yarn before starting causes gaps and uneven stitches; straighten the raffia first and keep the working thread level with the hook while crocheting.
✗ Using the wrong hook size will change the gauge and shape; use 2mm and 3mm hooks as specified to match the pattern and finished dimensions.
✗ Skipping stitch markers during the base trim leads to misplaced decorative sections; place markers in the 8th, 12th, 16th, 20th, 30th, 40th, 44th, 48th and 52nd loops as directed.
✗ Overstuffing the eyes makes sewing and shaping difficult; add a small amount of stuffing and shape gradually to keep the eyes round and neat.
✗ Cutting the thread too early at the base before finishing the trim will leave you without a tail for finishing; follow the instruction 'The thread don't cut' until the trim is fully worked and shaped.