Make a stylish cold-shoulder crochet crop top with a pretty lace cup and fitted body. This pattern includes step-by-step row instructions, clear stitch counts for three sizes, and sleeve construction with a lace motif. You can customize length and sleeve style for a perfect fit and handmade wardrobe addition.
Progress Tracker
0% Complete
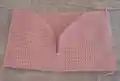
— Front Piece :
Info :
Make front piece as two cups separated by a skipped stitch. Instructions give counts for sizes Small-Medium-Large as three numbers separated by dashes.
Row 1 :
sc in 2nd ch from hook and in each ch across (51-61-71)
Rows 2-10 :
ch 1, turn; sc in each st across (51-61-71)
Info :
Add more rows in multiples of 2 here if you'd like more length- Just remember how many rows you added so the back piece will be even
Row 11 :
ch 1, turn; sc in next 25-30-35 sts (25-30-35)
Rows 12-16 :
ch 1, turn; sc in each st across (25-30-35)
Row 17 :
ch 1, turn; sc in next 5 sts, {sc2} in next st, sc in next 13-18-23 sts, {sc2} in next st, sc in next 5 sts (27-32-37)
Row 18 :
ch 1, turn; sc in next 5 sts, {sc2} in next st, sc in next 15-20-25 sts, {sc2} in next st, sc in last 5 sts (29-34-39)
Rows 19-21 :
ch 1, turn; sc in each st across (29-34-39)
Row 22 :
turn; sk 1st st, sc in next 5 sts, sk next st, sc in each st across (27-32-37)
Row 23 :
ch 1, turn; sc in each st across (27-32-37)
Info :
Continue decreasing by 2 sts every other row until you have a total of 19-20-21 sts and 31-35-39 rows -you'll decrease only on rows moving from center of work to outside edge
Row 24 :
turn; sk 1st st, sc in next 5 sts, sk next st, sc in each st across (25-30-35)
Row 25 :
ch 1, turn; sc in each st across (25-30-35)
Row 26 :
turn; sk 1st st, sc in next 5 sts, sk next st, sc in each st across (23-28-33)
Row 27 :
ch 1, turn; sc in each st across (23-28-33)
Row 28 :
turn; sk 1st st, sc in next 5 sts, sk next st, sc in each st across (21-26-31)
Row 29 :
ch 1, turn; sc in each st across (21-26-31)
Row 30 :
turn; sk 1st st, sc in next 5 sts, sk next st, sc in each st across (19-24-29)
Row 31 :
ch 1, turn; sc in each st across (19-24-29)
Info :
Size small skip to next page (continue instructions for medium and large below)
Medium Rows Start (Row 32) :
row 32: turn; sk 1st st, sc in next 5 sts, sk next st, sc in each st across (22-27)
Row 33 :
ch 1, turn; sc in each st across (22-27)
Row 34 :
turn; sk 1st st, sc in next 5 sts, sk next st, sc in each st across (20-25)
Row 35 :
ch 1, turn; sc in each st across (20-25)
Info :
Size medium skip to next page
Large Rows Continue (Row 36) :
row 36: turn; sk 1st st, sc in next 5 sts, sk next st, sc in each st across (23)
Row 37 :
ch 1, turn; sc in each st across (23)
Row 38 :
turn; sk 1st st, sc in next 5 sts, sk next st, sc in each st across (21)
Row 39 :
ch 1, turn; sc in each st across (21)
Info :
Go to next page for image
Info :
Continue decreasing by 1 st every other row until you have a total of 17-18-19 sts and 34-38-42 rows
Row Set :
row 32, 36, 40: turn; sk 1st st, sc in each st across (18-19-20)
Row Set :
row 33, 37, 41: ch 1, turn; sc in each st across (18-19-20)
Row Set :
row 34, 38, 42: turn; sk 1st st, sc in each st across (17-18-19)
Info :
row 11 other side: add ch 1 to beg of row 10, sc in next 25-30-35-40 sts (25-30-35) -there should be 1 stitch skipped between both cups
Info :
repeat rows to create 2nd cup
— Back Piece :
Row 0 :
Back piece: ch 52-62-72
Row 1 :
sc in 2nd ch from hook and in each ch across (51-61-71)
Rows 2-34, 2-38, 2-42 :
ch 1, turn; sc in each st across (51-61-71)
Info :
add more rows here if you added length to the front piece
Connect :
ch 1, lay pieces ontop of one another so RS are facing in, sl across the edge of the work to connect the edge of the front and back pieces, fasten off, repeat on other side to form loop
— Border & Finishing :
Border :
turn work RS out; sc across back 51-61-71 sts, sc across top 17-18-19 sts of cup, sc down 23-27-31 rows along edge of cup, sc in center st, sc up mirror 23-27-31 rows, sc across top 17-18-19 sts of 2nd cup, sl into sc st at beg of round (132-152-172)
— Sleeve :
Row 0 :
sleeve: ch 38-46-54
Row 1 :
sc in 2nd ch from hook and in each ch across (37-45-53)
Row 2 :
ch 1, turn; sc in next 5 sts, (ch 3, sk next 3 sts, sc in next 5 sts) all the way across (25-30-35 sc sts)
Row 3 :
ch 1, turn; sc in next 4 sts, (ch 3, sk sc st, sc in ch sp, ch 3, sk sc st, sc in next 3 sts) all the way across, sc in last st (21-25-29 sc sts)
Row 4 :
ch 1, turn; {sc2} in 1st st, sc in next 2 sts, (ch 3, sk sc st, sc in ch sp, sc in sc st, sc in ch sp, ch 3, sk sc st, sc in next st) all the way across, sc in next st, {sc2} in last st (23-27-31 sc sts)
Row 5 :
ch 1, turn; sc in 1st 3 sts, (ch 3, sk sc st, sc in ch sp, sc in next 3 sts, sc in ch sp) all the way across, ch 3, sk sc st, sc in last 3 sts (26-31-36 sc sts)
Row 6 :
ch 1, turn; sc in next 3 sts, sc in ch sp, (ch 3, sk sc st, sc in next 3 sts, ch 3, sk sc st, sc in ch sp) all the way across, sc in last 3 sts (23-27-31 sc sts)
Row 7 :
ch 1, turn; {sc2} in 1st st, sc in next 3 sts, (sc in ch sp, ch 3, sk sc st, sc in next st, ch 3, sk sc st, sc in ch sp, sc in sc st) all the way across, sc in next 2 sts, {sc2} in last st (25-29-33 sc sts)
Row 8 :
ch 1, turn; sc in 1st 6 sts, sc in ch sp, (ch 3, sk sc st, sc in next ch sp, sc in next 3 sts, sc in ch sp) all the way across, ch 3, sk sc st, sc in ch sp, sc in last 6 sts (29-34-39 sc sts)
Row 9 :
ch 1, turn; sc in next 6 sts, (ch 3, sk sc st, sc in ch sp, ch 3, sk sc st, sc in next 3 sts) all the way across, sc in last 3 sts (25-29-33 sc sts)
Row 10 :
ch 1, turn; {sc2} in 1st st, sc in next 4 sts, (ch 3, sk sc st, sc in ch sp, sc in sc st, sc in ch sp, ch 3, sk sc st, sc in next st) all the way across, sc in next 3 sts, {sc2} in last st (27-31-35 sc sts)
Row 11 :
ch 1, turn; sc in 1st 5 sts, (ch 3, sk sc st, sc in ch sp, sc in next 3 sts, sc in ch sp) all the way across, ch 3, sk sc st, sc in last 5 sts (30-35-40 sc sts)
Row 12 :
ch 1, turn; sc in next 5 sts, sc in ch sp, (ch 3, sk sc st, sc in next 3 sts, ch 3, sk sc st, sc in ch sp) all the way across, sc in last 5 sts (27-31-35 sc sts)
Info :
Continue repeating this format, increasing every 3 rows:
Row 13 :
ch 1, turn; {sc2} in 1st st, sc in next 5 sts, (sc in ch sp, ch 3, sk sc st, sc in next st, ch 3, sk sc st, sc in ch sp, sc in sc st) all the way across, sc in next 4 sts, {sc2} in last st (29-33-37 sc sts)
Row 14 :
ch 1, turn; sc in lst 8 sts, sc in ch sp, (ch 3, sk sc st, sc in next ch sp, sc in next 3 sts, sc in ch sp) all the way across, ch 3, sk sc st, sc in ch sp, sc in last 8 sts (33-38-43 sc sts)
Row 15 :
ch 1, turn; sc in next 8 sts, (ch 3, sk sc st, sc in ch sp, ch 3, sk sc st, sc in next 3 sts) all the way across, sc in last 5 sts (29-33-37 sc sts)
Row 16 :
ch 1, turn; {sc2} in 1st st, sc in next 6 sts, (ch 3, sk sc st, sc in ch sp, sc in sc st, sc in ch sp, ch 3, sk sc st, sc in next st) all the way across, sc in next 5 sts, {sc2} in last st (31-35-39 sc sts)
Row 17 :
ch 1, turn; sc in lst 7 sts, (ch 3, sk sc st, sc in ch sp, sc in next 3 sts, sc in ch sp) all the way across, ch 3, sk sc st, sc in last 7 sts (34-39-44 sc sts)
Row 18 :
ch 1, turn; sc in next 7 sts, sc in ch sp, (ch 3, sk sc st, sc in next 3 sts, ch 3, sk sc st, sc in ch sp) all the way across, sc in last 7 sts (31-35-39 sc sts)
Row 19 :
ch 1, turn; {sc2} in 1st st, sc in next 7 sts, (sc in ch sp, ch 3, sk sc st, sc in next st, ch 3, sk sc st, sc in ch sp, sc in sc st) all the way across, sc in next 6 sts, {sc2} in last st (33-37-41 sc sts)
Row 20 :
ch 1, turn; sc in lst 10 sts, sc in ch sp, (ch 3, sk sc st, sc in next ch sp, sc in next 3 sts, sc in ch sp) all the way across, ch 3, sk sc st, sc in ch sp, sc in last 10 sts (37-42-47 sc sts)
Row 21 :
ch 1, turn; sc in next 10 sts, (ch 3, sk sc st, sc in ch sp, ch 3, sk sc st, sc in next 3 sts) all the way across, sc in last 7 sts (33-37-41 sc sts)
Row 22 :
ch 1, turn; {sc2} in 1st st, sc in next 8 sts, (ch 3, sk sc st, sc in ch sp, sc in sc st, sc in ch sp, ch 3, sk sc st, sc in next st) all the way across, sc in next 7 sts, {sc2} in last st (35-39-43 sc sts)
Row 23 :
ch 1, turn; sc in lst 9 sts, (ch 3, sk sc st, sc in ch sp, sc in next 3 sts, sc in ch sp) all the way across, ch 3, sk sc st, sc in last 9 sts (38-43-48 sc sts)
Info :
Continue repeating the format, increasing every 3 rows as shown above until sleeve reaches desired length or specified counts.
Row 24 :
ch 1, turn; sc in next 9 sts, {sc2} in ch sp, (sc in next 5 sts, {sc2} in ch sp) all the way across, sc in last 9 sts (48-55-62)
Info :
ch 1, fold sleeve so RS faces in, sl along edge of both sides to form loop, fasten off
— Sleeve Attachment & Assembly :
Attach Sleeve :
Attach sleeve to body: turn sleeve and body RS out, line seam of sleeve up with seam of body sl through 10-12-14 sts of both pieces together, making sure the seam splits center (You'll have 5-6-7 sts before and after the seam) fasten off
Info :
Repeat steps to create and add the 2nd sleeve, do not fasten off (This will leave 41-49-57 sts free at back and 35-39-43 sts free from top of cup down to right before center st between cups)
Final Assembly :
After both sleeves are attached and seams are aligned, finish any remaining slip stitch joins and weave in ends. Block lightly if desired.
This cold-shoulder crop top pattern brings feminine lace and everyday comfort together into a wearable crochet piece. It's perfect for warm-weather styling or layering under jackets and kimonos. Customize the length, sleeve width, and neckline to make it truly yours. 🧶💖