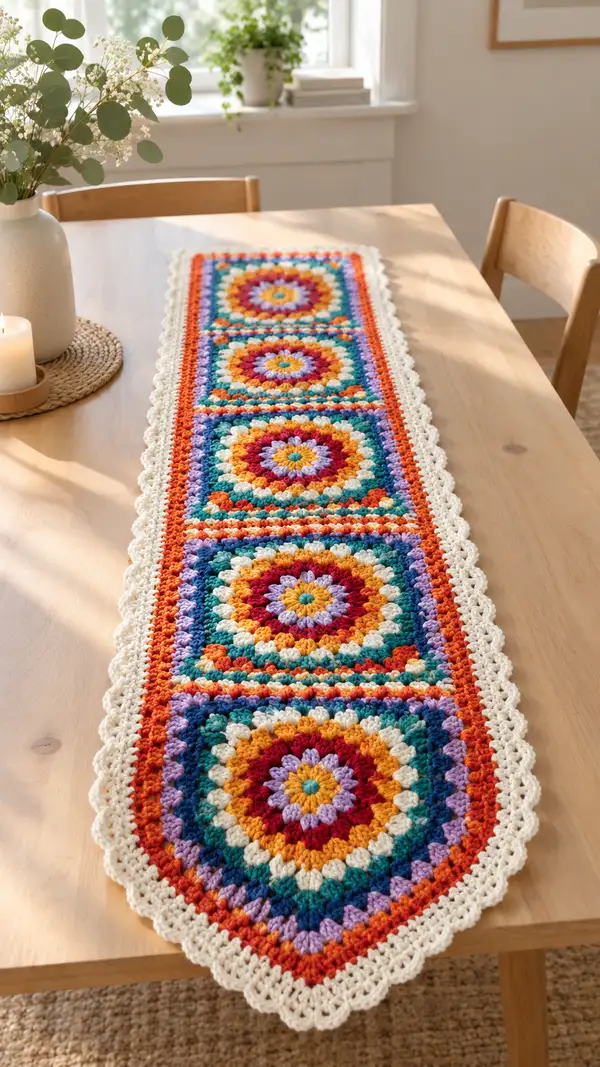
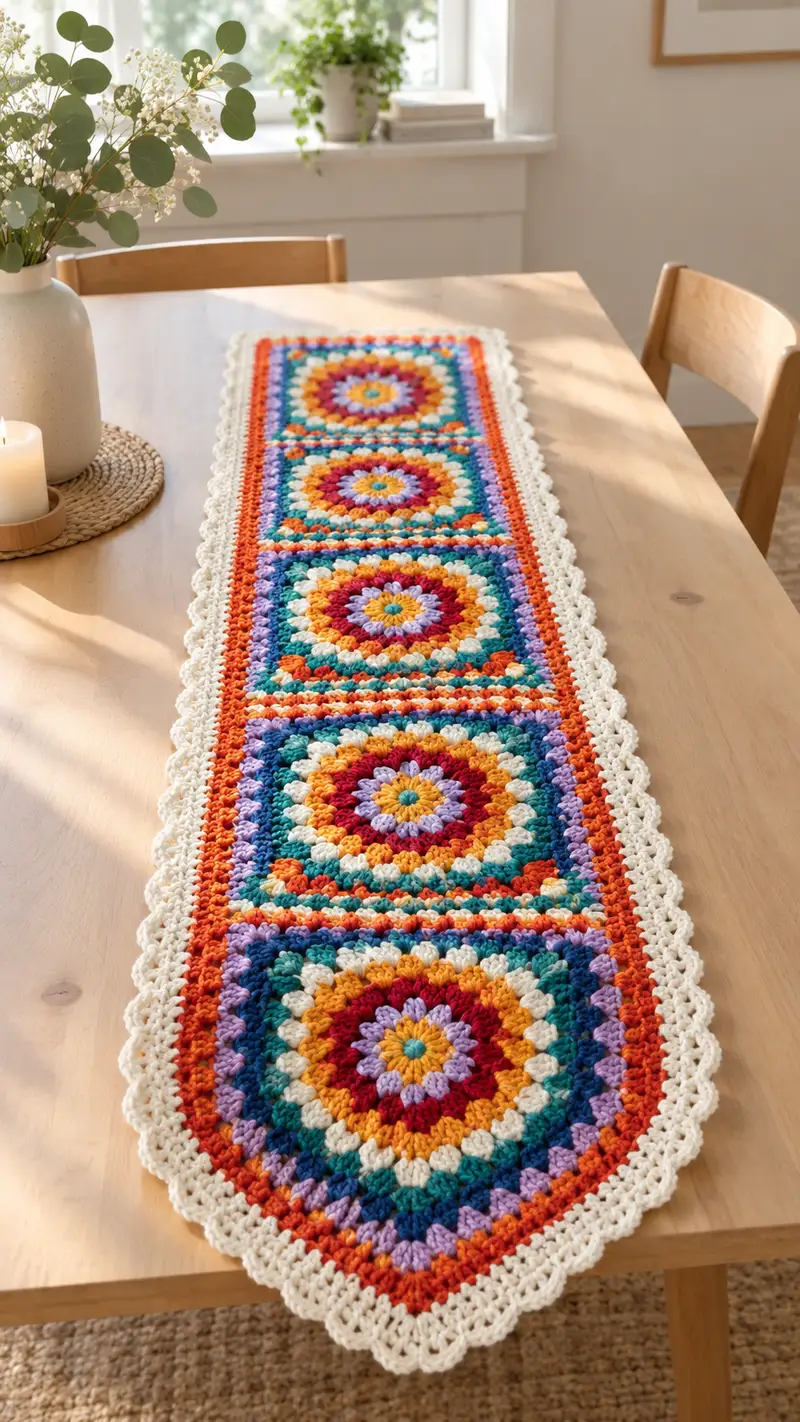
A bright, boho-inspired table runner made from four colorful medallion squares joined into a long runner with a delicate scalloped cream edge. Features puff/cluster stitches for a textured, floral medallion look, warm sunset colors and a crisp neutral border. Perfect for adding a handmade pop of color to your dining table or sideboard.
Progress Tracker
0% Complete
— Notes & Gauge :
Info :
This pattern is worked in worsted weight yarn (#4) with a 4.00mm (G) hook. Gauge is not critical for a table runner, but each medallion should measure approximately 10-11cm/4-4.5in across after round 12 before square shaping. Block squares flat before joining for best alignment.
Info :
Puff stitch technique used here: yarn over, insert hook, yarn over, pull up loop (repeat 3-4 times depending on puff height), yarn over and pull through all loops on hook, ch1 to secure. When a different puff count is required it will be specified.
— Medallion Motif (Make 4 identical motifs) :
Motif 1 — Round 1 :
Make a magic ring. Ch1, 6 sc in magic ring. Pull ring tight. (6)
Motif 1 — Round 2 :
6 inc (12) — (2 sc in each st around). Place marker at first stitch.
Motif 1 — Round 3 :
(1 sc, inc) x 6 (18)
Motif 1 — Round 4 :
(2 sc, inc) x 6 (24)
Motif 1 — Round 5 :
(3 sc, inc) x 6 (30)
Motif 1 — Round 6 :
(4 sc, inc) x 6 (36)
Motif 1 — Round 7 :
(5 sc, inc) x 6 (42)
Motif 1 — Round 8 :
(6 sc, inc) x 6 (48)
Motif 1 — Info :
Rounds 1-8 create a tight circular base. Keep tension even. Change color at end of round 8 if you like a color-defined ring (in the pictured runner a new accent color begins at Round 9).
Motif 1 — Round 9 :
Change to Accent Color A (mustard/gold). Ch2 (counts as first hdc). *Puff: make 3-loop puff in next st (yarn over, insert hook, pull loop up x3), ch1 to secure; hdc in next st.* Rep from * to * around. Work last hdc in the same space as beginning ch2 to tidy. (48 puff positions and 24 hdc; overall worked as alternating puff and hdc; total visual elements 48)
Motif 1 — Round 10 :
Change to Accent Color B (berry). Ch3 (counts as first dc). *3-dc cluster (dc3tog-style: dc in next 3 sts leaving last loop on hook, finish cluster), ch1, sk1* around positioning clusters between the puff stitches from previous round. Join with sl st to top of beg ch3. This forms a petal ring. (16 clusters; ch1 spaces between)
Motif 1 — Info :
Place petals evenly—you should see 16 petal clusters spaced around the circle. If cluster counts are off, adjust by shifting one stitch earlier or later to maintain 16 clusters evenly spaced.
Motif 1 — Round 11 :
Change to Accent Color C (deep teal). Ch2 (as hdc). Work *2 dc in each ch1 space between clusters from previous round, ch1* around. Join with sl st. (32 dc groups and 16 ch1 spaces; visual count 48 dc when counted singly)
Motif 1 — Round 12 :
Change to Accent Color D (soft purple). Ch3 (counts as dc). *Puff stitch in next st (3 loops), ch1, dc in next 2 sts* repeat around working puffs staggered to sit between the dc groups below. Join with sl st. Maintain approximately 48 puff/dc placements.
Motif 1 — Info :
At this point the medallion should be round and measure about 10-11cm across. Block flat or steam lightly if needed. Decide which side will be your public side before square rounds.
Motif 1 — Round 13 :
Change to Accent Color E (deep orange). This round starts to square the medallion. Ch3 (counts as dc). Work 3 dc clusters in groups to create four corner points: *Work 9 dc evenly along first quarter of the round, (3 dc, ch2, 3 dc) in next st for corner, work 9 dc evenly along next quarter, (3 dc, ch2, 3 dc) for corner* Continue to make 4 corners total so you end the round on top of beg ch3. The idea: 4 corner spaces created by (3 dc, ch2, 3 dc) spaced evenly. (Approx total dc stitches 48 + 8 extra corner dc to shape into corner — count will vary by how stitches are distributed but ensure four corners are present.)
Motif 1 — Info :
To make the square more even, spread your 9 dc sections across each side. If you have fewer stitches to reach 9, insert additional dc evenly so sides look straight; distributing stitches evenly will help the motif become a smooth square.
Motif 1 — Round 14 :
Ch3. Along each side work: (dc, ch1, dc) in each dc across until corner, at corner work (3 dc, ch2, 3 dc) in corner ch2 space. Continue around. This creates side chain spaces and crisply defines corners. Join with sl st. (Corners remain 4; side dc groups will total approximate counts to maintain shape.)
Motif 1 — Round 15 :
Change to Accent Color A (mustard). Ch1. Work 1 sc in each st and in each ch1 space across each side; in corner ch2 spaces work (sc, ch2, sc). This tightens the square and prepares for granny rounds. Count: sc across each side equalizes. (Visual stitch count roughly 4 sides x ~12 sc = ~48 sc).
Motif 1 — Round 16 :
Change to Accent Color B (berry). Begin a modified granny round: Join yarn in any side space. Ch3 (counts as first dc). *(2 dc, ch2, 3 dc) in corner ch2; skip to next side, work 3-dc granny cluster in each cluster-space across side separated by ch1 as needed.* Repeat for all sides. This establishes a classic granny motif border that will join easily to neighboring squares. (4 corner clusters and X side clusters as distributed.)
Motif 1 — Info :
If you want the square to be slightly larger, add an extra granny round of clusters along sides before finishing. For the pictured runner a single granny round here is enough to reach the desired size before joining strips.
Motif 1 — Round 17 :
Change to Accent Color C (deep teal). Ch1. Sc in each stitch around, working (sc, ch2, sc) into corner ch2 spaces to maintain square corners. Join with sl st and finish off leaving a 20cm tail for joining. (Approx total sc ~64 depending on clusters.)
Motif 1 — Round 18 :
Info : Block and steam the motif flat. Use pins to square corners before joining. Repeat Motif 1 Rounds 1-17 to make Motif 2, Motif 3 and Motif 4. Make 4 identical medallion squares in total.
Motif 2 — Round 1 :
Repeat Rounds 1-17 exactly as Motif 1. (Make 4 identical motifs total; keep outer granny edge consistent for simple joining.)
Motif 3 — Round 1 :
Repeat Rounds 1-17 exactly as Motif 1.
Motif 4 — Round 1 :
Repeat Rounds 1-17 exactly as Motif 1.
Info :
At this point you should have four blocked square medallions. Lay them out in the order you'd like: the picture shows them joined in a single long strip four squares long. Be sure the public side of each motif faces up and that color transitions flow pleasingly.
— Joining the Medallions Into a Runner :
Join — Round 1 :
Position Motif A and Motif B right sides together. Using the long tails left from Round 17, whip stitch through corresponding SCs along one side, sewing edge-to-edge. Begin at corner and sew through both loops of each sc to create an invisible seam. Sew across entire side and fasten off. Repeat to join Motif B to C and Motif C to D. This step forms 3 internal seams. (Info: Use pins every 6-8 sts to maintain alignment.)
Join — Round 2 :
Info : Alternatively you can use a join-as-you-go (JAYG) method: when making the final granny round of Motif B, at the side that meets Motif A, work sl sts into Motif A's side clusters instead of working full clusters. The JAYG method creates flatter joins and reduces finishing sewing.
Join — Round 3 :
After sewing the motifs into a single strip, check row alignment. The seam will be flush; press gently and pin to block once more so the runner lies flat. If there are small gaps, secure with a few extra slip stitches through adjacent threads.
Join — Round 4 :
Change to Bright Orange yarn for row separators. With runner laid flat, join yarn in the horizontal seam area between Motif 1 and Motif 2 at the top of the seam. Ch1, sc evenly across the seam area connecting the two motifs to create a solid stripe ~2 rows deep. Work 2 rows of sc across seam width to create the narrow orange band visible in the photo. Repeat between motifs 2 & 3 and motifs 3 & 4. (Final seams will have 2 sc rows in bright orange along each seam.)
Join — Round 5 :
Info : To produce the puffy triple-row stripe effect shown in the photograph, follow the two sc rows with a puff-row: change to Accent coral and work a row of puff stitches staggered across the orange sc rows, anchoring puffs into the sc rows below by inserting hook into the sc throughout. This yields a colorful textured stripe visible between medallions.
Join — Round 6 :
Work the same stripe sequence for each internal seam so the runner has matching stripes between each medallion. After finishing seams, weave in any remaining ends into adjacent stitches and trim close.
Join — Round 7 :
Info : At the two short ends of the runner you will round off into the pointed oval end shape (as pictured). To create the shaped ends, you will add additional half-motif shaping working off the end squares as described in the end shaping rounds below.
— End Shaping (Make 2 end caps) :
End Cap — Round 1 :
With runner flat, pick the outer edge of the first and last medallion to shape into an oval end. Join cream yarn (border color) in the center of the outer side of the end medallion. Ch2 (counts as hdc). Work 1 hdc in next 6 sts evenly across the side edge to prepare the rounded extension. (This creates a short row extension to form a half-medallion.)
End Cap — Round 2 :
Ch2. Work 2 hdc in first stitch, hdc across next 6 sts, 2 hdc in last stitch to increase corners and extend the side. (Adding 2 hdc at each short end helps the piece flare out.)
End Cap — Round 3 :
Ch3. Work dc clusters around the extension: (2 dc, ch1, 2 dc) in each end extension tip to create a rounded point. Then continue dc evenly across the side to meet the adjacent corner. Join and fasten off. Repeat for opposite end. These end caps will be covered and harmonized by the full cream border rounds that follow.
End Cap — Info :
Pin these end caps and steam/block them so the runner maintains a smooth pointed oval end like in the image. The later border rounds will tidy and unify the look.
— Border & Scalloped Edge (Working around entire runner) :
Border — Round 1 :
Join cream/ivory yarn at any seam on the outermost edge. Ch1. Sc evenly around the entire perimeter, placing (sc, ch2, sc) into each corner ch2 space and working a proportionate number of sc along each side and around the end caps. Join with sl st to first sc. This evens out the edge and prepares for subsequent textured rounds. (Total sc will vary with perimeter — count and mark the quarter points for even scallops.)
Border — Round 2 :
Ch1. Work 1 sc in each sc around. In corner spaces work (sc, ch2, sc). Place markers at the center of each long side and the tip of each end cap so you can divide border into 4 equal sections for scallop spacing. (This round tightens the edge; measure width now if you plan to adjust scallop size.)
Border — Round 3 :
Change to Bright Orange. Ch2. Work 1 hdc in each sc around for a single clean colored stripe that follows perimeter. Join and fasten off the bright orange and add an accent color row if you prefer (the photo features a single bright stripe right inside the cream border).
Border — Round 4 :
Change to cream. Ch2. Work 1 hdc in each stitch around again to reverse back to cream and create a narrow ridge. Join with sl st. (This gives the runner a balanced outer cream frame.)
Border — Round 5 :
Info : We will now add a textured shell-based scallop. Count your stitches across one quarter section (a long side between marked points). Divide into 12-16 scallop sets per long side depending on how large you want the scallops to be. In the pictured runner the scallop size is moderate and there are roughly 14 scallops per long side.
Border — Round 6 :
Ch1. *Skip 2 sts, (5 dc) in next st, skip 2 sts, sl st in next st* repeat across perimeter placing shells evenly and (3-dc, ch1, 3-dc) clusters at corners and end tips to maintain the rounded shape. Join with sl st at the end of the round. (This will create the outer scalloped look.)
Border — Round 7 :
Info : If shells gape or appear too large, work the outer shells as (4 dc) clusters rather than 5 dc. Adjust the number of skipped stitches to fit your total perimeter so the scallops sit evenly.
Border — Round 8 :
Ch1. Work 1 sc in the center dc of every shell around to anchor shells, and in corner shell centers work (sc, ch2, sc) to keep corners defined. Join with sl st and fasten off. Weave in ends.
Border — Round 9 :
Change to cream and re-join at midpoint of a long side for a small ornamental picot round: *sc in next st, ch3, sl st in top of sc two sts back to form a tiny scalloped picot* repeat across each side and around the end caps to emphasize the delicate edge. Join and finish off. (This optional tiny picot gives the edge the lacy finish seen in the photograph.)
Border — Info :
The pictured runner shows a scalloped cream edge with a gentle lacy repeat—if you prefer a denser edge, repeat the shell round for greater definition. Blocking after the final border will open up the scallops and make the runner lay flat and neat.
— Alternate Edging: Deep Lace Border (Optional, adds more rounds) :
Lace — Round 1 :
Join cream yarn. Ch4 (counts as tr). *Sk 2, 1 tr in next, ch2, 1 tr in next, sk2, sl st in next* Repeat to create arches. (This decorative round adds length and lacy texture to the border.)
Lace — Round 2 :
Ch1. In each ch2 arch work (sc, hdc, 3 dc, hdc, sc) to create a fuller scallop, placing (sc, ch2, sc) at corners. Join and finish. This optional deeper lace mimics the layered lacy effect of the photo if desired.
Lace — Info :
Use this optional set of rounds if you like a prominent scalloped edge. Count stitches and adjust arch spacing if your perimeter stitch count differs from the pattern to keep scallops even.
— Finishing Touches :
Finish — Round 1 :
Weave in all tails with a yarn needle, following the direction of the stitches for a neat finish. Trim close.
Finish — Round 2 :
Block entire runner: dampen lightly and pin to shape on a flat blocking board or towel, ensuring the pointed oval ends are symmetrical. Allow to dry completely.
Finish — Round 3 :
Info : If you like, add an invisible hem with a few discreet whip-stitches along the underside of the runner to stabilize the joins and ensure it lays perfectly flush on your table.
Finish — Round 4 :
Final press and styling: place runner centered on table and add decorative items—candles, vase—so colorburst medallions show. Enjoy your handcrafted accent!
Info :
This pattern provides flexible points where you can alter color order, number of medallions, or scallop size to make a shorter or longer runner or even a table mat by using a single medallion and the same edge rounds.
Finishing this runner feels so rewarding—watching four little medallion suns come together into a long, joyful table accent is delightful! The textured puffs, bold color bands and the scalloped cream edge create a handmade heirloom you can use for seasons or celebrations. I hope stitching this brings you as much warmth as it brings to your table. 🧶🌞✨