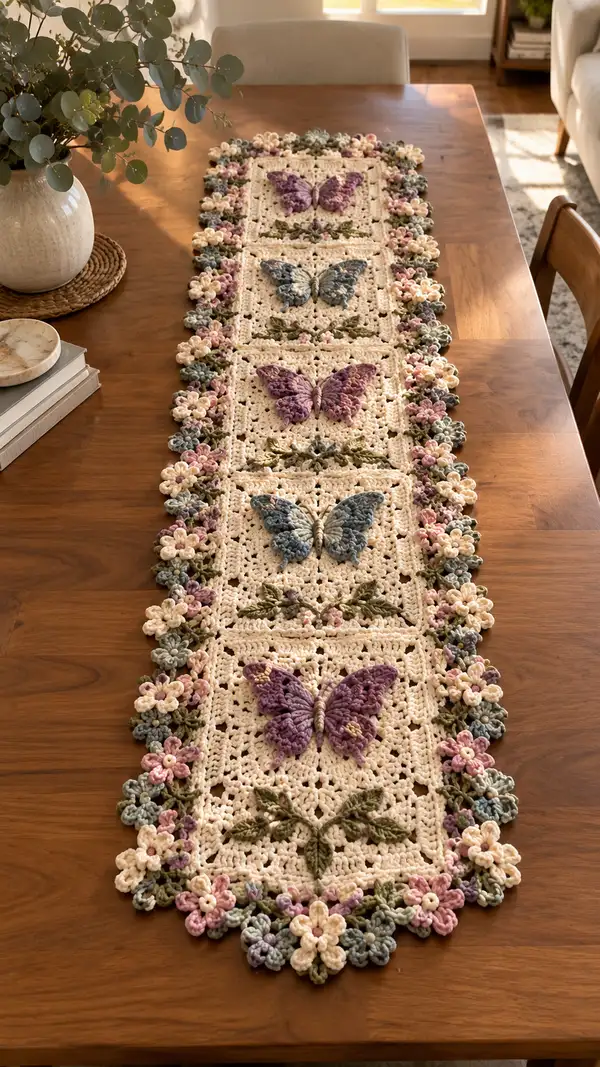
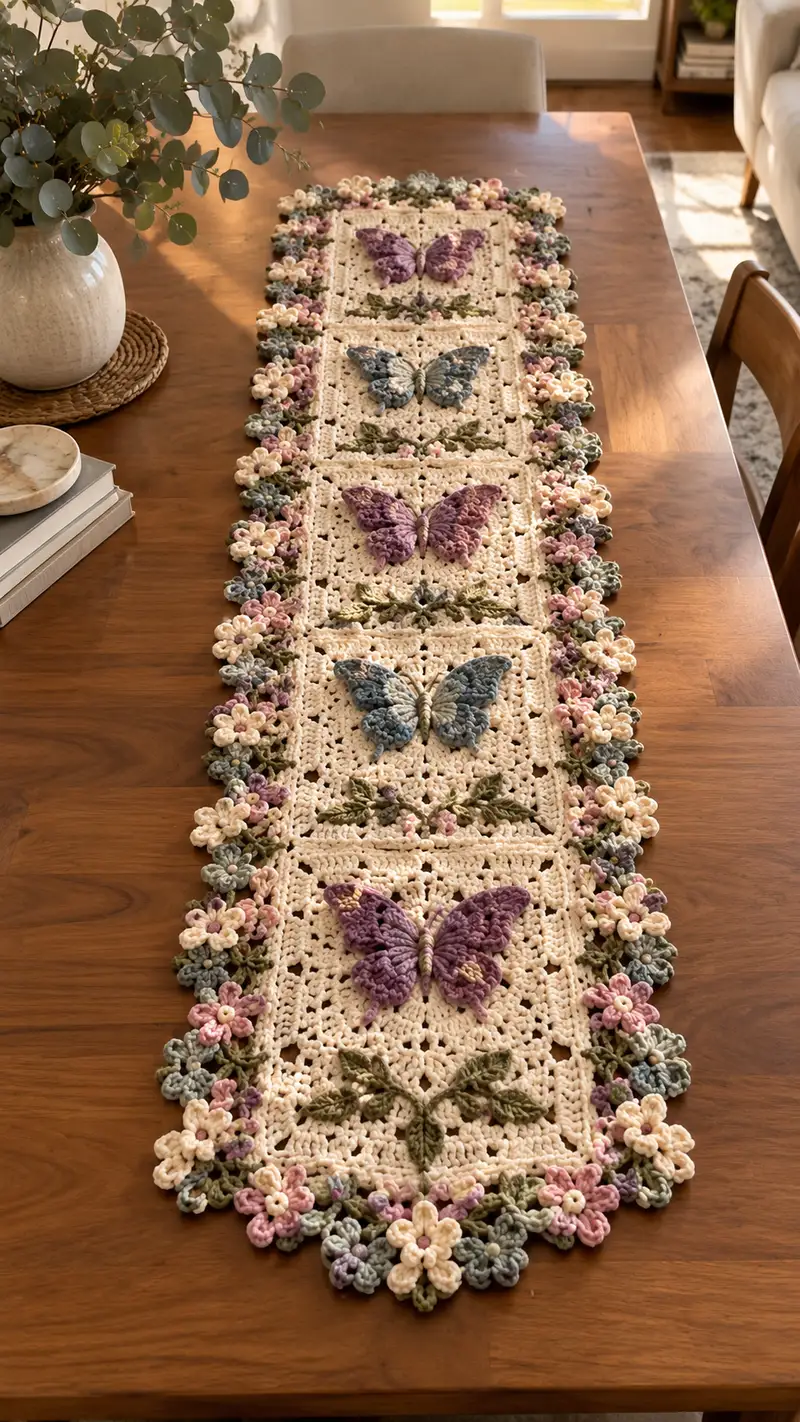
A delicate table runner composed of joined cream granny squares each showcasing a 3D butterfly and surrounded by a raised floral garland. Soft creams, dusty mauves and muted greens combine to create a romantic, vintage-inspired centerpiece. The runner in the image is modular — made from repeated squares joined and edged with clustered flowers for a sculpted, tactile finish.
Progress Tracker
0% Complete
— Notes and Overview :
Info :
This pattern produces modular lace squares (approx. 6.5"/16.5cm finished each when using worsted yarn and 4.0mm hook) joined end-to-end to create a long table runner. The shown runner uses 5 squares joined lengthwise for roughly 32-34" (81-86cm) of motif length plus decorative borders. Make as many or as few squares as needed for your table. Terms are US. Work tightly on appliques for sculptural detail. Block squares lightly before joining.
— Central Lace Square (Make X — see Notes) :
Info :
Each square begins as a small round and is worked into a square with corner chain-spaces and shell-lace rounds. The rounds below are written round-by-round, with stitch counts at the end of each round in parentheses. Maintain counts and use stitch markers to keep corner points aligned.
Round 1 :
6 sc in magic ring (6)
Round 3 :
(1 sc, inc) x 6 (18)
Round 4 :
(2 sc, inc) x 6 (24)
Round 5 :
(3 sc, inc) x 6 (30)
Round 6 :
(4 sc, inc) x 6 (36)
Round 7 :
(5 sc, inc) x 6 (42)
Round 8 :
(6 sc, inc) x 6 (48)
Info :
Place four markers at every 12th stitch (48/4) to mark future corner locations for square shaping. Keep the markers in place through Round 14 to keep edges even.
Round 9 :
1 sc in each st around (48)
Round 10 :
1 sc in each st around (48)
Round 11 :
Change to cream if not already. 1 sc in each st around (48)
Info :
Begin converting circle into square by creating small chain corners in the next round. Keep working into marked corner stitches — these will be the four corners of the square.
Round 12 :
*Work 10 sc evenly along side (measured from previous marker), ch 3 (counts as corner sp), sl st into next marker to create corner; rep from * around forming 4 corner chain-3 spaces (48 sc + 4 ch3 corner spaces)
Round 13 :
Working into spaces now: ch 3 (counts as dc), [2 dc, ch 2, 3 dc] in first ch3 corner sp; *skip to next side space and work (3 dc, ch 1, 3 dc) into next side sp to create shell and small lacy gap; rep from * around; at last corner work [3 dc, ch 2, 3 dc] to finish square (approximate cluster counts create a 4-corner lace square)
Info :
This round forms the first full lace round shaping the square. Aim to have the square much closer to a defined corner shape; counts are given as cluster guidance rather than precise stitch numbers; keep consistent spacing between clusters.
Round 14 :
Ch 3, dc around working shells into shells and 3-dc corners into dc corners; where you find side ch-1 spaces work (dc, ch 1, dc) to maintain lacy texture. This round forms a larger square approx 6" across. (Work evenly)
Round 15 :
Ch 2, hdc into each dc and hdc into chain spaces along sides, at corners work (hdc, ch 2, hdc) to keep corner space (stitch count approx 72 hdc)
Round 16 :
Ch 2, 1 hdc in each st (72)
Info :
If you prefer a more open square, skip the hdc rounds and continue with dc lace rounds. Block gently now: pin to a square shape approximately 6.25"/16cm across, steam lightly or wet block and let dry.
Round 17 :
Ch 1, sc evenly around working (3 sc, ch 2, 3 sc) in each corner space to create a neat border (counts approx 80 sc including corners)
Round 18 :
Ch 3, dc in each sc around, at corner ch-2 spaces work (3 dc, ch 2, 3 dc) to maintain square edge (counts vary with tension)
Round 19 :
Ch 1, sc in each st for one tidy round (approx 96 sc)
Round 20 :
Ch 1, slip stitch evenly around to finish and create a flat edge suitable for join-as-you-go. Fasten off and weave ends. Block square if needed before joining. (Final approximate perimeter stitch count ~96-100 depending on spacing)
Info :
Make X number of squares (the photo shows 5). Block each square to identical dimensions. Center of each square will receive a butterfly applique; keep central area free of large embellishments so butterfly stitches can be sewn through lace holes.
— Butterfly Applique (Make one per square — mirrored pair per butterfly) :
Info :
The butterfly is worked in small pieces: left wing, right wing (mirror), and a small wrapped body. Each wing is built as a layered set of rows to create raised texture. Use tighter tension than squares and preferably 3.5mm hook for a firmer result. Work wings in main accent colors (purple or blue). The counts below are per wing; mirror exactly for second wing.
Wing Round 1 :
mr, ch 1, 6 sc into ring; pull tight (6)
Wing Round 2 :
inc around (12)
Wing Round 3 :
(1 sc, inc) x 6 (18)
Wing Round 4 :
(2 sc, inc) x 6 (24)
Info :
Rounds 1-4 form the compact wing base. Keep tension tight; this small disk will be the inner wing area where texture rows attach.
Wing Round 5 :
Ch 3 (counts as dc), 1 dc in next st, *ch 1, skip 1, (2 dc, ch 1, 2 dc) in next st to form a tiny lobe; rep from * around to create 6 small lobes (work evenly) (approx clusters)
Wing Round 6 :
Working into lobe spaces from previous round: (ch 2, 3 tr, ch 2, sl st) in each lobe space to create raised petals — this gives the wing its scalloped outer edge (count: 6 lobes)
Wing Round 7 :
Ch 1, sc evenly around wing and into base stitches to make a smooth border (approx 30 sc)
Info :
Create a second layer of texture by making small popcorn stitches on the wing surface to mimic raised scales. Use the same color or a lighter/darker tone for contrast.
Wing Round 8 :
To add popcorns: *make 5 dc in same st, drop loop, insert hook in top of 5 dc, pull loop through and ch 1 to close popcorn; sl st to next st; rep across 6 points to make 6 small popcorns across wing surface.* (Finish with sl st) (popcorn count 6)
Wing Round 9 :
Ch 1, sc around to secure popcorns and tidy edge (approx 36 sc)
Wing Round 10 :
Shape distal wing tip: (hdc, dc, tr) in outermost lobes on wing tip facing away from body; sc filler along inner edge to create tapered base (work evenly)
Info :
Now repeat wing 1 for wing 2 as a mirrored piece. When mirroring, instead of working (hdc, dc, tr) toward outer side, reverse the direction of shaping so the two wings mirror each other. Use stitch markers to identify top, bottom, and inner edges for alignment on assembly.
Wing Round 11 :
Fasten off leaving long tail (~20-30cm) for sewing to square. Weave in short ends but leave long tail for assembly.
Body Round 1 :
Using contrasting sage or neutral, ch 8; sl st in 2nd ch from hook then sc along chain to form a small tube (7 sc). Fasten off leaving long tail for wrapping.
Info :
To create a slightly padded body, you may wind a small bit of fiberfill along the chain tube before closing fully or wrap the chain tightly with yarn around the center when attaching. The body will be wrapped around the join of two wing inner edges.
Wing Assembly Round 1 :
Place wings on square centrally over the open lace area. With body tail, wrap the chain tube around the inner wing edges to bring wings together and secure. Use whipstitch with body tail to sew through wing inner edges and small central stitches on square; wrap body yarn around several times to create a thick thorax and secure ends inside body wrap. Sew body ends through to secure and weave in.
Info :
Pin wings symmetrically before sewing. Aim for approx 6-8 stitches across wing base for secure attachment. The wings should be slightly raised from square surface; use small vertical stitches to anchor only at base so wings remain free along their outer edge.
— Leaf Vine Embroidery / Raised Leaves (per square) :
Info :
The vine is crocheted directly onto the square using surface slip stitch and small crochet leaves worked into chain loops. Use sage green. The vine adds a horizontal decorative motif below butterfly.
Round 1 :
Starting center bottom of square, attach green with sl st and ch 1, work a surface sl st vine across the middle section of the square for approx 18-22 stitches length, leaving loops for leaves. (work until desired vine length)
Round 2 :
At chosen points along vine, ch 4, sl st into 2nd ch from hook to form a short picot base, in that ch make (sc, hdc, dc, hdc, sc) across to form small leaf; sl st back to vine to anchor (make 6 leaves spaced evenly) (leaf count 6)
Round 3 :
For a slightly raised look, after leaves are attached, stitch a single chain-loop behind each leaf and add a small back stitch of yarn through the leaf base to lift it. Fasten off and weave ends cleanly.
Info :
Keep leaves small and shallow; they are decorative accents not structural elements. Space them symmetrically below the butterfly to echo the photograph styling.
— Small 3D Flowers (Make many for border) :
Info :
Flowers are worked as tiny layered 5-petal blossoms in cream, blush, and muted blue. They are made quickly and sewn around the square edge to form the garland. Use 3.5mm hook for a firm petal. Work several sizes: tiny (10-12mm) and small (15mm) for visual interest.
Flower Round 1 :
mr, ch 1, 5 sc in mr, pull tight (5)
Flower Round 2 :
*(ch 3, sl st in next st) x 5 to create 5 loops (5 loops)
Flower Round 3 :
Into each ch-3 loop work (sc, hdc, 2 dc, hdc, sc) to form a petal; after last petal sl st to base and fasten off (5 petals)
Flower Round 4 :
For layered flowers, make a slightly smaller five-petal layer in a contrasting color: mr, ch 1, 5 sc; ch 3 loops as above; work small petals of (sc, dc, sc) into each loop; sew centered onto first layer; fasten off leaving long tail for sewing.
Info :
Make large and small flowers: small = single layer; large = two-layer. Add a small French knot or tiny puff stitch in the center with soft warm yellow for visual pop. Create about 12-16 flowers per square edge area (photo used many clustered closely).
— Join-As-You-Go and Square Assembly :
Info :
Join squares lengthwise using join-as-you-go (JAYG) at the final border round so the floral garland can be worked continuously. The description below assumes joining the short edge of one square to the next to form a long runner; adjust to join multiple squares side-to-side if you prefer a wider runner.
Join Round 1 :
On final round of the square (Round 20), work up to the point of joining, then with right sides facing, when you reach corresponding stitch on adjacent square, insert hook through the next stitch of adjacent blocked square, pull loop and sl st to join; continue around completing join at each junction. Fasten off when joining complete.
Join Round 2 :
Where squares are joined you will likely have small ch gaps; sew small 3-5 petal flowers or tiny clusters into those gaps using long tails from flowers to disguise seams. This creates a continuous garlanded edge between squares.
Info :
When joining more than two squares, align center points and block both squares identically. Use pins and measure distances between corner points to ensure straight alignment. If using yarn instead of JAYG technique, sew squares together with mattress stitch for invisible join.
— Decorative Floral Border and Scallop Edge :
Info :
The border is a continuous cluster of small flowers and leaves worked into the final round of the runner with occasional chain loops. Work around the entire perimeter: short ends and long sides, attaching flowers as you go to achieve the clustered look.
Border Round 1 :
With cream, attach in a corner and ch 1, sc around the entire runner edge in each st and ch space from the squares joining round (approx counts will vary with runner length). At each corner work (sc, ch 2, sc) to create flexible corners.
Border Round 2 :
With sage, pick points along the edge and work short leaves: ch 4, sl st to form a base, in the chain work (sc, hdc, dc, hdc, sc) to form a small leaf; anchor with sl st back to edge. Make leaves at intervals of 8-12 sc to echo photo vine placement (leaf count depends on perimeter length).
Border Round 3 :
In remaining spaces make small single-layer flowers (as Flower Rounds 1-3) in alternating pastel colors. Work flower directly onto the edge by making mr and immediately securing to edge base with sl st at center and sewing petals outward so the flower lies flat and slightly raised.
Border Round 4 :
To create clustered effect, where you want a triple cluster, make a tiny bud (mr, 6 sc, ch 2 loop, 3 dc pop loop) and sew into edge in between two larger flowers. Repeat alternating large & tiny flowers around perimeter.
Info :
Use a variety of pastel shades and small flower sizes to create depth. Tuck leaves under flower clusters with a few anchoring stitches. The pictured runner uses dense flower clusters along long edges and slightly larger blooms at short ends.
Border Round 5 :
After all flowers are attached, make a final decorative scalloped round in cream: *sl st into next st, ch 3, (3 dc, ch 2, 3 dc) into a small gap or around petal base, sl st into next 2 sts; rep from * around; finish with sl st and fasten off. Weave in all ends.
Info :
Blocking now will help flowers flatten into place and make runner lay nicely on table. Steam gently with a cloth if needed and pin each flower cluster into position while cooling/drying for a crisp finish.
— Finishing and Final Details :
Info :
Weave all tails neatly on the back of the runner, trim close. If using delicate yarns that may shift, add a few strategic small stitches to anchor heavier flowers. Test runner on table and re-position any clusters if necessary. Optionally, add a small dab of fabric glue under flower centers for extra security (allow to dry fully before use).
Final Step :
Lay runner flat for final blocking, pin edges and flower clusters until dry. Your table runner is now complete — enjoy!
This cream and purple butterfly table runner brings a touch of handmade charm to any table — a lovely blend of lacey squares, sculpted butterflies and clustered blooms. Each delicate element adds texture and warmth, making it a beautiful centerpiece for everyday use or special gatherings. Working it is a peaceful, rewarding project that leaves you with a heirloom-quality accent to display with pride. 🧶🌸✨