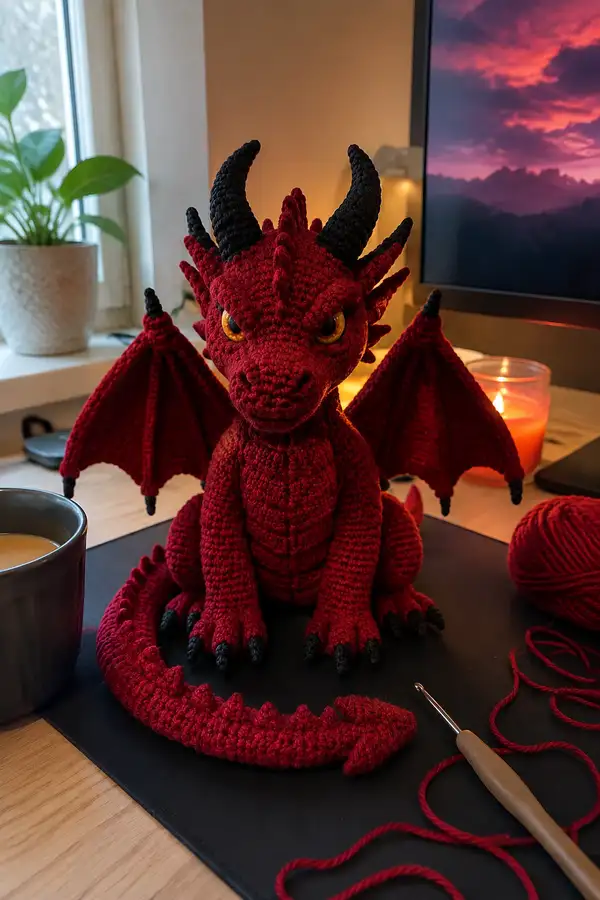
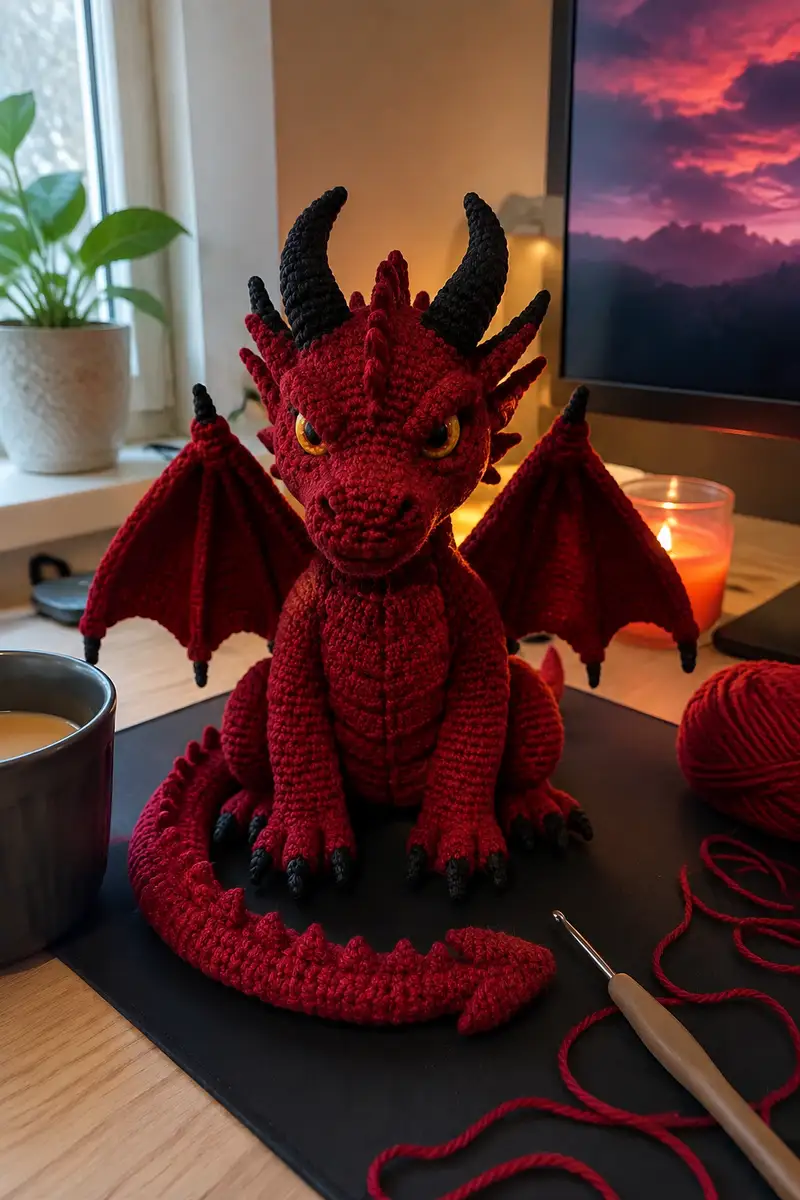
Bring this fierce-yet-friendly crimson dragon to life with step-by-step, realistic crochet instructions. This richly textured amigurumi features articulated wings, a long curled tail with scales, expressive golden eyes, and contrasting black horns and claws. Designed with lots of shaping, ridges, and surface detail to capture a majestic poseable look. Perfect for experienced makers who love character and sculptural crochet.
Progress Tracker
0% Complete
— Head & Snout :
Round 1 :
6 sc in magic ring (6)
Round 3 :
(1 sc, inc) x 6 (18)
Round 4 :
(2 sc, inc) x 6 (24)
Round 5 :
(3 sc, inc) x 6 (30)
Round 6 :
(4 sc, inc) x 6 (36)
Round 7 :
(5 sc, inc) x 6 (42)
Round 8 :
(6 sc, inc) x 6 (48)
Info :
Use stitch marker at start of each round. Work all head rounds in continuous spiral to avoid visible seams. Use tight tension for sculpted look. Place marker on first stitch of each round and move it up every round.
Round 9 :
1 sc in each st (48)
Round 10 :
1 sc in each st (48)
Round 11 :
1 sc in each st (48)
Info :
Begin placing facial shaping: mark where nostrils and brow will sit. Use small safety eyes placed later between rounds 14-15. Decide eye spacing now — choose 8-10 stitches apart for a fierce expression.
Round 12 :
1 sc in each st (48)
Round 13 :
1 sc in each st (48)
Round 14 :
1 sc in each st (48)
Info :
Place safety eyes between rounds 14-15, approximately 8 stitches apart (measure stitch counts visually). If embroidering eyes, mark center and stitch after head is closed. Add small safety eye washers inside head; do not insert before some stuffing is in place.
Round 15 :
1 sc in each st (48)
Round 16 :
(6 sc, dec) x 6 (42)
Round 17 :
(5 sc, dec) x 6 (36)
Info :
Begin stuffing head firmly but not overstuffed — work small amounts of fiberfill into snout and cheek area to keep shape. Keep stuffing firm at brow to hold eye position and less dense near neck opening for easy sewing later.
Round 18 :
(4 sc, dec) x 6 (30)
Round 19 :
(3 sc, dec) x 6 (24)
Round 20 :
(2 sc, dec) x 6 (18)
Round 21 :
(1 sc, dec) x 6 (12)
Info :
Carefully shape snout by pinching front of head to form nasal ridge; use a few through-and-through mattress stitches to deepen the muzzle. You can also add a small bit of fiberfill inside the tip for subtle lift.
Round 23 :
Fasten off leaving long tail for sewing onto neck. Weave tail through remaining sts and pull tight to close. Leave a neat finish for later attachment.
Info :
Create a light embroidery for nostrils now if desired — use a short length of black or dark brown yarn and make two small satin stitch dots and a defined mouth line under the snout. This is optional; the snout shape is strong without stitching too.
— Head Ridge & Facial Spikes (Make 9-11 spikes) :
Round 1 :
Using red, mr, 6 sc (6)
Round 2 :
(1 sc, inc) x 3 (9)
Round 3 :
1 sc in each st (9)
Round 4 :
(2 sc, inc) x 3 (12)
Round 5 :
1 sc in each st (12)
Round 6 :
Fasten off leaving tail. Make 9-11 of these small cone spikes in red; for each tip convert last 2-3 rounds to black to create dark tips if desired. Sew spikes along center line of head from brow to nape, spacing evenly.
Info :
Sew spikes on with a ladder stitch so the base sits flush against the head and create a continuous ridge. Make a few more than you think you need — you can trim extras off or use along back and tail.
— Horns (Make 2) :
Info :
Horns are worked in black. They are sculpted cones with a slight curve; use a smaller hook (3.0mm) for firmer fabric. Optional: insert a short length of floral wire inside for shape before final stuffing.
Round 3 :
(1 sc, inc) x 6 (18)
Round 4 :
1 sc in each st (18)
Round 5 :
(2 sc, dec) x 6 (12)
Round 6 :
1 sc in each st (12)
Round 7 :
(1 sc, dec) x 4 (8)
Round 8 :
1 sc in each st (8)
Round 9 :
Dec until closed (4-0) — stuff lightly and fasten off leaving tail for sewing. Shape curve by sewing a few running stitches along one side of horn and pulling slightly to create a gentle arc.
Info :
Sew horns to top sides of head slightly back of eyes. Angle them to curve inward toward the centerline of the head for dramatic silhouette.
— Neck (Attach to head, shaped cylinder) :
Round 3 :
(1 sc, inc) x 6 (18)
Round 4 :
1 sc in each st (18)
Round 5 :
1 sc in each st (18)
Round 6 :
(2 sc, inc) x 6 (24)
Info :
Sew neck to head by inserting the neck opening into the head base and pinning evenly before stitching. The neck should be sturdy but slightly flexible for pose. Leave the other end open to join body later.
Round 7 :
1 sc in each st (24)
Round 8 :
1 sc in each st (24)
Round 9 :
1 sc in each st (24)
Round 10 :
1 sc in each st (24)
Info :
If you want a longer neck, add additional even rounds now. When attaching to body, make sure the neck aligns with the chest centerline and that the seam is well distributed to avoid lumps.
— Body :
Round 3 :
(1 sc, inc) x 6 (18)
Round 4 :
(2 sc, inc) x 6 (24)
Round 5 :
(3 sc, inc) x 6 (30)
Round 6 :
(4 sc, inc) x 6 (36)
Round 7 :
1 sc in each st (36)
Round 8 :
1 sc in each st (36)
Info :
Work body in continuous rounds. The body is slightly egg-shaped; increases build width and later rounds will reduce toward the neck. Start stuffing gradually after round 10 so the bottom stays flat for sitting pose.
Round 9 :
1 sc in each st (36)
Round 10 :
1 sc in each st (36)
Round 11 :
(4 sc, inc) x 6 (42)
Round 12 :
1 sc in each st (42)
Round 13 :
1 sc in each st (42)
Round 14 :
(5 sc, inc) x 6 (48)
Round 15 :
1 sc in each st (48)
Info :
For belly ridges: mark center front of body. You will crocheted belly panel in alternating rounds in BLO to create vertical ridges; start the panel on round 16 to round 26. Use stitch markers to indicate the panel width — about 12-14 stitches wide depending on your gauge.
Round 16 :
1 sc in each st (48)
Round 17 :
1 sc in each st (48)
Round 18 :
1 sc in each st (48)
Round 19 :
(6 sc, dec) x 6 (42)
Round 20 :
(5 sc, dec) x 6 (36)
Info :
Begin stuffing body firmly but leave the top opening for inserting neck. Stuff the lower body more firmly so the dragon sits upright. For a flat base, press stuffing down and shape with your hands so feet sit flush.
Round 21 :
1 sc in each st (36)
Round 22 :
1 sc in each st (36)
Round 23 :
(3 sc, dec) x 6 (30)
Round 24 :
(2 sc, dec) x 6 (24)
Round 25 :
(1 sc, dec) x 6 (18)
Round 27 :
Fasten off leaving long tail for sewing. Close remaining opening with a round of slip stitches if needed or weave tail to draw closed. Attach neck opening to body top and secure with ladder stitch.
Info :
When joining neck to body, align center front of neck with belly panel. Stitch evenly, taking care not to twist neck. Use extra stitches under chin to create a secure and neat seam.
— Belly Panel (worked separately and sewn or worked in rounds on body) :
Info :
You can either stitch a belly panel using a rectangle worked in rows and sew to body front, or create vertical ridges directly on the body by working alternating rounds in BLO on the center panel. The instructions here describe a strip worked in rows then sewn for control.
Row 1 :
With crimson, ch 14, sc in 2nd ch from hook and across (13)
Row 2 :
Ch 1, turn, sc across (13)
Row 3-14 :
Ch 1, turn, sc across (13) — repeat for 12 rows total to create a rectangle of approx length equal to body front
Info :
To create ridges use 2 rows of BLO then 2 rows regular, or add raised stitches by working front post single crochets on every other row. Block the panel slightly by stretching to match the body curve.
Row 15 :
Fasten off leaving long tail for sewing. Center panel on body front and sew in place with whip stitch around edges; use matching red to blend.
— Arms (Make 2) :
Info :
Arms are sculpted with a paw/hand that flows to the upper arm; they will be sewn to body at the sides so the dragon can rest its front limbs on the ground. Work each arm in continuous spiral.
Round 3 :
(1 sc, inc) x 6 (18)
Round 4 :
1 sc in each st (18)
Round 5 :
1 sc in each st (18)
Info :
Begin forming paw: add 3 small claws (black) as separate cones or crocheted into the first rounds. Claws are very small cones (see claws section). Stuff paw firmly so claws sit proud and round.
Round 6 :
(2 sc, inc) x 6 (24)
Round 7 :
1 sc in each st (24)
Round 8 :
1 sc in each st (24)
Round 9 :
(3 sc, dec) x 6 (18)
Round 10 :
1 sc in each st (18)
Round 11 :
1 sc in each st (18)
Round 12 :
(1 sc, dec) x 6 (12)
Round 13 :
1 sc in each st (12)
Round 14 :
1 sc in each st (12)
Round 15 :
Fasten off leaving long tail for sewing. Stuff lightly from the top and more firmly in paw area. Sew arm to body at side seams aligning paw at rounds 10-12 of body to give natural resting posture.
Info :
Sew arms with ladder stitch through both arm and body stitches. Use several passes at top (around rounds 8-12 of arm) to secure. Keep seams tight and hidden.
— Legs & Feet (Make 2) :
Info :
Legs are larger than arms and end with an exaggerated paw/foot with 4 visible toes and claws. Work in spiral; attach to bottom of body so dragon can sit upright. Feet are stuffed very firmly for a solid base.
Round 3 :
(1 sc, inc) x 6 (18)
Round 4 :
(2 sc, inc) x 6 (24)
Round 5 :
(3 sc, inc) x 6 (30)
Round 6 :
1 sc in each st (30)
Round 7 :
1 sc in each st (30)
Round 8 :
Setup toe separation: 1 sc in next 7 sts, ch 3, skip 3 sts, 1 sc in next 7 sts, ch 3, skip 3 sts (this creates visual separation for toes)
Round 9 :
Continue working in spiral, (3 sc, dec) x 6 (24)
Round 10 :
1 sc in each st (24)
Round 11 :
(2 sc, dec) x 6 (18)
Round 12 :
1 sc in each st (18)
Round 13 :
(1 sc, dec) x 6 (12)
Round 14 :
1 sc in each st (12)
Round 15 :
Fasten off leaving long tail. Before closing the last round, insert stuffing strongly into the foot to build a firm base. Create toes by sewing small black claw cones onto the three or four separated points you created earlier.
Info :
Position legs at the bottom of the body, spaced about 8-10 stitches apart depending on body circumference. Sew with multiple passes to bear weight. Reinforce inner seams so the sitting pose holds.
— Claws (Make 14-16 small claws) :
Round 1 :
With black, mr, 4 sc (4)
Round 2 :
(1 sc, inc) x 2 (6)
Round 3 :
1 sc in each st (6)
Round 4 :
Dec until closed or 3 sc and fasten off leaving tail for sewing. Make 14-16 claws for toes and wing tips. Sew at paw/foot/wing tip positions and shape slightly forward for a talon effect.
Info :
For durability, sew claws through multiple stitches and knot securely on the inside before weaving tails. You can also use a dab of fabric glue at the base for extra hold.
— Tail :
Info :
Tail is a long tube tapered to the tip with triangular scale ridges along the top. Work in a spiral tube from base to tip, adding scale points by crocheting small cones or ridges along the top every few rounds. Insert flexible wire if you want poseable tail.
Round 3 :
(1 sc, inc) x 6 (18)
Round 4 :
1 sc in each st (18)
Round 5 :
(2 sc, inc) x 6 (24)
Round 6-10 :
1 sc in each st (24) — continue tube length
Round 11 :
(3 sc, dec) x 6 (18)
Round 12-16 :
1 sc in each st (18)
Round 17 :
(2 sc, dec) x 6 (12)
Round 18-22 :
1 sc in each st (12)
Round 23 :
(1 sc, dec) x 4 (8)
Round 24-26 :
1 sc in each st (8) — tapering to tip
Round 27 :
Dec until closed or leave small opening and fasten off leaving long tail for sewing. Stuff tail firmly but not rigid; shape into a curl to sit around body.
Info :
Make triangular scale ridges by creating small cones (use spikes pattern) and sew them along the top of the tail spaced 6-8 stitches apart. For a continuous row, you may crochet bobbles into the back loop along select rounds to simulate scales.
— Dorsal Spikes (Make 10-14) :
Round 1 :
With crimson, mr, 6 sc (6)
Round 2 :
(1 sc, inc) x 3 (9)
Round 3 :
1 sc in each st (9)
Round 4 :
Fasten off leaving long tail for sewing. Make 10-14 spikes, some slightly larger by adding an extra round. For tips, change final round to black by slip-stitching black into last round and fastening off.
Info :
Sew spikes centered down the back from neck seam to tail base. Overlap bases slightly for continuous ridge; stitch base securely through body to avoid shifting. Make spike spacing even — about every 6-8 stitches along center back.
— Wings (Make 2) :
Info :
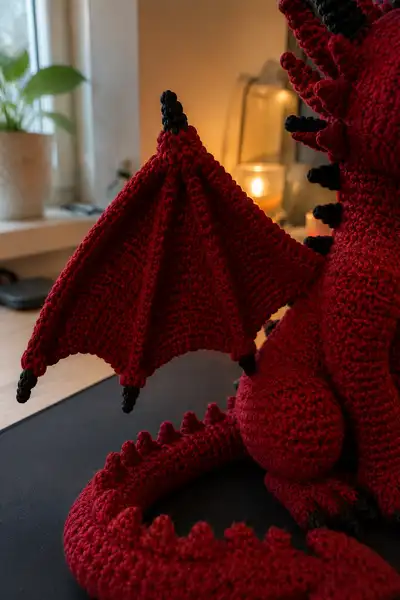
Wings are worked flat in rounds to form a bat-wing shape: a triangular membrane with three ridged 'bones' created by working post stitches or working separate bone ribs sewn on. The wing tip ends with a small black claw. You can insert thin wire into each bone rib for posing; cover wire with yarn or tape.
Round 1 :
With crimson, ch 14, sc in 2nd ch from hook and across (13)
Round 2 :
Ch 1, turn, sc across (13)
Round 3 :
Ch 1, turn, (sc, inc) across to widen at base to form a triangular shape — sc in first st, (1 sc, inc) x 6, sc in remaining (19)
Round 4 :
Ch 1, turn, sc across (19)
Round 5 :
Ch 1, turn, (2 sc, inc) x 6 across (25)
Round 6-7 :
Ch 1, turn, sc across (25)
Info :
Create the wing scallops: mark three points along the outer edge to create 3 segments (finger bones). Later you will create ridges along these segments with front post single crochets or by sewing separate rib tubes to the flat membrane.
Round 8 :
Ch 1, turn, (3 sc, inc) x 6 (31)
Round 9-10 :
sc across (31)
Round 11 :
Work 1 sc in next 8 sts, ch 6, skip 6 sts, 1 sc in next 8 sts, ch 6, skip 6 sts to shape membrane vents (this sculpts the scalloped edge)
Round 12 :
Work around each ch-6 loop with 6 sc to create pointed tips and form wing points (3 points total). sc around remaining stitches to finish edge.
Info :
To create the bone ribs, either: (A) work 1 row of front post single crochet along three radiating lines from the base to each wing tip, or (B) crochet three narrow tubes (rib bones) and sew them evenly spaced across the wing. I prefer tubes for stronger poseability.
Round 13-14 :
sc around entire wing (approx 40-44 sts) — attach black claw cone at outer tip by sewing small cone (see claws) for pointed effect
Round 15 :
Fasten off leaving long tail for sewing. Make second wing mirror image by flipping pattern when sewing. Insert optional wire into ribs before closing.
Info :
Sew wings to upper back between rounds where shoulder meets body. Position wings so they sit slightly behind the arms and angle them naturally outward. Reinforce seam with several passes to handle weight.
— Wing Rib Tubes (Make 6 small ribs, 3 per wing) :
Round 1 :
With crimson, mr, 6 sc (6)
Round 2-12 :
1 sc in each st (6) — length determines rib length (approx 10-14 rounds depending on wing size)
Round 13 :
Fasten off leaving long tail for sewing. Curve the tube slightly and sew under the wing surface, spacing the three ribs evenly from base to tip. Insert wire if wanted and sew over it with yarn to enclose wire ends.
Info :
For strong attachment, sew each rib tube through several wing rounds and into the body at the top stitch line. This distributes tension when posing.
— Eye Details :
Info :
Use 10-12mm safety eyes in amber or gold. Position between rounds 14-15 on head, approximately 8 stitches apart from center to create narrowed fierce expression. Secure washers inside head before final stuffing. If embroidering, use satin stitch for iris and French knot for pupil.
— Finishing Spines and Detailing :
Info :
Sew any remaining dorsal spikes, position horns, and check symmetry. Add a row of surface single crochet along each wing seam to tidy the join. Embroider mouth line under snout and add a few stitches for cheek definition if desired.
Info :
Weave all ends through inside seams and trim. For extra polish, lightly steam-block with a handheld steamer to even stitches (careful with safety eyes and stuffing). Add gentle blush using fabric-safe pastel if you want subtle color depth on cheeks/eyebrows.
Finishing this crimson dragon is such a rewarding experience — all the small spikes, the sculpted snout, and the dramatic black-tipped horns come together to create a striking character. The wings fold naturally and the curled tail frames the sitting pose perfectly. I loved seeing all the details take shape; this makes a wonderful gift or display piece! 🐉🧶✨