About This Crochet Beret Pattern
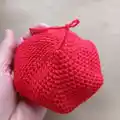
This pattern teaches you how to crochet a classic beret sized for the big penguin using YarnArt Jeans yarn and a 2 mm hook. The beret is worked in continuous rounds with clear increase and decrease rounds to shape the crown and the brim. A short finishing chain and slip-stitch loop give the beret its little top detail and a neat finish.
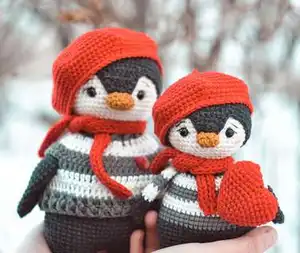
Perfect as an accessory for amigurumi penguins or as a tiny wearable accent for dolls and toys. The instructions include stitch counts per round and a brief finishing step with photos referenced for clarity.
Why You'll Love This Crochet Beret Pattern
I absolutely love this pattern because it is quick to work up and adds instant personality to any penguin amigurumi. I enjoy how the simple increase rounds create a lovely rounded crown without complicated shaping. It is very forgiving for beginners yet satisfying for more experienced crocheters who want a fast accessory. Making a beret is a lovely way to practice tension and counting while producing a charming finished piece I am proud to gift or display.
Switch Things Up
I love changing up yarn colors to create different moods for the beret; try deep navy for a classic look or pastel pink for a softer feel.
I often make a tiny pompom from leftover yarn and sew it to the top loop for a playful accent.
To make the beret larger or smaller I change the hook size and add or remove rounds in the crown section.
I sometimes work the brim in a contrasting color to frame the face of the penguin and add visual interest.
You can substitute a textured or boucle yarn for a fuzzy beret that feels extra cozy and unique.
I like to embroider small motifs or add tiny buttons to the side for personalization and a handcrafted touch.
If you want a sturdier brim, try blocking the beret gently or adding a narrow felt band inside to help it hold shape.
For miniature versions, use thinner yarn and a smaller hook to make berets for keychains or tiny dolls.
I recommend trying a couple of test crowns to practice tension before making the final piece, especially if you plan to gift the finished beret.
Don't be afraid to mix stitches — replacing a round with a row of HDC or X-stitch can create interesting texture and a unique finished look.
Common Mistakes & How to Fix Them
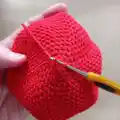
✗ Skipping the long starting tail can make it difficult to finish and attach the top loop; always leave the long starting tail as instructed at the beginning.
✗ Using the wrong hook size will change the final fit of the beret on your penguin; use a 2 mm hook for the beret as recommended or adjust consistently if you change yarn weight.
✗ Failing to count stitches after increases or decreases leads to uneven shaping and mismatched rounds; count at the end of each round and mark the start of rounds with a stitch marker.
✗ Working with inconsistent tension will make the beret look uneven and may not sit correctly on the head; maintain steady, moderate tension throughout and practice the stitches beforehand if needed.
✗ Not weaving the tail in properly after finishing can cause the beret to come apart or look untidy; cut the thread and weave it securely into the fabric as shown in the photos.
✗ Ignoring the instruction to work in continuous rounds can create visible joins or ridges; work continuously and use a marker to track the first stitch of each round.