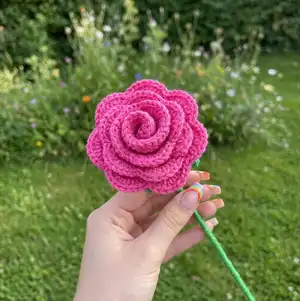
Create a charming handmade bouquet of 25 crochet flowers to brighten any room or give as a heartfelt gift. This pattern walks you through roses, daisies, small five-petal flowers, buds and carnations with detailed photo-step instructions. You will learn stem wrapping, leaf and sepal construction, and how to assemble each flower on a wired stem for a professional finish. Perfect for gifting or home decor, the finished stems are approximately 25 cm (10 in) long.
Progress Tracker
0% Complete
— General Info :
Info :
The bouquet includes 25 flowers: 5 roses, 5 daisies, 5 blue flowers, 5 buds and 5 carnations
Info :
Colors used: for leaves, stems and sepals - green. For roses - bright pink. For daisies - white and yellow. For blue flowers - two shades of blue. For buds - soft pink. For cloves - purple.
Info :
Necessary materials: yarn (two colors are used for photo tutorial - yellow and green), hook, scissors, a needle, floral wire, measuring tape, pliers, glue
Info :
This bouquet is made of cotton yarn, brand YarnArt 'Begonia' 169m/50g. The hook used is 2 mm in size. Stems 10 inches (25 cm) tall. Flower sizes vary approx 1.7 inches (4.5 cm) to 2.3 inches (6 cm). Use yarn thickness to adjust flower size.
— Stem :
Item Name (P1) :
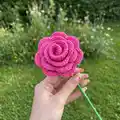
I will make each flower 25 cm (10 inches) long. The length of the stem is selected according to the size of the flowers that will be planted on the stem. If the flowers are small, a stem length of 25 cm (10 inches) is fine, my flower heads are between 6 cm (2.3 inches). If the volume of your flowers is larger, you can make the stem length 30 cm (12 inches). Using pliers, cut the required length of wire for the stem.
Info :
For the stem, use a flower wire 1.1 mm thick and 10 inch (25cm) long. Can also use flower wire 0.8 or 0.9 mm thick. Keep in mind the larger the volume of your flower, the thicker the flower wire you need.
Item Name (P2) :
apply glue to the edge of the wire and fasten the yarn firmly
Item Name (P3) :
gradually apply glue to the wire and wind the yarn
Item Name (P4) :
firmly fix the yarn on the edge of the wire, cut the yarn
Item Name (P5) :
gradually apply glue to the wire and wind the yarn to cover the stem until the desired length
— Leaf :
Row 2 :
CH 1, SC 1 in the first chain (I perform the second row in the back side of the chains, it's just more convenient for me, you perform as convenient for you)
Row 2 :
HDC 1 in the second chain
Row 2 :
DC 1 in the third chain
Row 2 :
DC 2 in the fourth chain
Row 2 :
TR 2 in the fifth chain
Row 2 :
DTR 3 in the sixth chain
Row 2 :
DTR 7 in the seventh chain
Info :
then we perform stitches in the same chains, according to the stitches that have already been made
Row 2 continued :
DTR 3 in the same chain where DTR 3 have already been made
Row 2 continued :
TR 2 in the same chain where TR 2 have already been made
Row 2 continued :
DC 2 in the same chain where DC 2 have already been made
Row 2 continued :
DC 1 in the same chain where DC 1 have already been made, HDC 1 in the next chain, SC 1 in last chain
Row 2 finish :
ST in the first SC of this row
Row 3 :
SC 1 in the same SC
Row 3 continued :
SC 1 in the first DC of three, SC 1 in the second DC, SC 1 in the third DC, SC 1 in the first TR of two, SC 1 in the second TR
Row 3 continued :
SC 2 in the first DTR of thirteen
Row 3 continued :
SC 3 in the sixth DTR
Row 3 continued :
SC 1 in the seventh DTR
Row 3 continued :
SC 1 in the seventh DTR
Row 3 continued :
SC 3 in the eight DTR
Row 3 continued :
SC 2 in the ninth DTR
Row 3 continued :
SC 2 in the tenth DTR, SC 2 the eleventh DTR, SC 2 in the twelfth DTR, SC 2 in the thirteenth DTR
Row 3 continued :
SC 1 in the first TR of two, SC 1 in the second TR, SC 1 in the first DC of two, SC 1 in the second DC, and repeat, SC 1 in the next each stitches
Row 3 finish :
ST in the first SC of this row
Info :
fasten and trim the ends of the yarn (the same leaves are made for each type of flower)
Info :
If cotton yarn is used, the leaf can be easily ironed
— Sepal :
Row 1 :
CH 1, SC 14 in the magic ring
Row 1 :
tighten the magic ring, ST in the first SC
Row 2 :
CH 3 from the first SC
Row 2 :
DC 1 in the first SC
Row 2 :
DC 2 in the second SC, repeat DC 2 in each SC around
Row 2 :
ST in the third chain
Row 3 :
TR 3-cluster in the next DC 3 (make 6 leaves by repeating same leaves)
Row 3 continued :
CH 4, ST in the next DC, repeat to make 5 more of the same leaves
Finish :
ST in the beginning of this row, done
Info :
fasten and trim the ends of the yarn
Info :
check whether the size of the hole of the sepal is suitable for the thickness of the stem, if not, then the magic ring can be slightly expanded or, on the contrary, tightened
Info :
if cotton yarn is used, the sepal can be easily ironed
— Rose :
Row 2 :
CH 2, HDC 1 in the second chain
Row 2 :
HDC 1 in the third chain, HDC 1 in the fourth chain, continue HDC 1 in each chain
Row 3 :
repeat until the end of the row, HDC 1 in each chain
Row 3 :
CH 2 from the first HDC
Row 4 :
since the second row began with CH 2, so the last (forty-fifth) HDC of the third row should be performed in the second chain of the beginning of the second row
Row 4 :
repeat until the end of the row, HDC 1 in each HDC
Row 4 continued :
DC 1 in the first HDC, CH 3, DC 1 in the first HDC
Row 4 continued :
CH 1, skip the second HDC 1, DC 1 in the third HDC
Row 4 continue :
DC 1 in the third HDC, CH 1, skip the fourth HDC, DC 1 in the fifth HDC, CH 3, DC 1 in the fifth HDC (creating arches for petals)
Row 5 :
SC 1 in the first DC
Row 5 :
DC 9 under the first arch of CH 3 (I call a chain of three chains an arch)
Row 5 :
SC 1 in the next chain
Row 5 :
DC 9 under the second arch of CH 3
Row 5 finish :
SC 1 in the next chain, repeat until the end of the row, turn out a twisted ribbon
Finish :
done. Fasten and trim the ends of the yarn
Info :
The same ribbon-type petals are used to wind the rose onto the stem
— Assembling the Rose onto Stem :
Item Name (P1) :
All parts + glue: prepare the rose ribbon, sepals and a leaf
Item Name (P2) :
determine the edge of the wire on which the yarn began to be wound (usually this edge looks worse than the edge where the thread ended), it is on this edge that I recommend winding the rose
Item Name (P3) :
apply glue to the first petal and on the areas shown here, start winding the ribbon on the stem, with the first petal, close the stem well so that it is not visible
Item Name (P4) :
then gradually wind the ribbon on the stem, apply glue and wind further
Item Name (P5) :
with the side where the edges of the yarn are fast, put the sepal on the stem, apply glue and stick to the flower
Item Name (P6) :
apply glue to the narrow edge of the leaf and glue to the stem
Finish :
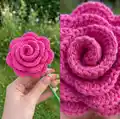
done. make roses in the colors you like; for the sample bouquet 5 pink roses were made
— Flower (five-petal small flower) :
Row 1 :
CH 1, SC 10 in the magic ring
Row 1 :
tighten the magic ring, ST in the first SC of this row
Row 2 (the first layer of the flower) :
CH 3 from the first SC
Row 2 :
TR 2 in the second SC
Row 2 :
CH 2, TR 2 in the second SC, CH 2
Row 2 continued :
TR 2 in the next SC forming small petal arches, CH 2, repeat until you have 5 small arches (five petals)
Row 3 :
CH 1, pull yarn through first SC to other side, make second layer of petals: CH 4, TR and clusters as shown to form the second layer of petals
Row 3 continued :
Make 3 more petals in the same way, ST in the beginning of this row, done
Info :
Fasten and trim the edges of the yarn. Check whether the size of the hole of the flower is suitable for the thickness of the stem and adjust magic ring if needed.
— The central part of the flower :
Row 1 :
CH 1, SC 6 in the magic ring
Row 1 :
tighten the magic ring, ST in first SC of this row
Row 2 :
CH 1, SC 2 in the first SC, repeat SC 2 in each SC around (SC 12)
Finish :
repeat and finish, center is used as flower core and glued to middle of petals
— The central part for small flower (green center) :
Row 1 :
CH 1, SC 6 in the magic ring (SC6)
Row 2 :
tighten the magic ring, CH 1, SC 2 in the first SC, repeat SC 2 in each SC (SC12)
Finish :
fasten and trim, sew or glue to center of upper petals
— Assembly Instructions Overview :
Info :
Glue the small flower center to the petals, then check hole for stem and attach sepal and leaves as required.
This crochet bouquet pattern helps you create a long-lasting, handmade floral arrangement perfect for gifts or home decor.🧶 The detailed photo steps make complex shapes like roses, leaves and sepals approachable and satisfying to make.✨ Enjoy customizing colors and sizes to create your perfect bouquet—happy crocheting!🌸