🧢 Beautiful ✨ Detailed πŸ’ Adorable

Cute Bunny Comforter Pattern

Cute Bunny Comforter Pattern
3.9β˜… Rating
2-3 Hours Time Needed
4.0K Made This
βœ‚οΈ

Beginner Friendly Level

Perfect for those just starting their crochet journey, with clear instructions and simple techniques

⏱️

Bite-Sized Project

Finishes in 2-4 hoursβ€”perfect for an afternoon of creative relaxation.

🧸

Cute Companion

An adorable friend to cherish, handcrafted with love to bring comfort and joy for years to come.

About This Cute Bunny Comforter Pattern

This pattern creates a cute bunny comforter combining a small granny square blanket with a sweet amigurumi-style bunny head, ears and arms. You will work a simple granny square and crochet the bunny parts in continuous rounds and short rows for the ears. The design is baby-friendly when finished with yarn-sewn facial details and offers a portable, cuddly gift.

Cute Bunny Comforter Pattern crochet pattern - detailed view of completed project

The pattern uses worsted/light 8ply yarn and a 5mm hook to create a soft, tactile comforter. Detailed rounds and notes are provided to help you shape the head, ears and arms accurately.

Why You'll Love This Cute Bunny Comforter Pattern

I absolutely love this pattern because it combines two classic crochet projects β€” a granny square and a small amigurumi β€” into one charming comforter. I enjoy how quickly the blanket grows and how satisfying the compact head shaping is to finish. The project is forgiving and fast, so I can make several as gifts in a short time. I also love that sewing the face with yarn makes the toy safe for babies, which gives me extra peace of mind when making it for little ones.

Cute Bunny Comforter Pattern step 1 - construction progress Cute Bunny Comforter Pattern step 2 - assembly progress Cute Bunny Comforter Pattern step 3 - details and accessories Cute Bunny Comforter Pattern step 4 - final assembly and finishing

Switch Things Up

I love experimenting with color β€” try pastel shades for a softer baby lovey or bold contrasting colors for a playful look.

If you want a larger comforter, repeat additional granny square rounds until you reach the desired size.

Swap yarn weight and hook size to make a minisize keychain lovey or a jumbo snuggle blanket; just remember the head sizing will change.

I often change ear shapes: make longer or shorter ears by altering the row counts to create different personalities.

Instead of sewing a yarn face, you can embroider different expressions or add tiny felt features for a different finish.

Use a decorative border around the granny square β€” shells, picots, or a simple sc round adds a neat trim.

Try adding a ribbon or a small crocheted heart to the corner of the blanket for an extra special gift touch.

I sometimes use variegated yarn for the blanket to add visual interest without changing colors mid-project.

Make the arms removable by sewing them with a loop and button if you want a washable option or easier repairs.

For older children, add safety eyes and a sewn-on nose instead of yarn embroidery, but avoid safety eyes for baby-safe versions.

Common Mistakes & How to Fix Them

βœ— Skipping stitch markers when working continuous rounds leads to lost stitch counts; place and move a marker at the start of each round to track rounds and maintain shape. βœ— Working too loosely on the head causes stuffing to show through the stitches; maintain a tighter tension for head pieces and use smaller hook if necessary. βœ— Forgetting to leave long tails makes assembly difficult later; always fasten off leaving a long tail for sewing head and ears to the blanket. βœ— Not stuffing the head firmly enough results in a floppy shape; stuff firmly but evenly while shaping so the head retains a smooth round appearance.

Cute Bunny Comforter Pattern

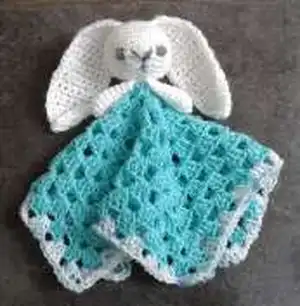
Make a sweet, handmade bunny comforter that doubles as a tiny lovey and blanket. This pattern walks you through a small granny square blanket with an attached crocheted bunny head, ears and arms so you have a complete comforter in one project. You'll enjoy the quick rounds and simple shaping β€” perfect for a thoughtful gift or a baby-safe keepsake. The pattern uses basic stitches and clear instructions to guide you step by step.

Beginner Friendly 2-3 Hours

Materials Needed for Cute Bunny Comforter Pattern

β€” Main Fabric

  • 01
    Light/Worsted/8ply yarn (approx. 15g of one color for bunny head, arms and ears)
  • 02
    Light/Worsted/8ply yarn (approx. 15g of a second color for the blanket/body/dress)
  • 03
    Small amount of yarn for facial details (contrast color, small amount)

β€” Tools Required

  • 01
    Crochet hook H (5mm)
  • 02
    Stitch marker
  • 03
    Darning needle (yarn/tapestry needle)
  • 04
    Polyester stuffing (for head)
  • 05
    Sewing needle optional for sewing with thread (not required)

Progress Tracker

0% Complete

β€” Special Stitches :

Info :

sc2tog (sc dec) (Insert hook into next st and draw up a lp) twice, yo and draw through all 3 lps on hook – 1 sc decreased
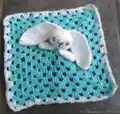
β€” Granny Square Blanket :

Info :

Useful Granny Square Tutorial link from The Crochet Crowd: http://www.youtube.com/watch?v=BFnyfJEWCd8 Ch4 and sl st to the beginning ch to form ring.

Round 1 :

Ch3 (counts as a dc from now on), work 2dc into the ring, *ch2, 3dc into the ring*, rep from * twice more, ch2 and sl st to the top of the ch3 that started the round.

Round 2 :

Ch3, work 2dc into the same sp, *ch1, work 3dc, ch2, 3dc into next ch2 corner sp. Repeat from * all the way around. Your final sts should be 3dc, ch2 and then sl st to the top of the ch3 that started the round.

Round 3 :

Ch3, work 2dc into the same sp, ch1 * work 3dc, ch1, into each ch sp across to corner sp. In corner sp, work 3dc, ch2, 3dc, ch1. Repeat from * all the way around. Your final corner should have 3dc, ch2 and then sl st to the top of the ch3 that started the round.

Info :

Repeat round 3 nine times. Each round will cause the square to increase in size.
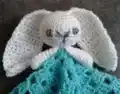
β€” Head :

Info :

Notes Rounds are worked in continuous spirals; do not join. Do not turn work at the end of each round but use stitch markers as indicated.

Round 1 :

Ch2, work 6sc in furthest ch from hook. Place stitch marker in first st for beg of next Round; move marker up at start of each Round.

Round 2 :

Work 2 sc in each sc around (12sc).

Round 3 :

*2sc in next sc, sc in next sc; repeat from * around (18sc).

Round 4 :

*2sc in next sc, sc in each of next 2sc; repeat from * around (24sc).

Round 5 :

*2 sc in next sc, sc in each of next 3sc; repeat from * around (30sc).

Round 6-10 :

Sc in each st around.

Round 11 :

*Sc2tog, sc in each of next 3sc; repeat from * around (24sc)

Round 12 :

*Sc2tog, sc in each of next 2sc; repeat from * around (18sc).

Round 13 :

*Sc2tog, sc in next sc; repeat from * around (12sc)

Info :

Stuff firmly.

Round 14 :

Sc2tog around (6sc).

Info :

Fasten off, leaving a long tail to use to sew head to centre of blanket.

β€” Bunny Ears :

Info :

Note: Turning ch1 does not count as a st.

Row 1 :

Starting at bottom of ear, ch 2, 3 sc in 2nd ch from hook, ch 1, turn (3sc)

Row 2 :

Sc in each st across, ch 1, turn (3sc)

Row 3 :

2sc in first sc, sc in next sc, 2sc in last sc, ch 1, turn (5sc)

Rows 4 & 5 :

Sc in each st across, ch1, turn (5sc)

Row 6 :

2sc in first st, sc in each st to last st, 2sc in last st, ch1, turn (7sc)

Rows 7 - 18 :

Sc in each sc across, ch1, turn.

Row 19 :

Sc2tog, sc in each st to last 2 sts, sc2tog, ch1, turn (5sc)

Row 20 :

Sc in each sc across, ch1, turn.

Row 21 :

Sc2tog, sc in next st, sc2tog, ch1, DO NOT TURN (3sc)

Edging :

Work 21 sc down side of ear, work 3 sc across opposite side of starting ch, work 21 sc up side of ear, ch1, join with a sl st to first sc of row 21. Leaving a length of yarn for sewing, fasten off.

Info :

Fold ear in half lengthwise and sew the top of row 21 together. Sew ears to top of head.

β€” Arms :

Info :

Notes Rounds are worked in continuous spirals; do not join. Do not turn work at the end of each round but use stitch markers as indicated.

Round 1 :

Ch2, work 5sc in furthest ch from hook. Place stitch marker in first st for beg of next round; move marker up at start of each Round (6sc)

Round 2 :

Work 2sc in each sc around (12sc).

Rounds 3 - 4 :

Work 1sc in each st around (12sc)

Round 5 :

Sc2tog, sc in next two sts around (9sc)

Rounds 6 - 9 :

Work 1sc in each st around (9sc)

Info :

Do not stuff arms, sew open end shut and tie off leaving a long tail. Using tail sew arms just beneath the head onto the blanket body.

Info :

Finish by sewing a simple face onto the bunny using a darning needle - using yarn makes this comforter very safe for little ones.

Info :

I hope you like this pattern! If you have any problems with it please don't hesitate to let me know and I'll see if I can help!

Assembly Instructions

  • Sew the head to the centre of the granny square blanket using the long tail left after fastening off Round 14; position centrally and use a whipstitch for a secure join.
  • Fold each ear lengthwise and sew the top of Row 21 together before attaching both ears to the top of the head for a neat finish.
  • Using the long tails left on the arms, sew each arm just beneath the head onto the blanket body so they lie across the front of the blanket.
  • Embroider the face with yarn using a darning needle to create safe, secure facial features suitable for babies.
  • Weave in all ends and tuck excess yarn inside seams before finishing to ensure a neat, baby-safe comforter.

Important Notes

  • πŸ’‘Use stitch markers and move them up at the start of each round when working in continuous spirals to keep track of rounds.
  • πŸ’‘Stuff the head firmly but evenly so the stuffing does not show through and the head keeps a smooth shape.
  • πŸ’‘Do not join rounds; work in continuous spirals as indicated to avoid visible seams in the head and arms.
  • πŸ’‘Leave long tails when fastening off key pieces (head, ears, arms) to make sewing parts together easier and more secure.

This adorable Cute Bunny Comforter pattern makes a perfect baby-safe keepsake or gift that is quick to crochet and full of charm. The combination of a granny square blanket with a sweet bunny head, ears and arms creates a comforting little pal to snuggle. Happy crocheting and enjoy gifting your handmade love to someone special! 🧢🐰

You ask,

we answer.

FAQs

What size will the finished piece be?

The finished comforter size depends on how many granny square rounds you make; with the pattern's suggested yarn and hook you will get a small lovey-sized square suitable for babies.

Can I use different yarn weights for this pattern?

Yes, you can use different yarn weights, but the final size will change; adjust hook size accordingly and remember tighter tension is recommended for the head so stuffing won't show.

Do I need prior crochet experience for this pattern?

This pattern is beginner friendly but assumes you know basic stitches like sc, dc and sc2tog and are comfortable working in the round and following simple shaping instructions.

How long does this project typically take to complete?

Most crocheters complete this small comforter in about 2-3 hours, though time will vary depending on experience and how many granny square rounds you choose to make.