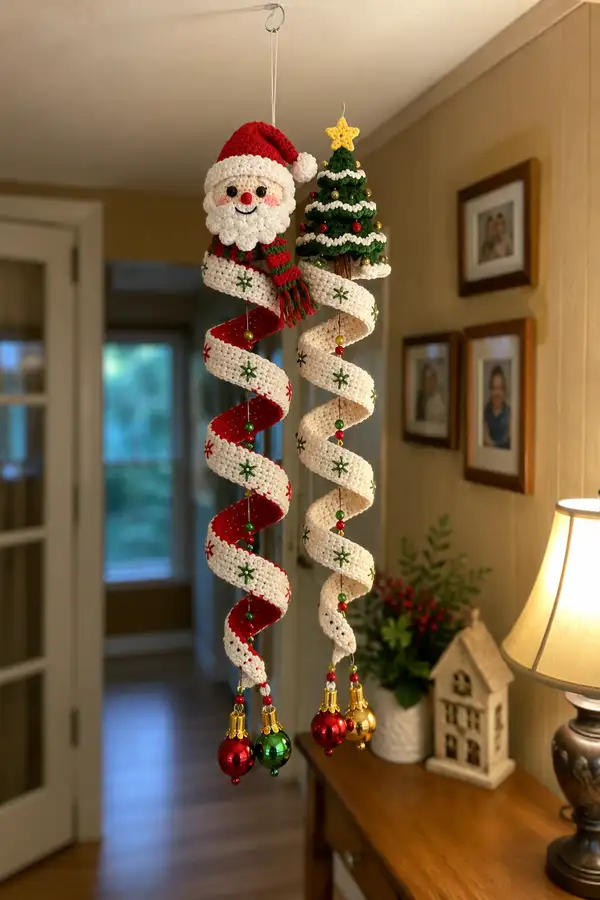
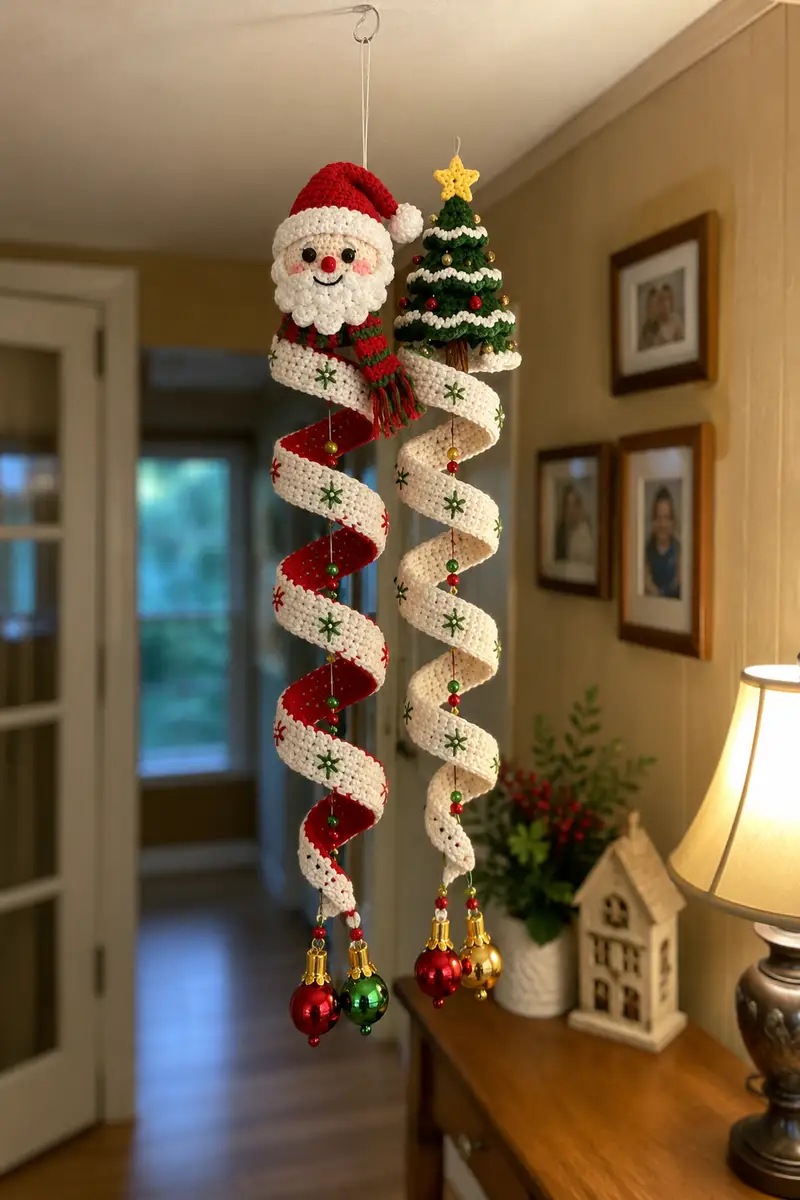
Make an enchanting pair of spiral Christmas garlands topped with a smiling Santa and a decorated tree. This pattern includes a cuddly Santa head with a textured beard, a pom-pom hat, a cozy striped scarf, a hollow mid-body ring to slip the spiral through, and a matching spiral ribbon with embroidered snowflake stars and bead tassels. Two complementary toppers allow you to create a coordinated holiday hanging decoration for doorways, windows, or tree displays.
Progress Tracker
0% Complete
— Head :
Round 1 :
6 sc in magic ring (6)
Round 3 :
(1 sc, inc) x 6 (18)
Round 4 :
(2 sc, inc) x 6 (24)
Round 5 :
(3 sc, inc) x 6 (30)
Info :
Change to skin tone yarn now if you started with cream for shaping. Keep stitches tight so stuffing won't show.
Round 6 :
(4 sc, inc) x 6 (36)
Round 7 :
(5 sc, inc) x 6 (42)
Round 8 :
(6 sc, inc) x 6 (48)
Round 9-12 :
1 sc in each st (48)
Info :
Place safety eyes between rounds 11 and 12, approximately 9-11 sts apart (center to center) depending on desired expression. Mark the first stitch of the round with a marker.
Round 13 :
1 sc in each st (48)
Round 14 :
1 sc in each st (48)
Info :
Embroider small nose placement between rounds 12-13. If using a safety nose bead attach now through the yarn before stuffing.
Round 15 :
1 sc in each st (48)
Round 16 :
(6 sc, dec) x 6 (42)
Round 17 :
(5 sc, dec) x 6 (36)
Info :
Begin light stuffing now. Add fiberfill gradually to avoid overstuffing. The face should be firm but slightly soft to touch.
Round 18 :
(4 sc, dec) x 6 (30)
Round 19 :
(3 sc, dec) x 6 (24)
Round 20 :
(2 sc, dec) x 6 (18)
Round 21 :
(1 sc, dec) x 6 (12)
Info :
Stop stuffing when the head is mostly full but still flexible at the base; you'll shape the neck and attach the body band later. Leave a long tail for sewing to the body band.
Round 23 :
Fasten off leaving a 20-30 cm tail for attaching to the body ring. Weave the tail into the inside to close a small gap or use sewing to secure if necessary.
Info :
If you want a slightly taller head, add 2-4 extra even rounds at 48 sts before starting decreases. Maintain placement of eyes relative to the center of the head.
— Beard (scalloped bobble panels) :
Info :
The beard is made as a semicircular scalloped panel composed of several bobble shells sewn to the face. Use cream/ivory yarn and a 3.25mm hook for dense texture.
Round 1 :
Make 12 sc in magic ring (12)
Round 2 :
(1 sc, inc) x 6 (18)
Round 3 :
1 sc in each st (18)
Round 4 :
Change to bobble stitch row: *ch1, skip 1, 5 dc bobble in next st, sl st to next st* repeat across to form 6 bobbles. End with sl st (6 bobbles)
Round 5 :
Work a second row of bobble scallops below the first: attach at the bottom edge and make bobbles staggered (6 larger bobbles)
Round 6 :
Working single crochet along top edge, create a neat edge to sew to the face: 1 sc in each st across (approx 18)
Info :
Make 2-3 small scallop panels and arrange them overlapping on the chin area for a full beard. Use pins to position and then sew with matching yarn, hiding stitches inside bobbles.
Round 7 :
If adding cheek tufts, make two small 6-st bobble clusters and sew to sides of the face at rounds 12-14.
Round 8 :
Fasten off and leave long tails for sewing; secure panels to lower face leaving a small gap for the mouth between scallops.
— Hat :
Info :
Hat is worked in red, starting with a small crown then expanding to a cylinder and finishing with decreases to form a slouch. The white brim is crocheted separately and sewn on using surface slip stitches for a raised look.
Round 1 :
6 sc in magic ring (6)
Round 3 :
(1 sc, inc) x 6 (18)
Round 4 :
(2 sc, inc) x 6 (24)
Round 5 :
(3 sc, inc) x 6 (30)
Round 6-10 :
1 sc in each st (30) — continue until the crown reaches desired depth for a slouch (5 rounds)
Info :
Measure hat against head before closing — it should be slightly larger than the head base so the white brim sits around the forehead without compressing the face.
Round 11 :
(3 sc, dec) x 6 (24)
Round 12 :
(2 sc, dec) x 6 (18)
Round 13 :
(1 sc, dec) x 6 (12)
Info :
Fasten off and leave long tail to stitch the hat closed at the top. Attach a white brim made as a slip-stitch strip then folded and bordered to create thick cuff.
— Pom Pom (hat tip) :
Round 1 :
6 sc in magic ring (6)
Round 3 :
1 sc in each st (12)
Round 5 :
Fasten off leaving long tail. Stuff firmly and sew to hat tip; trim surface if desired to make round cloud-like pompom.
Info :
Alternatively make a yarn pompom and attach for a fluffier look if you prefer not to crochet a ball.
— Body Band / Hollow Mid-Ring :
Info :
This cylindrical band forms the mid-section 'basket' the spiral passes through. It's crocheted as a round tube with a hollow center. Work in cream with an inner red lining (worked separately then sewn) for the red interior visible in the photo.
Round 1 :
Make a magic ring and crochet 12 sc into ring (12)
Round 3 :
(1 sc, inc) x 12 (36)
Round 4 :
(2 sc, inc) x 12 (48)
Round 5-6 :
1 sc in each st (48)
Info :
Stop increasing once you reach an internal diameter that will permit your spiral to pass through without rubbing (approx 4-5 cm). The tube will be worked up vertically for height.
Round 7-18 :
1 sc in each st (48) — work 12 rounds up to form height of band (approx 4 cm)
Round 19 :
Change to red inner lining yarn. Make a slip-stitch row on the inside or work a separate red tube slightly smaller and insert it; continue 1 sc in each st (48)
Round 20 :
Change back to cream and work 1 sc in each st (48)
Round 21 :
Join edges with one round of slip stitch if you worked lining separately; otherwise continue 1 sc in each st (48)
Round 22 :
Fasten off leaving long tails for sewing. The band should now be a sturdy ring that will sit around the Santa's waist area. Use additional stuffing around head/neck to anchor.
Info :
If you'd like the band to be stiffer, insert a ring of heavy plastic canvas or craft wire in the lower seam before closing. Stitch the casing closed firmly over it.
— Scarf (Make 1) :
Info :
The scarf pictured is striped red and green, worked flat as a long narrow rectangle, then fringed. Work in hdc for a soft dense fabric that folds nicely around the neck.
Round 1 :
Ch 8, hdc in 2nd ch from hook and across (7 hdc)
Round 2-4 :
Ch1, turn, hdc in each st across (7) — repeat for 3 rows in red
Round 5-7 :
Change to green. Ch1, turn, hdc in each st across (7) — 3 rows green
Round 8-10 :
Change to red. Ch1, turn, hdc in each st across (7) — 3 rows red
Round 11 :
Fasten off leaving long tails. Add fringe by attaching 6 strands at each short end (3 red, 3 green) and trimming to even length.
Info :
Wrap scarf around the neck area and stitch ends discreetly beneath the beard. If adding wire for pose, thread thin wire through the scarf center before sewing to allow shaping of ends.
— Spiral Ribbon (Make 2 — Left and Right) :
Info :
Each spiral ribbon is worked as a long flat strip (row-based) with a contrasting inner color worked as a separate lining or worked in the round for a two-color strip. The strip is then wound around a central wire or allowed to curl naturally. The pictured spiral is about 12-13 cm across at the widest loops and approximately 40-50 cm long un-wound. For compactness we will make a 90-row strip (both sides counted as rows) about 44 cm long. You may adjust row count for longer/shorter spiral.
Round 1 (Row 1) :
Using red for inner strip: ch 28, sc in 2nd ch from hook and across (27 sc) — this forms inner red core row 1
Round 2 (Row 2) :
Ch1, turn, 1 sc in each st across (27)
Round 3-10 (Rows 3-10) :
Repeat Row 2 to reach 10 rows of red core (27)
Info :
At this point the red core is the interior of the spiral. For the white outer edge, either work a separate long white strip and sew the two together along long edges, or change colors and work the white border around the red core. The pattern below shows working a white border using a second pass sewn to the red core for crisp edge.
Round 11 :
Fasten off red, start white strip: ch 28, sc in 2nd ch and across (27)
Round 12-20 :
Ch1, turn, 1 sc in each st across for 9 rows to form outer white strip (27)
Round 21 :
Fasten off leaving long tails. Place red and white strips RS together and whipstitch long edges together so white becomes the outer facing color. Alternatively single crochet the two strips together through both loops for a thicker edge.
Info :
To create a spiral with body, leave a long tail at the top to sew to the bead string; run a sturdy cotton string or thin wire up the center before sealing the top and then slide beads down the center later when assembling.
Round 22-40 :
Continue building length by repeating the 20-row set (10 red rows + 10 white rows sewn) until you reach desired length — pictured spirals use approx 40-45 rows of each color pairing (work until your strip measures about 44 cm).
Round 41 :
When length is reached, fasten off and hide ends. For shaping, curl the strip into a spiral so the white edge faces outward. Lightly mist with water/starch and shape around a cylindrical form to set curls, or insert a thin flexible wire along the inner edge to hold shape permanently.
Info :
Embroider green star motifs along the outer white face spaced about every 12-14 rows: using green embroidery yarn, bring needle from interior to outside and work an 8-point star using long straight stitches anchored at center. Space them evenly for attractive repeat.
Round 42 :
Add bead tassel: thread beads and small bauble onto thin wire. Pass wire up through the center of the spiral and secure top with a knot inside the body band. Use small beads (4-6 mm) and larger 12 mm baubles for bottom weight.
Round 43 :
Repeat the process to make the second spiral, but reverse color order for the pictured contrasting look: start with a white core and red outer, or vice versa for mirrored pairing.
Info :
To produce crisp scalloped decorative holes seen at spiral edges, work a picot-like border along the white outer edge before stiffening: *sc 3, ch 2, sl st in last sc* across the outer edge.
— Christmas Tree Topper (Make 1) :
Info :
The miniature tree is crocheted in dark green with layered conical tiers, a small brown trunk, and tiny bead ornaments sewn onto the tiers. The star topper is crocheted separately in yellow and sewn to the very top.
Round 1 :
6 sc in magic ring (6) — tree crown
Round 3 :
(1 sc, inc) x 6 (18)
Round 4 :
1 sc in each st (18)
Info :
Begin tier construction: each tier is worked as a ring of staggered shell rows that create the layered look. We'll make 4 tiers of increasing circumference.
Round 5 (Tier 1) :
*sc in next st, skip 1, 5 dc in next st, sl st in next st* around to form 6 small shells (approx 18 sts total accounted)
Round 6 (Tier 2 start) :
Attach yarn below first tier and work *sc 2, 5 dc shell in next st* repeat around to increase shell count to 8 (approx 24 area)
Round 7 :
Work an additional shell round to enlarge the tier: *sc 3, 5 dc shell in next st* across (approx 32 reference)
Round 8 (Tier 3) :
Repeat shell expansion for 10 shells, forming a broader tier and finishing with single crochet row to stabilize (approx 36-40)
Round 9 (Tier 4) :
Final wide tier: shell placement slightly staggered to mimic tree branches. End with single crochet stabilization row and fasten off leaving tail.
Round 10 (Trunk) :
Use brown yarn: 6 sc in magic ring (6)
Round 12-14 :
1 sc in each st (12) — work 3 rounds to form a short trunk, stuff lightly
Info :
Sew trunk to base of lowest tier. Add tiny beads sewn at shell centers as ornaments — use red and gold seed beads. Position beads symmetrically for balance.
Round 15 (Star) :
Using yellow yarn: ch 6 and join to form ring, (sc, ch2, sc) 5 times into ring to make 5 points; or crochet a small 5-point star by working 5 small triangles and sewing them together. Fasten off and attach to top.
Info :
Insert a thin wire from the top of the tree into the body band to secure when assembling the garland so the tree sits neatly above the spiral.
— Tree Decorations & Final Touches :
Round 1 :
Sew small beads to the tree tiers: place 6-8 beads evenly across tiers starting from the middle tier down to the base. Use a single thread and pass through several times to ensure stability.
Round 2 :
Edge each tier with a tiny white picot or slip-stitch for snowy trim: *ch2, sl st* into edge stitches to form scalloped snow edging.
Info :
Keep decorations small and flat to avoid making the tree off-balance. Test hang before final stitching; shift beads if tree leans to one side.
— Assembly & Bead Tassels :
Info :
Cut a length of strong thin wire or craft string approx 45 cm; this will thread through the top hanger, pass through the head/body ring, down through the spiral, and hold beads and baubles at the bottom. Attach top hanger loop first.
Round 1 :
Thread small round beads onto wire spaced by jewelry crimp beads as pictured. Use three or four decorative beads between each spiral loop to mimic the photo. Secure each bead by small crimp or knot below it to hold position.
Round 2 :
Slip the top of the wire into the top of the head (secure through hat seam) or into a sewn-in interior anchor. Sew the head to the body band with whip stitch using the long tail left from the head. Ensure alignment so the face looks forward and the spiral hangs centered beneath.
Round 3 :
After attaching head to body band, slide spiral strip down the wire so the top of the spiral is just below the band. Use a bead or small knot under the band to hold the spiral position while hanging.
Round 4 :
Sew the scarf to the neck area: tack at two points beneath the beard so scarf appears wrapped. Hide knots and tails beneath the beard for a neat finish.
Round 5 :
At the bottom of the spiral, thread larger glass baubles and secure with sturdy crimps and extra knots. Finish with bead caps and small accent beads to mimic photo tassels.
Info :
When assembling two garlands (Santa and tree), make one spiral with red interior and white exterior, and the other white interior with red exterior for contrast. Mirror bead patterns to make them complementary when hung side by side.
— Final Embroidery & Facial Details :
Round 1 :
Embroider a smiling mouth below the nose using black yarn or embroidery floss. A small curved satin stitch creates the smile pictured. Work gently to keep stitches even.
Round 2 :
Add rosy cheeks with blush using pink yarn felted in by small stitch clusters or apply a small dab of fabric-safe paint. Alternatively embroider small pink circles using yarn.
Info :
Sew beard panels around mouth and chin leaving a small area open so the mouth and nose are visible. Use short, neat stitches and hide tails inside the head for a clean finish.
— Finishing Notes :
Info :
Weave in all ends at least 4-5 cm into fabric. Check that the hanging wire is secure at top and bottom. Lightly steam-block fabric (avoid direct heat on beads) to relax any uneven stitches. If you used wire inside strips, bend gently to perfect spiral shape.
This charming spiral garland set brings instant holiday cheer and makes a delightful handmade decoration for seasons to come. Each carefully crafted topper and spiral combines textured crochet stitches, playful stripes, embroidered snowflakes, and shimmering beads to create a festive display you can hang anywhere. I hope stitching these pieces fills your home with warmth and creative joy — every loop and tassel tells a tiny Christmas story. 🎄🧶✨