🧢 Beautiful ✨ Detailed πŸ’ Adorable

Cute Girl Doll Amigurumi Pattern

Cute Girl Doll Amigurumi Pattern
4.8β˜… Rating
5-7 Hours Time Needed
1.4K Made This
βœ‚οΈ

Intermediate Level

Ideal for those with basic crochet experience, featuring slightly more advanced stitches and techniques to expand your skills.

⏱️

Weekend Treat

Takes 5-7 hours, making it an enjoyable project to finish over a couple of days.

🧸

Cute Companion

An adorable friend to cherish, handcrafted with love to bring comfort and joy for years to come.

About This Cute Girl Doll Amigurumi Pattern

This pattern creates a sweet crochet girl doll complete with curly hair, a removable skirt, and tiny flowers. It uses simple amigurumi shaping and layered hair strands to create a charming look. You will sew together head, body, arms, legs and decorate with small crocheted flowers for personality.

Cute Girl Doll Amigurumi Pattern crochet pattern - detailed view of completed project

The instructions include round-by-round stitch counts and clear assembly steps. Materials list and abbreviations are provided so you can start right away.

Why You'll Love This Cute Girl Doll Amigurumi Pattern

I absolutely love this pattern because it combines classic amigurumi construction with playful hair and floral details that make each doll unique. I enjoy the layered hair technique β€” it gives so much personality and movement to the finished piece. The skirt and tiny flowers are fun, quick accents that make the project feel rewarding. Sewing the pieces together and arranging the hair is where the doll truly comes to life, and that final stage always makes me smile.

Cute Girl Doll Amigurumi Pattern step 1 - construction progress Cute Girl Doll Amigurumi Pattern step 2 - assembly progress Cute Girl Doll Amigurumi Pattern step 3 - details and accessories Cute Girl Doll Amigurumi Pattern step 4 - final assembly and finishing

Switch Things Up

I love customizing this doll by changing yarn colors and accents to create different characters and moods.

Try pastel palettes for a soft, vintage look or bright, contrasting colors for a playful modern doll.

Swap the skirt for shorts or a dress with different stitch patterns to vary the outfit style.

I sometimes replace safety eyes with embroidered eyes for a more child-friendly or stylized finish.

To make a mini keychain version, use thinner yarn and a smaller hook for a compact, portable doll.

Make the hair longer or shorter by adjusting the number of chains in each strand, or use a boucle yarn for textured curls.

I like to add tiny crocheted accessories like hats, bags, or a tiny flower crown to personalize each doll.

Consider adding a small wire inside limbs for posability if you want a doll that can be posed on display.

Embroider different expressions or eyebrows to give each doll a unique personality before final assembly.

Experiment with bead or pearl accents on the skirt and shoes to add an elegant touch and dimension to the finished toy.

Common Mistakes & How to Fix Them

βœ— Placing the safety eyes in the wrong rounds can ruin facial proportions; place the safe eyes between rnd 15-16 and ensure there are 8 sc between them for correct spacing. βœ— Forgetting to stuff as you go can create lumps and misshapen parts; stuff the head, legs and body gradually and keep filling as you go for even shaping. βœ— Not counting stitches after increases or decreases leads to incorrect shaping; count stitches at the end of each round and correct mismatches before progressing to maintain the pattern's shape. βœ— Pulling stitches too tightly when joining parts causes puckering and poor joins; use moderate tension and pin parts before sewing to keep seams neat and symmetrical. βœ— Skipping the recommendation to leave long threads for sewing makes assembly harder later; always leave long threads at 'fo' instructions for easier sewing and finishing.

Cute Girl Doll Amigurumi Pattern

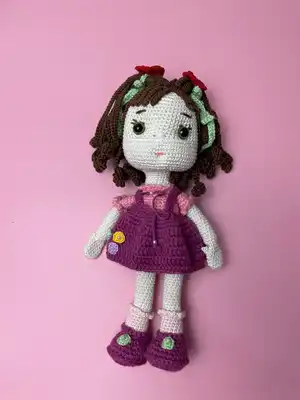
Make a charming handmade crochet girl doll with expressive eyes, curly hair, and a removable skirt. This pattern walks you through each piece step-by-step so you can create a unique keepsake. Perfect for gifting or decorating, the finished doll has lovely embroidered details and floral accents. Follow the clear rounds and assembly instructions to bring this little friend to life.

Intermediate 5-7 Hours

Materials Needed for Cute Girl Doll Amigurumi Pattern

β€” Main Fabric

  • 01
    Yarn - Main Color: Cream (A)
  • 02
    Yarn - Fushcia (B)
  • 03
    Yarn - Pink (C)
  • 04
    Yarn - Light Pink (D)
  • 05
    Yarn - Brown (hair) (D color listed as Brown)
  • 06
    Note: The pattern lists 'Yarn' generically; choose a yarn that works with a 2.5 mm hook and matches the pictured gauge.

β€” Tools Required

  • 01
    Crochet hook size 2.5 mm (or a size that fits your yarn)
  • 02
    Scissors
  • 03
    Stuffing (polyester fiberfill)
  • 04
    Tapestry needle for sewing and weaving ends
  • 05
    Stitch marker
  • 06
    Pins for assembly
  • 07
    Safety eyes (place between rnd 15-16; size as desired)

Progress Tracker

0% Complete

β€” Head :

Rnd 1-8 :

Rnd 1-8 sc in a mr

Rnd 2-8 :

Rnd 2-8 sc inc(16)

Rnd 3 :

Rnd 3-(8 times)1 sc into sc next inc(24)

Rnd 4 :

Rnd 4-(8 times)2 sc into sc next inc(32)

Rnd 5 :

Rnd 5-(8 times)3 sc into sc next inc(40)

Rnd 6 :

Rnd 6-(8 times)4 sc into sc next inc(48)

Rnd 7 :

Rnd 7-(8 times)5 sc into sc next inc(56)

Rnd 8-18 :

Rnd 8-18-(11 ring)sc into sc(56)

Rnd 19-21 :

Rnd 19-21 sc into sc(14 sc inc)21 sc into sc(70)

Rnd 20-24 :

Rnd 20-24 (5 ring) sc into sc (70)

Rnd 25 :

Rnd 25- (8 times) 9 sc into sc next dec (62)

Rnd 26 :

Rnd 26- (8 times) 8 sc into sc next dec (54)

Rnd 27 :

Rnd 27- (8 times) 7 sc into sc next dec (46)

Info :

Place the safe eyes between rnd 15-16. There should be 8 sc between them. Stuff the head tightly.

Info :

Keep filling as you go.

Rnd 28 :

Rnd 28- (8 times) 6 sc into sc next dec (38)

Rnd 29 :

Rnd 29- (8 times) 5 sc into sc next dec (30)

Rnd 30 :

Rnd 30- (8 times) 4 sc into sc next dec (22)

Rnd 31-36 :

Rnd 31-36- (6 ring) sc into sc (22) fo Leave a long thread to sew on.

β€” Legs & Body :

Rnd 1 :

Rnd 1- 6 sc in a mr

Rnd 2 :

Rnd 2- 6 sc inc (12)

Rnd 3 :

Rnd 3- (6 times) 1 sc into sc next inc(18)

Rnd 4 :

Rnd 4-(6 times)2 sc into sc next inc(24)

Rnd 5 :

Rnd 5-sc into sc(24)

Rnd 6 :

Rnd 6-in flo sc into sc(24)

Rnd 7-8 :

Rnd 7-8-(2 ring)sc into sc(24)

Rnd 9 :

Rnd 9-5 sc into sc(8 sc dec)5 sc into sc(16)

Rnd 10 :

Rnd 10-sc into sc(16)

Rnd 11 :

Rnd 11-in flo sc into sc(16)

Rnd 12-17 :

Rnd 12-17-(6 ring)sc into sc(16)

Rnd 18 :

Rnd 18-Socks detail - in blo sc into 3 ch(16)

Rnd 19 :

Rnd 19-in flo 2 sc dec(14) Stuff the legs. keep filling as you go

Rnd 20-33 :

Rnd 20-33-(14 ring)sc into sc(14)

Rnd 34 :

Rnd 34-2 sc inc(16)

Rnd 35 :

Rnd 35-sc into sc(16)

β€” Legs & Body More :

Rnd 36 :

Rnd 36-2 sc inc(18)

Rnd 37 :

Rnd 37-2 sc inc(20)

Rnd 38 :

Rnd 38-Bacakları birleştirin Sc into sc(40)

Rnd 39 :

Rnd 39-sc into sc(40)

Rnd 40-44 :

Rnd 40-44-(5 ring)sc into sc(40)

Rnd 45-47 :

Rnd 45-47-(3 ring)scinto sc(40)

Rnd 48 :

Rnd 48-(4 times)9 sc into sc next dec(36)

Rnd 49-50 :

Rnd 49-50-(2 ring)sc into sc(36)

Rnd 51 :

Rnd 51-(6 times)4 sc into sc next dec(30)

Rnd 52-57 :

Rnd 52-57-(6 ring)sc into sc(30)

Rnd 58 :

Rnd 58-(6 times)3 sc into sc next dec(24)

Info :

Stuff the body tightly. keep filling as you go

Rnd 59-60 :

Rnd 59-60-(2 ring)sc into sc(24)

Info :

Ana color-

Rnd 61 :

Rnd 61-in flo sc into sc(24)

Rnd 62 :

Rnd 62-sc into sc(24)fo.

Info :

collar detail - Rnd 61-in blo sc into 3 ch(24)fo.

β€” Arms :

Rnd 1-6 :

Rnd 1-6 sc in a mr

Rnd 2 :

Rnd 2-6 sc inc(12)

Rnd 3-6 :

Rnd 3-6-(4 ring)sc into sc(12)

Rnd 7 :

Rnd 7-2 ch.turn 2 ch into sc sc into sc(12)

Rnd 8 :

Rnd 8-2 sc dec sc into sc(10)

Rnd 9 :

Rnd 9-2 sc dec sc into sc(8)

Rnd 10 :

Rnd 10-(4 times)1 sc into sc next inc(12))

Rnd 11-22 :

Rnd 11-22-(12 ring)sc into sc(12)

Rnd 23 :

Rnd 23-sc into sc(12)

Rnd 24 :

Rnd 24-in flo sc into sc(12) Fill the sleeves. Keep filling as you go.

Rnd 25 :

Rnd 25-2 sc inc sc into sc(14)

Rnd 26-27 :

Rnd 26-27-(2 ring)sc into sc(14)

Rnd 28 :

Rnd 28-(4 times)2 sc into sc next dec(10)

Rnd 29 :

Rnd 29-Straighten it. sink the needle into both layers. 5 sc fo. Leave a long thread to sew on.

Info :

sleeve detail -Rnd 24-in blo sc into 3 ch.(12)fo.

Info :

clean the tip of the thread.

β€” Skirt :

Rnd 1 :

Rnd 1-40 ch. Combine

Rnd 2 :

Rnd 2-40 ch into sc(40)

Rnd 3 :

Rnd 3-sc into sc(40)

Rnd 4 :

Rnd 4-40 sc inc(80)

Rnd 5 :

Rnd 5-sc into sc(80)

Rnd 6 :

Rnd 6-sc into cr(80 cr)

Rnd 7-9 :

Rnd 7-9-(3 ring)cr into cr(80 cr)

Rnd 10 :

Rnd 10- in blo sc into hdc (80) fo.

Info :

Hangers are two

Rnd (Hanger) :

Rnd 1- 30 ch. 30 ch into sc (29sc) fo. leave some thread for sewing

β€” Flowers :

Make :

MAKE 5

Rnd 1 :

Rnd 1- 8 sc in a mr fo.

Info :

leave some thread for sewing

β€” Hairs :

Rnd 1 :

D COLOR

Rnd 1 :

Rnd 1- 8 sc in a mr

Rnd 2 :

Rnd 2- 8 sc inc (16)

Rnd 3 :

Rnd 3- (8 times) 1 sc into sc next inc (24)

Rnd 4 :

Rnd 4- (8 times) 2 sc into sc next inc (30) First Layer

Rnd 5 :

Rnd 5- (6 hair strand) 10 sc. 10 ch into sc (9 sc) 1 sc into sc.

Rnd 6 :

Rnd 6- (17 hair strand) 40 ch. turn 8 ch inc (16) 32 ch into sc

Info :

Second Layer

Rnd 7 :

Rnd 7-(14 hair strand)45 ch.turn 8 sc inc(16 sc)37 sc into sc fo.

Info :

Third Layer

Rnd 8 :

Rnd 8-(14 hair strand)50 ch turn 8 sc inc (16 sc)42 sc into sc fo.

β€” Joining Parts :

Rnd :

Rnd-56-stitch the sleeves to both sides.

Info :

Sew the head to the body.

Info :

Sew the hair to the head, the strands of the first layer. edit other layers without sewing them. release it.

Info :

Dress and shoe flowers-8 sc in a mr fo. Leave a long thread end to sew. Make 5 of them.

Buckles :

Buckles - make 2 of them. Color: red and green

Rnd 1 :

Rnd 1-12 sc in a mr

Rnd 2 :

Rnd 2-(6 times)1 sc into sc 1 sc into 4 cr.fo.

Rnd 3 :

Rnd 3-95 ch turn 95 ch into sc fo. Plant the flowers on it.

Assembly Instructions

  • Stitch the sleeves to both sides at the shoulder openings as indicated in 'Joining Parts' (Rnd-56), aligning sleeve edges and sewing securely.
  • Sew the head to the body using the long tail left at Rnd 31-36 of the head, matching center front and back for correct orientation.
  • Attach the hair to the head by sewing the strands of the first layer in place; arrange and 'edit' the other layers without fully sewing them to achieve natural movement.
  • Make and sew 5 dress and shoe flowers (8 sc in a mr fo, leave a long thread) onto the skirt and shoes in the pictured positions.
  • Make two buckles in red and green, then thread and attach them to the hanger straps and secure to the skirt.
  • Plant the safety eyes between rounds 15-16 with 8 sc between them, then embroider eyebrows and mouth as desired.

Important Notes

  • πŸ’‘Use stitch markers to mark the beginning of each round to keep track of rounds and maintain stitch counts.
  • πŸ’‘Stuff firmly and evenly as you go β€” especially the head and body β€” to avoid lumps and maintain the intended shape.
  • πŸ’‘Place safety eyes between rounds 15-16 with 8 sc between them before finishing the surrounding rounds and stuffing.
  • πŸ’‘Leave long tails at finishing rounds (fo) for easy sewing and assembly of pieces.
  • πŸ’‘Pin parts in place and check symmetry before sewing to ensure correct positioning.

This sweet crochet girl doll pattern captures playful charm with layered hair and delicate floral details. 🧢 Make it as pictured or personalize colors for a special handmade gift. πŸŽ€ Perfect for crafters who love finishing details and thoughtful stitching. ✨

You ask,

we answer.

FAQs

What size will the finished piece be?

The finished amigurumi measures around 20 cm in circumference and about 10 cm in length using the recommended hook size and yarn.

Can I use different yarn weights for this pattern?

Yes, you can use different yarn weights but it will change the final size; adjust your hook accordingly and expect differences in proportions.

Do I need prior crochet experience for this pattern?

This pattern is rated intermediate; basic amigurumi stitches and experience with increases, decreases, and sewing pieces together are recommended.

How long does this project typically take to complete?

Most crocheters finish this project in about 5-7 hours, although time can vary with experience, customization, and finishing details.

When should I place the safety eyes?

Place the safety eyes between rounds 15-16 with 8 single crochets between them before continuing to ensure correct facial placement.