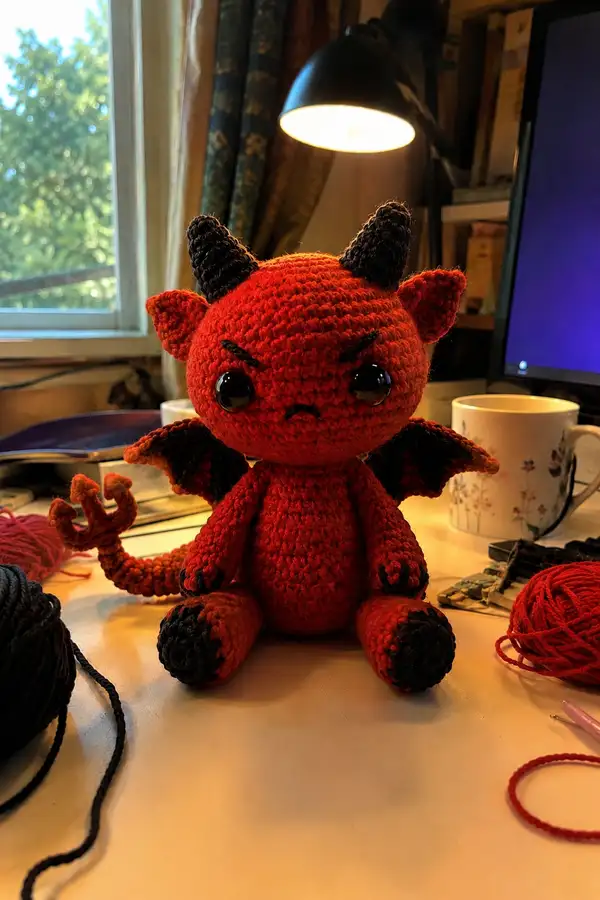
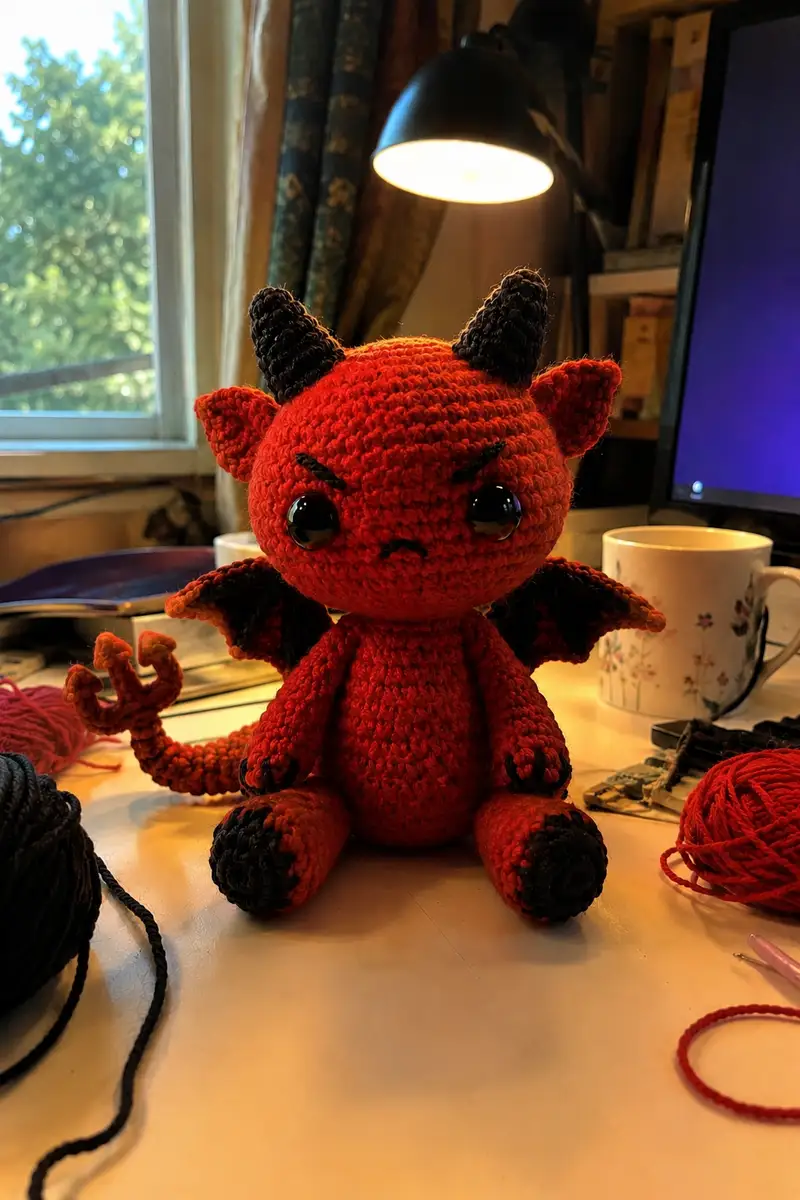
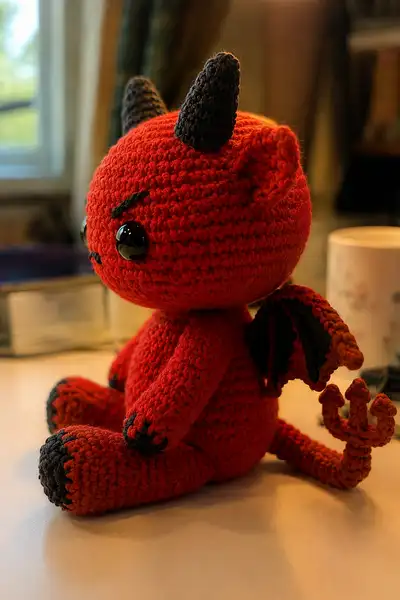
A squeezable, slightly grumpy little red devil-dragon with bat wings, pointy horns, and a curly pitchfork tail. This amigurumi features deep black accents on the horns, claws and wing membranes, large shiny safety eyes, and tiny embroidered brows and mouth for personality. Perfect as a whimsical desk buddy or seasonal gift, the pattern includes full assembly and stuffing guidance to achieve the same chubby, rounded look shown in the photos.
Progress Tracker
0% Complete
— Head :
Round 1 :
6 sc in magic ring (6)
Round 3 :
(1 sc, inc) x 6 (18)
Round 4 :
(2 sc, inc) x 6 (24)
Round 5 :
(3 sc, inc) x 6 (30)
Round 6 :
(4 sc, inc) x 6 (36)
Round 7 :
(5 sc, inc) x 6 (42)
Round 8 :
(6 sc, inc) x 6 (48)
Round 9-11 :
1 sc in each st (48)
Info :
Decide eye placement now. For this design place safety eyes between rounds 13 and 14 laterally about 10-12 stitches apart (center-to-center). Use stitch marker or clip to mark where the eyes will go before proceeding so facial features line up symmetrically.
Round 12 :
(6 sc, inc) x 6 (54)
Round 13 :
1 sc in each st (54)
Round 14 :
1 sc in each st (54)
Info :
Place safety eyes between rounds 13 and 14, approximately 10-12 stitches apart depending on desired cute expression. Lock washers now. Also plan eyebrow placement two rows above eyes for the 'mad' expression using black embroidery yarn.
Round 15 :
(7 sc, dec) x 6 (48)
Round 16 :
1 sc in each st (48)
Round 17 :
(6 sc, dec) x 6 (42)
Round 18 :
1 sc in each st (42)
Info :
Begin light stuffing from this round. Stuff gradually and evenly to keep the face smooth. For a plump look, moderately firm stuffing works best — not rock-hard but no sagging. Avoid overstuffing that stretches stitches.
Round 19 :
(5 sc, dec) x 6 (36)
Round 20 :
1 sc in each st (36)
Round 21 :
(4 sc, dec) x 6 (30)
Round 22 :
(3 sc, dec) x 6 (24)
Info :
Keep adding stuffing as you decrease. Make the cheeks round and firm but leave space at the bottom neck area so the head will sit flat on the body when attached. If you intend to embroider mouth and brows, tack them now using black yarn and a yarn needle before final closing.
Round 23 :
(2 sc, dec) x 6 (18)
Round 24 :
(1 sc, dec) x 6 (12)
Info :
Fasten off leaving a long tail for sewing. Finish stuffing through the neck hole and close using a tapestry needle and the invisible weave method. Set head aside for assembly. Make sure embroidered brows and mouth are secure; use three small satin stitches for brows angled downward to create the angry expression.
— Body :
Round 1 :
6 sc in magic ring (6)
Round 3 :
(1 sc, inc) x 6 (18)
Round 4 :
(2 sc, inc) x 6 (24)
Round 5 :
(3 sc, inc) x 6 (30)
Round 6 :
(4 sc, inc) x 6 (36)
Round 7-9 :
1 sc in each st (36)
Info :
These rounds build the torso base. If you want a slightly taller body, add extra even rounds here. Place stitch markers at the point where the body will join legs and arms so you can align them later (we'll attach legs at the bottom and arms at approx rounds 18-22 of the body).
Round 10 :
(5 sc, inc) x 6 (42)
Round 11-14 :
1 sc in each st (42)
Round 15 :
(6 sc, inc) x 6 (48)
Info :
If you prefer a slightly more pear-shaped body, start decreasing in a later round; for the pictured chubby look keep even rounds until Round 22. Begin stuffing body lightly from Round 16 onward so you can shape as you go.
Round 16-18 :
1 sc in each st (48)
Round 19 :
(6 sc, dec) x 6 (42)
Round 20 :
(5 sc, dec) x 6 (36)
Round 21 :
(4 sc, dec) x 6 (30)
Info :
Begin stuffing the body firmly from the bottom up. Make the bottom slightly flatter by pushing stuffing outward against your fingers to create a stable base for sitting. Stop stuffing a little before the top opening to allow for neck seam bulk without overfilling.
Round 22 :
(3 sc, dec) x 6 (24)
Round 23 :
(2 sc, dec) x 6 (18)
Round 24 :
(1 sc, dec) x 6 (12)
Info :
Fasten off leaving a long tail. Seam neck opening to the head using whip stitch or invisible ladder stitch. Use extra back-and-forth passes around the neck area to ensure a firm, stable attachment so the head sits up nicely. Close body hole and weave in ends.
— Arm (Make 2) :
Round 1 :
6 sc in magic ring (6)
Round 3 :
(1 sc, inc) x 6 (18)
Round 4 :
1 sc in each st (18)
Info :
This small tube will form the hand and lower arm; we will add a black claw tip with a short color change. If you want poseable arms insert thin wire before stuffing, but beware wire ends should be wrapped and secured.
Round 5 :
Change to black yarn: 1 sc in each st (18)
Round 6 :
1 sc in each st (18)
Round 7 :
Change back to red along last stitch: 1 sc in each st (18)
Round 8-12 :
1 sc in each st (18)
Info :
Stuff the hand area firmly to create a round palm. Stuff the arm lightly further up to allow flexibility at the shoulder. Keep an eye on round counts to maintain matching length for both arms.
Round 13 :
(4 sc, dec) x 3 (15)
Round 14 :
1 sc in each st (15)
Round 15 :
(3 sc, dec) x 3 (12)
Round 16 :
1 sc in each st (12)
Round 17 :
(2 sc, dec) x 3 (9)
Round 18 :
Fasten off leaving long tail for sewing. Lightly stuff top of arm and flatten opening to prepare for sewing. Stitch arms to body at body rounds 18-22 on each side approximately 12 stitches down from the neck for a natural sitting position.
— Leg (Make 2) :
Round 1 :
6 sc in magic ring (6)
Round 3 :
(1 sc, inc) x 6 (18)
Round 4 :
(2 sc, inc) x 6 (24)
Round 5 :
(3 sc, inc) x 6 (30)
Round 6 :
1 sc in each st (30)
Round 7 :
Change to black yarn for toe cap: (3 sc, dec) x 6 (24)
Round 8 :
1 sc in each st (24)
Round 9 :
Change back to red: 1 sc in each st (24)
Info :
The black toe cap is worked in the first rounds of the foot. Carry color up inside the leg or weave tail in. Stuff foot area firmly so the doll sits stably. Keep foot rounded and flat on the bottom by stuffing more in the front of the foot area.
Round 10-14 :
1 sc in each st (24)
Round 15 :
(4 sc, dec) x 4 (20)
Round 16 :
1 sc in each st (20)
Round 17 :
(3 sc, dec) x 4 (16)
Round 18 :
1 sc in each st (16)
Round 19 :
(2 sc, dec) x 4 (12)
Round 20 :
1 sc in each st (12)
Round 21 :
(1 sc, dec) x 4 (8)
Round 22 :
Fasten off leaving long tail for sewing. Stuff leg firmly, shaping foot to have a slightly flattened base. Sew legs to bottom of body at rounds 1-3 to create a seated posture. Make sure spacing between legs is wide enough for stable sitting (approx 6-8 stitches between leg join points).
— Ear (Make 2) :
Round 1 :
6 sc in magic ring (6)
Round 3 :
(1 sc, inc) x 6 (18)
Round 4 :
1 sc in each st (18)
Round 5 :
(2 sc, dec) x 4 + 2 sc (14)
Round 6 :
1 sc in each st (14)
Round 7 :
(1 sc, dec) x 4 + 2 sc (10)
Round 8 :
Fasten off leaving tail for sewing. Lightly stuff if desired or leave slightly flat for cupped look. Fold slightly at base and sew to top sides of head approx between head rounds 6-9 and 8-11 depending on orientation. Curve them forward a touch to match photo.
— Horn (Make 2) :
Round 1 :
6 sc in magic ring using black/dark gray (6)
Round 3 :
(1 sc, inc) x 6 (18)
Round 4 :
1 sc in each st (18)
Round 5 :
(2 sc, dec) x 4 + 2 sc (14)
Round 6 :
1 sc in each st (14)
Round 7 :
(1 sc, dec) x 4 + 2 sc (10)
Round 8 :
1 sc in each st (10)
Round 9 :
(3 sc, dec) x 2 + 4 sc (8)
Round 10 :
1 sc in each st (8)
Round 11 :
(1 sc, dec) x 2 (6)
Round 12 :
Fasten off leaving long tail for sewing. Lightly stuff horns if you like them slightly plump, or leave mostly uns stuffed to sit upright after sewing at head top. Position horns symmetrically around head center, slightly back from the brow (approx between head rounds 3-6). Sew on with tight, small stitches.
— Wing (Make 2) :
Round 1 :
Using red yarn ch 8, join to work in back loops to form base (or begin with magic ring and increase to a short oval) — chain-based start: ch8, sc in 2nd ch from hook, sc across (7)
Round 2 :
Turn work and 2 sc in first and last stitches to create a rounded end, sc across (9)
Round 3 :
1 sc in each st, sc around to create a small oval (9)
Round 4 :
Change to black yarn at last stitch: 1 sc in each st (9)
Info :
We will shape the wing by adding scalloped ridges and then working the inner membrane in black. The wing attaches to the back at approx body rounds 12-16. Keep both wings identical by counting stitches carefully.
Round 5 :
Switch back to red: (sc in next 2 sts, inc) around to create a slightly wider wing (12)
Round 6 :
1 sc in each st (12)
Round 7 :
(3 sc, inc) x 3 (15)
Round 8 :
1 sc in each st (15)
Round 9 :
Begin scalloped edge: (sc, hdc, dc, hdc, sc) in next 3 sections spaced evenly along the outer edge to form 3 pointed scallops (work over the outermost loops to create wing points)
Round 10 :
Change to black/dark gray yarn: attach at base and work 1 sc in each st inside the wing opening to create the inner membrane (15)
Round 11 :
1 sc in each st BLO to create a ridge between the membrane and the wing edge (15)
Round 12 :
Work small ribs: ch2, sl st in next 3 sts, ch2, sl st back to base to create 3 small inner ribs evenly spaced across membrane (3 small ribs)
Info :
The membrane is worked in black to create contrast. You can also embroider small ribs if you prefer. When sewing wings on, sew the flat base of the wing to the back of the body between rounds 10-16 and angle slightly downward so they sit like in the photos.
Round 13 :
Change to red: sc around base for a neat edge (15)
Round 14 :
Fasten off leaving long tail for sewing. Slightly stuff the wing base (do not overstuff the membrane) and flatten the inner seam to make sewing easier. Repeat for second wing and ensure mirror-image orientation before attaching.
— Tail (Spiral & Pitchfork Tip) :
Round 1 :
6 sc in magic ring (6)
Round 3 :
(1 sc, inc) x 6 (18)
Round 4 :
1 sc in each st (18)
Round 5 :
(2 sc, inc) x 6 (24)
Info :
This builds the tail base; we will then work in continuous spiral to create the long tubular tail. To create a curly tail, use tighter tension and alternate increases to encourage spiral. Optionally insert thin wire for poseability now by pushing it through the center of the tail tube.
Round 6-12 :
1 sc in each st (24) — work 7 rounds to create a long tube (Rounds 6-12)
Round 13 :
(3 sc, dec) x 6 (18)
Round 14-18 :
1 sc in each st (18)
Round 19 :
(2 sc, dec) x 6 (12)
Round 20-22 :
1 sc in each st (12)
Round 23 :
Change to darker red or brownish-red for pitchfork detail: 1 sc in each st (12)
Round 24 :
Fasten off leaving long tail for sewing to body. Lightly stuff tail so it keeps shape but remains flexible enough to curl. If using wire, wrap tail around wire and adjust spiral to look like the photo. Now crochet pitchfork prongs separately and sew to the tip as described next.
— Pitchfork Tip (Make 1) :
Round 1 :
Using darker red ch 4, join to work and 3 sc in 2nd ch from hook and next (3)
Round 2 :
sc around to shape into small nub (3)
Round 3 :
ch3, sl st into top of nub to create small prong; repeat to make three small prongs evenly spaced—make three tiny loops to form the three prongs of the pitchfork
Round 4 :
Fasten off leaving long tail. Sew this pronged piece securely to the tail tip. Reinforce with extra stitches so the prongs remain upright. Optionally stuff each prong slightly before closing.
— Claw Details (Hands & Feet) :
Info :
Claws are embroidered after sewing limbs in place using black yarn. Use satin stitch or small surface slip stitches to create three small claws on each hand and two or three small claws on each foot as desired. Sew claws to the ends where the black cap meets the red to blend the color transition.
— Finishing Touches & Embroidery :
Info :
Use black yarn and a yarn needle to embroider the tiny downturned mouth and the angry eyebrows. For the eyebrows, two short satin stitches angled down toward center create the mad expression. Mouth: a small curved satin stitch under the eyes gives the pout. Weave in all ends securely. Apply a dab of fabric glue behind safety eye washers if you expect rough handling.
Info :
Use a small amount of blush or fabric-safe pastel to add a subtle cheek tone if desired. Avoid heavy makeup that could rub off on handling. Add any accessory such as a tiny scarf or mini pitchfork prop by crocheting small shapes in the same gauge.
— Complete Stitch Count & Notes Summary :
Info :
Head top circumference peaks at 54 sts then decreases to 6 to close. Body peaks at 48 sts. Legs and arms are tubular with toe/hand caps worked in black. Horns are small cones peaked around 6-12 rounds each. Wings are shallow oval with black membrane and scalloped outer edge. Tail is a long tube 24 rounds overall finished with a small pronged pitchfork worked separately. Keep consistent tension and use stitch markers for round starts to match symmetry between sides.
Info :
If you need to scale the pattern, use bulkier yarn and larger hook to increase final size proportionally, or thinner yarn and a smaller hook to build a smaller version. Adjust safety eye size accordingly. Always crochet tightly for amigurumi to prevent stuffing showing through.
This playful devil-dragon makes a delightful handmade friend — every stitch adds personality, from the little angry brows to the curly pitchfork tail. The pattern walks you through shaping, color changes, and secure assembly so you end up with a sturdy, cuddle-ready figure you can be proud of. Add your own color variations or tiny accessories to make it truly yours. Happy crocheting and enjoy sharing your cute, mischievous creation! 🧶🔥