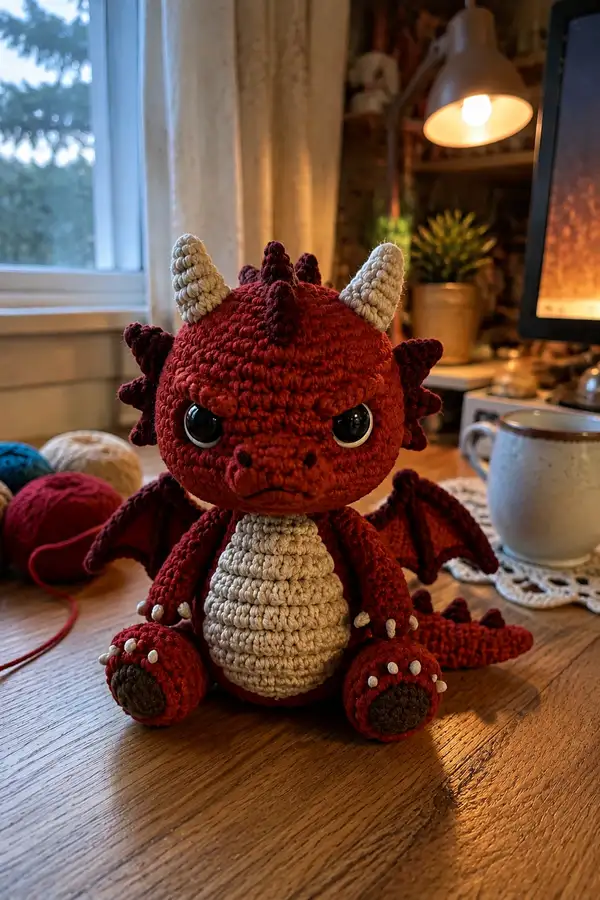
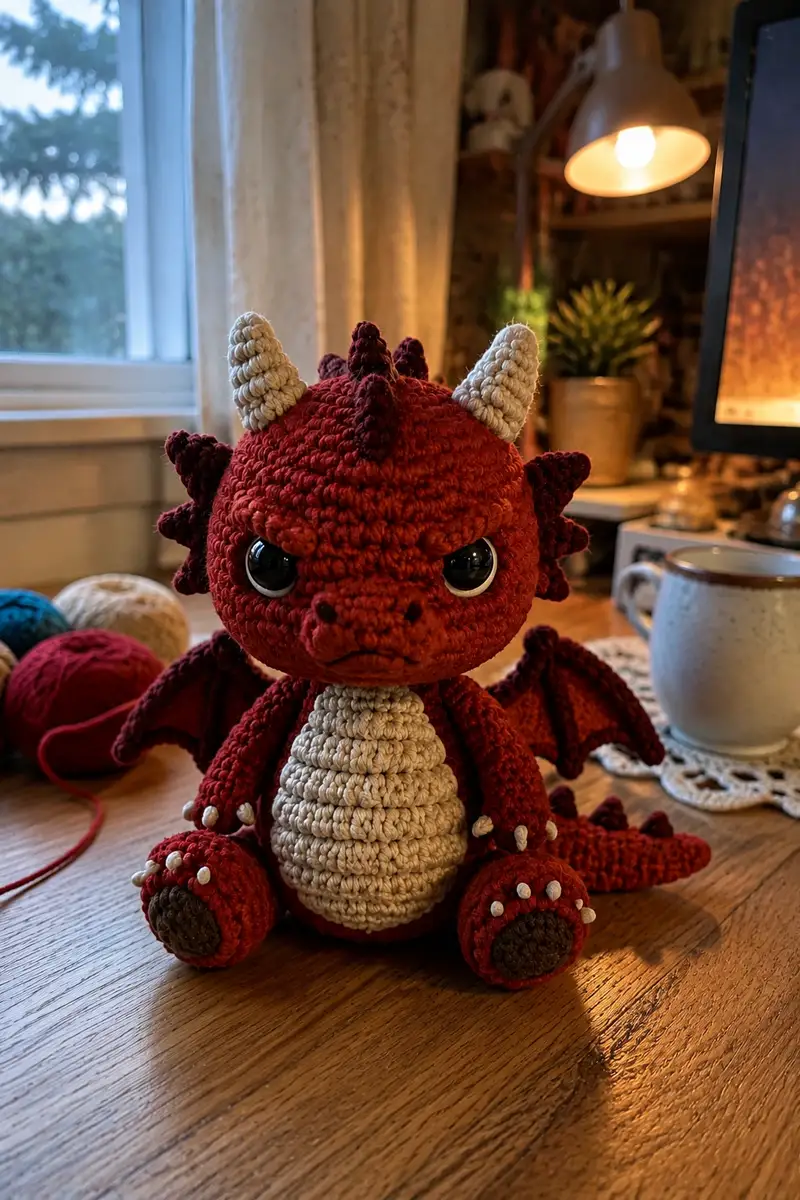
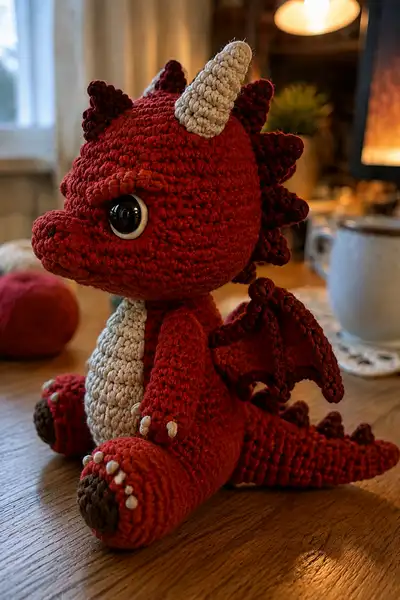
Bring this tiny, adorable 'angry' devil dragon to life with this detailed amigurumi pattern. The plush features deep red body, cream belly and horns, burgundy back spikes, brown paw pads and big glossy eyes. Includes step-by-step construction for head, muzzle, body, limbs, wings, tail, horns and spikes so you can recreate the fierce-yet-cute expression exactly.
Progress Tracker
0% Complete
— Notes :
Info :
Work in continuous rounds unless otherwise specified. Use a stitch marker at the first stitch of each round and move it up as you go. Gauge is not strict for amigurumi but adjust hook so stuffing does not show through. The pattern below breaks the dragon into logical parts: Head, Muzzle, Body, Belly panel, Arms (2), Legs (2), Horns (2), Dorsal Spikes (8), Tail, Wings (2), Paw pads and claws. Sew pieces tightly for stability.
— Head :
Round 1 :
6 sc in magic ring (6)
Round 3 :
(1 sc, 1 inc) x 6 (18)
Round 4 :
(2 sc, 1 inc) x 6 (24)
Round 5 :
(3 sc, 1 inc) x 6 (30)
Round 6 :
(4 sc, 1 inc) x 6 (36)
Round 7 :
(5 sc, 1 inc) x 6 (42)
Round 8 :
(6 sc, 1 inc) x 6 (48)
Round 9 :
(7 sc, 1 inc) x 6 (54)
Info :
Rounds 1–9 create a full spherical head base. Decide which side will be the front and mark with a scrap yarn tail so you can consistently place the muzzle and eyes later. If using safety eyes about 18mm, plan to place them between rounds 12–14 (see eye placement Info below).
Round 10-14 :
1 sc in each st (54)
Info :
Place safety eyes between rounds 13 and 14, approximately 8–10 stitches apart (this gives the big, slightly wide-eyed look). To measure, count 8 stitches horizontally between eye centers at round 13. Insert washers and secure before further stuffing—do not overstuff before eye placement.
Round 15 :
(7 sc, 1 dec) x 6 (48)
Round 16 :
(6 sc, 1 dec) x 6 (42)
Info :
Begin light stuffing after round 15; add more as you work round 16. Keep stuffing firm near the eyes and forehead to keep shape but softer at the lower head to allow muzzle attachment.
Round 17 :
(5 sc, 1 dec) x 6 (36)
Round 18 :
(4 sc, 1 dec) x 6 (30)
Info :
The head now narrows toward the neck. Stop stuffing temporarily to prepare the muzzle; we will attach a separate muzzle piece to create the pronounced snout seen in the photos.
Round 19 :
1 sc in each st (30)
Round 20 :
1 sc in each st (30)
Round 21 :
(3 sc, 1 inc) x 6 (36)
Info :
Create a short neck bulge: rounds 21–22 add a small outward curve to help the head sit on the body naturally. If you prefer a longer neck, add more even rounds here before the next decreases.
Round 22 :
1 sc in each st (36)
Round 23 :
(3 sc, 1 dec) x 6 (30)
Round 24 :
(2 sc, 1 dec) x 6 (24)
Round 25 :
(1 sc, 1 dec) x 6 (18)
Info :
Stuff the head firmly now, especially around the forehead and cheeks. Leave the lower 18-stitch opening to sew to the body or neck tube later — you can either fasten off and leave a tail for sewing, or finish a short neck tube (see Body assembly notes) before attaching the head to the body.
Info :
Option A: Fasten off leaving a long tail and lightly close the remaining hole before sewing to body. Option B: Do not fasten off—slip stitch around and continue forming a short neck tube of 4–6 rounds (sc in each st) to then insert into body opening. I recommend Option B for a secure join if you like a more sculpted neck insertion.
— Muzzle (Make 1) :
Round 1 :
6 sc in magic ring (6)
Round 3 :
(1 sc, 1 inc) x 6 (18)
Round 4 :
(2 sc, 1 inc) x 6 (24)
Round 5 :
1 sc in each st (24)
Round 6 :
(3 sc, 1 dec) x 6 (18)
Info :
The muzzle is a short, wide oval. Add 1–2 rounds of sc in FLO to create a flatter upper lip ridge if desired. Lightly stuff the muzzle, then position on front of head centered between the eyes and about 3–4 rounds below the eye placement. Sew using the long tail, anchoring at top first and then around to shape the snout slightly forward.
Round 7 :
(1 sc, 1 dec) x 6 (12)
Round 8 :
6 dec (6) - Fasten off leaving a long tail for sewing
Info :
Before closing completely, stuff the muzzle with a small amount of fiberfill so it holds a rounded snout. The seam attaching the muzzle is crucial for expression—overlap slightly at the base and pull tight to create a slight upward curve for the 'frowning' mouth impression.
— Body :
Round 1 :
6 sc in magic ring (6)
Round 3 :
(1 sc, 1 inc) x 6 (18)
Round 4 :
(2 sc, 1 inc) x 6 (24)
Round 5 :
(3 sc, 1 inc) x 6 (30)
Round 6 :
(4 sc, 1 inc) x 6 (36)
Info :
Body starts plump and slightly pear-shaped to match the head size. Keep rounds 1–6 tight and even. If you want the dragon to sit well, make the base slightly wider with extra increases or by flattening the last rounds later.
Round 7-10 :
1 sc in each st (36)
Info :
If you are attaching a belly panel (recommended), add it after round 10 to center under the head. The belly is worked in cream yarn and sewn to rounds 6–12 of the body for the pictured look (see Belly panel section).
Round 11 :
(4 sc, 1 dec) x 6 (30)
Round 12 :
1 sc in each st (30)
Round 13 :
(3 sc, 1 dec) x 6 (24)
Round 14 :
1 sc in each st (24)
Info :
Start stuffing the body from the bottom after round 12. For a stable seated dragon, stuff the base quite firmly. Do not overstuff the upper body; leave the top opening slightly underfilled so the head can be sewn in snugly.
Round 15 :
(2 sc, 1 dec) x 6 (18)
Round 16 :
(1 sc, 1 dec) x 6 (12)
Round 17 :
6 dec (6) - do not fasten off (leave tail for head attachment)
Info :
Leave long tail for sewing head into the top opening. If you created a neck tube on the head, insert it into the body opening now and sew through both layers for a secure join. Check sit balance by pinning head in place and adjusting stuffing as necessary.
— Belly Panel (Make 1) :
Info :
Worked in cream/beige yarn in an oval that is sewn onto the front of body rounds 6–14; the belly has visible horizontal ridges created by working in FLO to give the layered segment look.
Round 1 :
6 sc in magic ring (6)
Round 3 :
(1 sc, 1 inc) x 6 (18)
Round 4-9 :
1 sc in each st FLO (18) - work 6 rounds to create stacking ribs (18)
Info :
Sew the belly panel to the body centered between rounds 6 and 14. Use the ridged FLO rows to create the layered tummy look; anchor the top and bottom securely and then tack the sides at intervals so the piece stays slightly rounded.
— Arms (Make 2) :
Round 1 :
6 sc in magic ring (6)
Round 3 :
(1 sc, 1 inc) x 6 (18)
Round 4-6 :
1 sc in each st (18)
Info :
These early rounds shape the hand. Stuff the hand portion firmly so the arm sits and the fingers (claws) remain defined. You can insert a short piece of thin wire for poseability if desired before stuffing fully.
Round 7 :
(2 sc, 1 dec) x 4, 2 sc (14)
Round 8-12 :
1 sc in each st (14)
Round 13 :
(2 sc, 1 dec) x 3, 0 sc (11)
Round 14-16 :
1 sc in each st (11)
Round 17 :
(1 sc, 1 dec) x 3, 2 sc (8)
Round 18 :
1 sc in each st (8) - Fasten off leaving long tail for sewing
Info :
Sew arms to sides of body around rounds 8–11 of the body (approx). Position slightly forward so hands rest on knees when seated. Add cream yarn small slip-stitched claws on the tips by embroidering small vertical slivers or by crocheting tiny 3-sc claws and sewing on.
— Legs (Make 2) :
Round 1 :
6 sc in magic ring (6)
Round 3 :
(1 sc, 1 inc) x 6 (18)
Round 4 :
(2 sc, 1 inc) x 6 (24)
Round 5-7 :
1 sc in each st (24)
Info :
These rounds shape the foot. For a rounded toe, stuff firmly at the bottom and use a darker brown round for paw pad later. Keep the last few rounds of the foot more tightly filled for stable sitting.
Round 8 :
(3 sc, 1 dec) x 6 (18)
Round 9-13 :
1 sc in each st (18)
Round 14 :
(2 sc, 1 dec) x 6 (14)
Round 15-18 :
1 sc in each st (14)
Round 19 :
(1 sc, 1 dec) x 4, 2 sc (10)
Round 20 :
1 sc in each st (10)
Round 21 :
10 sc - Fasten off leaving long tail for sewing (10)
Info :
Sew legs to the bottom of the body spaced evenly — the photo shows legs placed slightly forward so the dragon sits upright. Add a brown paw pad (see Paw pads section) sewn to sole and cream dots for toes using small French knots or tiny sewn-on white/cream balls.
— Paw Pads (Make 2) :
Round 1 :
6 sc in magic ring (6)
Round 3 :
1 sc in each st (12) - Fasten off and sew to bottom of foot
Info :
Use dark brown yarn for pads. Sew the pad centered on the sole and then sew tiny cream claw dots at the front edge of the pad using embroidery or tiny crocheted beads.
— Horns (Make 2) :
Info :
Horns are worked in cream yarn as a spiral cone. They are worked in continuous rounds with occasional increases to form a tapered cone; the ridged spiral look can be amplified by working alternating rounds in BLO for texture.
Round 1 :
6 sc in magic ring (6)
Round 3 :
(2 sc, 1 inc) x 4, 4 sc (16)
Round 4 :
1 sc in each st BLO (16)
Round 5 :
(3 sc, 1 dec) x 3, 7 sc (13)
Round 6 :
1 sc in each st (13)
Round 7 :
(2 sc, 1 dec) x 3, 4 sc (10)
Round 8 :
(1 sc, 1 dec) x 3, 1 sc (7)
Round 9 :
7 dec to close small tip or leave small opening - Fasten off leaving tail for sewing
Info :
Lightly stuff horns and sew them to top sides of the head. The horns sit angled outward slightly in the photos; pin them then stitch through the base into the head for a secure hold. For the spiral ridge, twist yarn lightly as you stuff before closing.
— Dorsal Spikes (Make 8 small cones + 1 medium dorsal ridge) :
Info :
Spikes are made in dark burgundy for strongest contrast. Make multiple small spike cones - sizes vary: small cones (4 rounds) repeated along the head and tail center seam, and a slightly larger medium spike for the top center of the head.
Small Spike Round 1 :
4 sc in magic ring (4)
Small Spike Round 2 :
4 inc (8)
Small Spike Round 3 :
(1 sc, 1 dec) x 2 (6)
Small Spike Round 4 :
6 dec to close (0) - Fasten off leaving tail for sewing
Medium Spike Round 1 :
6 sc in magic ring (6)
Medium Spike Round 2 :
6 inc (12)
Medium Spike Round 3 :
(1 sc, 1 dec) x 4, 4 sc (8)
Medium Spike Round 4 :
8 dec to close - Fasten off leaving tail for sewing
Info :
Sew spikes along the head center seam (3–4 small spikes plus 1 medium at the crown) and down the tail midline. Space evenly and pin before sewing. Use a bit of stuffing in each spike so they keep a strong silhouette.
— Tail :
Round 1 :
6 sc in magic ring (6)
Round 3 :
(1 sc, 1 inc) x 6 (18)
Round 4-6 :
1 sc in each st (18)
Round 7 :
(2 sc, 1 dec) x 6 (14)
Round 8-10 :
1 sc in each st (14)
Round 11 :
(1 sc, 1 dec) x 4, 2 sc (10)
Round 12-16 :
1 sc in each st (10)
Round 17 :
(1 sc, 1 dec) x 3, 1 sc (7)
Round 18-22 :
1 sc in each st (7) - Fasten off leaving long tail for sewing
Info :
Sew spikes along the top of the tail from the base to the tip, alternating small and medium spikes. The tail in the photo tapers and lies behind the dragon when sitting; stuff moderately and shape slightly flat on the underside by compressing the stuffing a little when sewing to body so it sits naturally.
— Wings (Make 2) :
Info :
Wings are worked flat in rounds that act as rows to form a scalloped membrane and a thicker top ridge. Work in main red for membrane and add burgundy edging as pictured. Use BLO on the first ridge round for a raised top edge.
Round 1 :
Ch 12, sc in 2nd ch from hook and across (11), 3 sc in last ch, rotate and work along opposite side of chain sc across (11), sl st to first sc to join (25)
Round 2 :
Ch 1, 1 sc in each st around (25) - join (25)
Round 3 :
Ch 1, (2 sc in next st, 1 sc in next 3) repeat across curve to form scallops and slightly increase at wing tip (approx 30)
Round 4 :
Ch 1, 1 sc in each st BLO to create ridge (30)
Round 5 :
Change to burgundy yarn - 1 sc in each st around for neat edging and little scallop details (30)
Round 6-8 :
1 sc in each st (30) - Fasten off leaving tail for sewing
Info :
Sew wings to upper back between rounds 7–12 on the body, with the top ridge aligning to the dorsal spikes. Slightly cup the membrane when sewing so wings hold a natural curved silhouette. Add tacking points at three places to keep shape.
— Embellishments and Claws :
Info :
Use cream yarn to make tiny claws: either embroider small knots or crochet 3-sc claws: ch 3, sl st into first ch, fasten off leaving tail and sew to finger/foot tips. For the nose and small eyebrows or frown lines, use a strand of dark brown yarn and stitch small details under the eyes and across the upper muzzle to emphasize the grumpy expression.
Round 1 :
Ch 3, 3 sc in 2nd ch from hook, sl st to join - Fasten off (3) - make 10 for toes and finger tips
Info :
Sew claws grouped in threes on each toe and single ones on finger tips. Place claws symmetrically. The pictured dragon has three cream toe claws on each foot and three matching tiny cream claws on each hand.
— Finishing and Assembly :
Info :
Weave in all loose ends before final assembly. Use pins to position each piece before sewing. Sew the belly panel first, then attach legs, then arms, then wings, then tail, and finally sew the head in place to the top body opening. Add small tacking stitches on wings and spikes to secure shape.
Info :
Optional: apply a tiny dab of fabric glue behind safety eye washers if the toy is for a display piece rather than a child. Embroider nostrils and mouth lines with brown yarn for expression. Use blush or pastel lightly on cheeks if desired.
This adorable amigurumi combines classic crochet shaping with tiny sculpted details like spiral horns and layered belly ribs to create a character full of personality. Each piece comes together to form a fierce-yet-cuddly dragon perfect for gifting or display. I hope you enjoy stitching every textured ridge and spike — it's a satisfying project that yields a charming plush companion. 🐉🧶