๐Ÿงถ Beautiful โœจ Detailed ๐Ÿ’ Adorable

Dragonfruiteratops Amigurumi Pattern

Dragonfruiteratops Amigurumi Pattern
4.2โ˜… Rating
5-7 Hours Time Needed
3.4K Made This
โœ‚๏ธ

Intermediate Level

Ideal for those with basic crochet experience, featuring slightly more advanced stitches and techniques to expand your skills.

โฑ๏ธ

Weekend Treat

Takes 5-7 hours, making it an enjoyable project to finish over a couple of days.

๐ŸŽ

Tiny Treasure

Small, sweet, and gift-worthy creations that fit perfectly in the palm of your hand with detailed charm.

About This Dragonfruiteratops Amigurumi Pattern

This pattern creates a tiny, colourful Dragonfruiteratops amigurumi complete with a ruff, horns and decorative spots. You will make legs, a body, head, tail, ruff, horns and small spots then assemble them with long tails and simple stitching. The design uses Stylecraft Special DK yarn and finishes at about 9cm tall when made to the suggested gauge.

Dragonfruiteratops Amigurumi Pattern crochet pattern - detailed view of completed project

Step-by-step rounds and row instructions are included for every piece, plus photo references for assembly. Suitable for crocheters comfortable with basic shaping and joining techniques.

Why You'll Love This Dragonfruiteratops Amigurumi Pattern

I absolutely love this pattern because it pairs bright, playful colours with simple shaping to create a toy full of personality. I enjoy how the ruff and tiny spots add texture and charm without complicated stitches. The pattern is compact but satisfying โ€” you can finish a complete toy in a weekend. Sewing the pieces together and adding embroidered seeds always feels like the moment the character comes to life, which is hugely rewarding.

Dragonfruiteratops Amigurumi Pattern step 1 - construction progress Dragonfruiteratops Amigurumi Pattern step 2 - assembly progress Dragonfruiteratops Amigurumi Pattern step 3 - details and accessories Dragonfruiteratops Amigurumi Pattern step 4 - final assembly and finishing

Switch Things Up

I love experimenting with colours; I often swap the Bright Pink for a pastel or ombre yarn to create a softer version of this Dragonfruiteratops.

I sometimes make a mini keychain version by using a finer yarn and a smaller hook to create a pocket-sized charm.

I recommend trying different eyes โ€” safety eyes, embroidered eyes or French knots โ€” to change the expression and personality.

Want a chunkier creature? Use a DK or aran yarn with a larger hook for a squishier, bigger result.

I like adding wire to the limbs for slight posability if I want the legs to hold a pose on a shelf.

Try embroidering tiny freckles or additional seed patterns on the white belly using contrasting floss for extra detail.

Change the horn shapes by making longer crochet cones or flattened felt horns attached with whipstitch for variation.

Make a family set by varying yarn colours โ€” one in classic pink, one in yellow and one in mint green โ€” they look adorable together.

I sometimes add tiny crocheted accessories like scarves or bows to personalise each Dragonfruiteratops for gifting.

If you prefer a plush toy, line the ruff with a thin layer of batting and stitch it on more densely for a fuller frill effect.

Common Mistakes & How to Fix Them

โœ— Skipping stitch markers when joining the legs to the body can misplace attachments; place markers to align leg stitches with the body round and check counts before stitching. โœ— Not stuffing each leg firmly as you go results in floppy limbs; stuff each leg firmly before joining and add more stuffing gradually while shaping the body. โœ— Changing colour without securing the yarn can create loose tails and gaps; change colour by pulling through the new colour in the final stitch and tie or weave ends securely after a few stitches. โœ— Forgetting to place safety eyes at the recommended rounds will change the face proportions; insert safety eyes between rounds 6-7 of the head before fully stuffing to match the pattern photos. โœ— Rushing decreases at the end of the body may leave holes; use the invisible decrease method described in the techniques and tighten carefully while closing to avoid gaps. โœ— Not weaving in the long tails through the ruff and head can lead to loose seams; use the long starting tails for secure sewing and weave in ends as you finish each piece.

Dragonfruiteratops Amigurumi Pattern

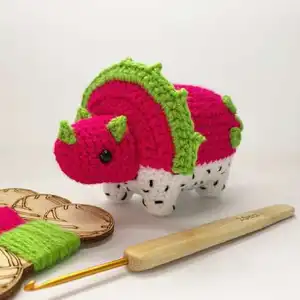
Make this adorable Dragonfruiteratops amigurumi โ€” a playful mashup of a dragon and a dragonfruit. You will enjoy the bright colourwork, cute ruff and tiny spots that give this toy so much character. Perfect as a handmade gift or a cheerful desk companion, the pattern walks you through every piece step-by-step. Follow the clear photo references and notes to assemble a polished little creature you can be proud of.

Intermediate 5-7 Hours

Materials Needed for Dragonfruiteratops Amigurumi Pattern

โ€” Main Fabric

  • 01
    Stylecraft Special DK - Bright Pink
  • 02
    Stylecraft Special DK - Grass Green
  • 03
    Stylecraft Special DK - White

โ€” Tools Required

  • 01
    2.5 mm Crochet Hook
  • 02
    Two 6mm safety eyes
  • 03
    Stitch markers
  • 04
    Black embroidery floss
  • 05
    Yarn needle
  • 06
    Fibrefill

Progress Tracker

0% Complete

โ€” Techniques :

Info :

How to close amigurumi invisibly 1. Insert needle in the FLO of each stitch around 2. Pull tight to close 3. Insert needle through centre exiting a few rounds down 4. Weave in the end and admire your work!

Info :

How to change yarn colour 1. Insert hook in final st before the colour change, yarn over and pull through as normal, yarn over in new colour 2. Pull through the new colour to complete stitch 3. Continue in new colour 4. Once a few stitches have been made and new yarn is secure you can tie the ends together.

Info :

How to decrease invisibly 1. Insert hook into FLO of first stitch 2. Insert hook into FLO of next stitch 3. Yarn over and pull through two loops 4. Yarn over and pull through two loops again. Invisible decrease complete!

โ€” Legs :

Rnd 1 :

6sc in MR (6)

Rnd 2 :

inc each st around (12)

Rnd 3 :

in BLO sc each st around (12)

Rnd 4 :

sc each st around (12)

Info :

Cut yarn and weave in ends

โ€” Body :

Rnd 1 :

ch9, sc in second ch from hook, 6sc, 3sc in next st, working down the other side of the ch, 6sc, inc (18)

Rnd 2 :

inc, 6sc, 3inc, 6sc, 2inc (24)

Rnd 3 :

sc, inc, 6sc, *sc, inc* rep 3 times, 6sc, *sc, inc* rep 2 times (30)

Info :

In the next round we will join the legs to the body.

Rnd 4 :

With the body still on your hook Insert hook through any st in leg 1 and through the next st of rnd 3 complete sc, complete a further 2sc in this way, 6sc, 3sc through leg 2 and rnd 3, 3sc, 3sc through leg 3 and rnd 3, 6sc, 3sc through leg 4 and rnd 3, 3sc (30)

Info :

All four legs should now be attached to the body

Rnd 5 :

9sc around the remaining sts of leg 1, 6sc, 9sc round leg 2, 3sc, 9sc round leg 3, 6sc, 9sc round leg 4, 3sc (54)

Rnd 6 :

*8sc, inc* rep 6 times (60)

Rnd 7 :

*8sc, dec* rep 6 times (54)

Rnd 8-10 :

sc each st around (54) (3 rnds)

Info :

Change to Bright Pink

Rnds 11-17 :

sc each st around (54) (7 rnds)

Rnd 18 :

*7sc, dec* rep 6 times (48)

Rnd 19 :

*6sc, dec* rep 6 times (42)

Rnd 20 :

*5sc, dec* rep 6 times (36)

Info :

Start to add stuffing, ensuring each leg is stuffed firmly. Continue stuffing as we go.

Rnd 21 :

*4sc, dec* rep 6 times (30)

Rnd 22 :

*3sc, dec* rep 6 times (24)

Rnd 23 :

*2sc, dec* rep 6 times (18)

Rnd 24 :

*1sc, dec* rep 6 times (12)

Rnd 25 :

dec 6 times (6)

Info :

Cut yarn leaving a long tail. Close invisibly and weave in any ends.
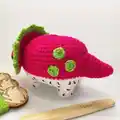
โ€” Head :

Rnd 1 :

6sc in MR (6)

Rnd 2 :

inc each st around (12)

Rnd 3 :

*3sc in next st, sc, 3sc in next st, 3sc* rep 2 times (20)

Rnds 4 - 6 :

sc each st around (20) (3 Rnds)

Rnd 7 :

*4sc, inc* rep 4 times (24)

Rnds 8 - 10 :

sc each st around (24) (3 rnds)

Info :

Finish the final rnd with a slst to join. Cut yarn leaving a long tail. Insert safety eyes either side of the head between rnds 6 - 7 and add stuffing.

โ€” Tail :

Rnd 1 :

6sc in MR (6)

Rnd 2 :

*sc, inc* rep 3 times (9)

Rnd 3 :

sc each st around (9)

Rnd 4 :

*2sc, inc* rep 3 times (12)

Rnd 5 :

sc each st around (12)

Rnd 6 :

5sc, 2inc, 5sc (14)

Rnd 7 :

sc each st around (14)

Rnd 8 :

6sc, 2inc, 6sc (16)

Rnd 9 :

sc each st around (16)

Info :

Finish the final rnd with a slst to join. Cut yarn leaving a long tail and add stuffing. Head and tail shown in (photo 6)

โ€” Ruff :

Row 1 :

Ch 19, sc in 2nd ch from hook, 17sc, ch1 turn (18)

Row 2 :

sc, *inc, 2sc* rep 5 times, inc, sc, ch1 turn (24)

Row 3 :

sc each st in the row, ch1 turn (24)

Row 4 :

sc, *inc, 3sc* rep 5 times, inc, 2sc (30)

Info :

Fasten off and cut yarn. Using Grass Green, turn work and join yarn to last sc worked in row 4

Row 5 :

sc each st in row, ch1 turn (30)

Row 6 :

3sc, *picot, 4sc* rep 6 times, picot, 3sc (30sc, 7 picots)

Info :

Cut yarn and weave in all ends except for the beginning long tail.

โ€” Horns :

Row 1 :

ch3, sc in 2nd ch from hook, hdc

Info :

Cut yarn leaving a long tail.

โ€” Spots :

Rnd 1 :

6sc in MR close with a slst (6)

Info :

Cut yarn leaving a long tail.

โ€” Assembly :

Info :

We will use the long tails to attach everything to the body. Please use the photos below as well as those on page 1 for reference.

Info :

Using the black embroidery floss, stitch seeds on the white section of the body

Info :

Attach the head to the front of the body over rnds 9 - 15

Info :

Attach the tail to the back over rnds 11 - 16

Info :

Stitch the ruff around the head at the point where the head meets the body. This should start and end at round 11 on either side of the head.

Info :

Sew one horn at the front of the head between rnds 3-4, the other two should be sewn between rnds 7 - 8 roughly three sts apart

Info :

Finally sew three spots onto the body either side of the tail

Assembly Instructions

  • Using the black embroidery floss, stitch seeds on the white section of the body as shown in the photos to create the dragonfruit seed detail.
  • Attach the head to the front of the body over rounds 9-15, using the long tail left from the head and whipstitch to secure it firmly.
  • Attach the tail to the back of the body over rounds 11-16, aligning the tail centre and sewing with the long tail left from the tail piece.
  • Stitch the ruff around the head at the point where the head meets the body, starting and ending at round 11 on either side of the head for symmetry.
  • Sew one horn at the front of the head between rounds 3-4; sew the other two horns between rounds 7-8 spaced roughly three stitches apart.
  • Sew three spots onto the body on either side of the tail using the long tails from each spot and secure ends neatly inside the body.

Important Notes

  • ๐Ÿ’กInsert safety eyes between rounds 6-7 of the head before stuffing to achieve the correct facial placement.
  • ๐Ÿ’กStuff legs firmly before joining to the body and continue stuffing the body gradually to maintain an even shape.
  • ๐Ÿ’กUse the long tail ends to sew pieces in place for a neater finish and weave in ends once you are satisfied with the placement.
  • ๐Ÿ’กWork the invisible decreases in the FLO as described in the techniques section to avoid visible gaps when closing.

This Dragonfruiteratops is a bright and playful little friend you can finish in a weekend. ๐Ÿงถ It mixes simple amigurumi shaping with colourful details for a joyful project. Perfect for gifting or keeping on your desk to brighten the day. ๐ŸŽ

You ask,

we answer.

FAQs

What size will the finished piece be?

If made using the suggested yarn and 2.5mm hook, the finished product is approximately 9cm tall.

Can I use different yarn weights for this pattern?

Yes, you can use different yarn weights, but the final size will change; choose an appropriate hook for your yarn and expect a larger or smaller toy.

Do I need prior crochet experience for this pattern?

This pattern is rated intermediate and assumes you are comfortable with basic amigurumi techniques such as magic ring, increases, decreases and joining pieces.

How long does this project typically take to complete?

Most crocheters complete this project in 5-7 hours, though time may vary depending on experience level and how much assembly is required.