🧢 Beautiful ✨ Detailed πŸ’ Adorable

Drooping Leave Amigurumi Pattern

Drooping Leave Amigurumi Pattern
4.2β˜… Rating
5-7 Hours Time Needed
1.1K Made This
βœ‚οΈ

Intermediate Level

Ideal for those with basic crochet experience, featuring slightly more advanced stitches and techniques to expand your skills.

⏱️

Weekend Treat

Takes 5-7 hours, making it an enjoyable project to finish over a couple of days.

🧸

Cute Companion

An adorable friend to cherish, handcrafted with love to bring comfort and joy for years to come.

About This Drooping Leave Amigurumi Pattern

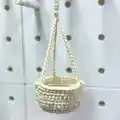
This pattern teaches you how to crochet a small hanging Monstera-style plant with drooping leaves, a soil insert, and a little pot. It includes step-by-step rounds for the pot and soil, plus clear leaf instructions and assembly guidance. The pattern uses common crochet stitches and is photo-illustrated for clarity, making it fun to follow and assemble.

Drooping Leave Amigurumi Pattern crochet pattern - detailed view of completed project

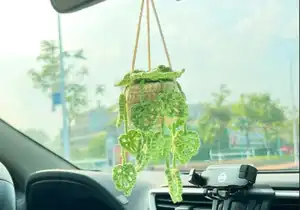
You will crochet the pot, a stuffed soil ball, many small leaves, and attach hanging ropes for a finished decorative planter. The pattern is great for gifting or adding a handmade green touch to any space.

Why You'll Love This Drooping Leave Amigurumi Pattern

I absolutely love this pattern because it transforms simple stitches into a lush, cascading plant that looks more complex than it is. I enjoy the relaxing repetition of the leaves and the satisfaction of seeing the planter come together during assembly. The mix of tiny motifs and a three-dimensional soil insert makes this project satisfying and varied. I love gifting these because they brighten small spaces and last forever without maintenance.

Drooping Leave Amigurumi Pattern step 1 - construction progress Drooping Leave Amigurumi Pattern step 2 - assembly progress Drooping Leave Amigurumi Pattern step 3 - details and accessories Drooping Leave Amigurumi Pattern step 4 - final assembly and finishing

Switch Things Up

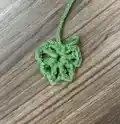
I love customizing this pattern by changing yarn colors to create different leaf looks; try darker greens or variegated yarn for a unique effect.

I often make the leaves larger by using a thicker yarn and a bigger hook to create a chunkier, more dramatic hanging plant.

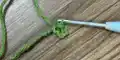
I sometimes add tiny embroidered veins on the leaves for more realistic detail and visual interest.

I like to experiment with the number of leaves and their spacing; making more leaves creates a fuller, bushier cascade.

I have tried adding thin wire inside a few leaf stems so the leaves can be posed and shaped as desired for display.

I also make the pot in contrasting colors or with stripes to match my home decor and create a personalized look.

I recommend testing different chain lengths for the hanging ropes so you can tailor how low the planter hangs in your space.

I occasionally attach small crocheted flowers or beads among the leaves for a whimsical touch that brightens the piece.

I advise trying different stuffing amounts in the soil insert to adjust firmness and fit inside different pot sizes.

I often create a mini set in different sizes as a gift ensemble; mixing small and large planters looks lovely grouped together.

Common Mistakes & How to Fix Them

βœ— Skipping the slip stitch at the end of rows can change your stitch counts and shape; always slip stitch in the first stitch when instructed. βœ— Not counting your increases or decreases will quickly throw off round totals; count after each round to ensure you have the correct stitch number. βœ— Overstuffing the soil insert makes it too firm to fit in the pot properly; stuff gradually and test the fit as you go. βœ— Pulling chains for the hanging ropes too tight will distort the pot rim; keep a relaxed, even tension when making chains and tying ropes.

Drooping Leave Amigurumi Pattern

Make a charming hanging Monstera-style drooping leaf planter to decorate your home or car. This pattern guides you through crocheting the pot, soil insert, and many delicate leaves so you can assemble a lush, cascading plant. Clear step-by-step instructions and photos help you bring this miniature hanging planter to life. Perfect as a thoughtful handmade gift or a cute personal accent.

Intermediate 5-7 Hours

Materials Needed for Drooping Leave Amigurumi Pattern

β€” Main Fabric

  • 01
    Super fine yarn, approximately 1.8 oz (50 g) per skein (used for leaves and details)
  • 02
    Color A: Green - for leaves (small amounts, multiple leaves)
  • 03
    Color B: Beige - for pot exterior
  • 04
    Color C: Brown - for soil insert (one 50 g skein is sufficient for soil)
  • 05
    Assorted small amounts of contrasting colors if you want accent details

β€” Tools Required

  • 01
    Crochet hook size 2.5-3.0 mm
  • 02
    Stitch marker
  • 03
    Sewing needle
  • 04
    Scissors
  • 05
    Cotton filling (polyester stuffing)
  • 06
    Yarn needle for sewing pieces together
  • 07
    Pins for assembly (optional)

Progress Tracker

0% Complete

β€” Pots :

Info :

Note : for newbie. Slip stitch in the first stitch in every time a row ends and begin a chain in every time a new row starts example : single crochet begin 1 chain 1, double crochet begin chain 2

Round 1 :

MR, chain 1, 8SC (8 sts)

Round 2 :

chain 1, 8SC inc (16 sts)

Round 3 :

chain 1, (1SC, 1 inc) 8 time (24 sts)

Round 4 :

chain 1, (2SC, 1inc) 8 time (32 sts)

Round 5 :

(3 SC, 1 inc) 8 time (40 sts)

Round 6 :

(BLO) 40 SC (40 sts)

Round 7 :

40 DC(40 sts)

Round 8 :

40 SC(40 sts)

Round 9 :

40 DC(40 sts)

Round 10 :

40 SC (40 sts)

Round 11 :

40 SC (40 sts)

Info :

For the hanging pot, continue crocheting chain 30 (make 3) and tie it to the rim of the pot plant. The distance of each hanging rope is 12-13 sts

β€” The Soil :

Round 1 :

Row 1 : mr 8SC (8sts)

Round 2 :

Row 2 : 8 SC inc ( 16sts)

Round 3 :

Row 3 : (1 SC + 1 inc ) 8 tomes ( 24sts)

Round 4 :

Row 4 : (2SC + 1inc) 8 times (32sts)

Round 5-8 :

Row 5-8 : SC in each st to end

Round 9 :

Row 9 : (2 SC + 1 dec) 8 times (24sts)

Round 10 :

Row 10 : (1 SC + 1 dec) 8 times (16sts) (stuffing)

Round 11 :

Row 11 : 8 dec (8sts) cut yarn and leave a long tail for sew, close off the hole.

β€” Leaves (1) :

Info :

ROW 1 : Chain 4, slip stitch in the first chain from the hook to make an MR.

Info :

All st crochet of row 1 into the MR β€’ Chain 3, 1DC + 3 Chain, 1HDC + 3 Chain, 1DC + 3 Chain

Info :

β€’ 1DC + 3 Chain, 1HDC + 3 Chain, 1DC + 3 Chain

β€” Leaves (2) :

Info :

ROW 2 : Now we have total 7 spaces

Info :

β€’ 1st - 3rd space : 3SC, 1 slip st

Info :

β€’ 4th space : 1SC, 1picot, 1SC, 1 slip st

Info :

β€’ 5-7th space : 3SC, 1 slip st

Info :

When you're done with the leaf, chain 10 and again slip st in the 4th chain from the hook to make an MR, and begin making the next leaf.

β€” Assembly :

Info :

Time to attach them onto the stem

Info :

Now we have toal of this

Info :

Sew every drooping leaves into the soil

Info :

Put the soil inside the pot.

Assembly Instructions

  • Sew every drooping leaf into the soil insert, spacing them for an even drape and securing the leaf tails inside the soil with a yarn needle.
  • Place the stuffed soil ball inside the pot opening and adjust until it sits snugly, tucking and arranging leaves to create a natural cascade.
  • Make three hanging chains by crocheting chain 30 for each rope, tie each chain to the pot rim, and space each rope about 12-13 stitches apart.
  • Weave in all yarn ends and secure any loose leaves with extra stitches so the assembly is stable for hanging.
  • Pin leaf clusters in place before final sewing to ensure an even and attractive spread of foliage around the pot.

Important Notes

  • πŸ’‘Slip stitch in the first stitch of a new row as noted to keep row edges neat and even.
  • πŸ’‘Stuff the soil insert gradually and check the fit inside the pot before closing the final rounds.
  • πŸ’‘Use stitch markers to mark the start of each round when working in continuous rounds for accurate stitch counts.
  • πŸ’‘Leave long tails when cutting yarn for pieces that need sewing; this makes assembly easier.

This drooping leaf hanging plant is a delightful little project that brings handmade charm to any nook or car mirror. It combines small motif work with a satisfying assembly that results in a lush, cascading planter. Enjoy gifting or keeping this permanent bit of greenery in your favorite spot! 🧢🌿✨

You ask,

we answer.

FAQs

What size will the finished piece be?

The finished hanging planter will measure roughly 10-15 cm tall for the pot plus hanging ropes, depending on your yarn and tension.

Can I use different yarn weights for this pattern?

Yes, you can use different yarn weights but this will change the finished size; adjust your hook accordingly and expect larger or smaller leaves and pot.

Do I need prior crochet experience for this pattern?

This pattern is rated intermediate, so basic knowledge of single crochet, double crochet, chains, and working in rounds is recommended.

How long does this project typically take to complete?

Most crocheters complete this project in 5-7 hours, though time may vary based on experience and how many leaves you choose to make.