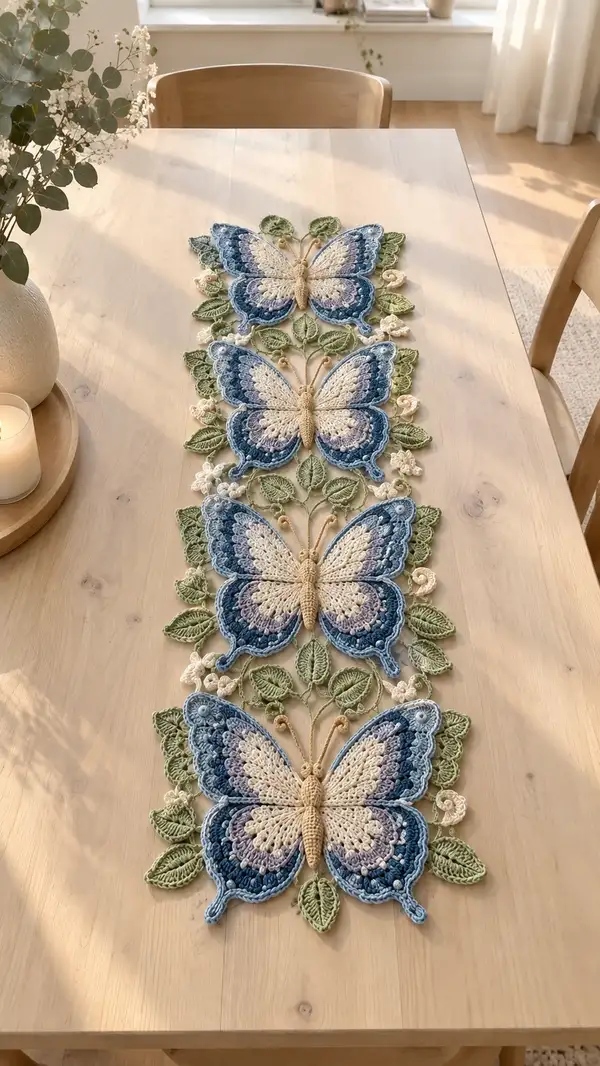
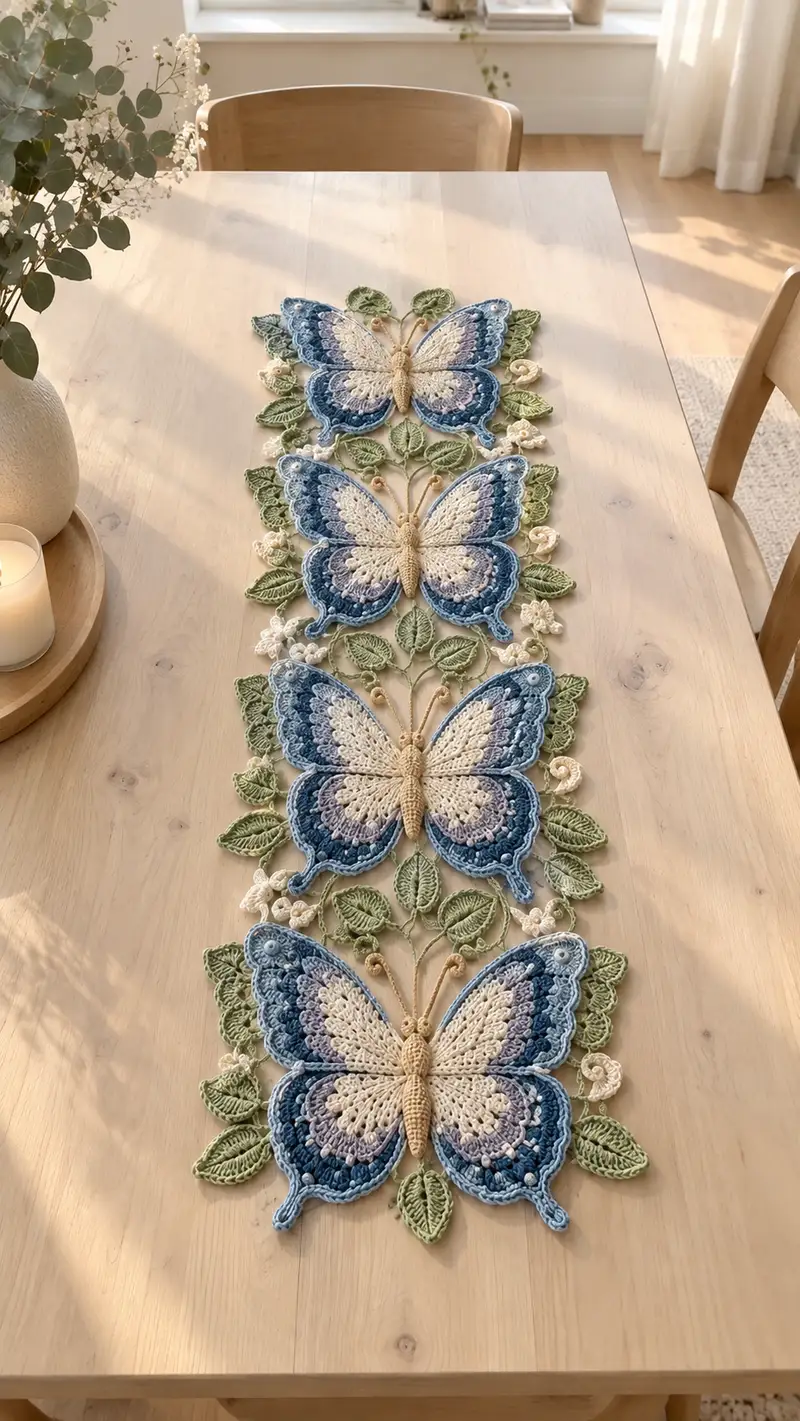
Create a stunning table runner made from four lacy butterflies joined by leafy vines and tiny floral accents. This runner features soft blue-to-cream gradient wings, a warm beige body, and delicate green leaves with cream flower clusters. The design is airy and romantic—perfect as a dining centerpiece or seasonal decorative accent. Clear round-by-round instructions guide you through each motif and join-as-you-go step.
Progress Tracker
0% Complete
— Pattern Overview and Notes :
Info :
This runner is built from modular motifs: one butterfly unit (consisting of an upper wing pair, lower wing pair, a crocheted body and antennae), leaves and small flowers. Make 4 identical butterfly units and join them vertically with connecting vines and leaves. Work motifs flat in rounds or rows. Use the 3.5mm hook for most work; use 3.0mm for crisp leaf edges. Block each motif before final assembly. All motifs are worked right-side up unless noted.
Info :
Color abbreviations used in rounds: C1 = cream/ivory, C2 = light blue/dove, C3 = medium sky blue, C4 = deep denim blue, C5 = beige/tan (body), C6 = sage green (leaves), C7 = pale cream (small buds). Carry colors neatly when working adjacent rounds if making gradient stripes.
— Butterfly Upper Wing (Left Half) :
Round 1 :
6 sc in magic ring (6) - start with C1 (cream)
Round 3 :
(1 sc, inc) x 6 (18)
Round 4 :
(2 sc, inc) x 6 (24)
Round 5 :
(3 sc, inc) x 6 (30)
Info :
These first five rounds create a small oval base for the wing's center. Keep tension even and do not over-tighten ring. Join with sl st to first sc if needed.
Round 6 :
1 sc in each st (30). Turn work to begin shaping outward on one side by placing marker at the point you intend to expand the scalloped edge (approx. stitch 1 of round)
Round 7 :
*1 sc in next 4 sts, 3 dc shell in next st* repeat 6 times across (30) - shells create initial lacy arches
Round 8 :
1 sc in each st between shells (30)
Round 9 :
Change to C2 (light blue). *1 sc in next 3 sts, (2 dc, ch1, 2 dc) shell in next st, 1 sc in next st* rep 6 times (30)
Info :
Change color by finishing the last sc of round 8 with C2. Carry C1 loosely across wrong side or weave in later. Shells will be staggered to build a scalloped wing edge.
Round 10 :
1 sc in each st (30)
Round 11 :
Change to C3 (medium blue). *1 sc in next 2 sts, (3 dc, ch1, 3 dc) shell in next st, 1 sc in next 2 sts* rep 6 times (30)
Round 12 :
1 sc in each st (30)
Round 13 :
Change to C4 (deep blue). *1 sc in next st, (4 dc, ch1, 4 dc) large shell in next st, 1 sc in next st* rep 6 times (30)
Round 14 :
1 sc in each st (30)
Round 15 :
Switch back to C2 for inner scallop: *sc around each dc of outer shells: (sc, sc) in each dc of shell clusters, ch2 in ch-spaces* resulting in a textured scallop edge (30, variations depend on shells)
Info :
At this stage the wing has a rounded outer scallop on the top curve. If you want stronger definition, use BLO on round 14 to create a ridge before adding the outer scallop.
Round 16 :
Work a decorative picot-row: *1 sc in next 2 sts, picot (ch3, sl st into top ch) on next ch-space or at tip of shell* rep across outer edge (30 picots)
Round 17 :
Switch to C1 and work 1 sc in each st across body-side of wing only (this begins shaping asymmetry). 20 sts along inner curve (20)
Round 18 :
Along inner curve: (2 sc, inc) x 4, 1 sc in remaining 12 (24)
Round 19 :
1 sc in each st (24)
Round 20 :
(4 sc, inc) x 4, 1 sc in remaining 8 (28)
Round 21 :
1 sc in each st (28)
Round 22 :
Edge finishing: change to C3 and work *sc, hdc, 2 dc, hdc, sc* in designated spots along the bottom curve to form the scalloped lower portion connecting to the lower wing later (28)
Info :
Fasten off leaving a long tail for joining to lower wing and for sewing to the body. Make 2 mirror halves (left and right) for upper wings by reversing shell orientation for the right half when working. Make 8 upper wing halves total (2 halves x 2 upper wings x 4 butterflies).
— Butterfly Lower Wing (Left Half) :
Round 1 :
6 sc in magic ring with C1 (6)
Round 3 :
(1 sc, inc) x 6 (18)
Round 4 :
(2 sc, inc) x 6 (24)
Round 5 :
1 sc in each st (24)
Round 6 :
Change to C2. Work *1 sc, 3 dc shell in next st* across (24)
Round 7 :
1 sc in each st (24)
Round 8 :
Change to C3. *1 sc in next 2 sts, (2 dc, ch1, 2 dc) shell in next st* rep 6 times (24)
Round 9 :
1 sc in each st (24)
Round 10 :
Change to C4. *1 sc in next st, (3 dc, ch1, 3 dc) cluster in next st, 1 sc in next st* rep 6 times (24)
Round 11 :
1 sc in each st (24)
Round 12 :
Work outer curve shaping: in designated outer shells work (sc, picot, sc) to make small rounded toe-tip effect along the bottom edge (24)
Round 13 :
Switch to C2 and add an edging row: 1 sc in each st, adding 3 sc evenly spaced to widen base near join to upper wing (27)
Round 14 :
1 sc in each st (27)
Round 15 :
Work decorative raised picot row using FLO across outer edge: *1 sc, ch3, sl st into base to form raised picot* repeat (27)
Info :
Fasten off leaving long tail for joining. Make 8 lower wing halves total (2 halves per butterfly). Mirror for right-side halves when constructing the right side.
— Wing Join and Outer Edge (Per Butterfly) :
Round 1 :
Arrange left upper and left lower halves adjacent and whipstitch together along the inner seam using tail from halves; make sure shell scallops align. Join through back loops only for a neat seam (join length approx 12-14 stitches)
Round 2 :
Repeat join for right side halves. You now have left and right wings. Place wings face-up and check mirror symmetry.
Round 3 :
With C3, work a continuous outer edging around both wings to unify the silhouette: sc evenly around entire perimeter, increasing slightly at curves to avoid puckering. Your perimeter stitch count will vary; aim for approx 120 sc across both wings (per butterfly) after edging.
Info :
When edging, maintain consistent tension and add 2 sc in corners and 1 sc increases at each shell valley to keep the flat shape. This is the round where gradients read as a continuous border.
— Butterfly Body :
Round 1 :
Using C5 (beige), ch 6, work 1 sc in 2nd ch from hook and across, turn and sc back across to create a row base (5 sc). This forms the first segment of the body.
Round 2 :
Work in continuous rounds around this short tube: inc at both ends to form oval tube: (sc, inc) x 2, 1 sc across back (7)
Round 3 :
1 sc in each st (7)
Round 4 :
(1 sc, inc) x 2, 1 sc across (9)
Round 5 :
1 sc in each st (9)
Round 6 :
(2 sc, inc) x 2, 1 sc across (11)
Round 7 :
1 sc in each st (11)
Round 8 :
Switch to back loops only for a tapered ridge: 1 sc BLO in each st (11)
Round 9 :
(2 sc, inc) x 2, 1 sc across (13)
Round 10 :
1 sc in each st (13)
Round 11 :
(3 sc, inc) x 2, 1 sc across (15)
Round 12 :
1 sc in each st (15)
Round 13 :
Work a sculpted ridge using 1 sc in BLO for 2 rounds to create a slender mid-body (15)
Info :
The body is worked as a short tube with fluctuations in stitch counts to create tapered head and tail segments. Fasten off with long tail for sewing; no stuffing is required as the runner should remain flat, but you may add a tiny bit of stuffing between wings if you want a slight raised thorax.
Round 14 :
Decrease to shape tail: (3 sc, dec) x 2, 1 sc across (13)
Round 15 :
1 sc in each st (13)
Round 16 :
(2 sc, dec) x 2, 1 sc across (11)
Round 17 :
1 sc in each st (11)
Round 18 :
(1 sc, dec) x 2, 1 sc across (9)
Round 19 :
1 sc in each st (9)
Round 20 :
6 dec (3) - close slightly leaving a small opening (3)
Info :
Fasten off leaving long tail to sew the body centrally between the left and right wings. If adding minimal stuffing to create a gentle thorax, insert stuffing now before final seam.
— Antennae (Make 2 per Butterfly) :
Round 1 :
With C5 chain 10, sl st into 3rd chain from hook to create a tiny curled tip, or leave as chain for delicate antennae. (no stitch count)
Round 2 :
Work back along chain with reverse slip stitches to stiffen: sl st in each chain back toward base. Fasten off leaving long tail for sewing (approx 8-10 cm length when sewn).
Info :
To create curled buds at antennae tips (seen in photo), wrap a small dup of C7 pale cream around 2 ch and secure with a sl st, or make a tiny spiral: ch 6, 1 sc into 2nd ch, 2 sc next, 3 sc next, sl st and tighten into a coil. Sew coil to antenna tip.
— Leaf Motif (Make 12 per butterfly area; 48 total) :
Round 1 :
Ch 8, work 1 sc in 2nd ch from hook, 1 hdc, 3 dc, 1 hdc, 1 sc across to form central leaf row (7 sts). Turn and work along opposite side.
Round 2 :
Along opposite side of foundation chain: 1 sc, 1 hdc, 3 dc, 1 hdc, 1 sc (13 total around)
Round 3 :
Change to C6 and work 1 sc in each st around (13)
Round 4 :
Work ribbing: 1 sc in BLO in each st for 2 rounds to form central vein (13)
Round 5 :
Edge shaping: *2 sc in next st, sc in next 3, 2 sc in next st* rep twice to add width to tips and stem (15)
Round 6 :
1 sc in each st (15)
Round 7 :
Work pointed tip: sc2tog at opposite tip to make a tapered point (13)
Round 8 :
Fasten off leaving long tail for sewing. Block leaf flat with a slight curve and press into final shape. Make 48 leaves total for the full runner (12 around each butterfly composition).
Info :
Leaves can be worked in two sizes by starting with ch 6 for small leaves (use same round pattern scaled) to create a varied organic border. Use the smaller size for filler spaces.
— Small Flower Motif (3-Petal) (Make 6 per butterfly cluster) :
Round 1 :
With C1, ch 4, sl st to form ring. Work (ch3, 2 dc, ch2, 3 dc) three times into ring separated by sl st to create three petals (each petal is 3 dc shell with ch2 picot valley)
Round 2 :
Sl st between petals and fasten off leaving tail to sew. For tiny berry clusters, make 3 small popcorns: (5 dc in same st, remove hook and pull last loop through first dc to close) x3 and sew grouped under petals.
Info :
These small flowers are purely decorative and should be pieced among leaves to echo the cream clusters visible in the photo. Use C7 for tiny berries or buds to vary tone.
— Tiny Spiral Bud (Make 4 per butterfly) :
Round 1 :
Ch 12 with C7, 1 sc in 2nd ch and across to end, sl st back into same row to create a thin cord (10 sc). Coil cord into a spiral and secure with a few stitches to hold shape. Fasten off leaving tail for sewing.
Info :
These spirals attach to vine junctions between leaves; they are the tiny cream curls in the photo and create delicate accents. Use small amounts of yarn; make all spirals consistent size for visual rhythm.
— Connecting Vine (Make 3 per runner join area) :
Round 1 :
With C6 create a long chained vine: ch 120 (or length required to span between motifs - measure as you lay pieces out). For a sturdy vine, work 1 sc in 2nd ch from hook and across to make a cord. Fasten off leaving long tails for sewing.
Round 2 :
Optional: Add small leaf sprouts by working small ch4 loops and single petals attached to vine every 10-12 stitches: ch4, sl st back to vine base to form loop, secure.
Info :
Measure and cut vines to precise lengths after blocking motifs. Use pins to lay vines between butterfly units, then sew gently to attach leaves in natural positions.
— Outer Decorative Border and Joining Edging :
Round 1 :
With C3, along the outer perimeter of the assembled butterfly (both wings attached) work 1 sc evenly around, placing 3 sc in sharp corners or tight curves to maintain flatness (approx 120 sc per butterfly after edging)
Round 2 :
Work decorative shell and picot border: *sc in next 3 sts, (2 dc, ch2, 2 dc) shell, picot (ch3 sl st) in next st* repeat around (maintain overall count by spacing shells evenly)
Round 3 :
Switch to C2 and work a final lace row: *1 sc, ch3, skip 2, sl st in next* around to create airy loops linking to leaves during assembly (approx 120 loops)
Info :
This outer decorative border is what makes the butterflies read as one cohesive lace panel. Add beads sparingly to shell centers if you want subtle shine; sew them on before final joining.
— Repeat and Make Units :
Info :
Make 4 butterfly motifs complete (each butterfly comprises: 2 upper wing halves + 2 lower wing halves joined, body, 2 antennae), plus the appropriate number of leaves (approx 12 around each butterfly), 6 small flowers, and 4 spiral buds per butterfly. In total you should have 4 butterflies, ~48 leaves, ~24 small flowers, and 16 spirals for the full runner layout.
— Assembly and Join-as-you-go Instructions :
Round 1 :
Block all motifs to final shape first. Place first butterfly at top of runner layout and pin to blocking surface. Lay a connecting vine ch-cord horizontally beneath where the next butterfly will sit, leaving about 2 cm overlap at joins.
Round 2 :
Attach second butterfly by sewing vine to underside of outer loops created in the outer lace row: thread yarn tail from vine and mattress stitch through both vine and loop edges, pulling gently to bring motifs together but not distorting lace. Repeat for subsequent butterflies.
Round 3 :
Sew leaves into vine junctions by placing leaf stems into the vine stitches and sewing through a few wraps of yarn to hold them flat. Alternate leaf sizes and orientations mimicking photo—leaves should point outward and inward for visual flow.
Round 4 :
Sew small flowers in clusters of 3 between leaves, secure spirals near vine forks, and attach antennae centrally by sewing base firmly to the top of the body between wings. Sew bodies to central wing seam using long body tails.
Info :
When joining, work with motifs face-up and use a fine yarn needle. Use horizontal ladder stitch for flat, invisible seams. Pin everything in place and double-check orientation before final stitching. Aim for consistent spacing between butterfly centers (approx 24-28 cm center-to-center depending on your blocking).
Round 5 :
After main joining, reinforce vine joins by working small sl st anchors in C6 along both sides of the vine at 1.5–2 cm intervals to ensure the runner lies flat and cannot catch on objects.
Round 6 :
Weave in all ends by threading tails through the underside of the runner, catching several motif layers to secure. Trim ends close to the fabric. Final steam block entire runner to flatten sew lines and even out shaping. Allow to dry completely before use.
Info :
Optional: Add a thin felt backing cut to the runner's outline to protect your table surface; tack it on using small whipstitches through outer border only.
— Finishing Touches :
Info :
Sew tiny beads into the center of outer shells if desired (use small glass or pearl beads). Add light surface embroidery lines along leaf veins with matching green for additional texture. For long-term durability, consider a thin fabric stabilizer between motifs and table to prevent slipping.
Info :
Store flat or rolled gently to avoid creasing. Hand wash cold and lay flat to dry; cotton yarns will soften and relax the blocked shape slightly over time (re-block if necessary).
This butterfly table runner will bring a graceful, handcrafted touch to any dining space—each motif layered with tiny details and soft color transitions. With patience and attention to blocking and joins, you'll end up with a piece that reads like fine lace and warms the room. I hope this pattern inspires slow, mindful stitching and becomes a treasured centerpiece in your home. 🧶🌿✨