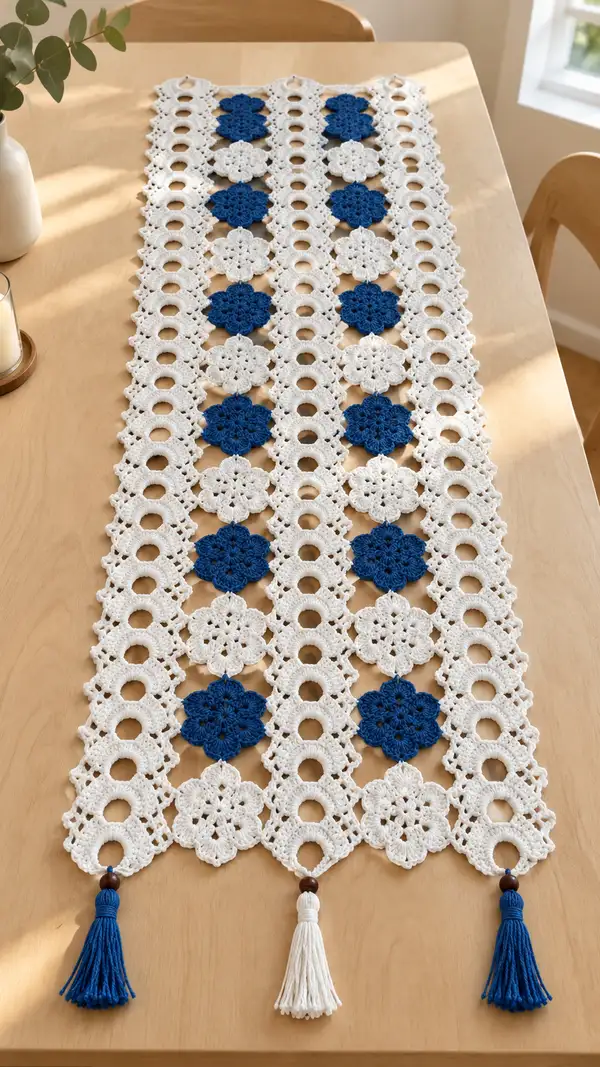
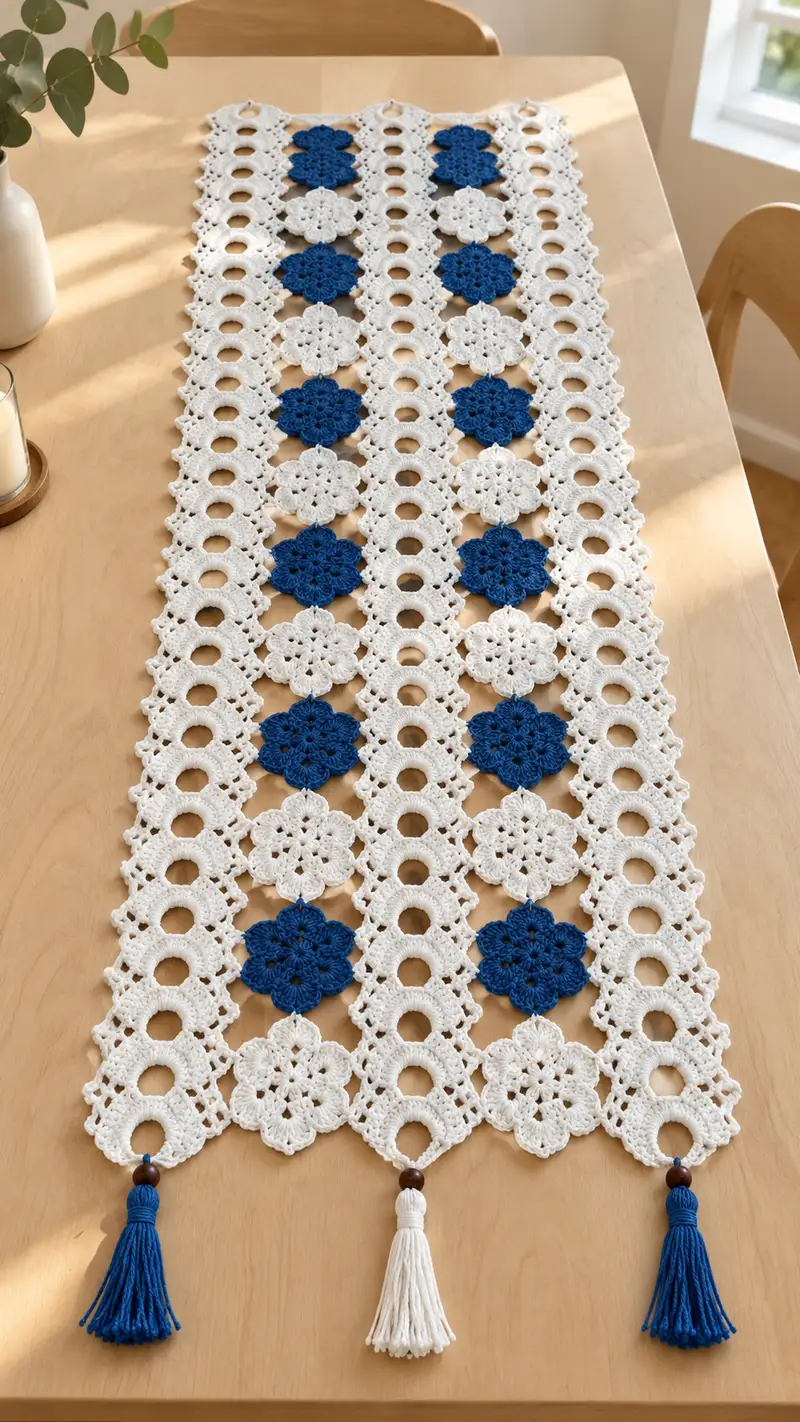
Create a long, airy table runner made from interconnected daisy-style motifs and open ring lace strips. This design features alternating deep blue and crisp white floral medallions with scalloped openwork columns and tassel-finished ends—perfect for modern or coastal tabletops. The pattern uses modular motifs joined as you go for a lightweight, decorative runner with beautiful drape and texture.
Progress Tracker
0% Complete
— Overview :
Info :
This pattern is modular and uses two primary motif types: the Daisy Medallion (solid floral motif) and the Ring Lace Motif (open circular connector). You will make multiple copies of each motif and join them as you go into three vertical strips which are then joined side-by-side. The pattern includes instructions for alternating colors and finishing tassels. Work with consistent tension and block motifs flat before final joining for best results.
— Gauge & Finished Size :
Info :
Gauge: One Daisy Medallion measures approximately 10.5cm (4.1") across after blocking when worked with DK cotton and 3.5mm hook. Finished runner in this layout (10 medallions per column, 3 columns across) measures approximately 36cm (14") wide by 140cm (55") long before tassels. Adjust number of motifs per column to shorten or lengthen runner.
— Daisy Medallion (Make 30 total: 15 white, 15 navy alternating) :
Round 1 :
Start with a magic ring. Ch3 (counts as dc), 11 dc into ring. Sl st to top of ch3 to join. (12)
Round 2 :
Ch1, sc in same st, *ch5, skip next dc, sc in next dc; rep from * around to create 6 ch-5 loops. Sl st to first sc to join. (6 ch-loops)
Info :
Round 2 creates the loop foundations for petals. Keep loops loose but even. You may make loops ch6 if your yarn is tighter; adjust so petals lay flat.
Round 3 :
Work petals in each ch-5 loop: join with sc into loop, ch2 (counts as hdc), 3 dc in same loop, ch2, sl st into same loop to form a puff-like petal. Rep in each of the 6 loops to form 6 petals. Sl st to join. (6 petals)
Round 4 :
Ch1, sc in same st, *ch3, sc in center between petals (in previous round sl st junction); rep from * around creating 6 ch-3 spaces. Sl st to join. (6 ch-spaces)
Info :
This round builds the inner decorative ring; keep stitches small and consistent to define the flower center. Use a stitch marker at the first sc to keep track of the join.
Round 5 :
In each ch-3 space: *(2 dc, ch2, 2 dc, ch1, 2 dc, ch2, 2 dc) — this makes a large scalloped petal cluster; sl st to next sc between petals; rep around. Sl st to join. (6 large scallops)
Round 6 :
Ch1, sc in same st, *ch4, sc in center of each scallop (the ch1 of previous), rep around to make 6 ch-4 loops for the outer round. Sl st to join. (6 ch-4 loops)
Info :
Round 5/6 create the texture of the daisy. If you prefer more open petals, use ch5 loops instead of ch4 in round 6. Keep counts accurate: you should have 6 outer loops.
Round 7 :
In each ch-4 loop: join with sc, ch2, puff stitch (yarn over, insert hook, pull up loop three times, yarn over and draw through all loops) rep puff 3 times in loop separated by ch1 between puffs, ch2, sl st into same loop to complete petal. Rep in each loop to make 6 textured petals. Sl st to join. (6 textured petals)
Round 8 :
Ch1, sc into next 4 sts evenly across the first petal, *ch5, skip next group (across outer petal), sc into next 4 sts; rep around making 6 ch-5 chain arches between petals. Sl st to join. (6 ch-5 arches)
Round 9 :
Work 8 dc into each ch-5 arch separated by sl sts into sc between arches to form a rounded outer ring: in each arch: (ch2, 8 dc, ch2), sl st into next sc. Rep 6 times. Sl st to join. (6 outer rings with 8 dc each)
Info :
Keep stitch counts consistent: each arch should contain the same number of dc to keep the medallion circular. If your outer ring puckers, increase arch counts slightly. Block flat after finishing each medallion.
Round 10 :
Ch1, sc in each dc across all outer ring stitches (approx 48 sc) to even the edge, sl st to join. (48)
Round 11 :
*Ch3 (counts as dc), dc in next 2 sts, ch2, skip 2 sts, sl st in next sc to create pointed scallops around; repeat around to make decorative spaced arches. Sl st to join. (approx 12 arches)
Round 12 :
In each ch2 space: (sc, ch3, 3 dc, ch3, sc) to form small loops between scallops. Sl st to join. (12 small loops)
Info :
Rounds 11–12 add lace detailing that will visually complement the open ring motifs. Ensure that ch counts are even to keep symmetry. Fasten off if changing color; weave in starting tail securely.
Round 13 :
Join contrasting or same color as required. Ch1, sc across each stitch around for a tidy edge (48 sc). Sl st to join. (48)
Round 14 :
Work picot edging for a delicate finish: *sc in next 3 sts, picot (ch3, sl st into 1st ch), sc in next 3 sts; rep around. Sl st to join. (approx 6 picots)
Round 15 :
Ch1, sc evenly around working into picot peaks and base to smooth any sharp points (48 sc). Sl st and fasten off leaving tail for joining. (48)
Info :
Weave in tails at least 6cm into the back of the medallion. Block each medallion flat with gentle steam or wet blocking to an even circle before joining. Make 30 medallions total alternating colors as desired.
— Ring Lace Motif (Make 66 total; these form the open circular columns between medallions) :
Round 1 :
Ch12, sl st into first ch to form a small ring (or make a magic ring and ch12 to start). Ch3 (counts as dc), 23 dc into ring, sl st to top ch3. (24)
Round 2 :
Ch1, sc into same st, *ch6, skip 3 dc, sc into next dc; rep around to create 6 ch-6 arches. Sl st to join. (6 arches)
Info :
These arches will become the decorative open rings that align vertically in the runner. Keep chains consistent; if you prefer larger open circles, use ch8 in place of ch6.
Round 3 :
In each ch-6 arch: join with sc, ch2, (dc, ch1, dc, ch2) twice to form an open shell, sl st to same arch. Rep around creating 6 shells. Sl st to join. (6 shells)
Round 4 :
Ch1, sc evenly across the shell tops and between shells to tidy the round (approx 36 sc). Sl st to join. (approx 36)
Info :
If you will be joining these ring motifs vertically in a column, plan to leave one side of the ring with a dedicated join loop (we provide join points in Round 5–7). Use a removable stitch marker to note the intended join side.
Round 5 :
*Ch4, skip 2 sc, sc in next st to create small arches around the ring; rep around to create a scalloped edge. Sl st to join. (approx 12 ch-4 arches)
Round 6 :
In each ch-4 arch: (sc, ch3, 3 dc, ch3, sc) to create little fans around the ring. Sl st to join. (approx 12 fans)
Round 7 :
Ch1, sc evenly around to smooth the fans (approx 48 sc). Sl st to join and fasten off, leaving tail for joining. (approx 48)
Info :
Make a total of 66 rings — three vertical columns will need 22 rings each to achieve the length in the photo sample. Block rings flat to open the circle fully before joining.
— Small Connector Diamond Motif (Make 60 total — used diagonally between medallions and rings) :
Round 1 :
mr, ch3 (counts dc), 7 dc into ring, sl st to join. (8)
Round 2 :
Ch1, sc in same st, *(ch3, sc in next dc) x4 to form a square of ch-3 spaces; sl st to join. (4 ch-spaces)
Round 3 :
In each ch-3 space: (sc, ch4, sc) to make small corner loops, sl st to join. (4 corner loops)
Round 4 :
Work 3 dc into each corner loop separated by sl sts in base to form a small diamond shell on each side. Sl st to join. (approx 12 dc groups)
Round 5 :
Ch1, sc around across groups to tidy edges, sl st to join. Fasten off leaving tail for joining. (approx 28 sc)
Info :
These small connectors help bridge medallions and open rings to create a delicate lattice. Their compact size lets the negative space show through while stabilizing joins. Make many and block lightly.
— Joining Motifs into Vertical Strips (Three Columns) :
Info :
You will assemble three identical vertical strips: Left column = 22 Ring motifs joined one below another with connector diamonds and medallions set in alternating positions; Center column = alternating medallions and rings (10 medallions + 11 rings); Right column mirrors left. The center column uses medallions centered with rings between them. Each column assembly is done 'join-as-you-go' using sl st joins and whip stitch where needed. Lay out motifs in final order before joining.
Joining Step A :
Join Daisy Medallion to adjacent Ring Lace Motif: place medallion on top of ring motif with right sides facing up. Identify 6 evenly spaced points around medallion edge that align with 6 fan spaces of ring. Using tail from medallion, whip stitch through both layers at each corresponding point with small even stitches; use 6 stitches to hold securely. For additional security, perform an overcast at two more points between petals. Fasten off and weave tail in. (6–8 joining stitches)
Info :
Alternatively use join-as-you-go: on last round of medallion, when working the final sc round, instead of sl st to join, align the medallion over the ring and work sl st through both motif edges every 6–8 stitches, matching shell peaks to fan valleys as you go for a continuous seam.
Joining Step B :
To join Ring-to-Ring vertically: hold two rings with right sides facing up and align their fan points. Using a tail from the upper ring, join with sc through back loop of upper fan and front loop of lower fan across 6 connection points spaced evenly. Work snugly but avoid pulling fabric in. Fasten off and weave tails. (6 joining points)
Joining Step C :
Insert Small Connector Diamond between medallion corners and adjacent ring fans by aligning diamond corner loops with the corresponding ch-spaces on each motif and sl st through both loop and motif, creating a diagonal bracing. Use thin yarn tail or matching thread for less bulk. Repeat for all connector positions.
Info :
Work one full vertical column at a time. Use pins or tapestry needles to hold motifs in place before making permanent joins. Joining as you go reduces weaving and avoids bulky seams. Keep a consistent direction for sl st joins so the stitches face the same way throughout the runner.
— Center Column Specific Layout (10 Daisy Medallions + 11 Rings) :
Info :
Layout from top to bottom: Start with Ring, then Medallion, then Ring, alternating down the column ending with Ring. Place medallions so their petals face the same orientation for a cohesive look. Use navy for medallions in an alternating checkerboard with white medallions if following the pictured design.
Join Sequence :
1) Join top Ring to next Medallion using join-as-you-go or whip stitch (see Joining Step A). 2) Join that Medallion to the next Ring using two connector diamonds diagonally and sl st at four direct points. 3) Continue alternating until center column completed. 4) Block the full column flat with pins to align rings and medallions perfectly before side joining.
Info :
If you prefer invisible joins, use mattress stitch with matching yarn; it is slower but produces a very neat back. If you prefer pronounced seams, use contrasting slip-stitch joins for decorative effect.
— Side Columns Layout & Mirror Joining :
Info :
Left and right columns are mirror images composed of Ring motifs primarily with medallions inserted every other ring, forming a staggered lattice. These side columns are joined to the center column using connector diamonds and occasional slip-stitch joins across adjacent rings so the pattern remains open and airy. Plan spacing carefully so medallion rows align horizontally across the three columns.
Joining Step D :
When joining columns together, align edges and attach by sl st at alternating fan junctions across columns: select every 3rd fan point on the center column and match to corresponding fan on side column, sl st through both pieces. This creates a balanced seam and preserves negative space. Work across entire length, then check alignment and adjust pins as needed before finalizing.
Info :
Leave about 1–2mm of slack in joins to preserve drape. Do not stretch motifs when joining; pins and blocking ensure accurate placement. After full length is joined, steam block the entire runner on flat surface to even out joins.
— Border & Side Edging (worked after columns are joined) :
Round 1 :
With right side facing up and white yarn, join at one corner seam with a standing sc. Work sc evenly around the entire runner edge across all exposed motif edges, placing 2 sc into tight corners and 1 sc per 5–7mm otherwise. Maintain even stitch count to prevent ruffling. (st count varies by runner size)
Round 2 :
Ch3 (counts as dc), *skip next sc, (3 dc, ch2, 3 dc) in next sc to create shell, skip next sc, dc in next sc; rep around to form spaced shell edging. Sl st to join. (shell count varies)
Info :
This shell border adds weight and a finished look to the runner. Keep shells evenly spaced. If the border pulls in, add more dc between shells; if it flares, reduce dc or add more sc between shells.
Round 3 :
Ch1, sc around into shell centers and between shells to smooth the edge (st count approx equal to previous round). Sl st and fasten off, weave in tail. (approx st count varies)
Round 4 :
Optional decorative picot round: *sc 4, picot (ch3 sl st in first ch), sc 4, sl st into next sc; rep around to add tiny points for a delicate finish. Fasten off and weave in ends. (picot count varies)
Info :
For a cleaner modern edge, omit picots and instead work a single round of sc in BLO (back loops only) to create a subtle ridge. Blocking after edging will settle the border into a smooth curve.
— Tassels & Bead Finishing (Make 3 tassels) :
Info :
Tassels add a charming finished detail. Make one tassel for each end point as pictured (three toward one end in the sample). Use matching navy and white yarn to coordinate with medallion colors and add a small wooden bead for spacing. Tassel length is optional; sample length approx 12cm (4.7") excluding bead.
Tassel Step 1 :
Wrap yarn (same as medallion color) around a 4cm wide cardboard 40 times for full tassel. Slide loops off, fold in half, tie tightly near fold with scrap yarn. Attach a small wooden bead above the knot by threading the top loop through bead hole. Secure with glue if needed. Trim ends to even length. (1 tassel)
Tassel Step 2 :
Attach tassel to corner motif by threading the top loop through the small ch space at the bottom of the corner ring, pull through so bead sits snug against motif, then secure knot on back with a few stitches using yarn needle. Trim and neaten. Repeat for remaining tassels with alternating colors.
Info :
If bead holes are small, use a tapestry needle to guide yarn through bead. For extra durability, knot the tassel top and apply a small amount of fabric glue to secure bead and knot from loosening.
— Final Blocking & Finishing :
Info :
Lay the assembled runner flat on blocking mats and pin all edges, motifs, and joins to achieve a straight, even shape. Spray lightly with water and allow to dry overnight. Use pins to even out scallops and ring openings. Once dry, remove pins and inspect for any loose joins or tails to weave. Trim any stray fibers and give a final steam press (avoid direct iron contact with acrylic blends).
Finishing Step :
Weave in all remaining tails securely on the reverse side, use small stitches to hide tails inside motifs. If desired, reinforce high-stress joining points with an extra passing of yarn on the back side. Store flat or rolled—do not hang to prevent stretching.
Info :
For long-term care, hand wash in cool water with mild soap and lay flat to dry to preserve shape and color. Avoid bleach and hot water which can distort cotton yarn and fade dye in colored motifs.
— Variation Ideas & Tips :
Info :
Change any medallion color pattern for seasonal runners: pastel tones for spring, warm neutrals for autumn, or festive hues for holiday tables. To shorten runner length, decrease number of medallions per column or use fewer rings per column. For a wider runner, add extra lateral columns and adjust motifs counts accordingly. Add beads between joins for decorative shimmer or use metallic thread for subtle sparkle in the outer picot rounds.
Info :
Keep a spare set of motifs and connector diamonds at hand so you can replace any damaged section later without unpicking the whole runner. Photograph the layout before final joins to remember the correct order of color placement during assembly.
Bringing this Daisy Lace Table Runner to life is such a rewarding project—each medallion you crochet adds a little bit more personality to the final piece. The open rings and delicate shells create a light, airy texture that brightens any table. Adding tassels gives a handcrafted flourish that makes the runner feel thoughtful and complete. 🧶✨ Enjoy the soothing rhythm of modular crochet, and display your finished runner with pride—it's a beautiful, tactile centerpiece that turns everyday meals into something special. 🌿