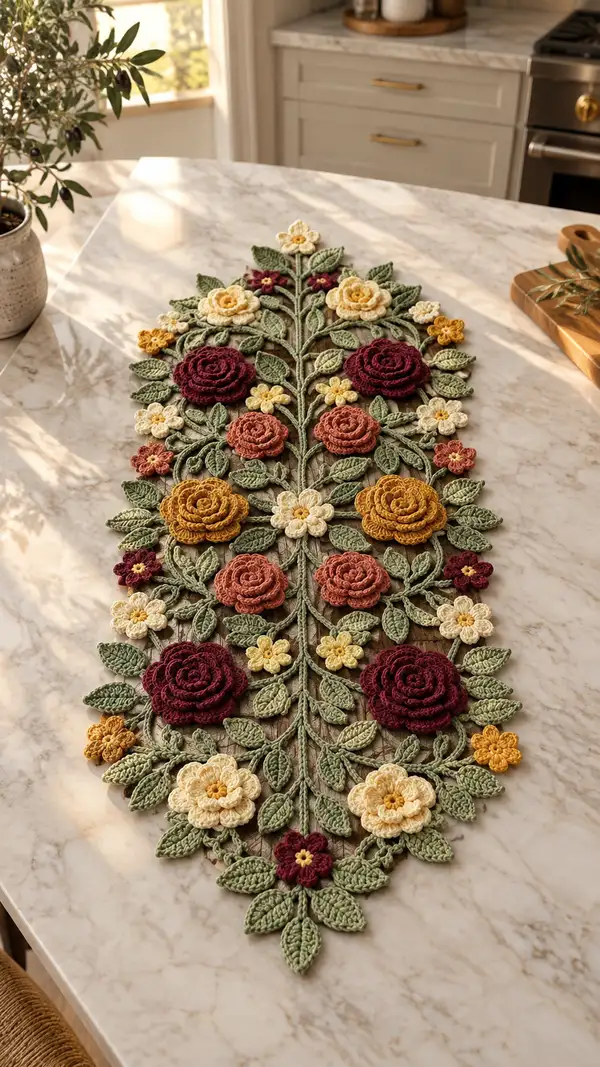
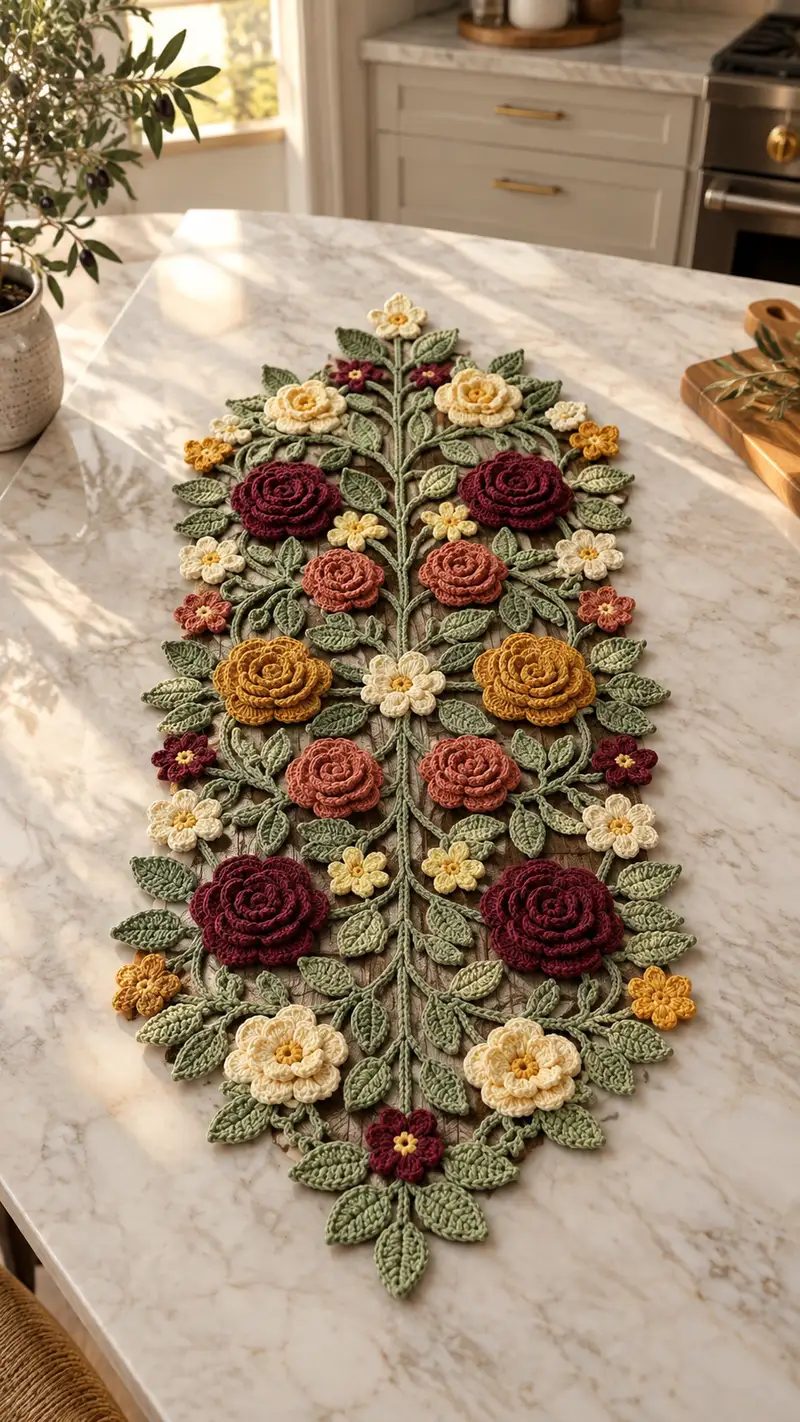
Create a stunning, botanical-inspired table runner embellished with layered roses, petite blooms, and sculpted leaves. This pattern recreates the pictured symmetrical vine runner using stacked 3D roses in burgundy, mustard, terracotta and creamy neutrals with sage-green foliage. The finished runner lays flat with a central braided stem and articulated leaf branches for a delicate, heirloom accent. Detailed construction and assembly instructions guide you through every motif, join and finishing touch.
Progress Tracker
0% Complete
— Notes & Gauge :
Info :
Gauge is not critical for this decorative runner, but work tightly enough to keep petal definition. With worsted yarn and 4.0mm hook, 10 rows of sc = approximately 2.5 cm when worked as cord. Block motifs slightly for best assembly.
Info :
All motifs are worked in joined rounds unless otherwise noted. Use stitch markers liberally when working long chains or spiral rounds. When changing colors, carry the unused yarn behind small motifs if you plan to embroider or tack later; otherwise break yarn and weave ends.
— Central Stem Cord (make 1) :
Round 1 :
Chain 120 (or desired runner half-length chain; work to desired length; chain counts here make a 90-95 cm runner in pictured scale)
Round 2 :
Working into 2nd ch from hook, 1 sc in each ch across (119)
Round 3 :
Ch1, turn, 1 sc in each st back across (119)
Round 4-6 :
1 sc in each st (119) — Work three rounds to create a flat, cord-like band approximately 3 rows thick. These rows will become the central spine for branching leaves.
Info :
If your runner length differs, adjust chain count in Round 1. Maintain symmetrical spacing by marking the center stitch with a stitch marker; you will mirror motifs on both sides of center later.
Round 7 :
Fold cord lengthwise and sl st along narrow edge to form a stable flat cord: starting at one end, sl st through both layers for 119 sl sts (119)
Round 8-15 :
Work: ch1, 1 sc in each sl st around the folded cord (119) — work 8 rounds to build height and allow stitches to anchor leaf stems
Info :
At this stage the stem cord should be firm and slightly raised. Use a contrasting colored scrap stitch marker every 12 sts to help plan leaf spacing (roughly every 8-10 cm depending on runner length).
— Stem Detail: Raised Central Spine (make 1 continuous row along cord) :
Round 16 :
With same color, join with sl st at center stitch (marked). Ch2 (counts as hdc), working along center of cord: 1 hdc in each 3rd stitch of body to form a raised ridge (approx 40 hdc depending on placement) (approx 40)
Info :
Work the raised central spine along full cord length. You will use this spine as anchor points for leaf branches and flower junctions. Adjust frequency of spine stitches so there are clean points to attach branches symmetrically.
Round 17-20 :
1 hdc in each st along spine to add height and definition (around 40) — work 4 rounds then fasten off; secure ends.
Info :
Blocking the stem lightly now helps keep it flat and straight for motif placement. Pin to blocking mat and lightly steam or wet block to shape.
— Basic Leaf (make approximately 38-44 leaves; variety sizes) :
Round 1 :
Ch7, sc in 2nd ch from hook, sc, hdc, dc, hdc, sc, sc across to form a simple leaf base (7 sts across)
Round 2 :
Turn to work along opposite side of foundation ch: sc, sc, hdc, dc, hdc, sc, sl st to first sc at tip (14)
Round 3 :
Sl st into first side st, ch1, 1 sc in same st, (1 sc, inc) x2 along one side to create slight bulge, 1 sc at tip, (1 sc, inc) x2 along opposite side, sl st to join (18)
Round 4 :
BLO: ch1, 1 sc in each st BLO around to create a defined midrib ridge (18)
Round 5 :
FLO: ch1, 1 sc in each st FLO around to add a textured face to the leaf (18)
Round 6 :
Edging: ch1, sc in each st, sl st to join, fasten off leaving long tail for sewing (18)
Info :
For larger leaves, increase starting ch to 9 or 11 and follow rounds accordingly (add additional (1 sc, inc) repeats). Block leaves flat with a slight curve toward the tip by pinning and steaming lightly.
— Sculpted Leaf Variant (make 8-12 for outer edge) :
Round 1 :
Ch9, sc in 2nd ch from hook, sc, hdc, dc, tr, dc, hdc, sc, sc (9)
Round 2 :
Work along opposite side: sc, sc, hdc, dc, tr, dc, hdc, sc, sl st to first sc (18)
Round 3 :
BLO: ch1, 1 sc in each st BLO around (18)
Round 4 :
FLO: ch1, (1 sc, inc) x6 across one side, 1 sc at tip, (1 sc, inc) x6 across opposite side (30)
Round 5 :
Sc edge: ch1, sc in each st around, sl st to join, fasten off leaving tail for sewing (30)
Info :
Use the sculpted variant at the perimeter and the basic leaf on inner branches to mimic the arrangement seen in the image. Place larger leaves under large roses for balance.
— Large Layered Rose (make 6; deep burgundy and mustard) :
Round 1 :
Make a magic ring, 6 sc in MR, pull tight (6)
Round 2 :
Inc in each st around (12)
Round 3 :
(1 sc, inc) x6 (18)
Round 4 :
(2 sc, inc) x6 (24)
Round 5 :
(3 sc, inc) x6 (30)
Info :
Rounds 1-5 create a small disc which becomes the rose center. Keep tension consistent to ensure flat center that supports petal rows.
Round 6 :
Ch4, sl st into next st, *ch4, sl st into next st* repeat around to make 15 ch loops (15 loops)
Round 7 :
Working into each ch-loop: [sc, hdc, 3 dc, hdc, sc] in each loop (makes 15 full petals) — fasten off and weave in ends
Round 8 :
Join at base of petals with sl st, ch5, sl st into base between petals to make second row of larger loops (15 loops)
Round 9 :
In each ch5 loop: sc, hdc, 5 dc, hdc, sc to form larger petals (15 large petals)
Round 10 :
Fasten off leaving long tail. Roll flower center slightly inwards so petals sit layered and use tail to sew the center into a rounded spiral. Secure hidden stitches to keep shape.
Info :
To vary size, use ch5/ch6 loops for larger petals or add an extra row of petal loops (Round 11 below). Use contrasting color for outermost petals if desired.
Round 11 :
Optional extra petal row: Join at back, ch6, sl st into base between petals around (15 loops). In each loop: sc, hdc, 7 dc, hdc, sc. Fasten off and sew in position to add depth (15 large petals)
Info :
Each large rose uses 15 petal repeats to create classic layered rosette; sewing center tightly but not overly pulled keeps petals free and dimensional.
— Medium Rosette (make 4-6; terracotta & mustard) :
Round 1 :
MR, 6 sc in MR (6)
Round 3 :
(1 sc, inc) x6 (18)
Round 4 :
Ch4 around base making loops into every other st for 9 loops (9 loops)
Round 5 :
In each ch4 loop: sc, hdc, 3 dc, hdc, sc to make 9 petals (9)
Round 6 :
Join at back, ch5 into spaces behind petals to create small outer ruffle of 9 loops (9 loops)
Round 7 :
In each ch5 loop: sc, hdc, 5 dc, hdc, sc (9 larger petals)
Info :
Medium rosettes use 9 petals per row to create a tight cluster ideal for filling gaps between larger roses. Sew centers by coiling inner rounds slightly before closing.
— Small Five-Petal Flower (make 18-22; cream and small accents) :
Round 1 :
MR, ch1, 10 sc in MR, pull tight and sl st to first sc (10)
Round 2 :
*Ch4, sl st into next st* repeat around to make 5 loops (5 loops)
Round 3 :
In each loop: (sc, hdc, 3 dc, hdc, sc) to make 5 petals — fasten off leaving tail for sewing (5 petals)
Info :
Make some small flowers with a contrasting tiny center (use 6-8 yellow center stitches) to echo the motif centers in image. These are excellent gap-fillers across leaf branches.
— Tiny Center Bud (make 18-24) :
Round 1 :
MR, 6 sc in MR, pull tight (6)
Round 2 :
1 sc in each st (6) — fasten off leaving tail to sew into center of small flowers or as freestanding tiny buds
Info :
Tiny buds add contrast and a realistic cluster effect. Use mustard or yellow to create the small center pop you see in the cream flowers.
— Joining Motifs: Branches & Attachment Points :
Round 1 :
Plan your layout by pinning the stem on a flat surface and arranging flowers and leaves symmetrically. Mark center of runner and mark positions every 10-12 cm for major roses (6 positions for large roses in pictured length).
Round 2 :
Join-as-you-go method: when adding a leaf or small flower to the stem, place motif on desired spot and use long tail to sew through stem cord and motif base with whipstitch, spacing sewing stitches evenly (approx 6-10 sewing loops per motif depending on motif size).
Round 3 :
For rose placement: position large roses at key anchor points—two near each tapered end and two near the runner center with mirrored counterparts. Use the long tail from each rose and sew through stem and through multiple nearby leaves to anchor securely.
Info :
To get the layered, natural look, overlap leaves under rose edges and tack through center of rose base into the stem and selected leaf bases to hide sewing. Use small backstitches to create invisible joins.
Round 4 :
Attach medium rosettes between the larger roses and alternate small five-petal flowers in clusters of 2-3 around rosette edges. Sew tiny buds into centers of cream flowers with yellow yarn for realism.
Round 5 :
Use a tapestry needle and mattress stitch to join petals of adjacent motifs when edges butt together; for delicate joins use 2-3 tiny stitches per petal to avoid puckering.
Info :
Keep motifs slightly loose at first; you can tighten joins once all pieces are placed. This allows small adjustments for overall symmetry and line flow.
— Decorative Mini-Vine Branch (make 6-8 small connecting branches) :
Round 1 :
Ch18, sl st back along chain to create twisted vine: starting in 2nd ch from hook, sc in next 16 ch, sl st to join (17)
Round 2 :
Along vine edge: ch1, 1 sc in each st, fold and sl st along opposite side to make thin cord (17)
Round 3 :
Ch3 at intervals to create leaf attachment loops: *sl st 4, ch3, sl st 4* repeat to end (creates 3 leaf loops)
Info :
These mini-vines bridge leaves and flowers and are slipped under petals then tacked. Make multiple lengths and trim to fit between main motifs.
— Edge Point Filler Motif (make 4 per tapered end) :
Round 1 :
MR, ch1, 12 sc in MR, pull tight, sl st to join (12)
Round 2 :
*Ch4, sl st into next st* repeat 6 times to make 6 loops (6 loops)
Round 3 :
In each loop: sc, hdc, 3 dc, hdc, sc. Fasten off leaving tail to sew these point fillers to the runner ends so the runner tapers to a graceful point (6 petals)
Info :
These small clusters anchor the runner tips. Use a contrasting small center (e.g., burgundy) to mirror lower center motif for continuity.
— Assembly & Layout Strategy :
Round 1 :
Lay out the blocked stem cord on a large flat surface. Arrange large roses symmetrically: two pairs near each end and two central, leaving spaces for medium rosettes and small flowers between them.
Round 2 :
Pin large leaves under each large rose, with smaller leaves radiating outward. Use the stitch markers placed along the stem to align left and right sides perfectly symmetrical.
Round 3 :
Sew in this order for best control: attach large roses first, secure their bases and sew through stems and several adjacent leaves. Attach medium rosettes next, then small five-petal flowers and buds, finishing with sculpted leaves and mini-vines to fill gaps.
Info :
Take photos as you go or sketch arrangement before permanent sewing. This helps recreate symmetry and easily reverse small joins if you change placement.
— Finishing Edging and Securing Backing :
Round 1 :
Once all motifs are sewn, work a thin edging around the outer perimeter to unify the runner: join sage yarn at one edge point and work single crochet evenly around the outermost motifs, placing 2 sc in outer petal tips for curve, 1 sc in side stitches (estimated 240-300 sc around depending on final layout).
Round 2 :
Round of picots for decorative edge: *sc 3, ch3, sl st in 3rd ch from hook to form picot, sc 3* repeat around to add scalloped detail. Fasten off and weave ends thoroughly.
Info :
For a more stable runner, add a thin fabric or felt backing cut to shape and machine baste invisibly with small stitches around edge or tack down with tiny hand-stitches through the sc edging. If so, use fabric glue sparingly and stitch through backing and crochet edge to secure.
— Blocking & Final Touches :
Round 1 :
Gently wet-block entire finished runner: pin out to final shape on blocking mat, paying special attention to tapered points and symmetric placement. Steam or spritz and allow to dry completely.
Round 2 :
Trim any visible tails; weave in ends on reverse side. If petals still curl, gently tack petals down at a few hidden points to preserve 3D effect while laying flat.
Info :
Final pressing with a pressing cloth or gentle steam will help petals flatten slightly where needed and ensure runner sits flush on table surface without buckling.
— Alternative Color & Size Tips :
Round 1 :
To scale up runner length, extend the stem chain in Round 1 proportionally and add additional pairs of large and medium motifs spaced evenly every 10-12 cm.
Round 2 :
To create a monochrome version, use tonal shades of one color (e.g., all greens or all neutrals) and add metallic thread in the rose centers for a subtle shimmer.
Info :
You can easily adapt the pattern to placemat or table centerpiece by reducing stem chain and using fewer motifs. The modular nature of the motifs makes customization simple.
This floral table runner brings garden elegance inside and turns a simple table into a centerpiece of handcrafted charm. Carefully layered roses, tiny buds and sculpted leaves come together to create a tactile, luxurious decoration that you'll be proud to display. The modular design invites color play and personalization, making each finished runner truly unique. 🧶🌿 Enjoy the process of arranging, sewing, and finishing—it's as delightful as the final result!