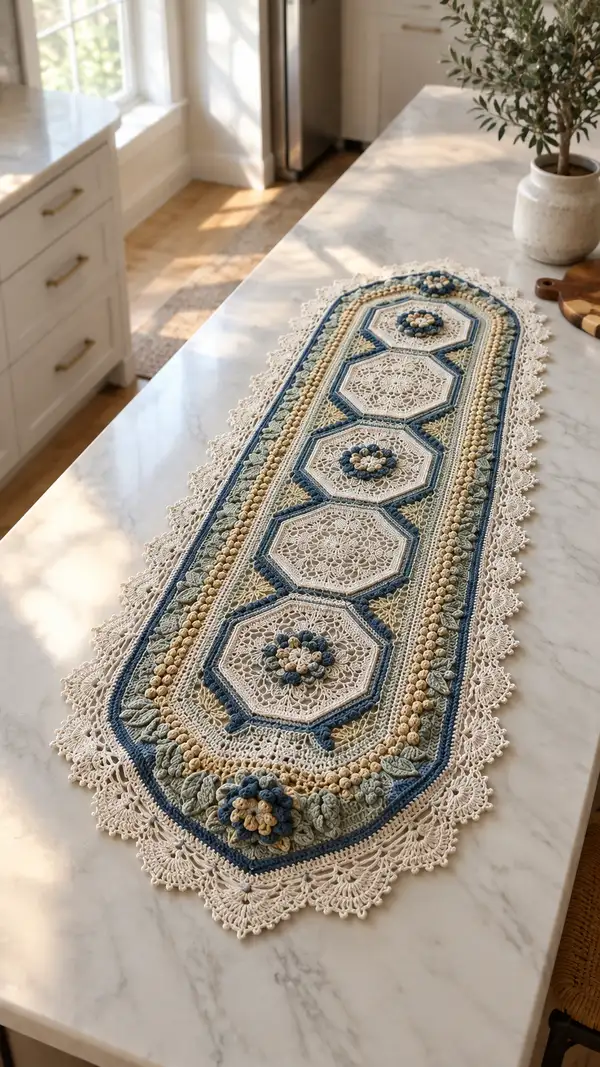
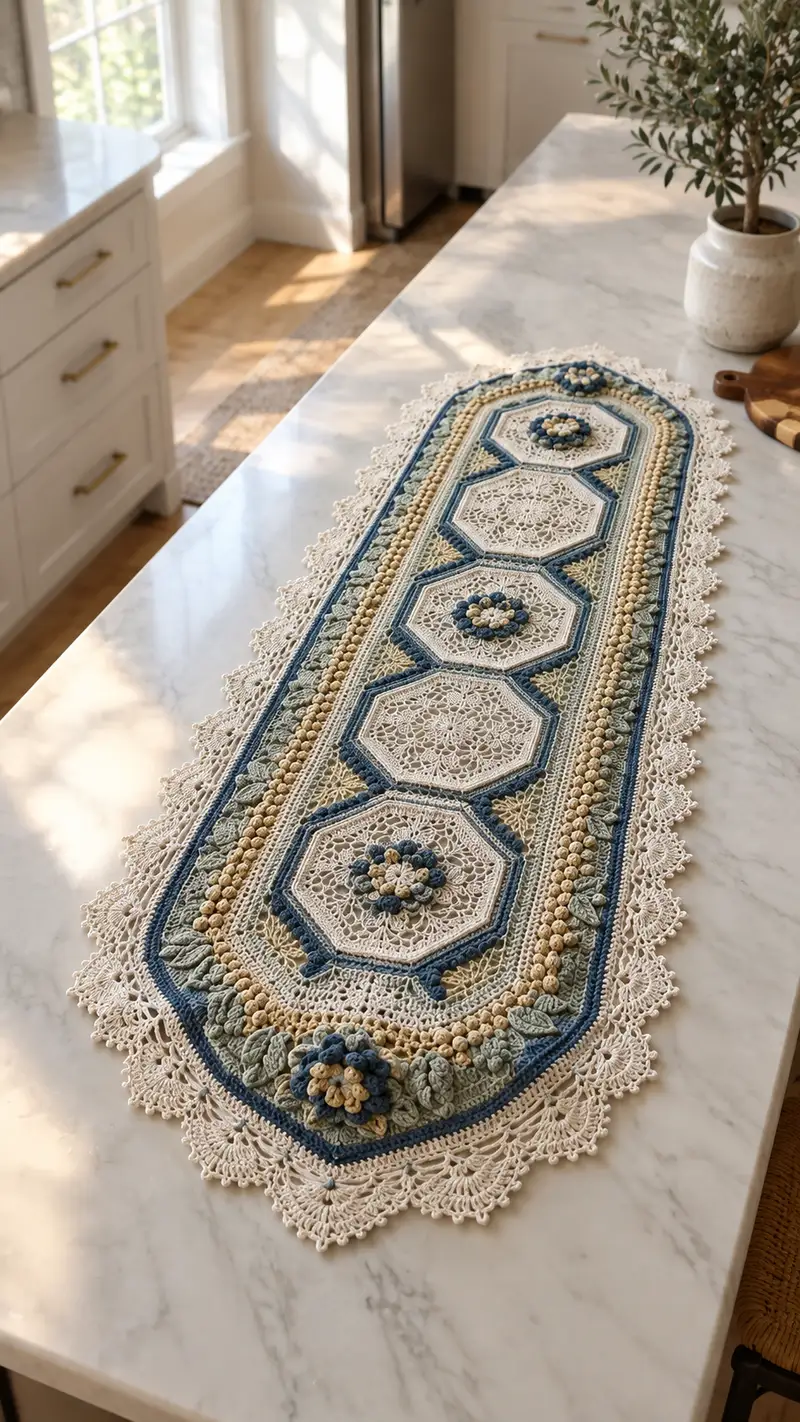
A long, elegant crochet table runner featuring five lacy hexagonal floral medallions linked by delicate lace panels, bobble rows and sculpted leaf vines. Soft cream, dusty blue, sage green and warm beige combine for a vintage-inspired centerpiece. Detailed stitchwork and a scalloped lace edge give this runner a refined, heirloom-quality finish. Designed to sit beautifully on a dining table, console or island as a statement of handmade charm.
Progress Tracker
0% Complete
— Materials & Gauge :
Info :
Use a smooth cotton or cotton-blend sport/fingering yarn. Gauge is not critical for lace runners, but for reference the sample measures approx. 12cm (4.75in) across a completed hex medallion center when blocked. Work a small swatch to confirm texture and hand; adjust hook size for crispness.
— Special Techniques & Notes :
Info :
This pattern uses basic lace stitches and textured techniques: puff/bobble stitches, 3D petal clusters, picot edges, shell stitches and join-as-you-go techniques. Read each Info section carefully. Block motifs to dimensions before joining. When making multiple identical motifs, make one fully, then repeat exactly to ensure uniform size.
— Hexagonal Floral Medallion (Make 5) :
Round 1 :
6 sc in magic ring (6)
Round 3 :
(1 sc, inc) x 6 (18)
Round 4 :
(2 sc, inc) x 6 (24)
Round 5 :
(3 sc, inc) x 6 (30)
Round 6 :
(4 sc, inc) x 6 (36)
Round 7 :
(5 sc, inc) x 6 (42)
Round 8 :
(6 sc, inc) x 6 (48)
Info :
These initial rounds create a solid small disc that will act as the medallion hub. Keep tension even. Place a stitch marker in the first stitch of each round for counting ease, and remove/replace when starting next round.
Round 9 :
1 sc in each st (48)
Round 10 :
1 sc in each st (48)
Round 11 :
Change to dusty blue now (Info will explain color work). *ch 3 (counts as dc), skip next st, dc in next st; rep around to create spaced treble points then sl st to join* — this round transforms the solid disc into a small lacy ring (work remains 48 'positions')
Info :
Change to dusty blue yarn. Fasten off cream if you prefer clean color joins, or carry cream behind if you will weave ends later. The method above uses a spaced dc/chain pattern; keep counts so you still have 48 repeat positions across the round.
Round 12 :
Working in spaces from previous round: *(ch2, 3 dc cluster in ch space, ch2, sl st to next space)* x 16 (this forms 16 petal positions; treat each petal cluster as 1 repeat)
Round 13 :
1 sc around each petal cluster base and in each chain space to tidy edges — approximately 48 sc spaced evenly (48)
Round 14 :
Form central floral puff layer: *In each petal base: (yarn over, insert hook, pull up loop) 5 times to form 5 loops, yarn over and pull through all 5 loops, ch1 to close puff; sl st to secure* around 16 puff petals
Info :
Puff instructions: keep loops even and do not pull loops tight. Close each puff with a short chain and anchor with sl st to avoid pulling the motif inwards. If desired, place a tiny amount of stuffing or a small loop of yarn inside the puff for a fuller look, but do not overstuff.
Round 15 :
Working behind the puff petals in cream: 1 sc in each st around to encase the petal base and even out the round (approx. 48 sc)
Round 16 :
Begin hex shaping: *(6 sc, inc) x 6 (54)
Round 17 :
*(7 sc, inc) x 6 (60)
Round 18 :
*(8 sc, inc) x 6 (66)
Info :
These increases create the angular geometry for the hexagon points. Keep increases aligned into six clear corners — place visible stitch markers at corner increases to maintain consistent shaping across repeated medallions.
Round 19 :
1 sc in each st (66)
Round 20 :
Switch to dusty blue and work *(1 sc, ch2, skip 2, sc) in pattern to form corner chain arches: shorten or lengthen ch2 to keep medallion flat (66 positions)
Round 21 :
In each chain arch work a shell: *(2 dc, ch1, 2 dc) in arch; sc between arches* — this frames each hex side with an open shell edge (repeat around)
Round 22 :
Return to cream: 1 sc in each st around to tidy shell bases and add a subtle raised ridge (approx. 66 sc)
Round 23 :
Form a petal ring outside hex: *(ch3, puff in next sc, ch3, sl st in next sc to anchor) repeat around to place 66 small puff accents evenly — compress repeats to fit the available space
Info :
When working many puffs in a round, count carefully to keep them spaced evenly. You may have to place two puffs close to a corner to maintain symmetry. Use pins to mark intended puff positions before crocheting to ensure even distribution.
Round 24 :
1 sc in each st (66)
Round 25 :
Start the raised frame in dusty blue: *(5 sc, inc) x 11 (77)
Round 26 :
*(6 sc, inc) x 11 (88)
Round 27 :
1 sc in each st BLO to create a ridge (88)
Round 28 :
Round of picots and small chains to refine the hex edge: *(sc, ch3, picot, sc) across each side; maintain 88 positions
Round 29 :
Change to sage green for leaf bases: 1 sc in each st around (88)
Round 30 :
Prepare for leaf vine insertion: *(ch5, skip 2, sc) around to create loop placements for leaves — count loops to total 22 loops (approx)
Round 31 :
Work leaf motifs into loops: Make leaf (See 'Leaf Motif' section below) into each loop position around hex (22 leaves attached)
Info :
Make one medallion and block to the intended dimension, then compare with next medallions as you make them. The join-as-you-go connection relies on consistent size. Use a gentle steam or wet block depending on yarn instructions.
Round 32 :
Return to cream: 1 sc around all bases to lock leaves into place (approx. 88)
Round 33 :
Decoration round: *(sc, ch2, sc) in each st forming a neat ladder around; add small sc clusters at corners to emphasize hex points
Round 34 :
Finish medallion base: 1 sc evenly around to tidy edges; fasten off leaving long tail for assembly
Info :
Make 5 identical medallions. If you prefer to work them in alternating color placements, swap the dusty blue and sage accents before Round 25. Block each medallion flat and to the same dimensions before joining.
— Leaf Motif (Make many for vine) :
Round 1 :
With sage green, ch6, in 2nd ch from hook 1 sc, hdc, dc, tr, dc, hdc, sc across the chain (shape leaf lengthwise)
Round 2 :
Work on opposite side of chain: sc in first st, hdc in next, dc, tr, dc, hdc, sc — slip stitch to base to close leaf (approx 14 sts)
Round 3 :
Fasten off leaving tail for sewing. Pin leaf where directed and tack with small invisible stitches at base (no stuffing)
Info :
Leaf shaping: adjust tr height if your yarn is thicker or thinner so all leaves are consistent in size. Make leaves slightly firm with a tiny dab of starch if you want them to hold shape better when blocked.
— Raised Frame & Connecting Band (work one long band for runner length) :
Round 1 :
With dusty blue, ch to length equal to medallion-to-medallion distance plus two medallion radii (measure from blocked medallion). Work 1 sc into each ch across to create foundation strip. Count will vary by length — for sample runner this foundation is approx. 240 chs.
Round 2 :
1 sc into each foundation ch across; turn — this creates a firm connecting panel base (approx 240 sc)
Round 3 :
Begin textured band: *(1 sc, ch3, skip next ch space, sc) across to create chain loops for future bobble row — keep count equal to 80 loops across (80)
Info :
Measure frequently. The connecting band must align with hexagon edges of medallions so that when joined they sit squarely. Adjust ch and loop counts proportionally to your medallion size.
Round 4 :
Switch to cream: 1 sc across to tidy the surface (approx 240 sc)
Round 5 :
Working in chain loops: *(make a bobble/pop stitch in each chain loop: (yarn over, insert, pull up loop) 5 times, yarn over and pull through all loops to form bobble; ch1; sl st to next loop) — 80 bobbles
Round 6 :
1 sc around each bobble base to secure (approx 240 sc)
Round 7 :
Change to warm beige for alternating small bobble accents: *in every 4th sc make a 3-loop puff closed with ch1; sc in between* across the band (approx 60 accents)
Info :
Bobble placement: press bobbles with a blocking pin while wet to maintain even height. If your yarn is more elastic, reduce puff loops to 4 to avoid too-large bobbles.
Round 8 :
Return to cream: 1 sc across (approx 240)
Round 9 :
Work narrow shell row to frame band: *(2 dc, ch1, 2 dc) every 6th st to give gentle scallop (approx 40 shells)
Round 10 :
1 sc around to tidy shell bases (approx 240)
Round 11 :
Attach medallions with join-as-you-go: align band to medallion edges and sl st through medallion outer round and connecting band every 6-8 sts to secure. Work across entire runner in this manner to join all medallions to the central band.
Info :
Join-as-you-go tip: block medallions and band to final dimensions first. Pin medallions onto the band and verify spacing visually before making any permanent joins. Use a contrasting thread to pin if needed then remove before final sl sts.
— Inner Lace Panel (Between Medallions) :
Round 1 :
With cream, ch to the length needed to fill the gap between medallion rims (approx 120 ch). Join to band edges with sl st and work 1 sc along to create narrow panel base (count varies)
Round 2 :
Form lace fan pattern: *(ch5, skip 2, sc in next) across, adjusting to match end-to-end spacing — creates open lattice (approx 40 fans)
Round 3 :
Into each ch5 fan: *(sc, 3 dc, sc) to form fan shell; sl st to next fan center — repeat across
Round 4 :
Work small chain arches above shells: *(ch4, sl st in center dc of shell) across to create decorative arches
Info :
Adjust ch lengths to lay flat without puckering. Lace panels should be soft and airy; do not overwork with tight tension.
Round 5 :
Return to cream: sc around panel to tidy and prepare for joining to medallion rims — weave in tails as you go
— Bobble & Bead Rows (Textured Center Rows) :
Round 1 :
With warm beige, sc across the band between medallions as a spacer row (count matches band width)
Round 2 :
Make a dense bobble row on top: *in every 3rd st make a 5-loop bobble/pop; sc in remaining sts* — create a visually continuous bobble column (math: if band = 240 sts, bobbles ≈ 80)
Round 3 :
Secure with cream sc row: 1 sc in each st across to flatten bobble bases (approx 240)
Round 4 :
Optional blue accent line: 1 sc in dusty blue along band edge to define the blue framing line
Info :
For cleaner bobbles, work one bobble and then immediately anchor with a sc in next stitch. This prevents movement and keeps bobbles aligned in column.
— Leaf Vine Row (Make enough leaves to run both runner sides) :
Round 1 :
With sage green, pick up at base edge and sc along the runner border placing a leaf anchor every 6th st — sc count approx. 240, leaf anchors ≈ 40
Round 2 :
At each leaf anchor: make a single leaf (see Leaf Motif) and sl st back to the band to continue — repeat across both sides of runner
Round 3 :
Return to cream and sc around leaf bases to lock them in (approx 240)
Info :
Arrange leaves alternating left and right to form a vine. If your runner edges are slightly wavy after attaching leaves, steam-block the attached area with pins to set shape.
— Small Flower Rosettes (Make 5 centers for medallions) :
Round 1 :
With warm beige, 6 sc in magic ring (6)
Round 3 :
Change to dusty blue: *(ch2, 3 dc cluster in same st, ch2, sl st in next) around to create 6 outer petals (12 clusters)
Round 4 :
Secure with cream sc round and fasten off leaving tail for sewing to medallion center
Info :
Sew the small rosette into the central floral puff ring you created earlier (Round 14 of medallion). Tuck the rosette edges under the puff ring and sew with matching thread for a neat finish.
— Outer Scalloped Lace Edging :
Round 1 :
With cream, join at any outer band point and 1 sc evenly around the entire runner outer perimeter; count will be approximately 600 sts on a long runner — ensure even distribution by increasing intervals at corners
Round 2 :
*(sc in next 4, 5 dc shell in next st, sc in next 4, picot) repeat around — creates large scallops spaced evenly
Round 3 :
Between major scallops work small fan bridges to link shells: *(ch6, sc in center of shell from previous round) across, adjusting ch count to space edges correctly
Round 4 :
Work final lace picot edging: *(sc, ch3, picot, sc) in each small fan to form delicate points — repeat around
Info :
Count scallops and make small adjustments: if shells bunch in one area, add an extra sc between shells; remove an sc where too wide. The total shell count should be balanced across both long sides and the two rounded ends.
Round 5 :
Optional layering: add dusty blue thread in thin slip-stitch rows inside selected scallops for a subtle outlined effect. Fasten off and weave all ends neatly into the back of the lace edging.
— Final Finishing Rounds & Blocking :
Round 1 :
Weave in all loose ends and tidy join seams with whip stitch using a matching yarn tail. Trim ends close after weaving through several stitches to secure.
Round 2 :
Block the finished runner to final dimensions. Pin gently to a flat blocking surface stretching evenly so scallops and leaf vines are symmetrical. Allow to dry fully (24 hours) before unpinning.
Info :
Use rust-proof pins and a breathable blocking mat. For cotton yarn use wet blocking; for cotton blends consider steam blocking. Light starch may be applied for a firmer, heirloom finish on table linens.
Round 3 :
Optional embellishments: add small sewn beads in the centers of rosettes or at the apex of scallops. Use clear thread and sew from the back so no visible knots remain.
Info :
Storing the runner: store flat or rolled on a wide tube between acid-free tissue. Avoid folding repeatedly to prevent permanent creases in lace.
Completing this runner is such a joyful reward — each medallion and border row layers into a graceful centerpiece that transforms a table into an heirloom display. The combination of lace, 3D petals and sculpted leaves makes every inch interesting to stitch and behold. Enjoy the relaxing rhythm of repeating motifs, then feel proud as they all come together in a beautifully finished runner. 🧶💫