Create a tiny, charming crochet dollhouse that opens to reveal miniature floors and cozy details. This pattern guides you step-by-step through making the floors, walls, attic, roof and wire frame so you can craft a sturdy, decorative miniature house. Perfect as a collectible, gift, or display piece, you'll enjoy stitching every small detail and customizing the finishes to suit your style.
Progress Tracker
0% Complete
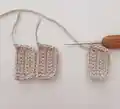
— Floor :
Info :
Make 3 floor details. Use yarn A (beige).
Round 1 :
Make a foundation chain of 9 stitches. Single crochet in second chain from hook, sc in each ch across row (8 sc)
Round 2-4 :
ch 1, turn, sc in each ch along row (8). Try to hide the tail of yarn while crocheting.
Round Trim :
ch 1, sc 4 evenly spaced along edge to corner; 2 sc into corner, 6 sc in each stitch, 2 sc into next corner, sc 4 evenly spaced from edge to corner (18)
Info :
Fasten off and cut the yarn after having finished 2 details. After having made the 3-d detail DO NOT cut the yarn.
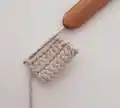
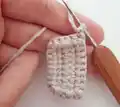
— Walls :
Round 1 :
Turn back the floor detail as you see on photo. Ch 1, make 18 sc through back loop of last row (after you turned the detail it's farther loop from you) (18)
Item Name (Section 1) :
Rows 2-4: ch 1, turn, sc 2 (every sc in each sc of bottom row) (2)
Item Name (Section 2) :
Row 2: ch 4, skip 2 stitches of bottom walls row, inserting hook into 3-d stitch sc 10 (every sc in each sc of bottom row) (10)
Round 3 :
ch 1, turn, sc 9 (every sc in each sc of bottom row), sc 1 hitching up the loop of ch (pull the yarn through the loop of chain when you finish making single crochet) (10)
Round 4 :
sl st into the loop of ch, turn, sc 10 (every sc in each sc of bottom row) (10)
Item Name (Section 3) :
Row 2: ch 4, skip 2 stitches of bottom walls row, inserting hook into 3-d stitch sc 2 (2)
Round :
Row 3: ch 1, turn, sc 1, sc 1 hitching up the loop of ch (2)
Round :
Row 4: sl st into the loop of ch, turn, sc 2 (2)
Round 5 (along all sections) :
ch 1, turn, sc 2 in each stitch, sc 2 into chain, sc 10 in each stitch, sc 2 into chain, sc 2 in each stitch (18)
Round 6 :
Turn. Take 1 floor detail. Ch 1, make 18 sc through back loop of walls (after you turned the detail, it's farther loop from you) and back loop of floor detail (18)
Round 7 :
ch 1, turn, sc in each stitch of row (18)
Item Name (Section 1) :
Rows 8-10: ch 1, turn, sc 6 in each stitch of row (6)
Item Name (Section 2) :
Row 8: ch 4, skip 2 stitches of bottom walls row, inserting hook into 3-d stitch sc 2 (2). Row 9: ch 1, turn, sc 1, sc 1 hitching up the loop of ch (2). Row 10: sl st into the loop of ch, turn, sc 2 (2)
Item Name (Section 3) :
Row 8: ch 4, skip 2 stitches of bottom walls row, inserting hook into 3-d stitch sc 6 (6). Row 9: ch 1, turn, sc 5, sc 1 hitching up the loop of ch (6). Row 10: sl st into the loop of ch, turn, sc 6 (6)
Round 11 (along all sections) :
ch 1, turn, sc 6 in each stitch, sc 2 into chain, sc 2 in each stitch, sc 2 into chain, sc 6 in each stitch (18)
Round 12 :
Turn. Take 2-nd floor detail. Ch 1, make 18 sc through back loop of walls (after you turned the detail, it's farther loop from you) and back loop of floor detail (18)
Info :
Don't fasten off! We'll start making attic from this place.
— Attic :
Round 1 :
ch 1, turn, 5 sl st, ch 1, sc 8 (8)
Round 2 :
ch 1, turn, dec, sc 4, dec (6)
Round 3 :
ch 1, turn, dec, sc 2, dec (4)
Round 4 :
ch 1, turn, 2 dec (2)
Round 5 :
ch 1, turn, dec (1), ch 1, 5 sl st down, 5 sl st along the top of wall, as showed on photos.
— Roof :
Info :
I'll show how to make the roof connecting it with walls and attic while crocheting - I try to avoid sewing in my projects as much as I can, but you may just crochet equal detail and sew it to walls and attic.
Info :
Take yarn B (white).
Round 1 :
Make a foundation chain of 7 stitches. Sc in second chain from hook, sc in each ch along row (6). Try to hide the yarn tail while crocheting.
Round 2 :
ch 1, sc 4 through last walls row and previous roof row together, sc 1 through last walls and roof rows hitching up the first attic row too as showed on photos, sc 1 (6)
Info :
Additional explanations: 'sc 4 through last walls row and previous roof row together' means that you need to insert hook into both details when you start making each of sc 4; 'sc 1 through last walls and roof rows hitching up the first attic row too' means you should first insert the hook into both roof and walls (as previous step), pull out the thread, then insert the hook into attic border, pull out the thread and crochet both loops on a hook together now.
Round 3 :
ch 1, turn, sc 1, sc 1 hitching up the stitch of attic, sc 4 (6)
Round 4 :
ch 1, turn, sc 4, sc 1 hitching up stitch of attic, sc 1 (6)
Round 5 :
ch 1, turn, sc 1, sc 1 hitching up stitch of attic, sc 4 (6)
Round 6 :
ch 1, turn, sc 4, sc 1 hitching up stitch of attic, sc 1 (6)
Round 7 :
ch 1, turn, sc 1, sc 1 hitching up stitch of attic, sc 4 (6)
Round 8 :
ch 1, turn, sc 4, sc 1 hitching up stitch of attic, sc 1 (6)
Round 9 :
ch 1, turn, sc 1, sc 1 hitching up stitch of attic, sc 4 (6)
Round 10 :
ch 1, turn, sc 4, sc 1 hitching up stitch of attic, sc 1 (6)
Round 11 :
ch 1, turn, sc 1, sc 1 hitching up stitch of attic, sc 4 (6)
Round 12 :
ch 1, turn, sc 4, sc 1 hitching up stitch of attic, sc 1 (6)
Round 13 :
ch 1, turn, sc 1, sc 5 pulling the thread through the stitches of last walls row (6)
Round 14 :
ch 1, turn, sc 6 (6)
Round 15 :
ch 1, turn, 6 sl st into previous row, ch 1, 2 sl st along frontal roof border (you should appear close to place where you've finished working with yarn A), do not fasten off!
— Frame :
Info :
I use floral tape for frame. Measure borders of house as showed. My total length is 19 cm (7,5"). Cut the wire of needed length + 0.5 cm (0,2"). I cut 19.5 cm (7,7"). Join the ends with round nose pliers as showed.
Round :
Insert hook in the loop of yarn A (beige) and crochet over frame as showed below. You have to make 1 ch, sc 6 along 2-nd floor, sc 6 along 1-st floor, sc 10 along floor into BACK loop, sc 6 along next side of 1-st floor, sc 6 along next side of 2-nd floor (34). Fasten off, cut the yarn.
This tiny Elendan Dollhouse is a delightful little project that fits in the palm of your hand and makes a perfect handmade gift. Customize the colors and add seasonal trims to make it truly yours. Enjoy the slow, detailed work and treasure the finished miniature. 🧶🏡✨