๐Ÿงถ Beautiful โœจ Detailed ๐Ÿ’ Adorable

EZ Diamond Lattice Blanket Pattern

EZ Diamond Lattice Blanket Pattern
4.0โ˜… Rating
12+ Hours Time Needed
2.3K Made This
โœ‚๏ธ

Advanced Level

Designed for experienced crocheters, these patterns involve intricate designs and complex techniques to challenge and inspire.

โฑ๏ธ

Multi-Day Project

A rewarding 12+ hour journeyโ€”perfect for dedicated crafters who love detailed work.

๐Ÿก

Cozy Accent

A warm touch for your space that transforms ordinary corners into inviting nooks filled with handmade charm.

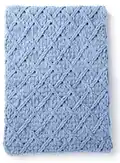
About This EZ Diamond Lattice Blanket Pattern

This pattern creates a plush diamond lattice blanket worked with Bernat Alize Blanket-EZ for a dense, cozy texture. The design uses a loop-and-cross technique to form raised lattice diamonds across the blanket surface. It is an advanced project that focuses on stitch control and consistent tension to achieve even, sculpted diamonds.

EZ Diamond Lattice Blanket Pattern crochet pattern - detailed view of completed project

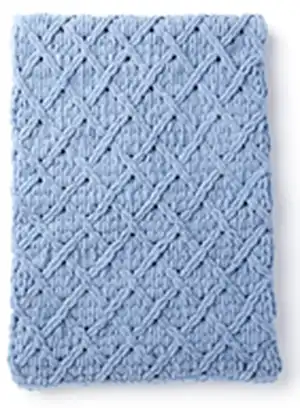
The finished blanket measures approximately 56" x 60" and uses 7 balls of Blanket-EZ yarn in the sample color. A video tutorial is available to help you master the loop technique used throughout the pattern.

Why You'll Love This EZ Diamond Lattice Blanket Pattern

I absolutely love this pattern because the diamond lattice texture transforms bulky yarn into an elegant, sculpted surface that feels luxurious to the touch. I enjoy how the loop technique creates depth without complicated stitch counts โ€” it feels meditative once you get into the rhythm. The finished blanket is wonderfully warm and heavy, perfect for cozying up on the sofa. I also love that the pattern is versatile and can be adjusted in size or color to suit your home or gift needs.

EZ Diamond Lattice Blanket Pattern step 1 - construction progress EZ Diamond Lattice Blanket Pattern step 2 - assembly progress EZ Diamond Lattice Blanket Pattern step 3 - details and accessories EZ Diamond Lattice Blanket Pattern step 4 - final assembly and finishing

Switch Things Up

I love customizing this blanket by changing yarn colors to create subtle or bold lattice effects.

I sometimes work the pattern using two contrasting colors, alternating every few repeats to make striped diamonds.

To make a larger blanket I add more foundation loops in multiples that keep the pattern repeats aligned across the width.

If you want a smaller throw, reduce the number of foundation loops and shorten the length by stopping when the blanket reaches your desired size.

I also experiment with different yarn textures and weights; a slightly fuzzier yarn softens the lattice edges, while a smooth yarn emphasizes definition.

Try adding a simple crochet border in single crochet or a decorative scallop to frame the lattice and give a finished look.

I sometimes substitute a complementary color for the foundation loops to create a subtle contrast along the edges of the blanket.

For gifts, I change the yarn color to match the recipient's decor and add a sewn ribbon or tag for presentation.

Consider making matching pillow covers using a smaller number of foundation loops and the same row repeats to create a coordinated set.

I always recommend practicing the loop-and-cross technique on a small swatch to find the perfect loop tension before starting the full blanket.

Common Mistakes & How to Fix Them

โœ— Not counting 68 loops accurately for the foundation row can throw off the entire pattern; recount and adjust the foundation loops before starting the first row. โœ— Turning the work when instructed not to can reverse the lattice direction and ruin the texture; follow the 'Do not turn' notes exactly for the rows specified. โœ— Pulling loops inconsistently creates uneven diamonds and tension; practice pulling loops with the same height and tension across several stitches before proceeding. โœ— Skipping the instruction to keep the working yarn behind stitches will change the look of the crossings; keep the working yarn held behind stitches throughout as directed. โœ— Not finishing the bind off correctly can allow the edge to unravel; follow the bind off row step sequence, cut the thread at the base of the loop and tie securely before weaving in the tail.

EZ Diamond Lattice Blanket Pattern

Create a cozy, textured blanket with an eye-catching diamond lattice design using Bernat Alize Blanket-EZ yarn. This pattern guides you through a unique looped technique to build a plush, chunky fabric that is perfect for snuggling. Follow the detailed row-by-row instructions and the included bind-off to finish a beautiful 56" x 60" blanket you'll be proud to gift or keep.

Advanced 12+ Hours

Materials Needed for EZ Diamond Lattice Blanket Pattern

โ€” Main Fabric

  • 01
    Bernat Alize Blanket-EZโ„ข (6.4 oz/180 g; 18 yds/16 m) Country Blue (37018) - 7 balls

โ€” Tools Required

  • 01
    No specific crochet hook size listed in pattern (use recommended hook for Blanket-EZ yarn on yarn label)
  • 02
    Scissors
  • 03
    Yarn needle for weaving in ends
  • 04
    Stitch markers (optional)
  • 05
    Tape measure

Progress Tracker

0% Complete

โ€” Measurements :

Info :

Approximately 56" [142 cm] wide x 60" [152.5 cm] long.

โ€” Materials :

Info :

Bernatยฎ Alizeยฎ Blanket-EZโ„ข (6.4 oz/180 g; 18 yds/16 m) Country Blue (37018) 7 balls

โ€” Instructions :

Infos :

Notes: Right side of project is facing at all times. 'Working yarn' is held behind stitches throughout work.

Info :

Count 68 loops for foundation row.

Round 1 :

1st row: Working from right to left, pull the 69th loop (from 'working yarn') up through 68th loop (last loop of foundation row) from behind to create a knit stitch. Pull next loop from working yarn up through next loop of foundation row. *Cross second loop of foundation row in front of first loop of foundation row (to the right). Pull next loop from working yarn up from behind next loop. Pull next loop from working yarn up from behind next loop. Cross next loop of foundation row in front of 2nd loop of foundation row (to the left). Pull next loop from working yarn up from behind 2nd loop. Pull next loop from working yarn up from behind 1st loop. (Pull next loop from working yarn up from behind next loop) over next 4 stitches. Cross 2nd stitch in front of next stitch (to the right). Pull next loop from working yarn up from behind 2nd stitch. Pull next loop from working yarn up from behind 1st stitch. Rep from * to last 6 stitches. (Pull next loop from working yarn up from behind next loop) over next 4 stitches. Cross next stitch in front of 2nd stitch (to the left). Pull next loop from working yarn up from behind 2nd loop. Pull next loop from working yarn up from behind 1st loop. (Pull next loop from working yarn up from behind next loop) twice. Repeat from * to end of row. Do not turn work. 68 stitches in row.

Round 2 :

2nd row: Working from left to right, pull next loop from working yarn up from behind through last stitch worked on previous row. *Cross 2nd stitch over next stitch (to the left). Pull loop from working yarn up from behind 2nd stitch. Pull next loop from working yarn up from behind 1st stitch. (Pull next loop from working yarn up from behind next loop) twice. Cross next stitch in front of 2nd stitch (to the right). Pull next loop from working yarn up from behind 1st stitch. Pull next loop from working yarn up from behind 2nd stitch. Pull next loop from working yarn up from behind next loop over next 4 stitches. Rep from * to last stitch. Pull loop from working yarn up from behind next loop. Do not turn.

Round 3 :

3rd row: Working from right to left, cross 2nd stitch of previous row over 1st stitch (to the right). Pull loop from working yarn up from behind 2nd stitch. Pull next loop from working yarn up from behind 1st stitch. *(Pull next loop from working yarn up from behind next loop) over next 4 stitches. Cross 2nd stitch in front of next stitch (to the right). Pull next loop from working yarn up from behind 2nd stitch. Pull next loop from working yarn up from behind 1st stitch. Rep from * to last 6 stitches. *(Pull next loop from working yarn up from behind next loop) over next 4 stitches. Cross next stitch in front of 2nd stitch (to the left). Pull next loop from working yarn up from behind 2nd loop. Pull next loop from working yarn up from behind 1st loop. Do not turn.

Round 4 :

4th row: Working from left to right, pull next loop from working yarn up from behind through last stitch worked on previous row. *Cross next stitch in front of 2nd stitch (to the right). Pull next loop from working yarn up from behind 2nd loop. Pull next loop from working yarn up from behind 1st loop. Pull next loop from working yarn up from behind 1st loop. (Pull next loop from working yarn up from behind next loop) twice. Cross next stitch in front of 2nd stitch (to the left). Pull next loop from working yarn up from behind 2nd loop. Pull next loop from working yarn up from behind 1st loop. Do not turn.

Round 5 :

5th row: Working from right to left, (pull next loop from working yarn up from behind last stitch worked on previous row) twice. *Cross next stitch in front of 2nd stitch (to the left). Pull next loop from working yarn up from behind 2nd stitch. Pull next loop from working yarn up from behind 1st stitch. Pull next loop from working yarn up from behind 1st stitch. (pull next loop from working yarn up from behind next loop) twice. Cross 2nd stitch in front of next stitch (to the right). Pull next loop from working yarn up from behind 2nd stitch. Pull next loop from working yarn up from behind 1st stitch. Rep from * to last stitch. Pull next loop from working yarn up from behind next stitch. Do not turn.

Round 6 :

6th row: Working from left to right, (pull next loop from working yarn up from behind last stitch worked on previous row) over next 3 stitches. *Cross 2nd stitch in front of 1st stitch (to the left). Pull next loop from working yarn up from behind 2nd stitch. Pull next loop from working yarn up from behind 1st stitch. Pull next loop from working yarn up from behind last stitch worked on previous row three times. *Cross 2nd stitch in front of 1st stitch (to the left). Pull next loop from working yarn up from behind 2nd stitch. Pull next loop from working yarn up from behind 1st stitch. Pull next loop from working yarn up from behind last stitch worked on previous row three times. Do not turn.

Round 7 :

7th row: Working from right to left, (pull next loop from working yarn up from behind last stitch worked on previous row) twice. *Cross 2nd stitch in front of next stitch (to the right). Pull next loop from working yarn up from behind 2nd stitch. Pull next loop from working yarn up from behind 1st stitch. Cross next stitch in front of 2nd stitch (to the left). Pull next loop from working yarn up from behind 2nd stitch. Pull next loop from working yarn up from behind 1st stitch. Rep from * to last stitches. Do not turn.

Round 8 :

8th row: Working from left to right, pull next loop from working yarn up from behind through last stitch worked on previous row. *Cross 2nd stitch in front of next stitch (to the left). Pull next loop from working yarn up from behind 2nd stitch. Pull next loop from working yarn up from behind 1st stitch. (Pull next loop from working yarn up from behind next loop) twice. Cross next stitch in front of 2nd stitch (to the right). Pull next loop from working yarn up from behind 1st stitch. Pull next loop from working yarn up from behind 2nd stitch. Pull next loop from working yarn up from behind next loop over next 4 stitches. Rep from * to last stitch. Pull loop from working yarn up from behind next loop. Do not turn.

Round 9 :

9th row: Working from right to left, cross 1st stitch over 2nd stitch (to the left). Pull next loop from working yarn up from behind 2nd loop. *Pull next loop from working yarn up from behind 1st loop. (Pull next loop from working yarn up from behind next loop) over next 4 stitches. Cross 2nd stitch in front of next stitch (to the left). Pull next loop from working yarn up from behind 2nd stitch. Pull next loop from working yarn up from behind 1st stitch. Rep from * to last 6 stitches. Pull next loop from working yarn up from behind 2nd loop. Pull next loop from working yarn up from behind 1st loop. Do not turn.

Round 10 :

10th row: Working from left to right, pull next loop from working yarn up from behind last stitch worked on previous row. Cross next stitch in front of 2nd stitch (to the right). Pull next loop from working yarn up from behind 2nd stitch. Pull next loop from working yarn up from behind 1st stitch. *(Pull next loop from working yarn up from behind next loop) twice. Cross 2nd stitch over next stitch (to the left). Pull next loop from working yarn up from behind 2nd stitch. Pull next loop from working yarn up from behind 1st stitch. Rep from * to last stitch. Pull next loop from working yarn up from behind next loop. Do not turn.

Info :

Repeat 5th to 10th rows for pattern. Work in pattern until Blanket measures approximately 60" [152.5 cm], ending on a 5th row.

Bind off row :

Bind off row: Working in same direction as last row, pull 2nd stitch through 1st stitch. Pull 3rd stitch through 2nd stitch. Pull 4th stitch through 3rd stitch. Continue in this manner to end of row. Cut thread at base of loop (thread used to create the loop) to create a yarn 'tail'. Tie to secure and weave in end.

Assembly Instructions

  • Finish the bind off as instructed, then tie the yarn tail securely and weave the tail into the edge of the blanket to hide and secure it.
  • Weave in any remaining loose ends along the back of the stitches with a yarn needle to ensure a tidy finish and no exposed tails on the right side.
  • Lay the blanket flat and gently shape or block to measurements (approximately 56" x 60") by smoothing with hands or light steaming if needed, taking care with the looped texture.
  • Follow the video tutorial for visual guidance on the unique loop-and-cross technique to ensure consistent loop height and correct crossing placement.
  • Inspect edges after weaving in ends and reinforce any loose border loops by sewing them down with a yarn needle for long-term durability.

Important Notes

  • ๐Ÿ’กKeep the right side of the project facing at all times to maintain consistent loop direction and lattice alignment.
  • ๐Ÿ’กHold the working yarn behind the stitches throughout work as instructed to create the correct crossings and texture.
  • ๐Ÿ’กDo not turn the work on rows marked 'Do not turn' โ€” these rows are worked in the same directional orientation as the previous row.
  • ๐Ÿ’กCount and maintain 68 loops on the foundation row to ensure the diamond lattice pattern repeats correctly across the blanket.

This EZ Diamond Lattice Blanket pattern creates a plush, sculpted throw perfect for cozy nights and thoughtful handmade gifts. The loop-and-cross technique forms a stunning diamond texture that looks complex but is wonderfully rhythmic once learned. Use your favorite Blanket-EZ color to make a blanket that becomes an instant heirloom piece. ๐Ÿงถโœจ

You ask,

we answer.

FAQs

What size will the finished piece be?

The finished blanket measures approximately 56" [142 cm] wide x 60" [152.5 cm] long as noted in the pattern.

How many yarn balls do I need?

The sample uses Bernat Alize Blanket-EZ and requires 7 balls of Country Blue (37018). Amounts may vary slightly by tension and modifications.

Do I need any special stitches or techniques?

This pattern uses a loop-pulling and crossing technique rather than standard crochet stitches; follow the row-by-row instructions and the video tutorial to master the method.

Can I change the blanket size?

Yes โ€” adjusting the number of foundation loops and repeating the 5th to 10th row pattern will change the width and length, but be sure to maintain pattern repeat counts for consistent diamonds.

Is this pattern suitable for beginners?

This pattern is rated advanced (experienced) due to the loop and cross technique and directional working; some crochet experience and patience are recommended.