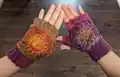
Create cozy, boho-inspired fingerless gloves with the Feather Moss Gloves pattern. This pattern guides you through crocheting decorative square panels, joining them, and adding ribbed cuffs and a thumb gusset for a comfortable fit. With clear step-by-step instructions and photos, you can make a stylish handmade gift or a snug accessory for yourself. Perfect for using variegated DK or worsted yarn to show off beautiful color transitions.
Progress Tracker
0% Complete
— Materials & Gauge :
Info :
Materials used ★ Any DK or worsted weight yarn will work for this project - I used Hayfield Spirit in shade: 0405 ≈ 170m / 186yds ★ 4mm crochet hook
Info :
Gauge ★ 22sts x 28 rows = 10cmx10cm ★ Each square should measure ~12.5cm / 5" when measured diagonally.
Infos :
Stitches used / Abbreviations ★ Sl st - slip stitch ★ Sc - single crochet ★ Hdc - half double crochet ★ Dc - double crochet ★ Blosc - back loop only single crochet ★ Puff st - puff stitch (yarn over, insert hook into same st, yarn over, pull through (3 loops on hook) yarn over, insert hook into same st again, yarn over, pull through (5loops on hook) yarn over, insert hook into same st, yarn over, pull through (7 loops on hook) yarnover, pull through all 7 loops) ★ Dc4tog - double crochet 4 together (yarn over, insert hook, yarn over, pull through [3 loops on hook] yarn over, pull through 2 loops, yarn over, insert hook into same ch1 space, yarn over, pull through [4 loops on hook] yarn over, pull through 2 loops, yarn over, insert hook into same ch1 space, yarn over, pull through [5 loops on hook] yarn over, pull through 2 loops [4 loops left on hook] yarn over, insert hook, yarn over, pull through [6 loops on hook] yarn over, pull through 2 loops [5 loops on hook] yarn over, pull through all 5 loops)
Info :
Finished Measurements ★ 9.5 cm / 3.75" (width of square)
— Glove Panels :
Info :
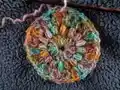
Make 4 squares following rounds 1-4. Repeat rounds 1-4 until you have a total of 4 squares.
Round 1 :
Make a magic circle 1) Ch3 (counts as 1 dc) 2) 1dc in magic circle Repeat step 2 for a total of 16 dcs Sl st to the top of your beginning ch3 to join (16dc total) 3) Pull tail of magic circle to tighten. (I like to tie and weave in the tail of the magic circle at this point to stop it coming loose, but of course this is a personal preference, and you can weave in at the end instead :) )
Round 2 :
1) Ch1 (doesn't count as a st), 1 puff st in same st 2) Ch1 3) [1 puff st in next st, ch1] in next dc from previous round Repeat step 3 until you reach your beginning puff st. Sl st to beginning puff st to join. (16 puff sts total)
Round 3 :
1) Sl st into ch1 space 2) Ch1 (doesn't count as st), dc4tog 3) Ch2 4) [dc4tog, ch2] in next ch sp 5) Repeat step 4 in each ch1 space, until you reach your beginning dc cluster. Sl st to join (16 dc clusters total)
Round 4 :
1) Sl st into ch2 sp 2) [Ch1, 3sc] in same ch2 sp 3) [3sc] in next ch 2 sp 4) [1sc, 1hdc, 1dc] in next ch2 sp, ch3 5) [1dc, 1hdc, 1sc] in next ch2 sp 6) [3sc] in next ch2 sp 7) [3sc] in next ch2 sp 8) [1sc, 1hdc, 1dc] in next ch2 sp, ch3 9) [1dc, 1hdc, 1sc] in next ch2 sp Repeat steps 6-10 until you reach your beginning sc. Sl st to join. Fasten off.
Info :
Repeat rounds 1-4 until you have a total of 4 squares.
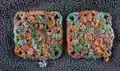
— Joining the squares :
Info :
Place 2 squares 'right sides facing down', next to one another (you'll be working along the 'wrong sides')
Step :
Attach your yarn in the top left hand corner of your square on your right. Ch1, 1sc in ch3sp.
Item Name (P1) :
1) Make 1 sc in next ch3 sp (this will be into the top right corner of your left square) 2) 1sc in next 12 sts 3) 1sc in ch3sp
Info :
Place squares together 'right sides facing each other', so you're working along the 'wrong side' of the squares.
Steps :
4) 1sc in next ch3 sp 5) 1sc in next 12 sts 6) 1sc in ch3 sp Sl st to beginning sc to join. (28) Do not fasten off.
— Ribbed Cuffs :
Round 2 :
2) 1sc in every st back down the chain (5)
Round 3 :
3) 1sl sts in next 2 sts at base of ch, turn
Round 4 :
4) Skip the 2 sl sts you just made, 1 blosc in each st back up (5) Ch1, turn
Round 5 :
5) 1blosc in each st back down the chain (5)
Round 6 :
6) Sl st in next 2 sts at base of chain, turn
Round 7 :
7) Skip 2 sl sts you just made, 1blosc in each st back up the cuff (5) Ch1, turn
Round 8 :
8) 1blosc in each st back down the cuff
Round 9 :
9) Sl st in next 2 sts at base of cuff, turn
Round 10 :
10) Sk 2 sl sts you just made, 1blosc in each st back up the cuff. (5) Ch1, turn
Info :
Repeat steps 8-10 until you reach your other corner. The next stitch at the base of your cuff should be the sc that you placed in the ch3 corner sp.
Round 11 :
11) 1 blosc in each st back down the cuff.
Round 12 :
12) Sl st in next 3 sts at base of cuff, turn
Round 13 :
13) Skip the 3 sl sts you just made, 1blosc in each st back up the cuff (5) ch1, turn
Round 14 :
14) 1blosc in each st back down
Info :
Repeat steps 6-8 until you have 3 sts remaining at the base of your cuff.
Round 15 :
15) Make 1 sl st in next 3 sts, turn
Round 16 :
16) Skip the 3 sl sts you just made, 1blosc in each st back up (5)
Info :
Sl st to join seam together. Fasten off.
— Wrist Cuffs :
Info :
Turn work upside down (so the ribbed finger cuffs you just made are at the bottom) Attach yarn in left hand corner, making a knot through, to tie both squares together at the corners.
Round 1 :
1) Ch1, sc in next ch3 sp
Round 2 :
2) 1sc in next 12 sts
Round 3 :
3) 1sc in ch3 sp
Round 4 :
4) 1sc in next ch3sp
Round 5 :
5) 1sc in next 12 sts
Round 6 :
6) 1sc in last ch3 sp
Round 7 :
7) Sl st to beginning sc to join
Round 8 :
8) Ch8, 1sc in every st back down (7)
Round 9 :
9) Sl st in next 2 sts at base of ch, turn
Round 10 :
10) Skip 2 sl sts you just made, 1blosc in each st back up (7) ch1, turn
Round 11 :
11) 1blosc in each st back down
Round 12 :
12) 1 sl st in next 2 sts at base of chain, turn
Round 13 :
13) Skip 2 sl sts you just made, 1blosc in each st back up the chain (7) ch1, turn
Info :
Repeat steps 10-12 until you reach the opposite corner. Your next stitch at the base of your cuff should be the sc that you made in the ch3 sp.
Round 14 :
14) 1blosc in each st back down
Round 15 :
15) 1sl st in next 3 sts, turn
Round 16 :
16) Sk the 3 sl sts you just made,1blosc in each st back up (7) ch1, turn
Round 17 :
17) 1blosc in each st back down
Round 18 :
18) Sl st in next 2 sts, turn
Round 19 :
19) Skip 2 sl sts you just made, 1blosc in each st back up (7) , ch1, turn
Info :
Repeat steps 11-13 until you have 3 sts remaining at the base of your cuff.
Info :
Repeat steps 14-16. Sl st to seam the cuff together. Do not fasten off. Turn work on side
— Thumb Cuff :
Round 1 :
1) 1sc in ch 3 sp of both squares (going through the back square ch3 space too, so you're joining them together)
Round 2 :
2) 1sc in next 6 sts (making sure you are going through the identical stitches on the back square too, so you're joining them both together)
Round 3 :
3) Now, making sure you are only going through the stitches on the front panel, 1sc in next 6 sts
Round 5 :
5) 1sc in next ch3sp
Round 6 :
6) 1sc in next 6 sts
Info :
Sl st to the beginning sc that you began your single, non joining row with.
Round 7 :
7) Ch6, 1sc in each st back down the ch
Round 8 :
8) Sl st in next 2 sts at base of ch, turn
Round 9 :
9) Skip 2 sl sts you just made, 1blosc in each st back up the ch (5), ch1, turn
Round 10 :
10) 1blosc in each st back down the ch
Round 11 :
11) 1 sl st in next 2 sts at base of ch, turn
Round 12 :
12) Skip 2 sl sts you just made, 1blosc in each st back up (5) , ch1, turn
Info :
Repeat steps 10-12 until you have no more sts available at the base of your cuff.
Round 13 :
13) Sl st to join your cuff seams together. Fasten off.
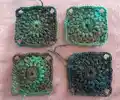
— Seaming Gloves :
Step 1 :
Attach yarn in ch3 space under finger cuff at left hand side, through both (front & back) panels, joining them together.
Step 2 :
1) Ch1, 1sc in same sp 2) Now, making sure you're going through the identical sts on the back panel as well - 1sc in next 12 sts 3) 1sc through both front and back ch3 sp. Fasten off.
Info :
Weave in all ends, turn the right way out and you are finished! Congratulations on completing your Feather Moss Fingerless Gloves!
These Feather Moss Fingerless Gloves are a lovely blend of texture and color that make a thoughtful handmade gift. The square-panel construction highlights variegated yarn beautifully and the ribbed cuffs ensure a snug, comfortable fit. Happy stitching and enjoy wearing your cozy new gloves! 🧶✨