🧶 Beautiful ✨ Detailed 💝 Adorable

Fern Plant Car Pattern

Fern Plant Car Pattern
4.5★ Rating
5-7 Hours Time Needed
2.4K Made This
✂️

Intermediate Level

Ideal for those with basic crochet experience, featuring slightly more advanced stitches and techniques to expand your skills.

⏱️

Weekend Treat

Takes 5-7 hours, making it an enjoyable project to finish over a couple of days.

🏡

Cozy Accent

A warm touch for your space that transforms ordinary corners into inviting nooks filled with handmade charm.

About This Fern Plant Car Pattern

This pattern guides you through crocheting a tiny hanging fern with pots, leafy fronds, and fiddlehead details. It uses superfine yarn and small hooks to create delicate, realistic foliage. You will make two hangings, five leaves, and three fiddleheads to assemble into a lush miniature plant. Photographs and step-by-step instructions are provided to help you at each stage.

Fern Plant Car Pattern crochet pattern - detailed view of completed project

Finished pieces make sweet car decor or small home accents and are lightweight and portable. The pattern includes exact stitch counts and specific hook sizes for each element to achieve consistent results.

Why You'll Love This Fern Plant Car Pattern

I absolutely love this pattern because it turns simple yarn into a tiny, living-looking fern that brings a bit of green to small spaces. I enjoy the delicate shaping of the leaves and fiddleheads—each piece has personality and texture. The project is relaxing and rewarding; you can see progress quickly as each leaf comes together. I also love that the finished hanging is versatile: it can sit in a small corner or hang in a car for a cheerful handmade touch.

Fern Plant Car Pattern step 1 - construction progress Fern Plant Car Pattern step 2 - assembly progress Fern Plant Car Pattern step 3 - details and accessories Fern Plant Car Pattern step 4 - final assembly and finishing

Switch Things Up

I love to experiment with color when I make this pattern; try lighter greens for a soft, vintage look or variegated yarn for a lively, natural effect.

I sometimes switch to a slightly thicker yarn and larger hooks to create a chunkier, more sculptural plant for shelf display.

I add tiny embroidered veins on the leaves for extra realism and a handmade signature touch that personalizes each piece.

You can vary the number of leaves and fiddleheads to make fuller or sparser plants; adding more leaves gives a lush, cascading effect.

I recommend trying metallic or sparkly yarn for a playful holiday version that shines in string lights.

For portability, I sometimes omit stuffing and flatten the pot to make a soft, flexible ornament that packs easily for travel.

I like to attach a small keyring to the hanging cord to turn the piece into a car charm or bag accessory for a unique gift.

If you want a trailing plant, make longer hangings and more leaves, spacing them along a longer cord for a boho look.

I also enjoy combining this fern with crocheted flowers or succulents to make mixed miniature planters that tell a little story on a dashboard or shelf.

Don’t be afraid to mix textures: a fuzzy yarn for the base with smooth yarn for leaves creates contrast and visual interest that I always find rewarding.

Common Mistakes & How to Fix Them

✗ Using the wrong hook size will change the scale and drape of the leaves; use the recommended 3.0mm for pots and 2.0mm for leaves and fiddleheads to match the pattern proportions. ✗ Cutting the tail too early on leaves or fiddleheads will make sewing them into the pot harder; leave the tail as instructed until after assembly to secure pieces neatly. ✗ Skipping stitch counts during increases can lead to an uneven pot rim; count stitches after each increase round to maintain correct stitch totals. ✗ Under-stuffing the pot makes it collapse and affects leaf placement; stuff the pot firmly but avoid overstuffing which can distort the shape. ✗ Sewing leaves asymmetrically can look messy and unbalanced; pin and arrange all leaves first, then sew them in place one by one to keep symmetry.

Fern Plant Car Pattern

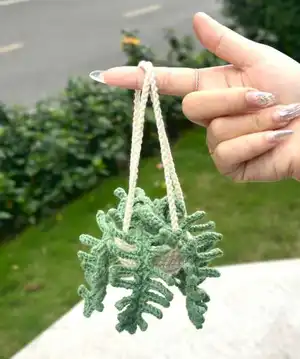
Make a charming hanging fern plant to decorate your car or small spaces with this cozy crochet pattern. You will create tiny pots, leafy fern fronds, and fiddlehead spirals using fine yarn and small hooks. The pattern includes clear, photographed steps and all finishing tips so you can assemble a realistic little hanging plant. Perfect for gifting or brightening your daily drive.

Intermediate 5-7 Hours

Materials Needed for Fern Plant Car Pattern

— Main Fabric

  • 01
    Super fine yarn (supper fine) 1.8 oz (50 g) total (use tan beige and fern green colors)
  • 02
    Color A: Tan beige - small amount for pots (approx 50 g skein recommended)
  • 03
    Color B: Fern green - small amount for leaves and fiddleheads (approx 50 g skein recommended)

— Tools Required

  • 01
    Crochet hook size 3.0mm (for pots)
  • 02
    Crochet hook size 2.0mm (for leaves and fiddleheads)
  • 03
    Alternative hook reference: 2.5-3.0mm range mentioned in materials
  • 04
    Stitch marker
  • 05
    Sewing needle
  • 06
    Scissors
  • 07
    Cotton filling (stuffing)
  • 08
    Yarn needle for sewing and finishing

Progress Tracker

0% Complete

— Pots (beige) :

Info :

*use 3.0mm hook size*

Row 1 :

Magic ring, chain 1, 10SC

Row 2 :

chain 1, (1 single crochet, 1 increase) 5 times (15sts)

Row 3 :

chain 1, (2 single crochet, 1 increase) 5 times (20sts)

Row 4 :

chain 1, (3 single crochet, 1 increase) 5 times (25sts)

Row 5 :

chain 1, (4 single crochet, 1 increase) 5 times (30sts)

Row 6 :

chain 1, (5 single crochet, 1 increase) 5 times (35sts)

Row 7-10 :

chain 1, 35 single crochet (35sts)

— Circle (in green) :

Row 1 :

Magic Ring, chain 2, 10 double crochet (10sts)

Row 2 :

chain 2 10 double crochet inc (20sts)

Row 3 :

chain 2 (1 double crochet, 1 increase) 10 times (30sts)

Row 4 :

chain 1 (5 single crochet, 1 increase) 5 times

Item Name :

Hanging (make 2) : 60-70CH

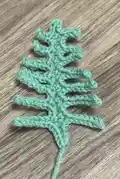
— Leaf (in green) (make 5) :

Info :

*use 2.0mm hook size*

Step 1 :

make a slip knot, 27ch

Step 2 :

hook in 2rd sts, 4 sl st

Step 3 :

1SC, 8ch. hook in 2rd, 7sl st, 1SC

Step 4 :

1sl st, 1SC, 8ch. hook in 2rd, 7sl st, 1SC

Step 5 :

1sl st, 1SC, 8ch. hook in 2rd, 7sl st, 1SC

Step 6 :

1sl st, 1SC, 7ch. hook in 2rd, 6sl st, 1SC

Step 7 :

1sl st, 1SC, 7ch. hook in 2rd, 6sl st, 1SC

Step 8 :

1sl st, 1SC, 6ch. hook in 2rd, 5sl st, 1SC

Step 9 :

1sl st, 1SC, 5ch. hook in 2rd, 4sl st, 1SC

Step 10 :

1sl st, 1SC, 4ch. hook in 2rd, 3sl st, 1SC

Step 11 :

2sl st 1ch 2 sl st

Step 12 :

1SC 4ch. hook in 2rd, 3sl st, 1SC

Step 13 :

1sl st, 1SC, 5ch. hook in 2rd, 4sl st, 1SC

Step 14 :

1sl st, 1SC, 6ch. hook in 2rd, 5sl st, 1SC

Step 15 :

1sl st, 1SC, 7ch. hook in 2rd, 6sl st, 1SC

Step 16 :

1sl st, 1SC, 7ch. hook in 2rd, 6sl st, 1SC

Step 17 :

1sl st, 1SC, 8ch. hook in 2rd, 7sl st, 1SC

Step 18 :

1sl st, 1SC, 8ch. hook in 2rd, 7sl st, 1SC

Step 19 :

4sl st, (do not cut off this tail just yet)

— Fiddlehead :

Step 1 :

slip knot, 21ch. hook in 2rd sts

Step 2 :

12SC, 8HDC, (do not cut off this tail just yet)

— Sewing step :

Info :

sow the circle inside pots and dont forget stuffing ^_^

Step :

sew leaf and fiddlehead in midle the pots

Assembly Instructions

  • Sew the circle inside each pot, place the circle snugly at the base and stuff with cotton filling before closing the top.
  • Arrange the five leaves and three fiddleheads in the center of the pot, pin them in place to check spacing, then sew securely through the base tails.
  • Attach the two hanging cords to opposite sides of the pot rim and reinforce with extra stitching so the hanging supports the weight.
  • Tidy up by weaving in all ends into the pot interior and trimming excess yarn, ensuring no loose tails are visible on the outside.
  • Adjust leaves and fiddleheads to fan outward for a natural look and stitch any overlapping pieces so they hold their shape.

Important Notes

  • 💡Use the recommended hook sizes (3.0mm for pots, 2.0mm for leaves) to keep proportions accurate and compatible for assembly.
  • 💡Do not cut the tail after finishing leaves or fiddleheads until they are sewn into the pot to make assembly easier and stronger.
  • 💡Stuff the pot firmly but not excessively so the rim retains shape and the leaves sit naturally without popping out.

Thank you for making this tiny fern hanging—your handmade plant brings a bit of calm and green wherever it goes. Whether you hang it in your car or gift it to a friend, each stitch adds personality and charm. Happy crafting and may your hooks be ever smooth! 🌿🧶

You ask,

we answer.

FAQs

What size will the finished piece be?

The finished hanging measures approximately the size of a small palm (about 8-12 cm diameter) depending on yarn tension and hook size.

Can I use different yarn weights for this pattern?

Yes, but changing yarn weight will affect the final size and texture—use appropriate hook sizes and expect the plant to be larger or smaller accordingly.

Do I need prior crochet experience for this pattern?

This pattern is rated intermediate; basic knowledge of single crochet, double crochet, chains, slip stitches, and simple increases is recommended.

How long does this project typically take to complete?

Most crocheters complete this project in 5-7 hours, though time may vary depending on your experience and speed.