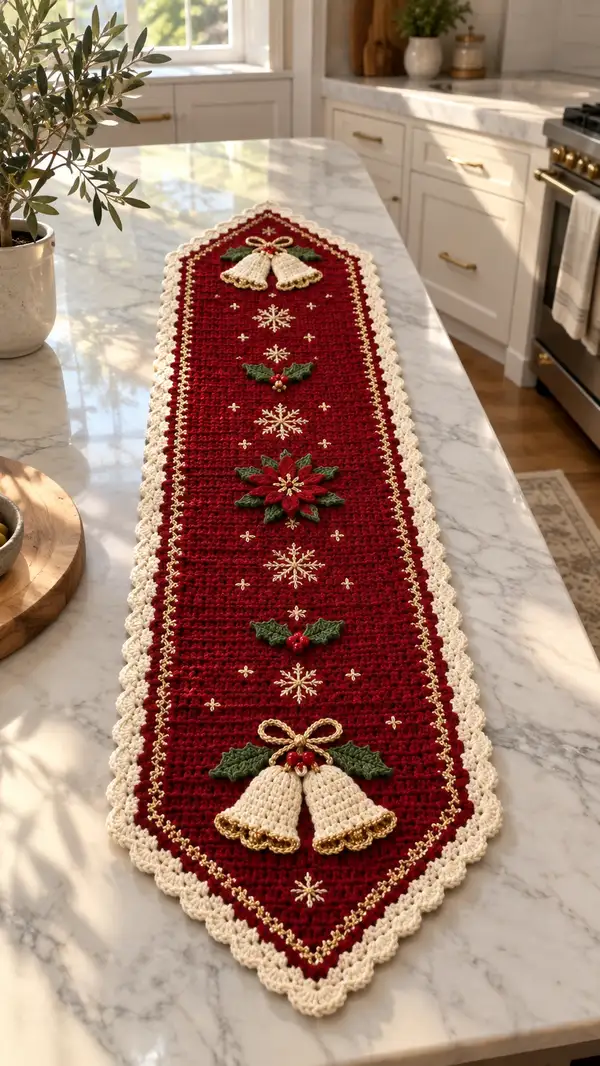
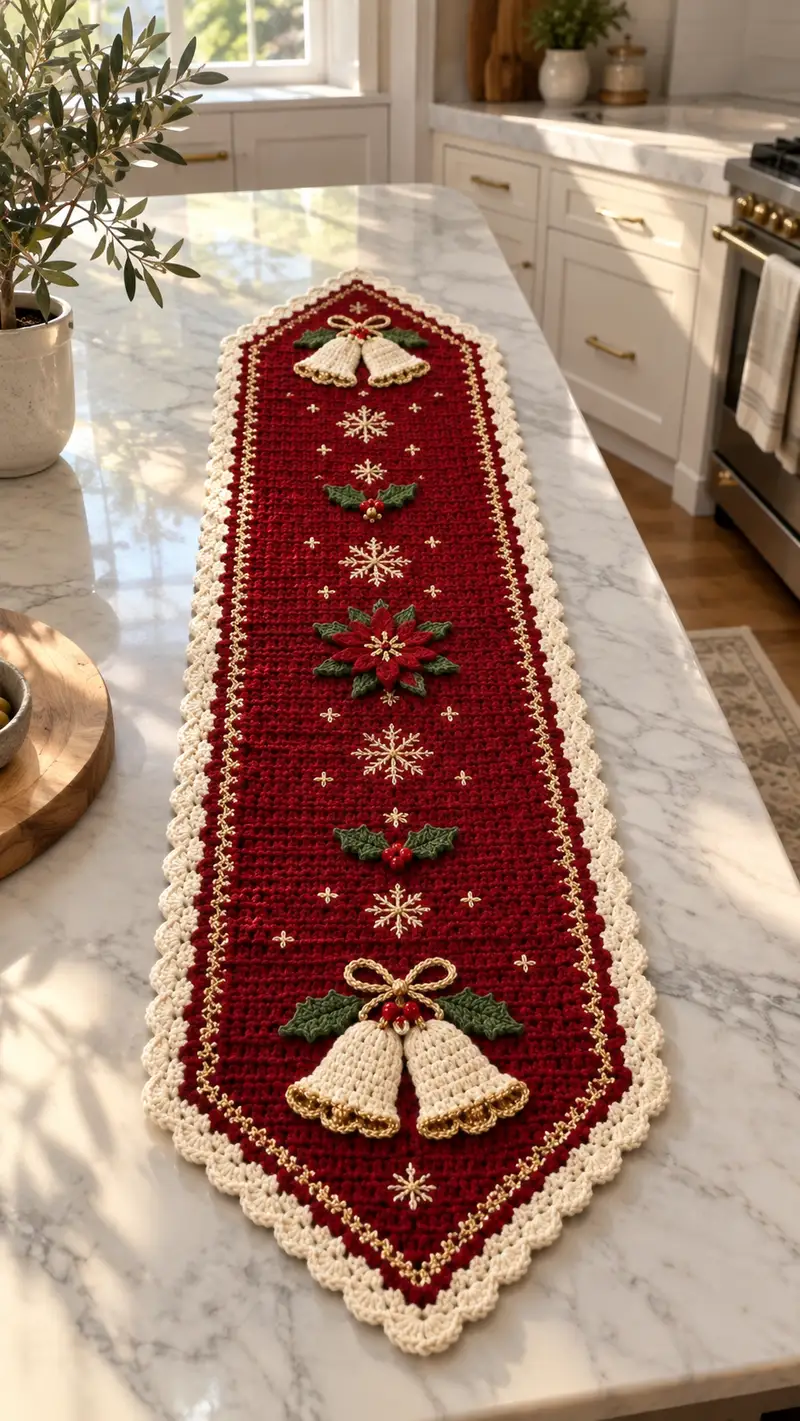
Create a luxurious, hand-crocheted Christmas table runner in classic holiday red, cream and gold. This elongated runner features textured hdc rows, scalloped cream edging, embroidered gold snowflakes and three-dimensional appliques: bells, holly leaves with berries, and a layered poinsettia. Perfect for a holiday centerpiece, the design combines simple stitch repetition with decorative details for an heirloom-quality accent.
Progress Tracker
0% Complete
— Gauge & Notes :
Info :
Gauge for main body: 14 hdc = 4 inches across (measured after blocking) and 12 rows = 4 inches. Use a 5.0mm hook to achieve a dense but flexible fabric. Work with consistent tension so appliques and embroidery placement match the stitch spacing described. This pattern refers to each horizontal pass across the runner as a 'Round' even though the piece is worked flat; treat 'Round' as 'Row'.
Info :
Colors used in photos: Deep Holiday Red (Main), Soft Ivory/Cream (Border, Bells), Metallic Gold Thread (trim/embroidery), Forest Green (Leaves), Bright Red Accents (berries). Substitute shades to match your decor.
— Main Panel (Flat rectangle center) :
Round 1 :
Foundation: Ch 63 (this includes 2 turning chains). Working into 3rd ch from hook, hdc across back to first ch, total = 61 hdc (61)
Round 2 :
Ch 2 (counts as first hdc), turn, hdc in each st across to end, finish with last hdc in top of turning ch, total stays (61)
Round 3 :
Repeat Round 2: 1 hdc in each stitch across (61)
Round 4-10 :
Repeat Round 2. Keep tension steady. (61)
Info :
These first 10 rows create a stable base texture. Use stitch markers at the first stitch of each row (mark the stitch immediately after your turning chain) so the edges remain straight while you work many rows.
Round 11-20 :
Continue 1 hdc in each st across for each row, working a total of 10 rows in this band. (61)
Info :
At the end of Round 15, assess your width. If your swatch has resulted in a runner wider than desired, switch to a 4.75mm hook for subsequent rows to tighten the fabric slightly; if too narrow, return to 5.0mm. Maintain the 61-stitch width for the rectangular center portion.
Round 21-30 :
Continue working 1 hdc in each st across each row. These rows form the central field where appliques will be attached later. (61)
Info :
Mark the center column of stitches now to make applique placement easy later. To find center: count from either side to stitch 31 (the 31st stitch of each row is center). Place a removable stitch marker or safety pin through the row at this point in one row to note alignment.
Round 31-40 :
Work 1 hdc in each st across for 10 more rows, maintaining 61 stitches. This completes the rectangular middle portion. (61)
Info :
Lay the rectangle flat and measure its length. The rectangular section length is determined by the number of rows (40) and your row gauge. If you prefer a longer runner, continue additional even rows in multiples of 2 to maintain symmetry for applique placement.
— Lower Triangle (Pointed end - worked from tip outward) :
Round 1 :
With Main Color (red): Ch 2, hdc in 2nd ch from hook (1) - this is the very tip of the triangle (1)
Round 2 :
Ch 2, turn, 2 hdc in same st (work 2 hdc into the single st from previous row) (2)
Round 3 :
Ch 2, turn, 2 hdc in first st, 1 hdc in next st, 2 hdc in last st. (increase by 2, total 4+1? -> careful math): After Row2 you had 2 sts; Row3: 2 hdc in first (2), 1 hdc in middle (1), 2 hdc in last (2) = 5 total (5)
Round 4 :
Ch 2, turn, 2 hdc in first st, hdc in each st across until last st, 2 hdc in last st. (Previous 5 sts -> +2 = 7)
Round 5 :
Repeat Round 4: 2 hdc in first, hdc across, 2 hdc in last (9)
Round 6-16 :
Repeat Round 4 for each row; each row increases stitch count by 2. Row counts by sequence: R6 (11), R7 (13), R8 (15), R9 (17), R10 (19), R11 (21), R12 (23), R13 (25), R14 (27), R15 (29), R16 (31)
Info :
Continue increasing until the triangle base measures the same width as the rectangular panel (61 sts). Using the formula 1 + 2n = final stitch count, where n = number of rows total in triangle minus 1, you'll need 30 rows total to reach 61 stitches because 1 + 2*30 = 61. You have now reached row 16 and 31 stitches; continue to row 30 to reach 61 stitches.
Round 17-30 :
Repeat Round 4 on each row. Row counts continue: R17 (33), R18 (35), R19 (37), R20 (39), R21 (41), R22 (43), R23 (45), R24 (47), R25 (49), R26 (51), R27 (53), R28 (55), R29 (57), R30 (59), R31 (61)
Info :
When you reach the final triangle row which equals 61 stitches, fasten off and block lightly to match the rectangular center before seaming. Make two such triangular pieces: one for the lower end and one for the upper end (the pattern uses symmetrical triangle panels attached to each rectangular end).
— Upper Triangle (Pointed end - mirrored) :
Round 1 :
Repeat Triangle Lower Round instructions to make second triangle. Start with 1 hdc in ch2, increasing by 2 stitches per row until you reach 61 sts (Row sequence identical). When complete, fasten off leaving a long tail for seaming to center panel.
Info :
Block both triangles and rectangle so edges are flat and stitch gauge matches across pieces. This will ease seaming. Use pins to line up the base of each triangle to the short edge of the rectangle and ensure stitches align before sewing.
— Seaming Panels :
Round 1 :
Position lower triangle to one short edge of rectangle with right sides facing. Match the 61-stitch base to the rectangle short edge (61 sts). Using a yarn needle and the long tail from the triangle, whip stitch through both loops across the entire seam; use 61 equally spaced stitches to join snugly.
Round 2 :
Repeat with upper triangle on opposite short edge. After both triangles are attached you have the full elongated runner shape with pointed ends.
Info :
Try the assembled runner on a flat surface and stretch gently to check seam alignment. If small ripples appear, remove a few seam stitches and adjust. Weave tails into seam and trim. Block the whole runner gently to encourage a flat surface before border work.
— Scalloped Border (Soft Ivory/Cream) :
Round 1 :
Attach cream yarn at any point on the right side with sl st. Work 1 round sc evenly around the entire perimeter, placing (3 sc) in each corner or point to allow the fabric to sit flat. Work 3 sc into the last base stitch where triangles meet the rectangle to avoid pulling. DO NOT CUT. Maintain even tension. (stitch count varies by size; work 1 sc in each edge stitch and 3 sc in each corner/point)
Info :
Because the runner is worked flat and the border is worked in the round, stitch count will vary depending on your gauge. Aim for smooth edges: place extra sc in any area that seems to pucker, or reduce sc density if the scallop pulls inwards.
Round 2 :
Ch 1, sc in same st, sl st in next st, *skip 1 st, (5 dc) in next st, skip 1 st, sl st in next st, sc in next st; rep from * around to create scallops, adjusting at corners so scallops are evenly spaced. Join with sl st to first sc. Fasten off cream and weave in tail.
Info :
The ‘(5 dc) in next st’ creates the scallop. If your scallops are too large or too small relative to the runner’s width, adjust to (4 dc) or (6 dc) consistently across the border to maintain aesthetics. Keep the scallops symmetrical on both long sides and at tapered points.
Round 3 (Metallic Inner Trim) :
Using metallic gold thread (or crochet thread held with a fine yarn if preferred), reattach with sl st into the row just inside the scallop row (about one stitch in from the scallop base). Ch 1, *sc in each stitch for 3 stitches, ch 1, skip one stitch, sc in next 3 stitches; rep around to create a light twisted chain look. Alternately work crab stitch (reverse single crochet) for a raised metallic inner trim. Fasten off and weave in ends.
Info :
Metallic thread can be slippery; carry a short tail and weave it into several stitches at the start and end of the round to secure. If using two strands (metallic + cream) hold them together to create a richer gold ridge.
— Large Poinsettia Applique (Make 1 centerpiece) :
Round 1 :
With green yarn: Make a magic ring. Ch 1, 8 sc into ring. Pull tight and join with sl st (8)
Round 2 :
Ch 1, inc in each st around (16)
Round 3 :
Ch 1, (1 sc, inc) x 8 (24)
Info :
This small green circle becomes the inner leaf base. After this round, we will create pointed leaf shapes that act as the green sepals behind the red petals.
Round 4 (Sepal/Leaf Formation) :
*Ch 3, skip 1 st, sl st in next st* repeat around to create 8 points. Fasten off green and change to red for petals.
Round 5 (First Petal Layer) :
Join red yarn in back of one loop near a ch-3 space: *Ch 2, (sc, hdc, 2 dc, hdc, sc) into the ch-3 space, sl st to base; skip base and move to next ch-3 space; rep around for 8 petals. Fasten off and weave tail. This forms a small petal layer (8 petals).
Info :
Petal stitch counts: sc(1), hdc(1), 2 dc(2), hdc(1), sc(1) = 6 stitches per petal into the space. Each petal adds structure. Block petals slightly with steam or damp cloth to shape.
Round 6 (Second Petal Layer - Larger) :
Join red near midpoint between petals on previous row: *Ch 2, (sc, hdc, 3 dc, hdc, sc) into the space between previous petals to stagger; sl st; rep around for 8 larger outer petals. Fasten off and weave tail.
Round 7 :
With gold metallic thread, embroider a small starburst in the center: bring needle from back to front in center, take 8 short straight stitches outwards equal lengths to meet petal bases, then back to center for each stitch to anchor. Add small red beads (6-8) stitched securely in the very center for the poinsettia stamen. Secure and weave ends to back.
Info :
Block the finished poinsettia flat while moist to set petal shapes. When dry, tack the poinsettia gently to the runner's center stitched alignment (see assembly section). Use small whip stitches across the green base to secure, hiding stitches under the petals for a clean look.
— Decorative Bells (Make 2 — Top and Bottom) :
Round 1 :
With cream yarn: Make a magic ring. Ch 1, 6 sc into ring. Join with sl st (6)
Round 2 :
Ch 1, 6 inc (12)
Round 3 :
Ch 1, (1 sc, inc) x 6 (18)
Round 4 :
Ch 1, 1 sc in each st around (18)
Round 5 :
Ch 1, (2 sc, inc) x 6 (24)
Round 6 :
Ch 1, 1 sc in each st around (24)
Round 7 :
Change to a smaller 4.0mm hook for a slightly tighter fabric if needed. Ch 1, (3 sc, inc) x 6 (30)
Info :
These initial rounds create the bell cup shape. After the increases, we will form the bell skirt by working a short flared ridge and then a scalloped gold trim. Stuff lightly at the last third of the bell to maintain shape.
Round 8 :
Ch 1, 1 sc in each st around (30)
Round 9 :
Ch 1, (1 sc, dec) x 10 (20)
Round 10 :
Ch 1, 1 sc in each st around (20)
Round 11 :
Ch 1, (2 sc, dec) x 5 (15)
Round 12 :
Ch 1, 1 sc around (15)
Round 13 :
Stuff bell lightly at this stage (see Info). Ch 1, (sc, hdc, 2 dc, hdc, sc) in each stitch around to create flared scalloped skirt — work this motif into each of the 15 base sts so each scallop occupies one base stitch. This will produce 15 scallops. Fasten off cream and weave in tail.
Round 14 (Gold trim) :
With metallic gold thread, join at scallop edge and work *sl st, ch 2, 3 dc in scallop apex, ch 2, sl st* around each scallop to create a shiny scalloped rim. Fasten off and weave ends. Add a tiny bead or knotted yarn for clapper at inside base of bell (securely stitched).
Info :
Make two matching bells. At least one bell should be slightly stuffed to keep a dimensional look. Use a small amount of fiberfill and do not overstuff — the bell should keep a soft bell curve, not rigid. Sew a small knot or bead inside as a clapper for a more finished look.
— Holly Leaves (Make 4 sets of 2 leaves each for two sprigs) :
Round 1 :
With green yarn: Ch 8. Row specifics: starting in 2nd ch from hook: sc, hdc in next, dc in next, hdc in next, sc in next, sl st in last to create one leaf shape. Fasten off. This creates a small, slightly angular leaf (approx 6 stitches along center).
Round 2 :
Make 2 more identical leaves per sprig so each sprig has 2 or 3 leaves depending on desired fullness. For larger leaves (poinsettia leaves), increase to ch 12 and use (sc, hdc, 2 dc, 2 dc, hdc, sc) for elongated leaf with veins.
Info :
Shape leaves by blocking and then embroider veins with a running stitch in darker green yarn. Add three small red beads clustered at the base to represent berries for each holly sprig. Leave long tails for sewing.
— Small Holly Sprigs & Berry Clusters (Make 3 small sprigs) :
Round 1 :
Cut short lengths of red yarn or use small red beads. Cluster three beads and stitch through the center of three small green leaves. Secure on the back with a knot and weave in ends. Alternatively, embroider 3 small French knots with red yarn to represent berries.
Info :
Placement: one sprig near each bell and one small sprig in the center underside of poinsettia. Sew securely so beads do not come loose when the runner is used.
— Embroidered Snowflakes & Tiny Gold Stars :
Round 1 :
Using metallic gold thread and a sharp tapestry needle, embroider symmetric snowflakes on the main red field. Snowflake design: Start at center; bring needle up, make 6 straight stitches outward (spokes) of equal length (about 8-12 mm), then between each spoke make 2 short cross stitches (forming a traditional small snowflake). Secure metallic thread at the back and weave in; do not knot on the front.
Round 2 :
Place snowflakes vertically down the runner: align one snowflake centered vertically between appliques (e.g., just below the top bells, below the poinsettia, and near the bottom bells). Use the stitch center marker you placed earlier to ensure perfect vertical alignment. Add small gold 'star' crosses (tiny 4-stitch crosses) scattered around for sparkle.
Info :
For consistent placement, count rows from your rectangle center to position each motif: Example alignment in a 40-row rectangle: Snowflake 1 centered at row 8 from the lower seam, Poinsettia center at row 20 (center of the rectangle), Snowflake 2 at row 32. Adjust as needed if you altered rectangle row count.
— Assembly & Placement of Appliques :
Round 1 :
Refer to the center marker placed on the rectangular panel. From the lower triangle seam moving upward: place a bell centered on the tip (covering approximately 6-8 rows and about 10-12 stitches in width), then a small holly sprig approx 10 rows above, then a snowflake embroidered motif above that, then the large poinsettia centered at the absolute center of the runner, then mirror the sequence toward the top triangle (snowflake, holly, bell). Pin each applique in place to verify symmetry before sewing.
Round 2 :
Sew appliques: attach bells by stitching through the inner top of the bell (the green base of the bell motif or the top center) into the body of the runner using a matching cream yarn and hidden whip stitch. Secure each holly sprig under bell bows and sew poinsettia by running invisible stitches through the green base and body fabric (approx 8 evenly spaced stitches around the sepal base). Weave tails to back and trim.
Info :
Use small tying stitches for the beads and embroidery; avoid long visible stitches on the right side. Use pins while sewing to maintain curvature. If you used beads for berries, secure their thread on the back with several passes and knot extra thread then hide the knot inside the applique by pulling it under stitches with the tapestry needle.
— Final Finishing Touches :
Round 1 :
Blow-dry lightly with cool air or allow to air dry after a final gentle blocking and steam to set shapes. Press (steam only) the gold trims lightly to bring out metallic sheen if necessary. Trim and weave in any remaining tails.
Info :
Check underside for loose threads and secure them. If the scalloped border needs more definition, add one extra round of slip stitches in cream just behind the scallops to pull the edge gently and uniformly.
Round 2 :
Optional: Hand tack a few unobtrusive stitches at the center underside of each applique so they lie flat during storage and cleaning. For cleaning, spot clean gently or hand wash on cool setting and lay flat to dry to preserve metallic threads and beadwork.
This festive table runner pattern brings timeless holiday style to your table with richly textured rows, a soft scalloped border, and handmade appliques that sparkle with metallic touches. Every stitch contributes to a piece you’ll reach for year after year — perfect for family gatherings and seasonal décor. Make one as a thoughtful holiday gift or a beautiful heirloom for your home. 🧶🎄✨