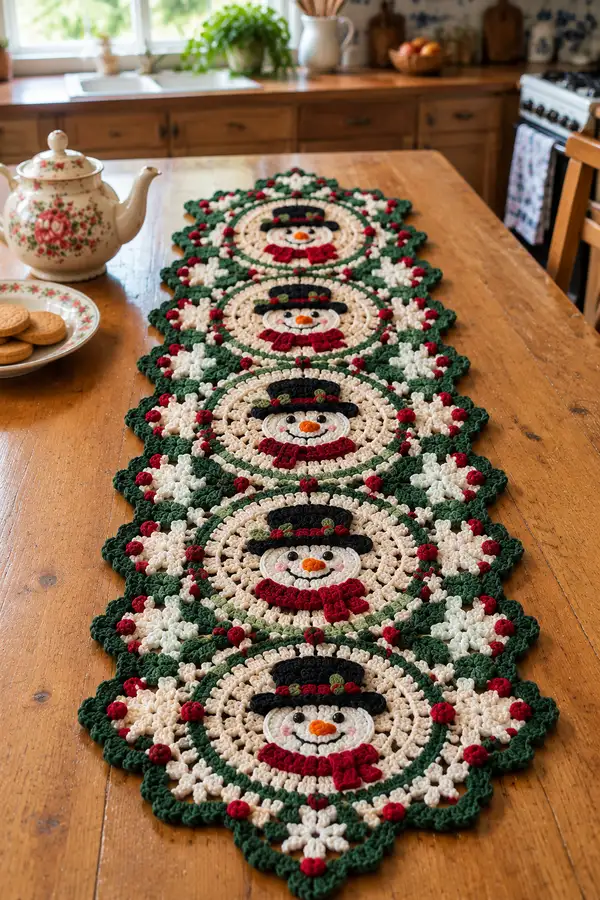
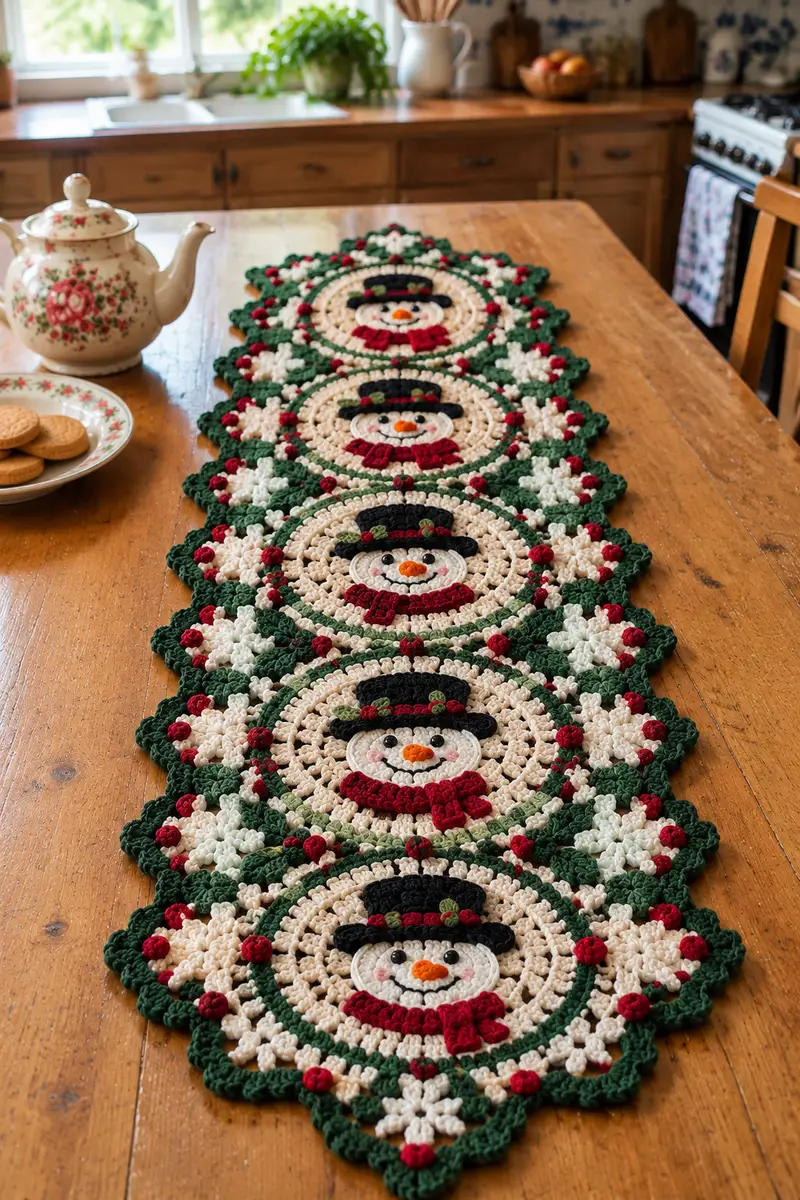
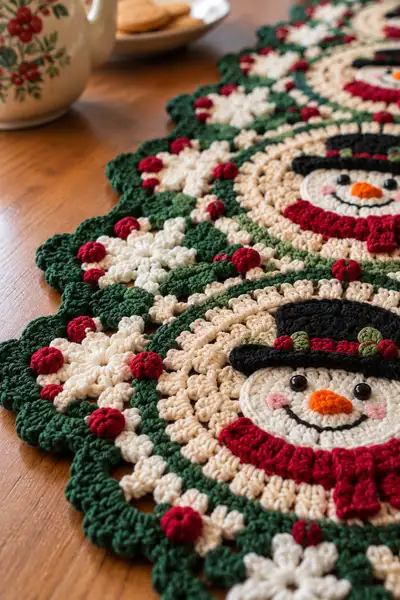
A long, festive table runner made from five joined circular snowman motifs with scalloped edges, holly berries, and lacy snowflakes. The runner uses classic holiday colors — cream, deep green, cranberry red, black and orange — and features textured puff clusters and bobbles for a rich, dimensional look. Each round motif is worked in pieces (face, hat, scarf, outer rings, snowflake corner pieces) then joined-as-you-go for a seamless runner. Perfect for holiday tables and seasonal gifting.
Progress Tracker
0% Complete
— Face Circle :
Round 1 :
6 sc in magic ring (6) - using white yarn for the snowman face center
Round 3 :
(1 sc, inc) x 6 (18)
Round 4 :
(2 sc, inc) x 6 (24)
Round 5 :
(3 sc, inc) x 6 (30)
Info :
Keep tension even and do not over-tighten the magic ring; this center will become the snowman face. If you prefer less curling, use a slightly larger hook for rounds 1-4 and switch to main hook for later rounds
Round 6 :
(4 sc, inc) x 6 (36)
Round 7 :
(5 sc, inc) x 6 (42)
Round 8 :
(6 sc, inc) x 6 (48)
Round 9-11 :
1 sc in each st (48)
Info :
Place eyes between Round 10 and 11. For a centered expression place eyes approximately 6-8 sts apart (counting from center line). Use small black beads or embroider with black floss. If using beads, sew them firmly and secure with knot and a little fabric glue if preferred
Round 12 :
(6 sc, inc) x 6 (54) - change to cream/ivory yarn at the end of the round to create a soft halo around the face
Round 13 :
1 sc in each st (54)
Round 14 :
1 sc in each st BLO (54)
Info :
Work 1 round BLO to create a subtle ridge around the face that visually separates the face from the outer halo. Use a stitch marker to mark the start of rounds
Round 15 :
*(3 dc, ch1, 3 dc) in next st, sl st in next 3 sts* around to create a lacy halo (54 clusters - adjust spacing: 6 groups around) - see note below for cluster math
Info :
The lacy halo round is decorative and should sit flat; adjust tension or skip a group if the halo cups. Aim to make six evenly spaced shell groups around the circle, each group occupying 9 stitches total on the previous round (3 dc, ch1, 3 dc equals 6 stitches visually applied to a 9-st interval)
Round 16 :
1 sc in each st (54)
Round 17 :
*(2 sc, bp) repeat across to create small texture bumps around the inner halo: (2 sc, bp) x 18 (54)
Info :
Bobble (bp): yarn over, insert, pull up loop, yarn over, insert, pull up loop; repeat 3 times total then yarn over and draw through all loops on hook. Secure bobbles by pulling the final yarn tail inside the bobble and weaving to the back
Round 18 :
1 sc in each st (54)
Round 19 :
Change to light tan or warm beige yarn. 1 sc in each st (54)
Round 20 :
*(7 sc, inc) x 6 (60)
Info :
Begin the outer textured ring for the motif; the warm beige creates a classic farmhouse look. Keep the surface flat—if it begins to ripple, reduce increases in next round
Round 21 :
(8 sc, inc) x 6 (66)
Round 22 :
1 sc in each st (66)
Round 23 :
*(5 sc, inc) x 11 + 1 sc to finish round (77) - distribute increases evenly
Info :
If your count is off, recount and adjust increases so the motif rounds stay circular. This beige ring will be the main background for the snowman head, so it should be wider than the white center
Round 24 :
1 sc in each st (77)
Round 25 :
Change to dark green yarn. *(4 sc, ch2, skip 2) - forming points for outer motif structure (work to create 12 arches across) (77 approx)
Info :
These arches will become attachment points for the snowflake corners and scalloped edging. Keep counts approximate but consistent across motifs; the join-as-you-go later will accommodate small variances
— Hooked Carrot Nose :
Round 1 :
Using orange yarn: 6 sc in magic ring (6)
Round 2 :
(1 sc, inc) x 3 (9)
Round 3 :
(2 sc, inc) x 3 (12)
Round 4 :
1 sc in each st (12)
Round 5 :
*(2 sc, dec) x 3 (9)
Round 6 :
Stuff lightly with a tiny pinch of fiberfill then (1 sc, dec) x 3 (6)
Round 7 :
6 sc - fasten off leaving long tail for sewing
Info :
Sew carrot nose to center of face between Rounds 10 and 12, angling slightly upward. Use vertical stitches to secure and hide yarn tail inside the nose
— Eyes, Cheeks and Smile :
Info :
Eyes: position at Round 10-11 on the white face center. Use two 6-8mm black beads or embroider small satin-stitched circles with black thread. Cheeks: use blush pink tiny circles (French knots with embroidery floss or small 6 dc cluster in pink yarn) on either side of the nose.
Round 1 (Mouth Embroidery) :
Using black embroidery floss, create a slight upward smiling curve beneath the nose using backstitch or chain stitch. Make small evenly-spaced stitches to form the smile across approximately 10-12 stitches of the face round
Round 2 (Cheeks) :
Use blush pink yarn and create two small puff or 6-hdc circle embellishments, each about 6 mm diameter. Sew in place between face rounds 11-12
Info :
Tuck and weave all embroidery tails to the backside of the motif and secure; avoid large knots on the front that can create bumps visible on the table surface
— Scarf (Worked Flat, Then Attached) :
Row 1 :
With cranberry red, ch 24, sc in 2nd ch from hook and across (23)
Row 2 :
ch1, turn, sc across (23)
Row 3 :
ch1, turn, (hdc in next 3, bp in next, hdc in next 3) repeat across to create ribbed texture. Fasten off leaving long tail
Info :
Fold scarf in half and sew the center to Round 11-12 area of face so that the ends drape over the lower face edge. Trim and shape tassel ends by leaving a small fringe or crafting short small tails as desired
— Top Hat (Make 1 for each motif) :
Hat Brim Round 1 :
With black yarn, ch 20, join to form a ring without twisting. R1: 40 sc around the chain (40)
Hat Brim Round 2 :
1 sc in each st (40)
Hat Brim Round 3 :
*(1 sc, inc) x 13 + 1 sc to equal (54)
Info :
Flatten brim and use one or two rounds to create a slightly wider edge by working in BLO for extra definition; keep brim lightly stuffed if you want subtle stiffness
Hat Crown Round 1 :
Attach black to center of brim top, mr 6 sc into ring (6)
Hat Crown Round 2 :
6 inc (12)
Hat Crown Round 3 :
(1 sc, inc) x 6 (18)
Hat Crown Round 4 :
(2 sc, inc) x 6 (24)
Hat Crown Round 5-7 :
1 sc in each st (24)
Info :
If you prefer a shorter crown, stop at Round 6; for a taller whimsical hat, add an extra round of (3 sc, inc) x 6 before continuing. Add a small decorative band in olive/leaf green with 1 round of sc around the base of the crown
Hat Trim :
Using olive green yarn, ch around the base and sc in each st for a single round of hat trim; add 3 tiny red bobbles evenly spaced to mimic holly berries
Info :
Sew hat onto top of motif covering Rounds 15-17 area of the circle. Tuck edges slightly under brim to create a snug look and stitch down through the beige and white rounds to secure neatly
— Outer Green Ring and Snowflake Corners :
Round 1 :
With dark green: join to the outermost beige round; ch1, sc evenly around (approx 77 sc) - count to match previous round (77)
Round 2 :
*(3 sc, ch2, skip 2) x around to produce 12 arches (approx) (77)
Round 3 :
Into each arch: (3 dc, ch1, 3 dc) to make shell motifs around (12 shells)
Info :
These shell groups will form the structural base for the scalloped final edge. Keep the number of shells even and symmetrical so snowflakes and berries align between motifs when joined
Round 4 :
1 sc in each st and in each ch-space around (approx 100 sts)
Round 5 :
Change to cream yarn: 1 sc in each st (100)
Round 6 :
*(1 sc, puff, 2 sc) across to add texture - work 100 sts with 25 puffs evenly spaced
Info :
Puff stitch: yarn over, insert hook, pull up loop; repeat 3 times then yarn over and pull through all loops. Work puff into ch-spaces or as directed. Keep puff stitch tension uniform by pulling loops to the same height before gathering.
Round 7 :
1 sc in each st (100)
Round 8 :
Change to white: make small snowflake points by working into selected shell gaps - see Snowflake motif below and attach
— Snowflake Motif (Make 4 per motif, attached to outer ring) :
Round 1 :
With white yarn: 6 sc in magic ring (6)
Round 3 :
(1 sc, inc) x 6 (18)
Round 4 :
*ch3, sl st back in ring to make point*, repeat 6 times to create 6 points; fasten off leaving tail for sewing
Info :
Sew each snowflake into the green arches formed on the outer ring so they sit evenly between the shell groups. Pin placement before sewing to ensure symmetry
— Holly Berries (Make multiple small red bobbles) :
Round 1 :
Using cranberry red: 6 sc in magic ring (6)
Round 2 :
*(yo, insert, pull up loop) repeat 3 times gather and sl st through all loops to form a tiny bobble - fasten off leaving long tail to sew (approx 6 loops collapsed)
Info :
Sew bobbles into the centers between shells and snowflakes; cluster three near the hat trim as holly berries for each motif. Use small green leaves (2-3 sc teardrops) for leaf accents
— Scalloped Edge Final Border :
Round 1 :
With dark green: 1 sc in each st around to tidy (approx 100 sc)
Round 2 :
*(5 dc in next st, sl st in next st) repeat around to create 12 large scallops (approx) - adjust repeat to create even points
Round 3 :
Into each scallop: work (ch1, 7 dc, ch1) then sl st to base to form full scallops; fasten off and weave ends
Info :
Place small red bobble in the center of each scallop or at every other scallop for the dotted-berry look. If scallops pucker, block gently with a damp cloth and pin to shape
— Join-As-You-Go Row (Connecting Motifs into Runner):
Info :
Work the final border round on each motif but pause at one scallop that will be the connection point to the adjacent motif. When reaching that scallop, join to corresponding scallop on the completed neighbor by slip stitching through both motifs' edge sts as you work. Pin motifs together before joining to ensure alignment.
Round 1 (Join) :
At the chosen scallop, ch1, sc across next 6 sts then instead of finishing scallop, sl st through the corresponding st of the adjacent motif, ch1 and continue scallop. Repeat for each joining point (4 joins per side per motif except ends) to attach two motifs together (maintain consistent tension to avoid pulling)
Info :
Join motifs in a straight line: place the first motif on the table, align the second so scallop points match, and attach between the two closest scallop points. Continue adding motifs left-to-right, joining every time you come to the join scallop. For stronger joins, go back and sew through the edge of both motifs with a yarn needle using mattress stitch
— Finishing Touches and Final Assembly Rounds :
Round 1 :
Once all five motifs are joined, check the runner for loose tails, and weave all ends to the back. Add extra securing stitches at joins if runner will be moved frequently (8-12 mattress stitch passes per join recommended)
Round 2 :
Optional: add a single round of slip stitch around the entire outside perimeter in dark green to tidy edges and reinforce joins
Info :
Carefully block the entire runner by pinning it flat to a blocking surface and lightly spraying with water or using a steam iron held above (do not press). Allow to dry fully to encourage scallops and snowflakes to sit flat
Round 3 :
Inspect the runner and sew down any decorative pieces that lift or do not sit flush. Add a dot of fabric glue to the back of beads to further secure them if desired
Info :
Final size will vary based on yarn and tension; estimate approx 10-12 inches wide and 48-60 inches long for five motifs joined with the specified yarn and hooks. Adjust by adding or removing motifs
This festive snowman table runner brings vintage charm and cheerful detail to your holiday table! Each medallion is full of texture — puffs, bobbles and scallops — and the join-as-you-go construction makes assembly satisfying and neat. The finished piece is a lovely seasonal centerpiece to treasure or give as a thoughtful handmade gift. 🧶❄️🎄