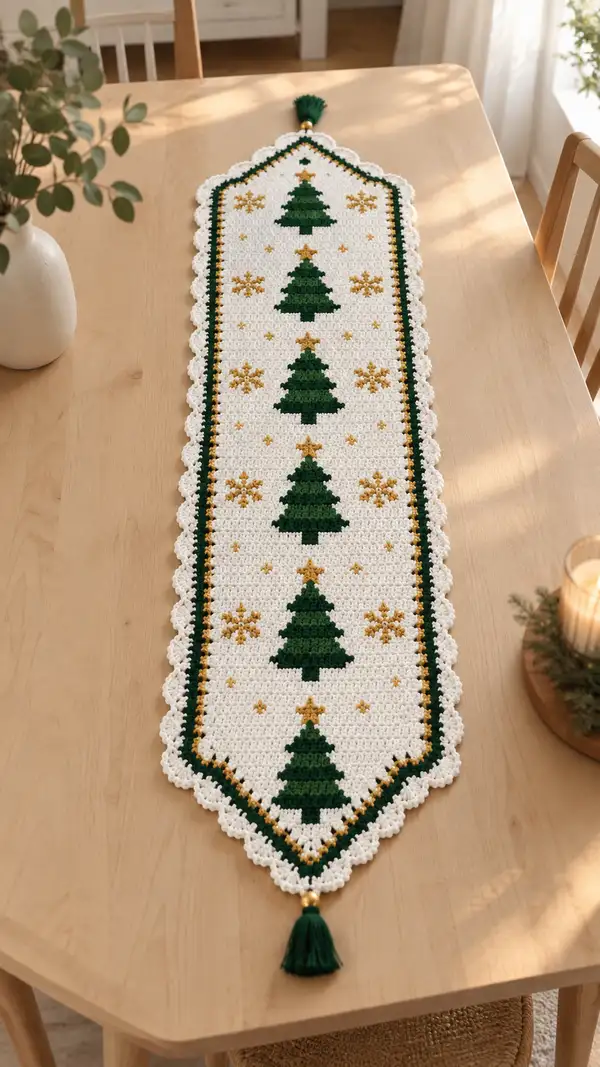
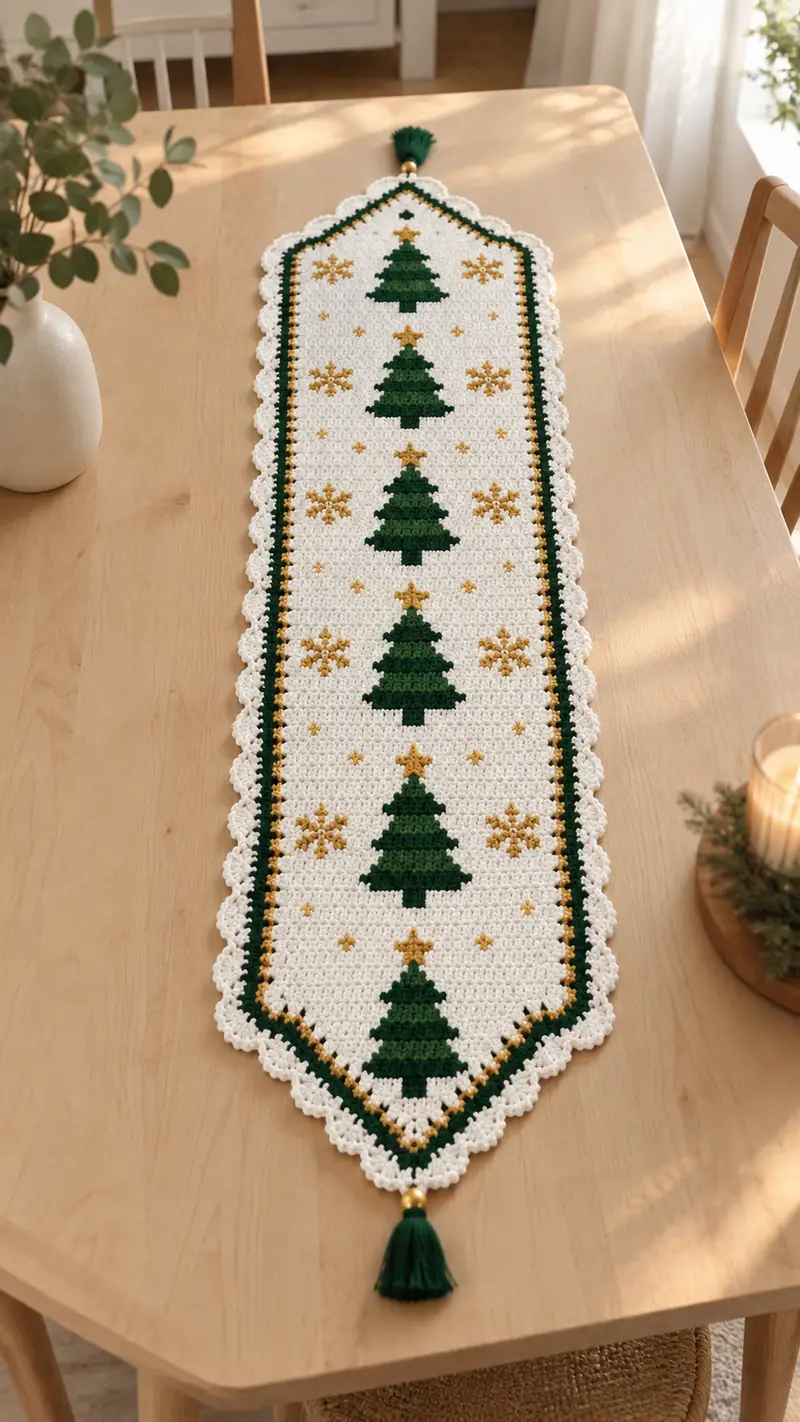
Create a charming holiday table runner featuring a column of stacked green Christmas trees, golden stars and snowflakes, a dark green and gold inner border, scalloped white edging, and tasseled ends. This written pattern uses tapestry crochet for crisp motifs and a delicate shell edging to finish. Perfect for dressing a wooden table or sideboard with handmade holiday cheer.
Progress Tracker
0% Complete
— Materials & Gauge :
Info :
Gauge: 18 sc and 20 rows = 10 cm/4" using 3.5mm hook in worsted weight yarn. A tighter gauge is preferred for tapestry work to reduce float visibility. Final runner in sample measures approximately 14" (35 cm) wide and 60" (152 cm) long including tasseled points.
— Notes before you begin :
Info :
This pattern is written in rows using tapestry crochet (single crochet color changes). All rows are worked turning at the end unless otherwise noted. Carry unused colors along the row and catch them behind the fabric by crocheting over the floats, no longer than 6-8 stitches. Use stitch markers at the beginning of each row and at each motif column boundary to avoid miscounting.
— Foundation Chain & Starting Row :
Round 1 :
Ch 61 (this is the foundation chain that sets the working width for the entire runner). The chain count of 61 produces 61 sc across each subsequent row (61)
Round 2 :
Row 1 (RS): Starting in 2nd ch from hook, 1 sc in each ch across, turn (61)
Round 3 :
Row 2 (WS): Ch 1, 1 sc in each st across, turn (61)
Info :
Work the next rows all in sc unless otherwise specified. For crisp motif edges, make color changes on the last yarn over of the stitch preceding the new color so the new color is carried into the stitch when you complete it.
— Center Panel: Main White Background and Motif Grid (Rows 3–150) :
Round 4-6 :
Row 3-5: 1 sc in each st (61) (Work three rows of white for a top margin before the first motifs)
Round 7 :
Row 6: 1 sc in each st (61)
Info :
We will build five tree motifs down the center column, each 18 rows tall, with 12-row white spacers between them. The tree motif is centered on the 61-st width: it occupies a 15-st wide motif column centered on the runner. Use the following column layout from left to right: 17 white, 15 motif, 17 white, 12 white as side borders (this keeps 61 stitches total). Place markers at the column boundaries (after 17 sts, after 32 sts, after 49 sts).
Round 8 :
Row 7-8: 1 sc in each st (61)
Round 9 :
Row 9 (Begin first tree motif zone): Work across row in white except within motif column (st 18-32) where you will follow the motif pixel map. Row total remains 61 stitches (61)
Info :
Motif grid: Each tree is 15 stitches wide and 18 rows tall. Star and trunk details are included in the motif grid. For clarity, the motif column stitch positions are absolute: stitches 18 through 32 inclusive. Keep the same column index for all motif rows and subsequent tree motifs.
Round 10 :
Row 10 (Motif Row 1 for Tree 1): 17 white sc, 7 white sc + 1 green sc + 7 white sc across motif column layout (61)
Round 11 :
Row 11 (Motif Row 2): 17 white sc, 6 white sc + 3 green sc + 6 white sc (61)
Round 12 :
Row 12 (Motif Row 3): 17 white sc, 5 white sc + 5 green sc + 5 white sc (61)
Round 13 :
Row 13 (Motif Row 4): 17 white sc, 4 white sc + 7 green sc + 4 white sc (61)
Round 14 :
Row 14 (Motif Row 5): 17 white sc, 4 white sc + 7 green sc + 4 white sc (61)
Info :
These first five motif rows form the top of the stylized Christmas tree and should use the dark green for main tree color. If using two greens (dark and medium), substitute a few internal pixels on rows 12–14 with medium green to give a subtle banded look; otherwise use single green for a clean silhouette.
Round 15 :
Row 15 (Motif Row 6): 17 white sc, 3 white sc + 9 green sc + 3 white sc (61)
Round 16 :
Row 16 (Motif Row 7): 17 white sc, 3 white sc + 9 green sc + 3 white sc (61)
Round 17 :
Row 17 (Motif Row 8): 17 white sc, 2 white sc + 11 green sc + 2 white sc (61)
Round 18 :
Row 18 (Motif Row 9): 17 white sc, 2 white sc + 11 green sc + 2 white sc (61)
Round 19 :
Row 19 (Motif Row 10): 17 white sc, 1 white sc + 13 green sc + 1 white sc (61)
Round 20 :
Row 20 (Motif Row 11): 17 white sc, 1 white sc + 13 green sc + 1 white sc (61)
Round 21 :
Row 21 (Motif Row 12): 17 white sc, 0 white sc + 15 green sc + 0 white sc (61)
Info :
Row 21 is the widest part of the tree (a 15-st green band). If you want a trunk to appear, it will be centered below this band using darker or same green for blocks and gold for the star above the trunk row.
Round 22 :
Row 22 (Motif Row 13): 17 white sc, 2 white sc + 11 green sc + 2 white sc (61)
Round 23 :
Row 23 (Motif Row 14): 17 white sc, 2 white sc + 11 green sc + 2 white sc (61)
Round 24 :
Row 24 (Motif Row 15): 17 white sc, 3 white sc + 9 green sc + 3 white sc (61)
Round 25 :
Row 25 (Motif Row 16): 17 white sc, 3 white sc + 9 green sc + 3 white sc (61)
Round 26 :
Row 26 (Motif Row 17): 17 white sc, 5 white sc + 5 green sc + 5 white sc (61)
Round 27 :
Row 27 (Motif Row 18): 17 white sc, 7 white sc + 1 green sc + 7 white sc (61)
Info :
Immediately above the tree top you may want to add a gold star motif. Replace the single green pixel at the top center (Row 10-like position) with a gold stitch. Mark the single-star pixel positions for later trees so spacing aligns vertically.
Round 28-39 :
Row 28-39: Work 12 rows of white spacer (1 sc in each st across, 61) between trees (61)
Info :
Now repeat the tree motif sequence outlined in Rounds 10–27 for Tree 2. Each tree block (including its own top star and trunk) spans 18 rows. Repeat the 18-row motif description exactly for each subsequent tree, maintaining the same column boundaries to keep trees vertically aligned.
Round 40-149 :
Row 40-149: Repeat motif block (Rows 10–27) followed by 12 rows spacer (Rows 28–39) for Trees 2–5. Make sure trees are centered in the motif column and that gold star pixels are placed directly above each tree where described. Each motif block keeps the overall count at 61 stitches per row (61)
Round 150 :
Row 150: After completing the 5th tree motif block and a final 6-row white margin, work 1 sc in each st across (61)
Info :
At this point you have a long rectangular panel with all tree motifs. Take time to check that all color floats are tidy on the WS and that motif pixels line up vertically. We will now shape the pointed end on the far edge by progressive decreases worked as mirrored rows.
— Pointed End Shaping (Top Tip) : (Rows 151–180)
Round 151 :
Row 151: Ch 1, sc2tog over first 2 sts, 1 sc in each remaining st until last 2 sts, sc2tog over last 2 sts, turn (59)
Round 152 :
Row 152: Ch 1, sc2tog, 1 sc in each st to last 2 sts, sc2tog, turn (57)
Round 153 :
Row 153: Ch 1, sc2tog, 1 sc in each st to last 2 sts, sc2tog, turn (55)
Round 154 :
Row 154: Ch 1, sc2tog, 1 sc in each st to last 2 sts, sc2tog, turn (53)
Info :
Continue decreasing 2 stitches per row by sc2tog at beginning and end of each row. The decrease forms a symmetric triangle. Keep tension consistent and use leftover yarn to maintain color continuity at the very tip. Check counts every 5 rows.
Round 155 :
Row 155: Ch 1, sc2tog, 1 sc in each st to last 2 sts, sc2tog, turn (51)
Round 156 :
Row 156: Ch 1, sc2tog, 1 sc in each st to last 2 sts, sc2tog, turn (49)
Round 157 :
Row 157: Ch 1, sc2tog, 1 sc in each st to last 2 sts, sc2tog, turn (47)
Round 158 :
Row 158: Ch 1, sc2tog, 1 sc in each st to last 2 sts, sc2tog, turn (45)
Round 159 :
Row 159: Ch 1, sc2tog, 1 sc in each st to last 2 sts, sc2tog, turn (43)
Round 160 :
Row 160: Ch 1, sc2tog, 1 sc in each st to last 2 sts, sc2tog, turn (41)
Info :
Check the tip width visually — the pictured tip is fairly narrow. Continue decreasing until the tip measures a few stitches wide (aim for 3–5 sts at the narrowest point to allow for tassel attachment). If you prefer a sharper point, decrease to 1 stitch; for sturdier tassel attachment, leave 3 stitches.
Round 161 :
Row 161: Ch 1, sc2tog, 1 sc in each st to last 2 sts, sc2tog, turn (39)
Round 162 :
Row 162: Ch 1, sc2tog, 1 sc in each st to last 2 sts, sc2tog, turn (37)
Round 163 :
Row 163: Ch 1, sc2tog, 1 sc in each st to last 2 sts, sc2tog, turn (35)
Round 164 :
Row 164: Ch 1, sc2tog, 1 sc in each st to last 2 sts, sc2tog, turn (33)
Round 165 :
Row 165: Ch 1, sc2tog, 1 sc in each st to last 2 sts, sc2tog, turn (31)
Round 166 :
Row 166: Ch 1, sc2tog, 1 sc in each st to last 2 sts, sc2tog, turn (29)
Round 167 :
Row 167: Ch 1, sc2tog, 1 sc in each st to last 2 sts, sc2tog, turn (27)
Round 168 :
Row 168: Ch 1, sc2tog, 1 sc in each st to last 2 sts, sc2tog, turn (25)
Round 169 :
Row 169: Ch 1, sc2tog, 1 sc in each st to last 2 sts, sc2tog, turn (23)
Round 170 :
Row 170: Ch 1, sc2tog, 1 sc in each st to last 2 sts, sc2tog, turn (21)
Round 171 :
Row 171: Ch 1, sc2tog, 1 sc in each st to last 2 sts, sc2tog, turn (19)
Round 172 :
Row 172: Ch 1, sc2tog, 1 sc in each st to last 2 sts, sc2tog, turn (17)
Round 173 :
Row 173: Ch 1, sc2tog, 1 sc in each st to last 2 sts, sc2tog, turn (15)
Round 174 :
Row 174: Ch 1, sc2tog, 1 sc in each st to last 2 sts, sc2tog, turn (13)
Round 175 :
Row 175: Ch 1, sc2tog, 1 sc in each st to last 2 sts, sc2tog, turn (11)
Round 176 :
Row 176: Ch 1, sc2tog, 1 sc in each st to last 2 sts, sc2tog, turn (9)
Round 177 :
Row 177: Ch 1, sc2tog, 1 sc in each st to last 2 sts, sc2tog, turn (7)
Round 178 :
Row 178: Ch 1, sc2tog, 1 sc in each st to last 2 sts, sc2tog, turn (5)
Round 179 :
Row 179: Ch 1, sc2tog, 1 sc in each st to last 2 sts, sc2tog, turn (3)
Round 180 :
Row 180: Ch 1, sc2tog, sc (if needed) to close to tip until you have 1–3 stitches as desired; fasten off leaving long tail for tassel anchoring (1–3)
Info :
At the tip, leave an extra 16–20" tail for securing tassel loop and finishing. Repeat these decreases symmetrically on the opposite short end later to form the second point or you may choose to work both ends mirror-wise (recommended).
— Mirror Pointed End (Bottom Tip) : (Rows 181–210)
Round 181-210 :
Row 181-210: Return to the straight rectangular panel start edge (the very bottom of your first foundation). Repeat the same decrease sequence used for Rows 151–180 on the opposite end to create the second pointed tip. Work dec rows until tip width matches top tip. Fasten off leaving long tail for tassel (1–3)
Info :
Once both tips are shaped, weave in and secure all color floats across WS, trim any long floats. At this point the runner is a long narrow diamond-ended panel. We will work an inset inner border in gold and green, then an outer scalloped shell edge in white.
— Inner Stripes & Frame Border :
Round 211 :
Join gold at any stitch on RS near the long side about 6 rows down from tip. Ch 1, sc evenly along long edge through the sides of rows: place 1 sc into the side of each row-end across the entire long side, placing 2 sc into each row-end at the narrow triangular sections to keep the edge from pulling (approximate count varies by side length, aim for even spacing)
Info :
Counting side stitches precisely when working into row ends is difficult because the triangular tips reduce row counts. Focus on spacing shells and scs evenly along straight sides and add extra scs in triangular rows where necessary to avoid puckering. Mark quarters to keep stripes even.
Round 212 :
With gold still attached, work 1 round of sc along entire perimeter (including short pointed ends): place 3 sc into each point tip to turn corners smoothly and join with sl st to first sc; fasten off gold (edge stitch count will vary per side)
Round 213 :
Join dark green to the RS with sl st into any sc. Ch 1, work 1 sc evenly around entire perimeter into each sc, placing 3 sc into each point tip and 2 sc into the sl st corners if necessary; join with sl st and fasten off (this creates a dark green inner stripe directly outside the gold band)
Info :
The gold + dark green inner border in the image is narrow but striking. Keep both rounds tight and even. If you want a cleaner framed look, block the piece after attaching these stripes to flatten and square the inner frame before working the scallop edge.
— Outer Scalloped Shell Edge (White) :
Round 214 :
Join white to RS at midpoint of one long side. Ch 1, 1 sc into same st, *skip 2 sts, work (dc, dc, dc, dc, dc) all into next st (5 dc shell), skip 2 sts, 1 sc into next st; rep from * around long side to the tip corners; on the triangular point rows, space shells so that 3 shells meet at the tip and work 3 sc into the actual tip to keep shape. Continue around entire perimeter, join with sl st to first sc (shell count approx varies; distribute evenly)
Info :
Work shells into the side of rows, not into the top loops — this gives a nice picot scallop. On the straight long sides, aim for approx one shell every 5–6 rows depending on spacing; ease them around the triangular tip by placing smaller gaps between shells.
Round 215 :
Ch 1, *sl st in first dc of next shell, ch 3, sl st in third dc of same shell (this creates a small loop inside each shell), sl st to next sc between shells; rep from * around; join with sl st and fasten off (this refines shells and gives a lacy edge)
Round 216 :
Optional crisping round: With white, work 1 sc into each shell center and 1 sc into each sc space to make edge firmer; join and fasten off
Info :
If your scallop spacing feels uneven, damp-block the entire piece, shaping shells to consistent curves with pins. Allow to dry fully before attaching tassels and beads.
— Golden Snowflakes & Accent Stars (Embroidered or Tapestry) :
Round 217 :
Info : The small gold snowflakes and scattered stars are easiest to add using duplicate stitch (embroidery) after the runner is blocked. Use gold yarn and a yarn needle to embroider a 6-point snowflake motif and small 1-3 stitch star dots between tree motifs. Alternatively, incorporate them into tapestry by substituting gold stitches on the appropriate rows while crocheting the central panel.
Round 218 :
Embroider 6-point snowflake: Starting at designated position (refer to photo spacing: snowflakes sit roughly 6–8 rows above/below tree center and to either side of the motif column), use duplicate stitch to embroider a center + 6 radiating arms each 2–3 stitches long. Add small 1-st stars around as tiny crosses of 1 or 3 stitches for sparkle.
Info :
Place three large snowflakes per long side per repeated banding pattern (as in photo): between each pair of adjacent trees, embroider two snowflakes symmetric left and right and single stars in the outer white fields to balance composition. Measure so embroidery aligns vertically across motif repeats.
— Tassels & Beads :
Round 219 :
Make 2 tassels: Wrap dark green yarn around a 4" wide book or card 60 times for a medium-thick tassel. Tie the top with a short length of gold yarn, slide off the card, and secure the loop by wrapping the top 1/2" with gold thread. Trim the bottom edge evenly. Add a gold bead on the wrapped loop and knot securely.
Round 220 :
Attach tassels: Thread the long tail left at each point-tip through the loop of the tassel or tie tassel directly through the tip st(s). Pull the tail to WS and knot several times to secure. Weave ends back into tip for a neat finish. Add a dab of fabric glue inside tip if desired for extra security.
Info :
Tassels add a polished, festive touch and hide the pointed tip transitions. If you prefer, make pom-poms instead or leave tips unadorned for a cleaner modern look.
— Finishing :
Round 221 :
Weave in ends: Use a yarn needle to weave all leftover ends into the runner on the WS, following the rows for at least 1.5" before trimming to prevent slipping, especially where color changes are frequent.
Round 222 :
Blocking: Pin the runner to blocking mats, shaping scallops and tips. Lightly mist with water and allow to dry fully. For a crisper finish, use a steam iron from a distance or a damp cloth and low steam, testing on a scrap if necessary.
Round 223 :
Final check: Secure beads and tassels, trim stray fibers, and check for any loose stitches. Your runner is ready for the table.
Info :
Care: Hand wash gently in cold water and lay flat to dry. Spot-clean as needed. Store flat or rolled to protect scallops and tassels.
— Alternative size and motif adjustments :
Info :
To lengthen or shorten the runner, add or remove full 30-row motif spacer blocks between trees (12-row spacers plus 18-row tree motifs). To change the number of trees, adjust starting row count and repeat motif sequence. To make a narrower runner, reduce foundation chain by multiples of 2 while maintaining motif column centrality (ensure motif width stays 15 sts and side margins adapt accordingly).
Completing this festive table runner brings a special handcrafted touch to your holiday table that guests will notice and admire. The combination of crisp green trees, delicate gold snowflakes, and a scalloped white edge creates a classic-yet-modern look that's perfect year after year. I hope you enjoyed the rhythmic tapestry crochet and the soothing repetition of shells — every stitch adds to the warmth of your home. 🧶✨ Add a few sprigs of evergreen and a candle to finish the scene and enjoy! 🎄