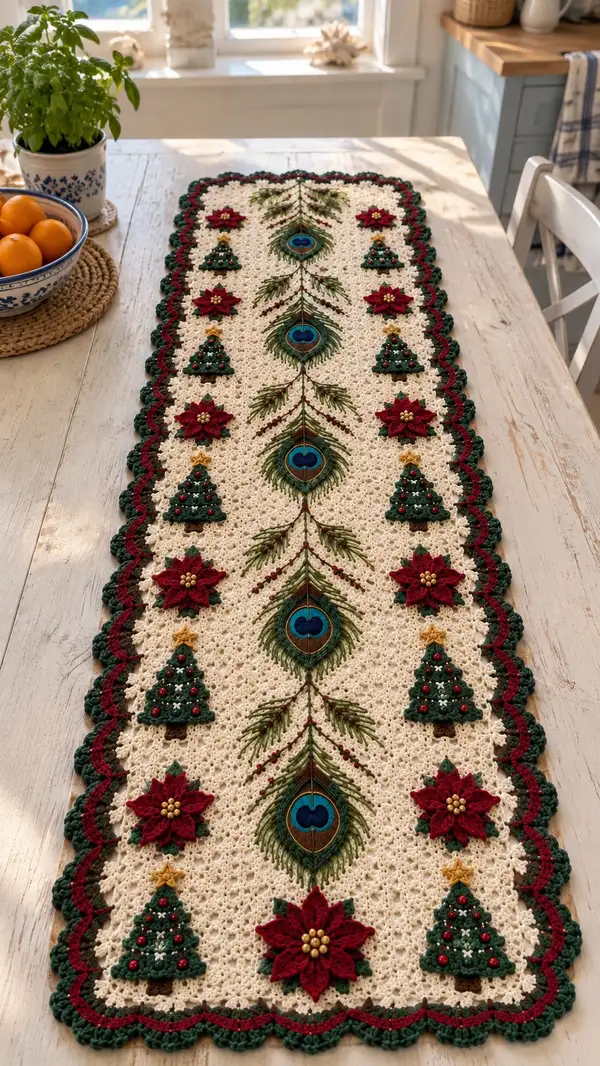
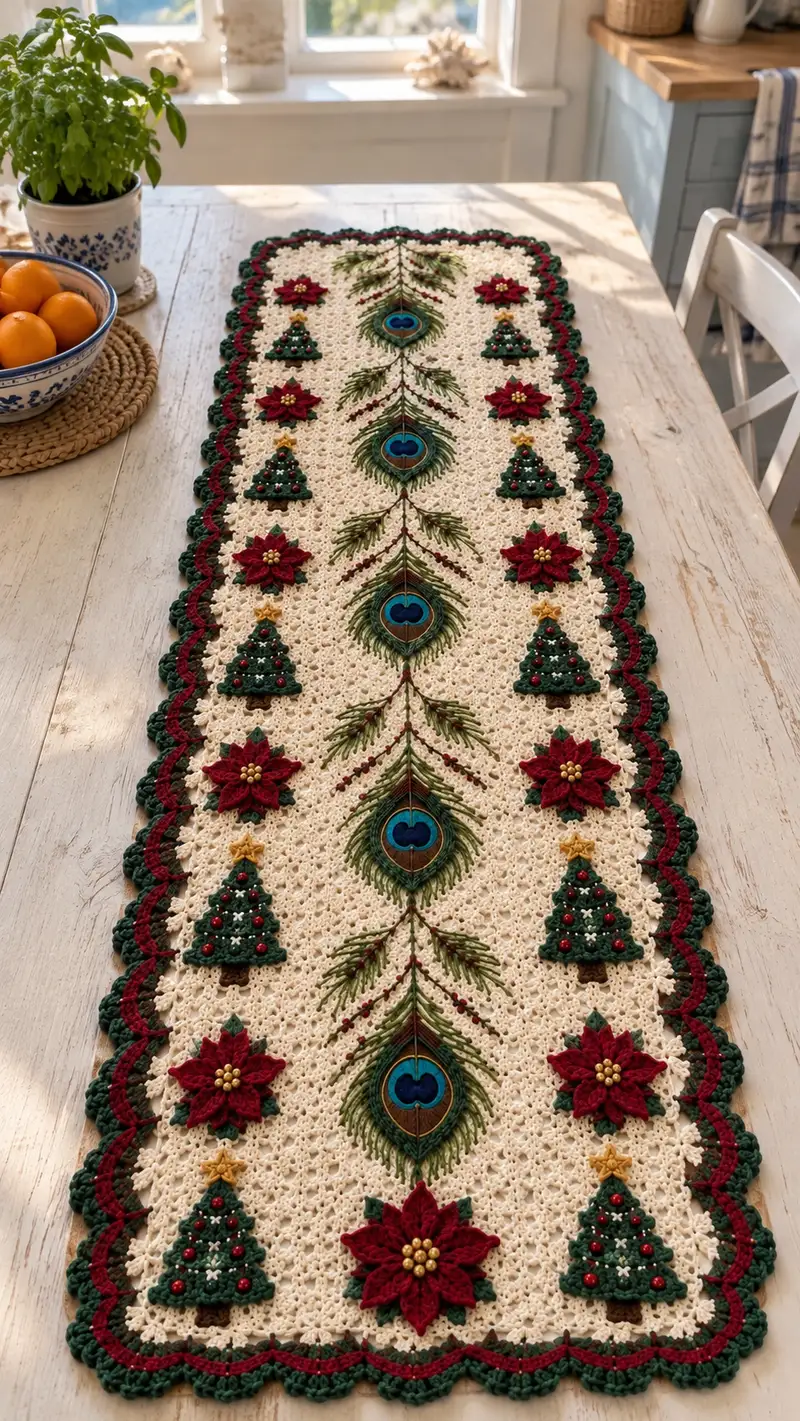
A festive, heirloom-quality table runner featuring elegant peacock-feather medallions down the center, surrounded by raised poinsettia and tiny Christmas tree appliques. The background is an airy cream lacy mesh with a scalloped deep-green-and-crimson border that frames the runner beautifully. Bead-embellished centers and embroidered stems add sparkle and texture—perfect for holiday tables, buffets or as a seasonal centerpiece.
Progress Tracker
0% Complete
— Materials & gauge :
Info :
Gauge: Mesh base worked with worsted weight yarn and 3.5mm hook. Approx gauge: 12 V-stitch repeats = 10 cm across; 12 rows = 10 cm tall (after blocking). Adjust hook if necessary to achieve a firm yet lacy fabric for appliques to sit on.
Info :
Finished size (approx): 36cm x 140cm (14" x 55"). Final size will vary with yarn and blocking. Pattern is written for a single long runner with 3 central peacock medallions, flanked by 2 columns of alternating poinsettia and small tree appliques.
— Background Mesh Panel :
Info :
This section creates the airy cream background with a repeating V-stitch mesh. Work continuously in rows (we call them Rounds here for continuity); maintain the same stitch count for the majority of the panel to allow consistent placement of appliques. Foundation chain is multiple of 6 plus 4 for symmetry across edging.
Round 1 :
Foundation chain 124, ch1, sc into 2nd ch from hook and across to end (123 sc). Turn. (123)
Round 2 :
Ch3 (counts as dc), *sk next ch, V-stitch (dc, ch1, dc) in next ch, sk next ch, sc in next ch* rep across, end with dc in last st. Maintain pattern so you have 41 V-stitch spaces across (calculation: pattern multiple gives 41 V-st spaces). (123)
Round 3 :
Ch1, sc in each dc and sc across to align with previous V-st positions, placing sc into ch-1 spaces where needed to create even foundation row (123)
Round 4 :
Ch3, *V-st in ch-1 spaces from previous row, sc in top of next dc* rep across (41 V-st) (123)
Info :
Keep stitch marker at the start of each row to maintain counts. After Round 4 you have established a repeating row pattern: one V-st row, one sc row. This alternation creates a stable mesh perfect for applique placement.
Round 5-12 :
Rep Rounds 2-4 twice (alternating mesh rows) to build height for the first applique band. Maintain 123 sts each row. (123 each row)
Info :
Place a temporary marker at the horizontal center of the panel (st 62–63) to guide peacock feather placement. The three peacock medallions will be centered on this vertical axis later.
Round 13-24 :
Continue repeating mesh pattern (V-st row then sc row) for 12 additional rounds to create a tall uninterrupted central band for attaching peacock feather stems and embroidery. (123 each row)
Info :
Count rows as you go; pin a scrap of yarn every 6 rows to mark placement lines for later appliques. Block the mesh very lightly after 24 rounds if time allows—this stabilizes the fabric for applique placement.
Round 25-36 :
Rep Rounds 2-4 three more times to extend the panel to the first medallion placement (a total of 36 rounds so far on the mesh). Mark row 18 (center) for first peacock medallion center. (123)
Info :
The full background mesh will eventually total approximately 60 rounds to accommodate three medallions and spaces for stars/trees. Continue the same repeating pattern until Round 60, keeping counts constant and markers in place for applique mapping.
Round 37-60 :
Continue mesh repeats (pattern Rounds 2-4) until panel reaches desired length for three medallion placements and spaces between them. End after Round 60. Keep stitch count consistent (123).
Info :
Final mesh panel should measure approximately 36cm wide and 120–125cm long before edging. If your mesh is smaller or larger, add or remove sets of 6 stitches from the foundation chain at the start and increase or decrease the number of mesh repeats so three peacock medallions can be centered vertically with equal spacing.
— Peacock Feather Medallion (Make 3) :
Info :
Each peacock medallion is built as a layered applique: inner eye layers in blues, a stitched brown base ring, then many long feather strands made with looped or surface stitches to create the feather fringe. Work each medallion flat and sew to mesh panel at marked centers. These rounds are written for a single medallion; repeat to make three.
Round 1 :
With peacock-teal yarn, mr, ch1, 6 sc into magic ring. Pull tight. (6)
Round 2 :
Inc in each st around (12) (6 inc)
Round 3 :
(1 sc, inc) x 6 (18)
Round 4 :
Change to deep blue. (2 sc, inc) x 6 (24)
Round 5 :
Change to lighter teal. (3 sc, inc) x 6 (30)
Round 6 :
1 sc in each st (30)
Info :
At this point the layered eye has three color rings. Fasten off lighter teal leaving long tail for sewing; stitch the inner eye to the brown base later. Maintain nice flat circle—if buckling, adjust last round with BLO or loosen tension.
Round 7 :
Join brown yarn to outer edge of eye. Ch1, sc around in brown for a firm ring (30)
Round 8 :
(3 sc, inc) x 6 (36)
Round 9 :
1 sc in each st (36)
Round 10 :
(4 sc, inc) x 6 (42)
Info :
Round 10 creates a wider ring that helps the feather-shaped surround sit correctly on the mesh. Fasten off, leaving long tail for placement and sewing to mesh. We will add the feather fringe with embroidery-style loops attached to the brown ring.
Round 11 :
Blocking step: Pin the ring flat and steam gently to shape the medallion; do not press hard on the inner blue eye. Allow to cool fully before adding fringe.
Round 12 :
Feather embroidery base: Using olive green yarn and a sharp embroidery needle, take a length of yarn and secure at the back of the brown ring. Work 24 equally spaced straight stitches radiating outward from the lower half of the ring (approx 24 stitches). These are the stem/base of long feather strands (no change in stitch count).
Round 13 :
Create feather fringe by using a looped stitch technique in each radiating stitch: insert the needle through mesh near the end of the radiating stitch, pull up a long loop approx 2.5–3.0 cm, then secure with a small stitch at the base. Repeat across all 24 radiating stitches to create a full fringe. Trim loops to semi-even lengths and comb gently for feathered effect.
Info :
For a more 3D feather effect, add a second row of shorter loops closer to the brown ring (12 short loops). Use a slightly lighter green for the inner short loops to give depth. Secure all yarn ends neatly at the back.
Round 14 :
Surface embroidery: With dark brown embroidery thread, stitch a slender stem upward from the bottom of the medallion in a slight curve to mimic the central feather shaft. Add tiny red bead accents along this stem (use small beads and a length of beading thread). Fasten off behind medallion.
Round 15 :
Sewing medallion to mesh: Position medallion on the mesh center mark. Using the long brown tail and tapestry needle, sew evenly around the brown ring through mesh V-st or sc spaces. Use small, nearly invisible whip stitches—about 20–24 stitches spaced evenly for secure hold. Fasten and weave ends to the back.
Info :
Repeat steps to make three medallions; place one medallion in the central marked row and the other two spaced evenly above and below so the vertical stems align. When all medallions are attached, add extra surface embroidery to link them with a delicate branch (see Embroidered Branches section).
— Embroidered Branches & Berry Sprays (Surface work between medallions) :
Round 1 :
Using brown embroidery thread, secure yarn on the back of the mesh at the lower medallion and bring thread to the front at the medallion center point. Work a chain of small straight stitches upward between medallions to form the central stem; each straight stitch should be 8–12 mm depending on gauge. Continue until you reach the next medallion. No stitch count change on mesh.
Round 2 :
Attach olive-green yarn for leaves: along the stem, add groups of 3–5 short straight stitches at an angle to form leaf clusters. Secure each cluster with a tiny anchoring stitch. Repeat between medallions to match photo placement—approximately 6 leaf clusters per interspace.
Round 3 :
Add berry clusters using small red beads threaded on beading thread; stitch beads into place near leaf clusters (3–5 beads per cluster). Tie and secure threads on the wrong side and dab a tiny amount of fabric glue if needed to secure bead knots.
Info :
Make sure embroidered stems are slightly raised and not pulled too tight—this creates delicate topography that complements the appliques. Work from the center outward to maintain symmetry.
— Poinsettia Applique (Make 8) :
Info :
Each poinsettia is layered: inner small petals, larger outer petals, and a beaded gold center. These are slightly raised appliques sewn onto the mesh side columns alternating with tree motifs. Make 8 total—four on each side column.
Round 1 :
With deep red yarn, mr, ch1, 6 sc in ring. (6)
Round 2 :
Inc in each st around (12). (12)
Round 3 :
(1 sc, inc) x 6 (18)
Round 4 :
Petal base: *ch3, sl st into next st* rep around to make 6 loops. Fasten off. (no change in numeric count)
Round 5 :
With same red, join in front loop of each loop made, work (sc, hdc, 2 dc, hdc, sc) into each loop to form 6 small petals (each petal 6 stitches wide at peak). Fasten off inner layer. (work counts per petal)
Round 6 :
Attach deep red again for outer layer along the base of inner petals. In space between petals, *ch4, sl st* to make 6 outer loops. (no numeric change)
Round 7 :
Into each outer loop work (sc, hdc, 3 dc, hdc, sc) to make 6 larger pointed petals. Finish off and weave in ends. The finished poinsettia will have 12 visible petals (6 small inner and 6 larger outer).
Round 8 :
Center bead cluster: thread 6 small gold beads onto short length of gold thread. Bring thread up to center front of the flower and stitch through the center to anchor beads in a small circular cluster. Tie and hide knots on the back. (no change)
Info :
Lightly block each poinsettia flat on a small foam block to set petal shape. Sew to mesh using the underside of the inner circle: place on mesh at pinned positions, and baste through the inner ring only so petals lift slightly from the fabric.
— Mini Christmas Tree Applique (Make 8) :
Info :
Tiny layered triangle tree with a brown trunk, star topper and beaded ornaments. Make eight to alternate with poinsettias down both side columns of the runner.
Round 1 :
With dark green, ch6, turn: Row 1: sc in 2nd ch from hook and across (5 sc). (5)
Round 2 :
Ch1, turn, sc across (5)
Round 3 :
Change to slightly longer triangle: ch1, turn, sc in first st, inc, sc, inc, sc in last st (7). (7)
Round 4 :
Ch1, turn, sc across (7)
Round 5 :
Widen: (sc, inc) x 3 then sc in final st (10). (10)
Round 6 :
Turn and sc across (10)
Round 7 :
Ch1, turn, dec at each end (sc2tog at ends), sc across middle as needed to maintain triangular shape (8). (8)
Round 8 :
Fasten off and add trunk: with brown yarn, embroider or crochet a tiny 2-row trunk (2 sc across, ch1, turn, 2 sc). Attach at base center under triangle.
Round 9 :
Decorate: sew small red beads as ornaments in staggered rows onto triangle (3–6 beads per tree depending on size). Sew a tiny gold bead or star (worked from gold yarn as ch3 star) at the top. Secure all threads on back. (no numeric change)
Info :
Make sure trees are small and slightly raised; do not over-stuff. When sewing to mesh, attach by stitching into a few mesh V-stitches behind the trunk and base to hold tree upright but still flexible.
— Assembling Appliques to Mesh :
Round 1 :
Layout: Place mesh panel flat and measure centerline and side columns. Mark positions for 3 peacock medallions (center and two equidistant above/below), and positions for 8 poinsettias and 8 trees alternating along the two side columns. Use straight pins to secure each applique in place before sewing.
Round 2 :
Sewing: Using matching yarn and a tapestry needle, baste each applique by sewing through the underside or inner round only, leaving edges lightly tacked to allow petals and tree tips to lift. Use small stitches and sew through the mesh V-spaces for invisible attachment.
Info :
Place appliques so petals do not overlap the central peacock feathers; leave about 2–3 cm clear space to avoid crowding. Pin placement prior to stitching is essential for consistent spacing.
— Border Preparation & Base Rounds :
Round 1 :
After all appliques are attached, create a narrow single-crochet border around the runner to define edges: With dark green yarn, join at a corner with sl st, ch1, work 1 sc evenly into each row end around the entire runner, placing 3 sc in each corner to turn smoothly. Count: work approx 123 sc along long edge, about 12 sc on short ends depending on final length—maintain same rhythm. Fasten off. (counts vary by actual blocked measurement)
Info :
Tip :
Work loosely around intricate appliques so you don't distort shapes. Use more sc at corners if your count requires it to keep corners square.
Round 2 :
Switch to deep red yarn: Join with sl st to the base green round, ch3 (counts as dc), *skip next 2 sc, 5 dc shell in next sc, skip next 2 sc, dc in next sc* rep across long edges, placing 3 dc shells evenly across short ends. This builds the first decorative scalloped row. Keep shells symmetrical across both long sides. (st count varies by perimeter stitches)
Info :
Placement math: Each shell uses 1 stitch to anchor but spans 5 dc; space shells evenly so scallops appear balanced. If you run out of stitches at the end, adjust by adding or removing single dc steps between shells.
— Outer Scalloped Edge (Final Layer in Dark Green) :
Round 1 :
With dark green yarn, join behind a shell valley with ch1, (sc, ch2, sc) into valley to make a picot-style anchor, then into each red shell work (3 dc, ch2, 3 dc) as a large scallop. Repeat around entire runner. Place (sc, ch2, sc) into red valleys between scallops to anchor and keep edge flat. Fasten off and weave ends. (no numeric total provided because depends on perimeter)
Round 2 :
Optional finishing row in deep red to make a band between outer scallops and body: Join red, sc around working through sc anchors and into scallop peaks with one sc per peak to create a red ruffle effect. Fasten off and weave ends neatly to the wrong side.
Info :
If you prefer a simpler edge, work three rounds of sc in green and one decorative shell row in red and skip the large scallops. The photo shows a pronounced scallop; follow the instructions above to mimic it.
— Final Detailing & Finishing Touches :
Round 1 :
Secure all beadwork: After all beads and pearls are sewn in place on poinsettia centers, trees and feather berries, run a small drop of fabric glue to the hidden knot on the wrong side to prevent slippage (optional). Trim excess threads and weave tails at least 4–5 cm inside the backing before trimming flush.
Round 2 :
Blocking: Pin runner to blocking board to final dimensions, pulling scallops to even shape. Lightly mist with water and allow to dry completely. Block appliques individually if necessary prior to final pinning to maintain 3D shape.
Round 3 :
Edge check: Inspect scalloped edge for any loose stitches. Reinforce with small hidden stitches from wrong side to secure. Give one final weave in of tails and trim neatly.
Info :
Store flat or rolled to maintain scallop shape. Avoid hanging to prevent stretching. If you make this as a gift, include care instructions: gentle hand wash cold, reshape while damp, dry flat away from heat.
Bringing this runner to life is a wonderful, meditative holiday project full of small rewarding moments. Each applique and embroidered feather adds its own personality, and the scalloped edge frames everything with classic elegance. The finished runner looks like a treasured heirloom—perfect for the holiday table or as a special gift. 🧶✨ Your patience and careful finishing will shine in every stitch; enjoy the process and celebrate the result! 🎄