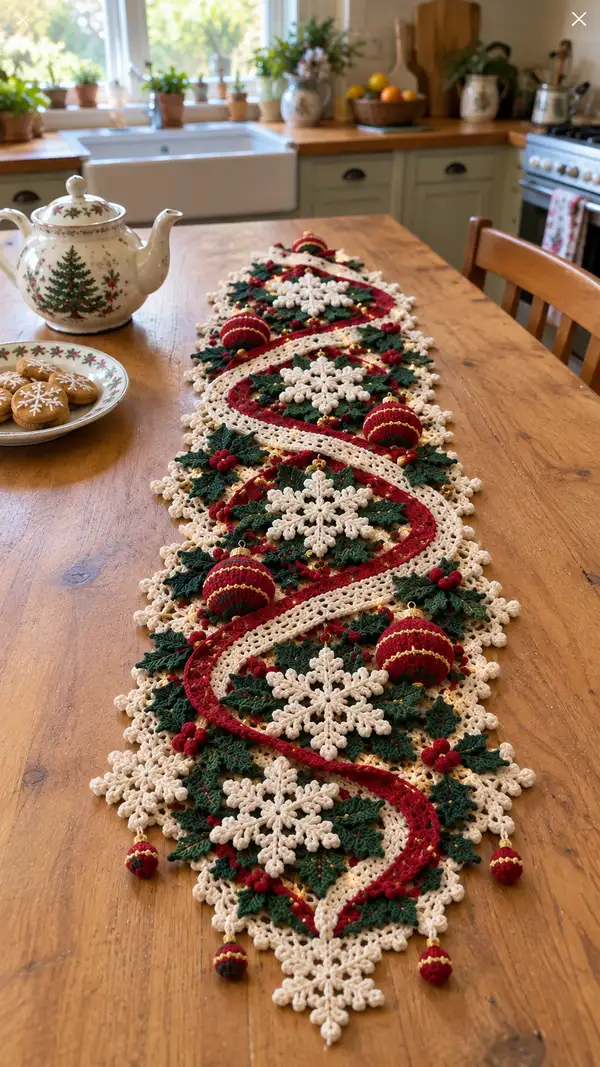
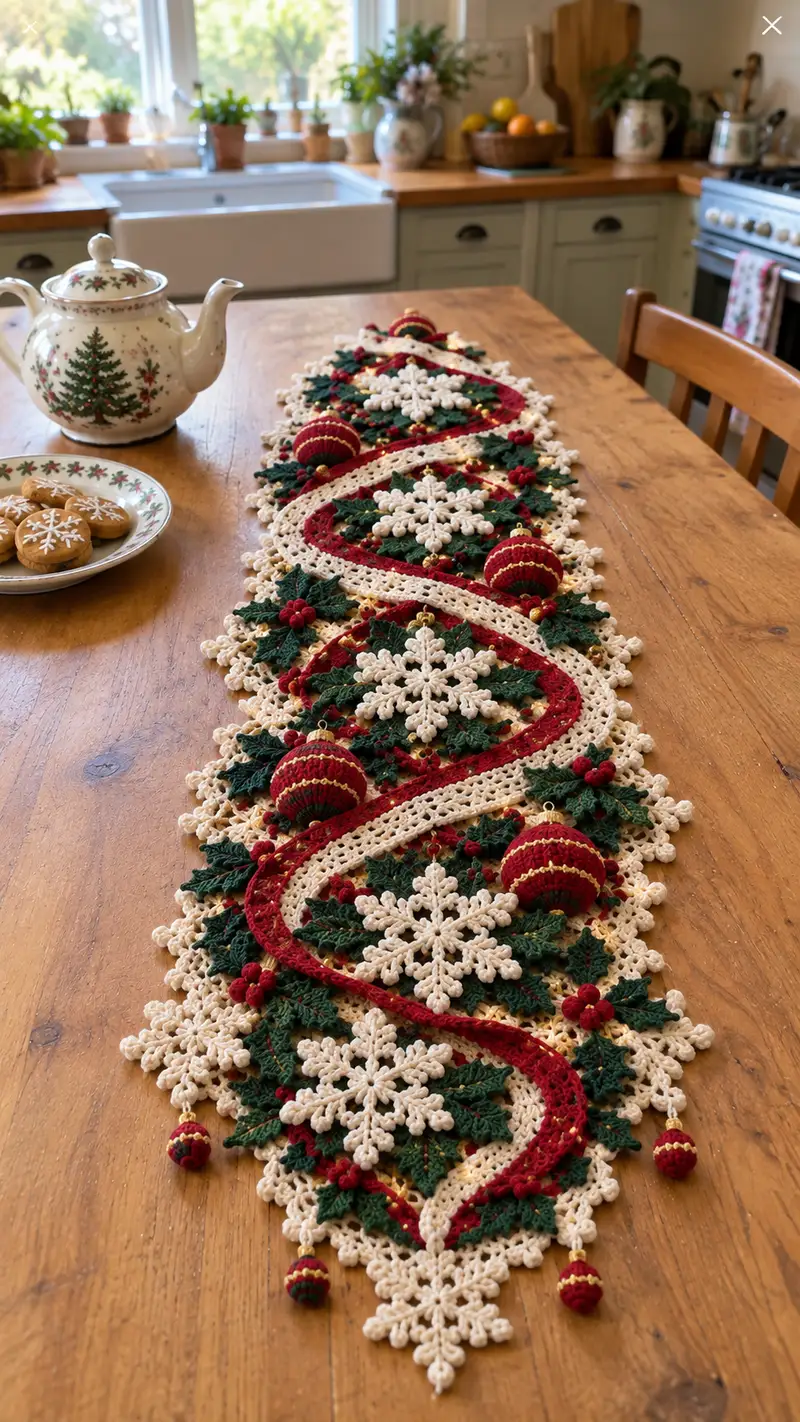
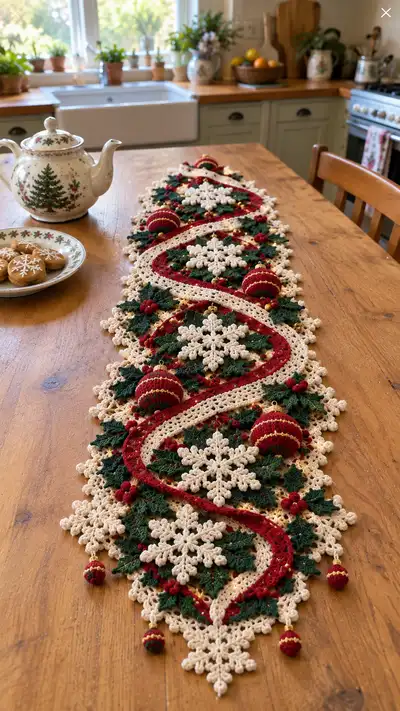
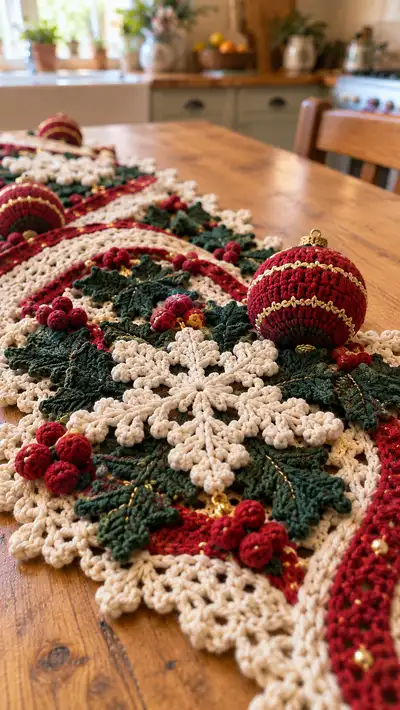
Create an elegant holiday table runner inspired by classic Victorian trim—layered cream lace motifs, deep green holly leaves, clustered red berries, crocheted bauble covers and a sinuous red ribbon winding through the length. This richly textured runner is worked in cotton for crisp stitch definition and finished with gold highlights for a luxurious, heirloom look. Perfect for a holiday centerpiece that doubles as a showpiece for seasonal gatherings.
Progress Tracker
0% Complete
— Materials & Gauge :
Info :
Gauge is not critical for overall design but affects final size and motif fit. Recommended gauge for lace ground: 22 dc x 12 rows = 10cm using 3.25mm hook in worsted cotton. Make a small sample swatch and adjust hook as needed so snowflake centers and leaves align evenly.
— Base Panel (Long lace oval foundation) :
Round 2 :
Inc around (2 sc in each st) (12)
Round 3 :
(1 sc, inc) x 6 (18)
Round 4 :
(2 sc, inc) x 6 (24)
Round 5 :
(3 sc, inc) x 6 (30)
Round 6 :
(4 sc, inc) x 6 (36)
Round 7 :
(5 sc, inc) x 6 (42)
Round 8 :
(6 sc, inc) x 6 (48)
Round 9 :
(7 sc, inc) x 6 (54)
Round 10 :
(8 sc, inc) x 6 (60)
Info :
At this stage you have a flat circular foundation. To create a long runner foundation, we convert to an elongated oval by making increases at four evenly spaced points. Visualize compass points and mark 4 increases across opposite quadrants.
Round 11 :
1 sc in each st (60)
Round 12 :
1 sc in each st (60)
Round 13 :
1 sc in each st (60)
Round 15 :
*(14 sc, inc) x 4* (64)
Round 16 :
*(15 sc, inc) x 4* (68)
Round 17 :
*(16 sc, inc) x 4* (72)
Info :
These increases at four cardinal points elongate the circle into a gentle oval. Continue alternating even rounds to stabilize stitches to create a long but still flexible base. If you want a wider runner, increase the repeats (i.e., use (N sc, inc) x 4 pattern for more rounds).
Round 18 :
1 sc in each st (72)
Round 19 :
1 sc in each st (72)
Round 20 :
*(18 sc, inc) x 4* (76)
Round 21 :
1 sc in each st (76)
Round 22 :
1 sc in each st (76)
Round 23 :
*(19 sc, inc) x 4* (80)
Round 24 :
1 sc in each st (80)
Round 25 :
1 sc in each st (80)
Info :
To create the airy lace ground, we will now begin openwork rows. These rows create a grid where individual motifs (snowflakes, leaves) will be attached later. If you prefer a denser background, work more sc rounds before starting openwork.
Round 26 :
*Ch3 (counts as dc), skip 1 st, dc in next st; repeat across turning at ends: 40 dc and 40 ch-1 spaces (this creates an openwork mesh) (80 counting dc and spaces as 40 dc sequences)
Round 27 :
Join with sl st to first dc, ch4, *dc in next dc, ch1; repeat across to maintain mesh (80 counting placements)
Round 28 :
1 sc in each dc and ch-space around to tidy edges and stabilize the mesh (80)
Round 30 :
Work a decorative border: *(ch3, sl st in 3rd ch to form picot), 3 sc in next 3 sts, picot; repeat around base edge creating a scalloped frame for attaching motifs (maintain approx 40 scallops across length)
Info :
At this point the base panel is a stabilized mesh with a scalloped edge. Block it lightly to open mesh and set curves before assembly so that motifs lie flat and join points match across repeats.
— Snowflake Motif (Make 6 large snowflakes) :
Round 1 :
MR, ch2 (counts as hdc), 9 hdc into MR, sl st to top of ch2 (10)
Round 2 :
Ch3, *skip next st, sc in next st, ch3* around to form 5 ch-loops; join with sl st (5 loops)
Round 3 :
Into each ch-loop: *(2 dc, ch2, 2 dc) to form petal base; sl st into next base; repeat x5 giving 5 petals
Round 4 :
Ch4, *(tr, picot, tr) in top of petal peak, sl st to next petal base; repeat for 5 raised points
Info :
Use a slightly smaller hook (2.75mm) for snowflake arms if you want crisp points. Keep tension consistent to ensure all snowflakes are identical in size.
Round 5 :
Between petals, work chain loops for midpoints: *sl st to base, ch5, sl st into next base; repeat around creating 5 outer loops
Round 6 :
Into each ch5 loop: *(sc, hdc, 3 dc, hdc, sc) - forming decorative raised point (each arm resembles a small leaf) (counts maintained per arm)
Round 7 :
Picot ends: on each arm tip, ch3, sl st in 3rd ch to make tiny picot; secure to center with sl st and create extra small cluster for dimension
Round 8 :
Ch1, sc around center ring in remaining stitches to tidy center (10)
Round 10 :
Optional raised embellishment: Using front loop only on selected arms, work 6 sc along each arm center to create a ridge. Repeat across all 5 arms for symmetry.
Round 11 :
Edge finish: sc around entire snowflake including arms, adding picot (ch3, sl st in 3rd ch) to each tip for delicate points
Round 12 :
Fasten off leaving long tail for sewing. Block snowflake flat, ensuring all arms are evenly spaced and pointing radially.
Info :
Make 6 identical snowflakes. If you prefer larger snowflakes, repeat arms or add an additional round of dc around arms to increase diameter.
— Holly Leaf Motif (Make 24-30 leaves) :
Round 1 :
Ch8 (foundation), sc in 2nd ch from hook, hdc in next, dc in next 2, tr in next 2, sl st in last ch (this forms one side of leaf)
Round 2 :
Turn, work on opposite side of chain: sl st, tr, dc, dc, hdc, sc across; do not join, instead continue to the base with a chain to create a small stem (resulting leaf has pointed tip and tapered base)
Round 3 :
Picot edging: *sc along edge, ch3, sl st in 3rd ch to form tiny serrations; repeat along both sides for jagged holly edge*
Round 5 :
Refinement: Using BLO on the second pass, work 1 sc in each st to create a defined vein; after completing center vein, embroider veins with gold thread if desired to echo photograph highlights
Round 6 :
Fasten off leaving a 15cm tail for sewing. Make 24-30 leaves; stagger them in clusters of 3-5 when attaching so they form dense groups under snowflakes.
Info :
Size of leaves may be scaled by adding more foundation chains (eg ch10) and following same shaping so clusters look varied and natural.
— Berry Cluster (Make many small clusters) :
Round 1 :
MR, 6 sc in MR (6)
Round 3 :
(1 sc, inc) x6 (18)
Round 4 :
Sc in each st (18)
Info :
These small berries are ideally worked in red with a 2.75mm hook for tight stitches. Stuff very lightly or leave hollow for a matte look. Join 3 berries together with small stitches to create a traditional holly berry cluster.
Round 5 :
Fasten off leaving long tail for joining. Make 30-40 berries and assemble into clusters of 3 or 4 based on photo spacing.
— Red Ribbon Serpentine (Central Ribbon, worked as flat tube) :
Info :
Ribbon is a long, narrow tube that is stitched along the central spine of the runner in a wavy path. Work the ribbon in red using a 3.25mm hook. Work multiple strips to reach full runner length and seam end-to-end invisibly.
Round 1 :
Ch50 (length of a ribbon section—make sections to equal runner length), join to form a long loop or work flat as preferred. For a tube, join last ch to first with sl st.
Round 2 :
Round 2: Work 1 sc in each ch around to create a neat base (50)
Round 3 :
Round 3: Repeat 1 sc in each st (50)
Round 4 :
Round 4: Work 1 sc in back loop only around to create a slight ridge edge (50)
Round 5 :
Round 5: To make tube, fold strip and sl st through both layers along edge every 4 sts to form a narrow cord; or continue working in the round if you joined in step one.
Round 6-20 :
Repeat 1 sc in each st for 15 rounds to create firm ribbon thickness for the sinuous effect (50)
Info :
Over multiple sections join with invisible seam and carry a thin strand of gold thread along ribbon body by working gold slip-stitch embellishments every 6-8 stitches to mimic photo metallic highlights. Curve the ribbon into an S-shape and pin to the base before tacking it down with whip stitches.
— Bauble Covers (Make 4-5 removable covers sized for 40-50mm baubles) :
Round 1 :
MR, ch1, 6 sc in MR (6)
Round 3 :
(1 sc, inc) x6 (18)
Round 4 :
(2 sc, inc) x6 (24)
Round 5 :
(3 sc, inc) x6 (30)
Round 6 :
(4 sc, inc) x6 (36)
Round 7 :
1 sc in each st around (36)
Round 8 :
1 sc in each st around (36)
Round 9 :
*(4 sc, dec) x6* (30)
Round 10 :
*(3 sc, dec) x6* (24)
Round 11 :
*(2 sc, dec) x6* (18)
Round 12 :
*(1 sc, dec) x6* (12)
Round 13 :
Fasten off leaving long tail, invert cover over bauble and seam opening with whip stitch to secure snug fit. Optionally add rows of alternating gold thread slipped loops for decorative bands.
Info :
Test fit as you go: before closing fully, try on a sample bauble to ensure the cover will slip on easily but remain snug. Add or remove rounds if your gauge differs.
— Scalloped Edge & Lower Lace Points :
Round 1 :
Attach cream yarn to edge ring of base panel. *ch5, sl st in second ch from hook, sc in next sc of base, ch5, sl st in second ch from hook, sc in next base st* repeat to create alternating loops (approx 40 loops)
Round 2 :
Into each ch5 loop: *(sc, hdc, 3 dc, hdc, sc) to form a fan scallop; repeat around creating 40 fans
Round 3 :
Edge picots: along scallop tips work picot clusters (picot, picot) to create the snow-like fringe seen in photograph
Round 4 :
Fasten off and block the scalloped edge to accentuate points and curves. Add a light starch if you want more rigidity for the runner to sit flat under ornaments.
Info :
Scalloped edge spacing should mirror snowflake placement to create a repeating pattern down the runner. Measure and mark placements with pins before finalizing scallops.
— Small Decorative Sprigs (Optional fine details) :
Round 1 :
Chain 12, sc in second ch from hook, hdc, 2 dc, 2 tr, 1 dc, 1 hdc, sl st to finish forming a tiny sprig
Round 2 :
Make small berry knots: using red yarn, tie or sew tiny French-knot-style clusters of 3 using yarn needle and short strands or crocheted mini-bobbles (MR with 4 sc and close)
Info :
These fine sprigs add a naturalistic touch between snowflakes and ribbon. Work many tiny sprigs and tuck them under leaves for a layered look.
— Assembly & Joining (Extensive) :
Info :
Before sewing, block every component to precise shape and size. Lay out the base panel flat on a blocking board. Place the ribbon in an S-shape along the center and pin firmly. Arrange snowflakes at even intervals along the runner (photo shows repeating pattern of snowflake - space approx 16-18cm center-to-center). Pin leaves in clusters beneath each snowflake with berries and small sprigs tucked among leaves. Baubles are added last and can be attached with a small loop or left removable.
Round 1 :
Sew ribbon to base using a yarn needle and matching red thread by working small whip stitches every 6-8 stitches. Keep stitches hidden beneath ribbon ridge. Secure ends with a few extra stitches and weave in tails.
Round 2 :
Sew snowflakes to base by stitching through the snowflake center to the mesh below, using invisible ladder stitch around 6-8 points. Use the long tail left when finishing motif to create a sturdy join. Attach 6 snowflakes equally spaced.
Round 3 :
Attach leaf clusters: position 3-5 leaves in a fan under each snowflake and tack them in place with small stitches along the leaf stems to the mesh, then overlay a small berry cluster and couch down to secure—this hides attachment stitches.
Round 4 :
Sew small berry clusters in groups of 3 using the long tails. Position berries close to leaf bases and between ribbon and snowflake edges to echo photograph detail.
Round 5 :
Attach bauble covers: if using removable baubles, place each covered bauble atop leaf clusters and tack to runner with a short decorative chain and a few stitches through the bauble cap. Use gold thread to create a small loop that slips over the bauble hook, allowing removal for storage.
Round 6 :
Detailing: embroider tiny gold lines on leaves and around ribbon using metallic thread. Add small gold bead chain segments between motifs to mirror the photograph's sparkle. Secure all ends and block one final time to set shapes.
Info :
Work slowly and pin everything in place before committing stitches. Mirror the layout on both ends for symmetry and use a ruler to keep even spacing across the runner length.
— Finishing Touches :
Round 1 :
Weave in all tails with tapestry needle, burying ends through several stitches to prevent loosening.
Round 2 :
For extra firmness, spray with a light starch or fabric stiffener while pinned to block. Let dry thoroughly before removing pins or placing decorations.
Info :
Store runner flat or gently rolled with tissue paper to preserve shape. Remove baubles for storage to prevent crushing motifs.
Finishing this runner is a true holiday joy—every snowflake, leaf and jewel-like bauble adds to a piece that looks like heirloom lace. The layered texture and gold highlights make it a centerpiece to treasure for seasons to come. Display it with fresh greenery or keep it simple; either way it brings handcrafted warmth to the table. 🎄✨🧶