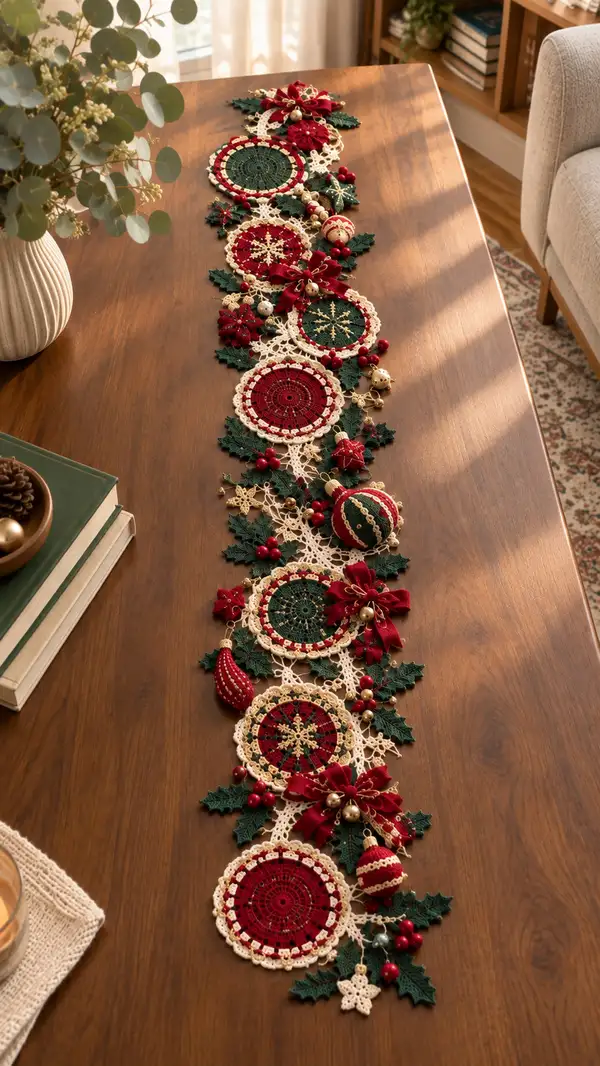
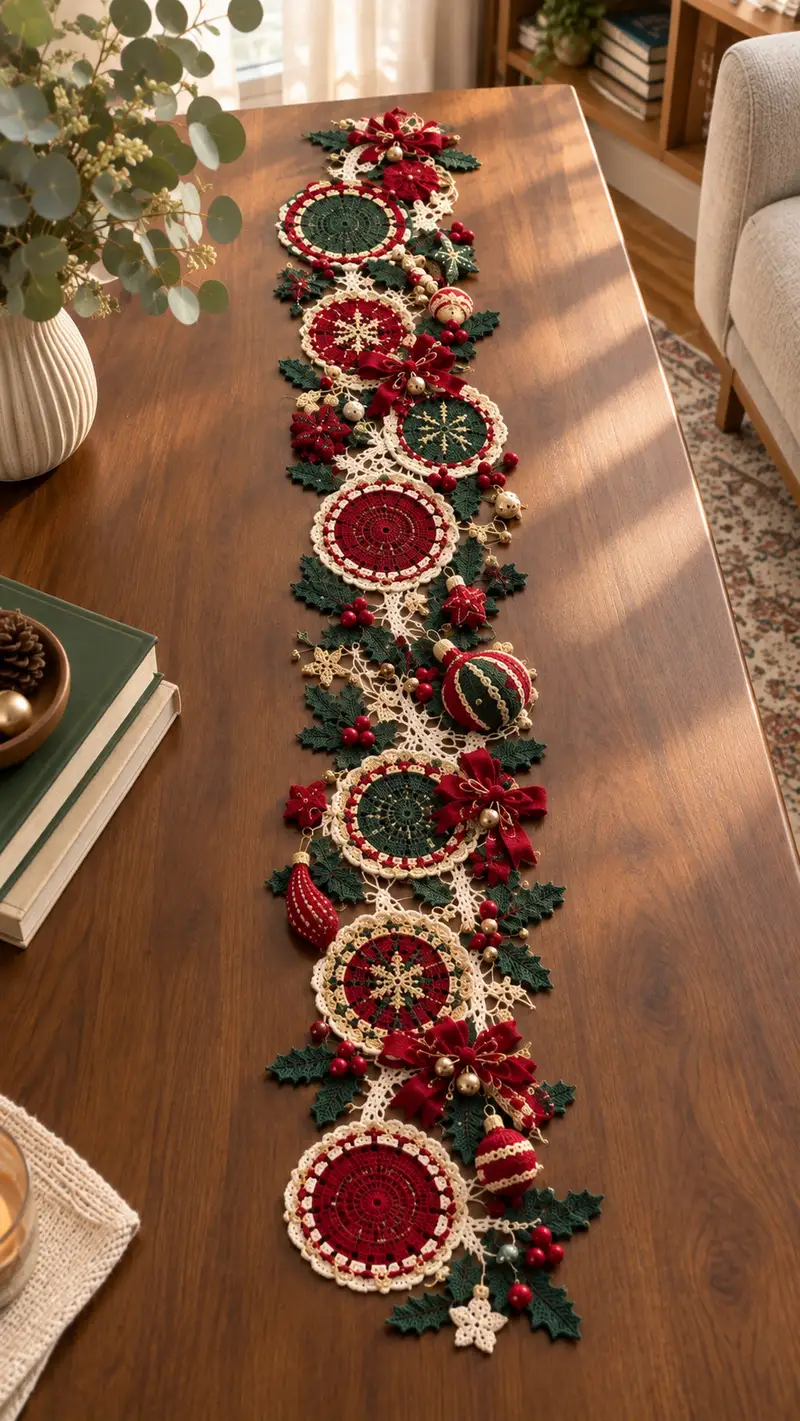
Create a gorgeous holiday table runner composed of layered circular doilies, delicate cream lace connectors, deep evergreen holly leaves, and rich red accents. This runner features alternating red and green medallions, tiny crochet ornaments, embroidered gold highlights, and clustered berries for a traditional Christmas centerpiece. Designed to be assembled motif-by-motif, it is perfect for careful stitchers who love lacework and decorative finishing touches. The finished runner adds an heirloom-quality, handmade accent to your holiday table.
Progress Tracker
0% Complete
— Overview & Gauge :
Info :
Work with mercerized size 10 cotton and a 1.5mm hook for crisp lace. Gauge is not critical for overall length but affects motif diameter. Each large circular medallion measures approximately 11-12 cm (4.25-4.75 in) across when blocked. Layout as shown uses 7 large medallions with intervening lace and embellishments; adjust repeat count to your desired runner length.
Info :
All rounds are worked continuously unless otherwise stated; use stitch marker at first stitch of round. Color changes are worked with join-as-you-go where noted, or fastened off and woven in—choose whichever you prefer for cleaner edges.
— Large Circular Motif (A) - Traditional Medallion (worked in two colors) :
Round 3 :
(1 sc, inc) x 6 (18)
Round 4 :
(2 sc, inc) x 6 (24)
Round 5 :
(3 sc, inc) x 6 (30)
Info :
Change to medallion color now (either Deep Red or Evergreen). Fasten off center color or carry if you prefer. This creates a solid central disc base for decorative rounds.
Round 6 :
(4 sc, inc) x 6 (36)
Round 7 :
(5 sc, inc) x 6 (42)
Round 8 :
(6 sc, inc) x 6 (48)
Round 9 :
1 sc in each st (48)
Info :
Eye placement note for decorative topwork: if embroidering a star or gold spokes, make a small stitch hole through the center area before adding metallic thread to avoid pulling stitches out of alignment.
Round 10 :
(3 sc, ch2, sk 1) x 12 resulting in 12 ch-2 loops around (48)
Round 11 :
Work in each ch-2 loop: (sc, hdc, 3 dc, hdc, sc) in each loop (12 shell clusters; st count variable but work each shell into its loop)
Round 12 :
1 sc in each st around across shells (approx 60-72 depending on shell count)
Info :
If you want small picot edging around the medallion center, work a pic pattern in the next round: (sc, ch3, sl st) across or as indicated below. Keep counts even for join points.
Round 13 :
(1 sc, pic) x across each shell top (work 1 sc, ch3 sl st to make picot into every top stitch) Continue until full circle (st count equals number of shell tops)
Round 14 :
Change to Cream color. 1 sc in each st BLO for one round to give an inner ridge (st count same as previous)
Round 15 :
Into each previous shell top: (sl st, ch4, 1 dc, ch4, sl st) forming decorative arches (work 12 arches evenly) - count remains at arch anchor points
Round 16 :
Work 1 sc in the top of each arch anchor and 3 sc across arch top (this evens the edge and readies for outer lace) (approx 72)
Round 17 :
(1 sc, ch3, 1 sc) in every 6th st to make small loops for outer picots; adjust so you have 24 loops (24 small loops)
Round 18 :
Into each loop: (sc, 3 dc, sc) creating 24 small shell clusters around (approx 96)
Info :
For the final decorative ring you may add metallic gold embroidery. Using metallic thread and a yarn needle, weave spokes from the center outward attaching to shell points. Embroider now before final edge if desired.
Round 19 :
Change to Cream. 1 sc in each st around (maintains count) (approx 96)
Round 20 :
(2 sc, ch2, sk 1) x around creating 32 ch-2 loops for scalloped outer edge (st count based on anchors)
Round 21 :
Work (sc, hdc, 3 dc, hdc, sc) in each ch-2 loop to form pronounced scallops (32 scallops)
Round 22 :
1 sc in each st across scallops to even the rim (approx 128)
Round 23 :
Decorative picot round: (sc, ch3, sl st into sc two sts ahead) repeated around to create lacey points (final count equals picot placements)
Round 24 :
Change to medallion color and work 1 sc in each st around to add a color-contrasting ring if desired (maintains count)
Round 25 :
Join-as-you-go points: Prepare to join medallions to the connecting lace by leaving small evenly spaced loops (mark 6 equal join points around the rim using stitch markers)
Round 26 :
Fasten off leaving long tail for joining. Weave ends in after blocking.
Info :
Block each medallion to precise diameter before assembly. Use rust-proof pins and measure spacing between join points to match the connecting lace layout.
— Alternate Circular Motif (B) - Star Medallion :
Round 3 :
(1 sc, inc) x 6 (18)
Round 4 :
(2 sc, inc) x 6 (24)
Round 5 :
(3 sc, inc) x 6 (30)
Round 6 :
Change to Cream. 1 sc in each st (30)
Round 7 :
Switch to contrasting medallion color (Deep Red or Evergreen). (4 sc, inc) x 6 (36)
Round 8 :
1 sc in each st around (36)
Info :
To create an embroidered star effect later, leave the center area relatively flat and unobstructed. You will add metallic single stitches from center to outer anchors.
Round 9 :
(2 sc, ch2, sk 1) x 12 creating ch-2 loops for later star points (36)
Round 10 :
Into each ch-2 loop work: (sc, dc, tr, dc, sc) forming triangular points (12 star points)
Round 11 :
1 sc in each st across the base of star points (approx 60)
Round 12 :
Change to Cream. 1 sc in each st BLO to create a defined ridge for joining (maintain count)
Round 13 :
Make decorative chain arches: (sl st, ch6, sl st) into every fifth st to form 12 arches
Round 14 :
Work (sc, hdc, 3 dc, hdc, sc) into each arch apex to create ornamented scallops (12 scallops)
Round 15 :
1 sc around across scallops (approx 96)
Info :
After Round 15, embroider gold spokes from the center to the base of each star point using metallic thread. Secure thread ends neatly on the WS before final edge.
Round 16 :
Final edge: (sc, ch3, sl st) across to form a delicate lacy edging; fasten off and block to size.
Round 17 :
Leave long tail for joining and weave ends after blocking
Info :
Use this motif alternating with Motif A to create visual rhythm. Decide the sequence on your table layout before joining.
— Connecting Lace Panel (Join-As-You-Go) :
Info :
This cream lace panel connects the circular motifs with a mesh of chain arches and small picot flowers. Work a base strip to desired length connecting medallions using join-as-you-go method at marked join points (see Medallion Round 25 notes).
Round 1 :
With Cream, ch 16, join with sl st to form loop (or work multiple loops to create starting row of chains depending on runner width)
Round 2 :
Ch3 (counts as dc), work 15 dc into loop evenly to form a small disk (16 dc)
Round 3 :
Ch5, *sk 1 dc, sc into next dc, ch5* rep down strip to create 8 arches (establishes pattern repeat)
Round 4 :
Into each ch-5 arch: (sc, ch3, pic, ch3, sc) forming tiny flower-like points (8 points)
Round 5 :
Join-as-you-go: At each point where an arch corresponds to a medallion join point, sl st into medallion join loop (as marked) and continue the lace; this secures medallions to the strip.
Round 6 :
Continue the lace strip: *ch8, sc into base chain to form a chain bridge, ch8, attach to next arch with sc* Repeat for required length between medallions
Round 7 :
Work small 3-dotted picot flowers between bridges: (sc, ch3, sl st into sc) into center of each bridge
Info :
Make enough lace strips to run the full length between medallions on both sides; you will join two parallel lace strips together with small star motifs and holly leaf clusters to create fullness.
Round 8 :
Work a connecting ladder: sc across bridge backs and form small loops every 6 sts for additional decorative joining (count variable)
Round 9 :
Decorative edging: Into each ladder loop work (sc, ch3, sc) to give uniform loops for seaming additional decorations
Round 10 :
Fasten off long tail for joining. Repeat this strip to mirror on opposite side of medallions as pictured.
Info :
Blocking tip: Pin the lace strips slightly concave to sit smoothly between medallions. Measure identical distances between join points on each strip before final seam.
— Holly Leaf (Make multiple) :
Round 1 :
With Evergreen, ch 6, sl st to form ring or start mr with 6 sc
Round 2 :
Work along ch foundation: sc in second ch from hook, hdc, dc, tr, dc, hdc, sc across to form one pointed leaf (7 stitches total across leaf)
Round 3 :
Working around to create bilateral leaf: ch1, sc down opposite side mirroring increases: sc, hdc, dc, tr, dc, hdc, sc (total leaf symmetrical)
Round 4 :
Edge shaping: *sc in next 2, picot, sc in next 2* along both sides to mimic holly serration (adjust to 6 picots per leaf)
Round 5 :
Work small veins: Using surface slip stitch or embroidery with a single stranded darker green, stitch a central vein from base to tip and 2-3 diagonal veins on each side
Info :
Block each leaf slightly cupped by pinning a tiny curve to give realistic depth. Make enough leaves to cluster around each medallion (approximately 4-6 leaves per medallion depending on fullness desired).
Round 6 :
Fasten off leaving a long tail for sewing. Weave in ends. Repeat to make required quantity (approx 30-40 leaves for sample runner).
— Poinsettia Flower (Make several) :
Round 1 :
With Deep Red, mr, 8 sc in mr (8)
Round 2 :
(1 sc, inc) x 4 (12)
Round 3 :
Ch2, *(5 tr in same st, sl st into next) x 6* creating 6 lofty petals attached at base (work petals in same round)
Round 4 :
Into each petal base: (sc, hdc, 3 dc, hdc, sc) to thicken petals and create dimension (6 petals)
Info :
Add a small cluster of gold beads or bells to the flower center using embroidery thread. Sew securely and weave knots on WS so beads do not shift.
Round 5 :
Optional additional petal overlay: make 6 smaller cream petals worked in front post around base between existing petals for layered effect; work sc in front to anchor.
Round 6 :
Fasten off leaving long tail for sewing. Block petals slightly upward for natural shape.
— Small Star Motif (Make many) :
Round 1 :
mr, 5 sc in ring (5)
Round 2 :
Chain petal method: *(ch4, sl st into next st) x5* making 5 ch-4 loops as star points
Round 3 :
Into each loop make (sc, dc, tr, dc, sc) to shape points (5 points) - fasten off and weave ends
Info :
Make small stars in cream and gold to use as filler in lace connectors; lightweight stars add visual sparkle without bulk.
— Ornament Cover - Spherical Bauble Sleeve :
Round 1 :
With medallion color, mr, 6 sc in mr (6)
Round 3 :
(1 sc, inc) x 6 (18)
Round 4 :
(2 sc, inc) x 6 (24)
Round 5 :
(3 sc, inc) x 6 (30)
Round 6 :
(4 sc, inc) x 6 (36)
Round 7 :
1 sc in each st around for 3 rounds to build dome (36)
Round 8 :
(4 sc, dec) x 6 (30)
Round 9 :
1 sc in each st around for 2 rounds (30)
Round 10 :
(3 sc, dec) x 6 (24)
Round 11 :
Change to Cream. 1 sc in each st around (24)
Round 12 :
(2 sc, dec) x 6 (18)
Round 13 :
(1 sc, dec) x 6 (12)
Round 14 :
6 dec (6) - this creates small hole for gathering; fasten off leaving long tail
Info :
Insert lightweight bauble now before closing completely. Pull tail to close snugly around bauble neck, then stitch a small ring or loop at top as hanger. Add ribbon loop or sewing hook inside for hanging or secure attachment to runner.
Round 15 :
For decorative vertical stripes, embroider with metallic thread along dome segments after cover is slipped over bauble.
Round 16 :
Optional tail finishing: Add gold bead to bottom tip and sew securely to hold cover onto bauble.
— Small Berry (Make many) :
Round 1 :
With red thread, mr, 6 sc (6)
Round 3 :
1 sc in each st (12)
Round 4 :
(1 sc, dec) x 4 (8)
Round 6 :
Fasten off leaving tail for sewing. Stuff lightly with a tiny bit of fiberfill if desired and sew into clusters of 3-5 for realistic berries.
Info :
Sew small gold bead caps or embroider tiny highlights onto berries for a polished look. Make 20-30 berries for sample runner depending on fullness.
— Decorative Velvet Bow (Fabric or Crocheted) :
Option A Info :
The bows pictured are velvet ribbon. Cut two 12 cm lengths for loops and one 6 cm length for center wrap. Form bow, secure center with hot glue or whip stitch, add small gold bell at center and sew onto runner.
Option B - Crocheted Bow :
With Deep Red, ch 18, row 1: sc in 2nd ch and across (17 sc). Work 8 rows back and forth in sc for a small rectangular band. Fold accordion-style and wrap center with a short length of cream yarn, stitch in place and attach bell.
Info :
Whether ribbon or crocheted, attach bows near medallion joins with a few sturdy slip stitches through the lace backing, then reinforce with hidden stitches and a dab of fabric glue if using ribbon.
— Assembly & Joins :
Info :
Lay out all motifs on blocking board in final arrangement. Sample runner alternates Motif A and B, separated by cream connecting lace. Decide final order and photograph layout for reference before sewing.
Round 1 :
Join-as-you-go method: With cream tail from medallion Round 25, align medallion join loop with corresponding loop on lace strip, insert hook into both loops and sl st through to join firmly. Repeat at each marked join point around each medallion.
Round 2 :
Sew holly leaves into small clusters of 3-5 around medallion edges using long tails. Stagger leaves at alternating angles for natural look. Reinforce with 3-5 passes through each leaf base.
Round 3 :
Attach poinsettia flowers at focal medallion positions: sew through flower base and into lace backing with small stitches, then stitch bead cluster into flower center. Use buttonhole stitch technique for secure hold.
Round 4 :
Sew small berries in clusters using the long tails; place clusters near leaf bases and under bows so berries look tucked into foliage. Secure with a few back-and-forth stitches.
Round 5 :
Attach ornament covers by sewing the top neck loop into the lace at secure points; reinforce with extra stitches and a bead or jingle bell to hide the attachment point. For extra security, stitch the lower hemisphere to the lace at two anchor points with clear monofilament if bauble is heavy.
Info :
When adding metallic embroidery, work on WS and anchor thread ends by weaving into several adjacent stitches. Avoid pulling too tight to maintain even lace tension.
Round 6 :
Edge tidy-up: with cream, work a neat sc border across entire runner periphery to unify pieces. Where two runner edges meet, use slip stitch seams to close small gaps and create a continuous border.
Round 7 :
Final blocking: pin entire assembled runner flat, steam lightly or wet-block as preferred. Ensure ornaments and bows are dry before moving. Trim any stray threads and weave in all ends on WS.
Info :
Optional stiffening: if you prefer the runner to lay flatter and hold shape, use a starch spray or fabric stiffener lightly, applied evenly and re-blocked to smooth finish. Test on a spare motif first to ensure desired look.
— Finishing Touches & Embellishment Details :
Info :
Add small gold bells, bead clusters, or tiny star charms by stitching through the lace to hide knots on the WS. Space clusters to follow natural leaf groupings and medallion focal points. Alternate red berry clusters with gold bead clusters for balance.
Info :
Use small brass eye pins or thin wire to string bead garlands between medallions if you wish to add extra sparkle. Ensure wire ends are tucked and wrapped in thread to prevent snagging table linens.
Info :
Keep photographic reference of your layout as you stitch — this helps you recreate a symmetrical pattern and ensures even distribution of heavier elements like ornament covers and bows.
This festive table runner blends classic lace doilies with seasonal color and sparkling embellishments for an heirloom-quality centerpiece. From the layered medallions to the holly clusters and tiny ornament covers, every detail adds warmth and holiday charm. You'll love blocking, assembling, and watching the runner come alive as you add gold highlights and bead accents. Enjoy the calming rhythm of lace crochet and the joy of gifting something truly handmade. 🎄🧶