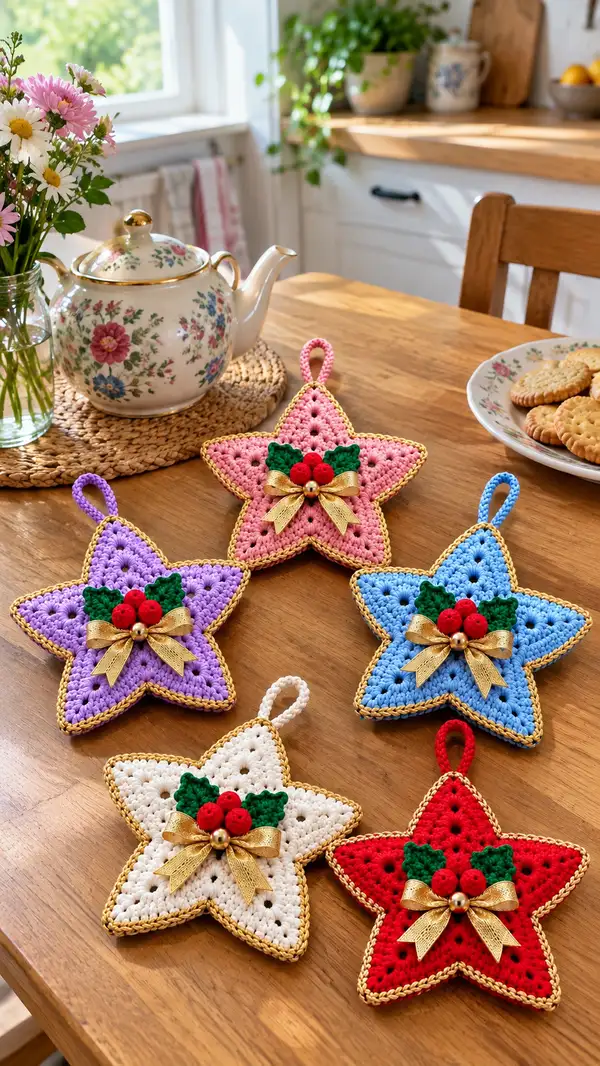
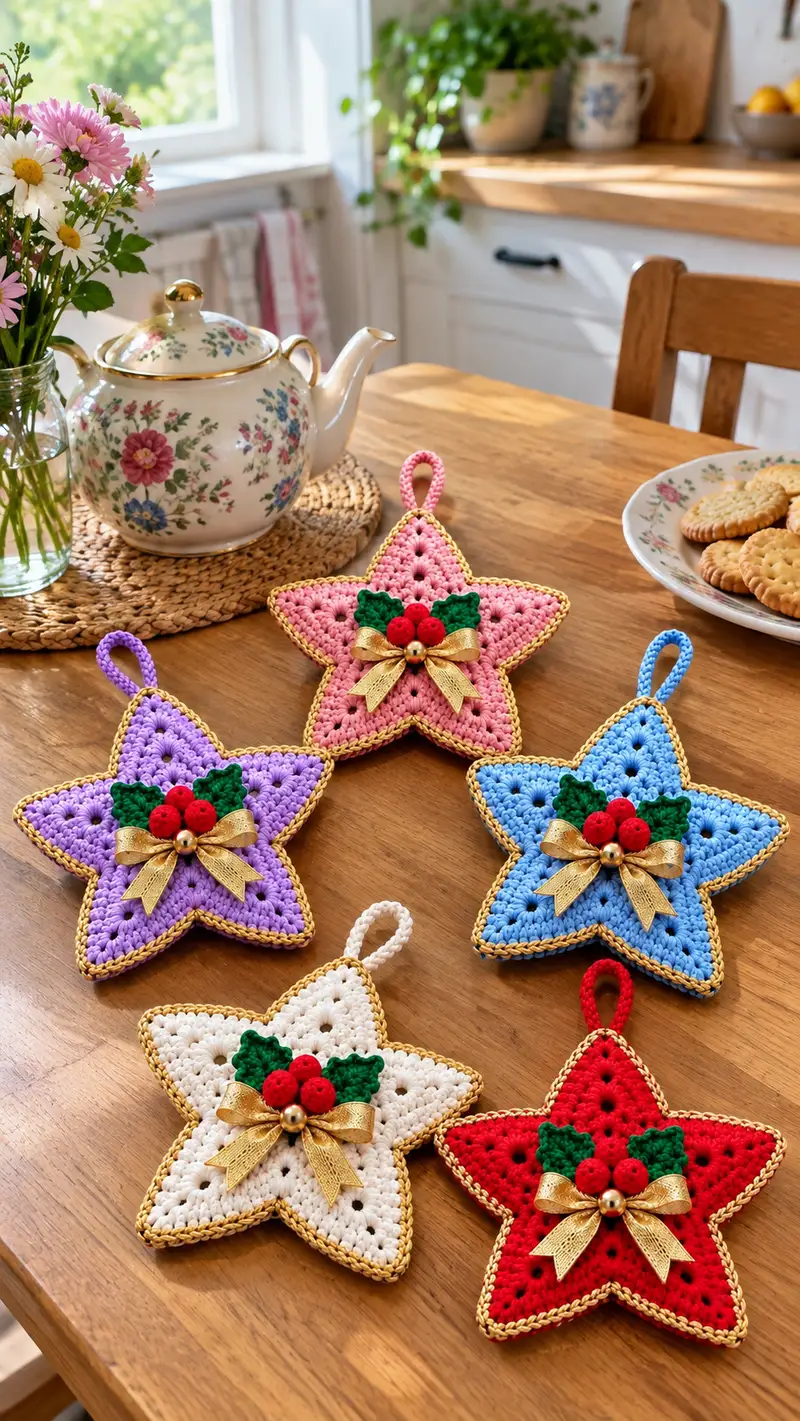
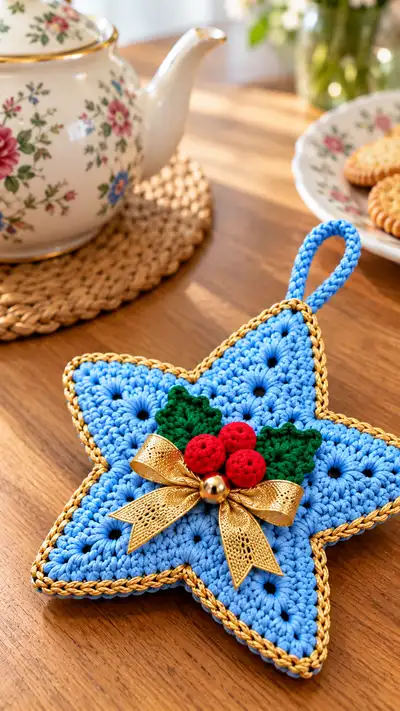
Create a set of five-point star ornaments perfect for holiday decorating and gifting. Each star is worked in a textured round-to-point motif, edged in a metallic-gold trim, and embellished with crocheted holly leaves and three tiny berries with a satin bow. The finished piece is flat-puffed (pillow style) with a hanging loop for easy display. Pattern includes detailed round-by-round instructions and assembly notes to recreate the stars shown in the photo.
Progress Tracker
0% Complete
— Notes & Gauge :
Info :
This pattern is written for one star ornament. Work tightly to avoid stuffing showing through. Gauge is not critical but 18 sc x 20 rows in sc = approx. 10 cm when using worsted cotton with a 3.5mm hook. Use stitch markers for round starts and every 10-15 stitches in larger rounds.
— Star Front (Make 1) :
Round 1 :
Make a magic ring. Ch1, 5 sc in ring (5)
Round 2 :
Inc in each st around (10)
Round 3 :
(1 sc, inc) x5 (15)
Round 4 :
(2 sc, inc) x5 (20)
Round 5 :
(3 sc, inc) x5 (25)
Info :
These first five rounds set the central pentagon for your star. Keep stitches even and place your marker at the first sc of each round to track progress.
Round 6 :
1 sc in each st around (25)
Round 7 :
(4 sc, inc) x5 (30)
Round 8 :
1 sc in each st around (30)
Round 9 :
(5 sc, inc) x5 (35)
Round 10 :
1 sc in each st around (35)
Info :
At this stage you have a larger circle with 5 radial sections. These will become the bases for the star points. If you prefer a smaller star reduce repeats by one increase round.
Round 11 :
(6 sc, inc) x5 (40)
Round 12 :
1 sc in each st around (40)
Round 13 :
(7 sc, inc) x5 (45)
Round 14 :
1 sc in each st around (45)
Info :
We're now going to build outward and add texture. From round 15 we'll alternate rounds that maintain total stitches with rounds that add five stitches (1 per point), creating little ridges that will help define the five points.
Round 15 :
(8 sc, inc) x5 (50)
Round 16 :
1 sc in each st (50)
Round 17 :
(9 sc, inc) x5 (55)
Round 18 :
1 sc in each st (55)
Round 19 :
(10 sc, inc) x5 (60)
Round 20 :
1 sc in each st (60)
Info :
Rounds 15-20 may produce a flat circle larger than you need - this creates the cushion for the points. If you want a smaller star reduce the number of increasing rounds. Keep marker on first sc each round to ensure symmetry across points.
Round 21 :
(11 sc, inc) x5 (65)
Round 22 :
1 sc in each st (65)
Round 23 :
(12 sc, inc) x5 (70)
Round 24 :
1 sc in each st (70)
Info :
We'll now start sculpting the star points. The next sequence will create 5 identical point sections. Each 'point sequence' spans a set of rounds worked across the same sets of stitches — use markers to divide your round into five equal sections of 14 stitches each (70/5=14).
Round 25 :
*Mark 14-st sections: In section 1 work (1 sc in next 6 sts, 1 hdc, 1 dc, 1 tr, 1 dc, 1 hdc, 1 sc in next 3 sts); rep across each 14-st section* (70)
Round 26 :
1 sc in each st around working tall stitches into their same stitches to keep counts even (70)
Info :
The tall stitches in round 25 (dc and tr) create height in the five point areas. This round maintains the same stitch count while anchoring those taller stitches so the points start to rise.
Round 27 :
*In each 14-st section work (1 sc, 1 sc, 1 hdc, 2 dc in next st, 1 tr in next st, 2 dc in next st, 1 hdc, 1 sc, 1 sc) to add an increase in the center point stitch* (70)
Round 28 :
1 sc in each st around (70)
Round 29 :
*In each section work (1 sc, 1 sc, 1 hdc, 1 dc, 1 dc, 1 tr, 1 dc, 1 dc, 1 hdc, 1 sc, 1 sc) making the middle of the section taller to accentuate the point* (70)
Round 30 :
1 sc in each st around (70)
Info :
Rounds 25-30 add sculptural height for each star point without changing stitch counts. If your stitches feel too tall, substitute hdc for dc in outer rounds. Use the same stitch type for front and back panels for neatness.
Round 31 :
*Shape each point by working across each 14-st section: (dec, 1 sc, 1 hdc, 1 dc, 1 tr, 1 dc, 1 hdc, 1 sc, dec) — note 'dec' here is a sc2tog worked angled toward the center to create a tapered edge* (70)
Round 32 :
1 sc in each st (70)
Round 33 :
*Further taper each point: (1 sc, dec, 1 hdc, 1 dc, 1 tr, 1 dc, 1 hdc, dec, 1 sc) across each point section* (70)
Round 34 :
1 sc in each st (70)
Info :
Rounds 31-34 use decreases inside each section to create the star point tips. The overall round count remains 70; shape is achieved by changing stitch heights and strategic decs. If unfamiliar with sc2tog invisible decrease, practice on scrap yarn first.
Round 35 :
*Create crisp point tips: In center of each section work (1 sc, dec, 1 sc) to narrow the tip area; between sections maintain bases with (2 sc)* (70)
Round 36 :
1 sc in each st (70)
Round 37 :
*Edge shaping round: 1 sc in each st BLO around to create a ridged inside edge and help define the points (70)
Info :
Working BLO gives a subtle ridge that visually separates the point faces from the side-edge; it helps the star keep a crisp profile when joined. If you prefer a flat finish, work regular sc instead of BLO.
Round 38 :
Sl st around to tidy edge then fasten off leaving 20cm tail for sewing & assembly. Weave in the beginning tail slightly — leave sewing tail for final assembly (70)
— Star Back (Make 1) :
Round 1 :
Make a magic ring. Ch1, 5 sc in ring (5)
Round 2 :
Inc in each st around (10)
Round 3 :
(1 sc, inc) x5 (15)
Round 4 :
(2 sc, inc) x5 (20)
Round 5 :
(3 sc, inc) x5 (25)
Round 6 :
1 sc in each st (25)
Round 7 :
(4 sc, inc) x5 (30)
Round 8 :
1 sc in each st (30)
Round 9 :
(5 sc, inc) x5 (35)
Round 10 :
1 sc in each st (35)
Info :
You can make the back identical to the front (use same rounds 11-38) or stop earlier for a slightly smaller back to allow front to be more dominant. For a tidy edge match the counts to the front exactly so joining is straightforward.
Round 11 :
(6 sc, inc) x5 (40)
Round 12 :
1 sc in each st (40)
Round 13 :
(7 sc, inc) x5 (45)
Round 14 :
1 sc in each st (45)
Round 15 :
(8 sc, inc) x5 (50)
Round 16 :
1 sc in each st (50)
Round 17 :
(9 sc, inc) x5 (55)
Round 18 :
1 sc in each st (55)
Round 19 :
(10 sc, inc) x5 (60)
Round 20 :
1 sc in each st (60)
Round 21 :
(11 sc, inc) x5 (65)
Round 22 :
1 sc in each st (65)
Round 23 :
(12 sc, inc) x5 (70)
Round 24 :
1 sc in each st (70)
Info :
Work rounds 25-38 on the back exactly like the front until your back matches the front shape and overall size. For speed you may substitute some textured tall-stitch rounds with sc rows, but ensure totals remain 70 to allow perfect joining.
Round 25 :
Repeat rounds 25-38 as for front to sculpt the five points (70)
Round 26 :
Fasten off leaving a long tail for joining (approx. 25cm). Weave in beginning tail but do not close the back — leave opening for stuffing until joining round.
— Hanging Loop (Make 1) :
Round 1 :
Attach yarn at a chosen top point of the front panel. Ch20 (or length to suit preferred loop), sl st in 2nd ch from hook and across to make a sturdy chain-loop (19)
Round 2 :
Fold loop and sc through both layers of the first ch to create a 1-row tubular loop: sc 19 around the chain, sl st to join (19)
Info :
Adjust ch count for a longer or shorter hanging loop. When joining the star front to back, position the loop between the front and back so it is securely trapped in the seam.
Round 3 :
Fasten off leaving 15cm tail for sewing into seam. Securely weave ends after assembly.
— Joining Front & Back (Puff-Flat Pillow Join) :
Info :
With right sides facing out, position front and back panels together, aligning the five points. Use pins to secure. We'll join with an outer sc join that creates a neat ridge. Leave a 6-7 cm gap at one inner edge for stuffing.
Round 1 :
Using main color and long tail from back, insert hook through both layers at a point just to the side of the top point. Work 1 sc through both layers in each stitch around until 6-7 cm before finishing point; do not stuff yet (70)
Round 2 :
Start stuffing gently through gap making sure to distribute fill evenly into each star point and center; press stuffing into points with a blunt tool or chopstick while you continue to sc around to close. Continue 1 sc in each st around and close the remaining stitches, slip stitch to join (70)
Info :
Stuff the points gently but firmly so each point is pleasantly full. Avoid overstuffing the central area to keep the ornament flat-puffed. Add small amounts of stuffing between sc rounds so the seam closes smoothly.
Round 3 :
Fasten off and weave in remaining tails into the seam for a clean finish (70)
— Gold Edging / Braided Trim :
Info :
Use metallic gold yarn or thin gold cord held with matching yarn to create the ornate edge. This edging is worked in the round across the outer edge. Use a 3.0mm hook for tighter stitches. The edging should be started at the top point behind the hanging loop to hide the join.
Round 1 :
Join gold yarn at seam between two points. Ch1, sc evenly in each outermost stitch around in back loops only to create a braided ridge (70)
Round 2 :
Work 1 sc in each st around (70)
Round 3 :
*To create a visible braid: (sl st, ch1, skip 1 st) repeat around, tightening each sl st slightly to pull the gold yarn forward and create a contrasting braid-like edge* (70)
Round 4 :
Fasten off gold yarn and securely weave ends. If using a separate gold cord, sew around the seam with small whip stitches catching the cord into the outer edge every 3–4 stitches for even spacing (70)
Info :
When using a metallic thread, crochet slowly — metallics can be slippery. If using two strands (gold + main color) carry the main color inside to help stabilize the braided look and hide the structural strand.
— Holly Leaves (Make 2) :
Round 1 :
With green yarn, ch7. Row 1: sc in 2nd ch from hook and across (6)
Round 2 :
Ch1, turn. 1 sc in first st, hdc in next, dc in next 2, hdc in next, sc in last (6)
Round 3 :
Ch1, turn. Work along the other side of foundation chain: sc in first, hdc in next, dc in next 2, hdc in next, sc in last (12 total across both sides)
Round 4 :
Turn leaf tip by sl st into tip stitch, ch1, work 3 sc into tip, then continue back along opposite side to join with sl st at base—fasten off leaving tail for sewing (12)
Info :
Pin the leaf to a flat surface to shape it slightly. You can curve the edges by blocking lightly with a damp cloth and pins. Make two leaves per star and flip them so they overlap attractively beneath the berries.
— Berries (Make 3) :
Round 1 :
With red yarn, make a magic ring. Ch1, 6 sc in ring (6)
Round 2 :
Inc in each st around (12)
Round 3 :
1 sc in each st around (12)
Round 4 :
Now shape: (1 sc, dec) x4 (8)
Round 5 :
Stuff very lightly with a tiny pinch of fiberfill. Finish with 4 dec (4). Fasten off leaving a long tail for sewing. Pull tail to close hole and weave inside berry for a neat finish.
Info :
Berries are tiny—use a small amount of stuffing to keep them firm but not misshapen. If you prefer a slightly larger berry, make round 2: (1 sc, inc) x6 = 18 sts then shape down over additional rounds.
— Additional Decorative Round: Optional Raised Dots Across Face :
Round 1 :
Using same main color or contrasting metallic thread, work small 3-sc popcorns into selected stitch holes around the star face to mimic the small hole patterns seen in the photo. Popcorn: 5 dc in same st, remove hook from loop, insert into top of first dc, pull loop through to close. Secure with a sl st behind to anchor. Repeat 5–8 times evenly spaced (no change to total stitch count)
Info :
These raised dots give the star a traditional granny-like texture and echo the little holes seen in the photographed stars. Place them symmetrically so the star looks balanced.
— Bow & Center Bead :
Info :
Use a narrow gold ribbon. Tie a small bow about 2–3 cm across and secure the center with a small stitch or glue. Thread a small gold bead or bell onto a short length of thread and stitch through the bow center and into the star. Hide the knot under berries or leaves.
Round 1 :
Position the leaves and berries on the front face, centering them slightly above the middle of the star. Pin in place, then use the long tails from leaves and berries and a yarn needle to sew through the star body into the seam to anchor.
Info :
Sew berries first: anchor each berry with 2–3 small stitches through the star then through the berry base. Arrange three berries in a triangular cluster with two leaves fanned beneath. Place the bow atop the cluster and secure with a bead through the bow center for a polished finish.
— Finishing Touches :
Info :
Weave in all tails into the inner seam of the star and trim close. Wet-block lightly if using cotton yarn to settle the shape. If you used metallic yarn for edging, avoid high heat — rather shape with hands and pins and let dry naturally.
Round 1 :
Final inspection: ensure loop is secure, gold trim is even and embellishments are symmetrical. Add a small dab of fabric glue under the bow if needed for extra hold. Your star is now ready to hang!
These festive star ornaments bring a handmade sparkle to seasonal decor and make thoughtful keepsakes or gifts. Each star combines simple shaping with little accents that add personality and polish — from the delicate gold braid to the cheerful cluster of holly berries and ribbon. Whether you make a set in traditional colors or a pastel palette, these ornaments are quick to work up and endlessly customizable. Enjoy stitching, decorating, and sharing these cozy handmade treasures! 🎄✨