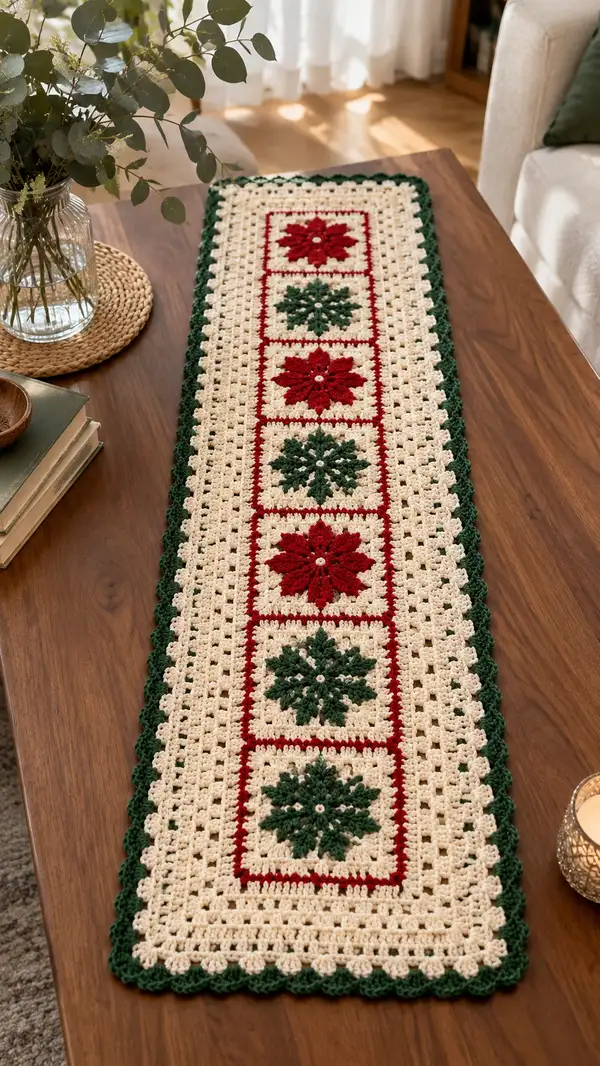
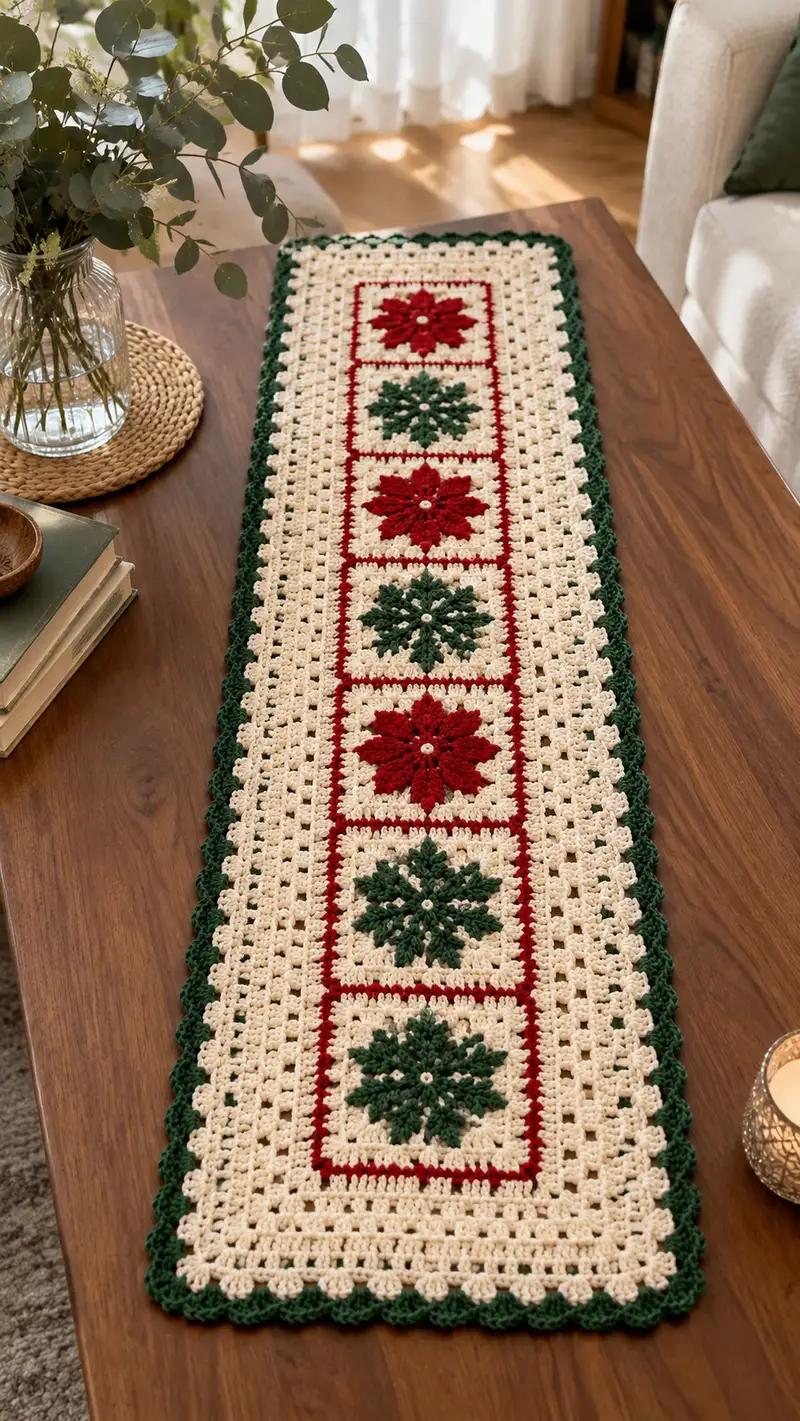
A long, elegant holiday table runner composed of alternating starburst squares framed by a creamy granny field and a deep forest green scalloped edge. Bold red and green star motifs sit inside crisp cream squares for a classic seasonal look. This pattern includes step-by-step motif instructions, joining, and a decorative scalloped border to finish the runner beautifully.
Progress Tracker
0% Complete
— Notes & Gauge :
Info :
Gauge is not critical for this runner, but to achieve similar finished dimensions aim for approx. 4-5 dc = 1" and 3-4 rows = 1" in granny rounds with worsted yarn and a 4.0mm hook. Make tension consistent between motifs for an even final piece.
Info :
Abbreviations used below follow US crochet terms. Work tightly enough that the background does not show stuffing (this project is flat so no stuffing is required). Use stitch markers to mark the beginning of each round when working continuous rounds.
— Star Square Motif (make 6 - alternate colors) :
Info :
Make six star squares total. Alternate the center star color: Motifs 1,3,5 use Holiday Red center; Motifs 2,4,6 use Forest Green center. All surrounding square rounds use Cream unless otherwise specified. Each motif is worked in joined-round style and finished to a 9" square approximately (blocked).
Motif Setup - Round 1 :
With center color (Red or Green) make a magic ring, ch 3 (counts as dc), 11 dc into ring, sl st to top of ch 3 to close (12 dc) (12)
Round 2 :
Ch 1, sc in same st, ch 3, *skip next dc, sc in next dc, ch 3*; rep from * to * around creating 6 ch-3 spaces between scs; sl st to first sc to join (6 sc, 6 ch-3 sps). This sets up spaces for puff petals. (12 sts + 6 ch-sps)
Round 3 :
Info : Make puff petals into the ch-3 spaces. Puff stitch instruction: yo, insert hook into ch-3 sp, yo pull up loop; repeat 4 more times for a total of 5 loops on hook, yo and pull through all 5 loops, ch 1 to close puff. Each puff counts as a petal.
Round 3 :
*In next ch-3 sp work: (puff, ch 1); sl st into next sc to move to following ch-3 sp; rep from * around to make 6 puff petals. After last petal, sl st to base of first puff to join. (6 puffs)
Info :
Center accent: Add a small pearl bead or a contrasting small french knot using embroidery thread stitched through the center of the puff flower now if desired. Secure and weave in tails before proceeding.
Round 4 :
Join Cream yarn with a sl st to any ch-1 between puffs, ch 3 (counts as dc), 2 dc in same ch-1 sp, ch 2, 3 dc in same ch-1 sp (this forms corner 1). *Move to next ch-1 space between puffs; 3 dc, ch 2, 3 dc (corner); rep from * around creating 6 small corner groups separated by narrow sides. After completing the 6th corner, sl st to top of beginning ch 3 to join. (6 corner groups of 3dc) This begins the square framing. (3dc per corner x6 = 18 dc + ch-2 corners)
Info :
Your motif will initially look hexagonal; we will square it up over the next rounds by working side clusters and corner increases. Work loosely across sides if your tension is tight to allow for flat shaping.
Round 5 :
Ch 1, sc in same st, ch 3, sc into space between the next two 3-dc groups to form a side chain, *ch 3, sc into next side space; rep across until you reach the corner ch-2; in corner work (3 dc, ch 2, 3 dc) into the corner ch-2; rep side chains and corner clusters around. Join with sl st to first sc. This smooths out the sides into square alignment. (Workable stitch pattern, sides now have spaced ch-3 sps.)
Round 6 :
Ch 3 (counts as dc), 2 dc in same st, *ch 1, skip next ch-3 sp, into next sc work 3 dc, ch 1, into following sc work 3 dc; repeat across side until corner, in corner work 3 dc, ch 2, 3 dc; rep around. Join with sl st to top of ch 3. (This round creates side shells and fills sides, keeping corners expanded.)
Info :
At the end of this round the motif should start resembling a square. If any side is curling, block gently or adjust tension by adding an extra ch-1 between clusters on tight sides.
Round 7 :
Ch 1, sc in same st, ch 3, *2 dc into next ch-1 space (side), ch 1, 2 dc into same ch-1 space; sc into corner ch-2; rep around placing 2-dc shells centered on sides and sc in corner ch-2. Join with sl st. (This builds out the side bands) (Approx 32 dc distributed)
Round 8 :
Ch 3 (counts as dc), dc in next 3 sts, ch 1, skip 1 st, dc in next 4 sts, ch 2 in corner, dc in next 4 sts, ch 1, skip 1 st, dc in next 4 sts; repeat around maintaining symmetry. Join with sl st to top ch 3. (This evens stitch counts on each side; aim for equal stitches per side.)
Info :
By round 8 the motif should reach about 4.5" square unblocked. If you prefer a slightly larger motif, use a 4.5mm hook or add an extra dc round evenly around.
Round 9 :
Ch 1, sc in same st, *ch 3, skip next 2 dc, sc in next st; rep across side and into corners work (sc, ch 3, sc) into corner ch-2; join. This adds airy chain spaces that will blend into the granny join later. (sc and ch-3 pattern continues)
Round 10 :
Switch to working in clusters for a classic granny-square feel. Join cream yarn if not already. Ch 3 (counts as dc), 2 dc in same st, ch 1, *(3 dc, ch 1) into next ch-3 sp or side gap; rep around placing a 3-dc cluster in each side gap; in corners work (3 dc, ch 2, 3 dc) as corner cluster. Join with sl st to top of ch 3. (This produces a recognizable granny round; count per side: 3 clusters + corner clusters.)
Info :
From this point, further rounds will expand the square evenly, using (3 dc, ch 1) clusters along sides and (3 dc, ch 2, 3 dc) in corners. These counts scale predictably so you can make each motif the same size using the rounds below.
Round 11 :
Ch 3, 2 dc in same st (corner), ch 1, 3 dc in each side ch-1 space, ch 1 between clusters; in corner work (3 dc, ch 2, 3 dc); rep around. Join with sl st. (Sides now have more clusters; square grows evenly.)
Round 12 :
Repeat Round 11 to continue squaring up: ch 3, 2 dc in same st (corner), *ch 1, 3 dc in each ch-1 space along side, ch 1; corner (3 dc, ch 2, 3 dc); rep around. Join. (Squares now measure approx. 6-7" after blocking depending on tension.)
Info :
If you wish for motifs to be slightly smaller or larger to match table length, add or omit one granny expansion round. Keep all motifs identical for a flat runner.
Round 13 :
Ch 3, (2 dc, ch 1) into same corner cluster, *3 dc into next ch-1 space, ch 1, rep across side, corner (3 dc, ch 2, 3 dc); rep around. Join. (By the end of this round each side will show distinct 3-dc groups separated by ch-1 spaces.)
Round 14 :
Ch 1, sc in same st, ch 3, sc in next ch-1 space across sides to create evenly spaced sc-ch3-scs across the square; in corners work (sc, ch 3, sc) into corner ch-2. Join. (This sets up a neat lattice for the inner red border that comes next.)
Round 15 :
Info : If making the narrow inner red frame, change to Holiday Red now. Carry the cream behind or fasten off and rejoin red. This narrow red line shown in the photo is worked as two rounds of red single/double crochet for contrast.
Round 15 :
Change to Holiday Red, ch 1, sc evenly around working 1 sc in each ch-1 space and 1 sc in each dc cluster top across sides; in corners work 2 sc in corner ch-3 to maintain square shape. Join with sl st. (Even sc round in red frames the motif square.)
Round 16 :
Ch 2, hdc in each st around working 2 hdc in each corner (space) to keep corners square. Join with sl st. This gives a subtle raised red frame. Fasten off and weave in ends. (Square now ready for final cream join rounds or blocking.)
Round 17 :
Info : Block this motif lightly to bring all six motifs to an identical square size and shape. Pin to measurement (approx 9" square) and steam or wet block as yarn requires. Allow to dry fully before joining for neat joins.
Round 18 :
Make 6 motifs in total following Rounds 1-16. Alternate center color as instructed. After finishing each motif, weave in ends of motif center and frames; leave ends for join-as-you-go if you prefer that method. (6 motifs completed)
— Layout & Joining Plan :
Info :
Layout the six motifs in a single long column in this order from top to bottom: Motif 1 (Red star), Motif 2 (Green star), Motif 3 (Red), Motif 4 (Green), Motif 5 (Red), Motif 6 (Green). The motifs should touch at sides and be joined to create a long central column. We will join them using a combination of slip-stitch whip-join for strength and a continuous cream granny field built around the column to unify the design.
Join - Step 1 :
Place motif 1 RS up and motif 2 RS up, align edges. Using Cream yarn and a blunt tapestry needle, whip-stitch through the outer-most red frame stitches along one full side seam: insert needle under the back loop only of both motifs across matching stitch positions. Use even, close stitches to create a flat join. Repeat to attach motif 2 to motif 3 and so on until you have a vertical strip of six motifs. (6 motifs joined vertically)
Info :
Alternatively use slip-stitch join: RS facing, join cream with sl st through both motif edges across matching ch-1 spaces, working sl st in each matching stitch to create a visible join ridge. The whip-stitch gives a flatter seamed look preferred for table runner stability.
— Joining Rounds & Granny Field Expansion (work around motif column) :
Round 1 :
With joined motif column placed RS up, attach Cream yarn to the outermost corner of the top motif corner by sl st. Ch 3 (counts as dc), in same corner work 2 dc, ch 1. Working along top edge of top motif: into each side ch-1 space work (3 dc, ch 1) across the width of the motif; at top outer corner of top motif work (3 dc, ch 2, 3 dc) to form outer corner. Continue along the long sides of the column building one continuous granny round that goes around the entire assembled column of motifs. When you reach the bottom, complete corner, and continue across bottom motif top to meet the starting point. Join with sl st. This integrates motifs into a single piece with a surrounding granny field. (This is the first background round.)
Info :
Count the side clusters per motif; each motif currently has an even number of side cluster spaces so the continuous granny will flow without awkward partial clusters. If you find a mismatch, add an extra ch-1 space mid-side to balance counts before continuing.
Round 2 :
Ch 3, 2 dc in same corner (expand), *ch 1, 3 dc in each ch-1 space across sides including across seams where motifs were joined; in outer corners work (3 dc, ch 2, 3 dc); rep. Join with sl st. (This increases the background margin evenly.)
Info :
Work the first three rounds of granny field loosely to prevent pulling the motifs inward. The cream field will create the wide airy background seen in the image. Keep consistent ch-1 spacings between clusters to produce even-looking squares around the central motif column.
Round 3 :
Repeat the granny expansion: ch 3 (counts as dc), 2 dc in same corner, ch 1, 3 dc in each ch-1 space around piece, ch 1 between clusters; in corners (3 dc, ch 2, 3 dc). Join. (Piece increases uniformly.)
Round 4 :
Repeat Round 3 to add additional cream field width. Join. (This round will give you approx the photo's cream border to reach about 1.5-2" from motif centers to the edge.)
Info :
After doing 3-4 granny expansion rounds, check the overall rectangular proportions against your tabletop. The runner in the photo has a generous cream border; add or subtract rounds to reach your preferred width before beginning the outer edge treatments.
Round 5 :
For a cleaner look, work a round of single crochet in cream around the entire runner: join cream, ch 1, sc evenly in every stitch and into corner ch-2 spaces work (sc, ch 1, sc) to keep corners square. Join with sl st. This creates a tidy frame for the inner red accent that follows in the photo.
Round 6 :
Info : Add the narrow red inner frame that sits directly around the full motif column, offset from the motifs by the cream field. This will echo the red frames of each motif and tie the design together. Change to Holiday Red for this round.
Round 6 :
With Holiday Red, join with sl st where desired on top edge, ch 1, sc evenly around working 1 sc in each sc from previous round; in corners work 2 sc to keep shape. Join and fasten off red. (This narrow red line produces the continuous inner border visible in the photo.)
Round 7 :
Rejoin Cream, ch 3, (2 dc, ch 1) in same st to begin a final cream granny expansion that will prepare for the green scalloped edge. Work (3 dc, ch 1) clusters across each side and (3 dc, ch 2, 3 dc) in corners. Perform 3 rounds of this granny expansion in cream to reach the desired final border depth. Join each round with sl st. (Rounds 7-9 expand the cream field to final width.)
Info :
Check measurements after each cream granny round; in the pictured runner the cream field shows three full rounds beyond the red inner border before the green scalloped edge begins. Match that look unless you need to adjust for table size.
Round 8 :
Repeat (3 dc, ch 1) clusters in each side gap and corner clusters as before. Join. (Continue to build even rounds.)
Round 9 :
Repeat one more time: ch 3, (2 dc, ch 1) in corner, 3 dc in side gaps with ch 1 between, corner (3 dc, ch 2, 3 dc). Join and fasten off if desired. (This is the last cream granny round before scallops.)
— Scalloped Edge (Forest Green) :
Info :
The scalloped outer edge in deep green forms a decorative finishing touch. Change to Forest Green yarn and work shell-based scallops across the final cream round edge. The scallops are placed centered on each side cluster or chain space for symmetry.
Round 1 (Scallop Base) :
Join Forest Green with sl st to any corner ch-2. Ch 1, sc in same st, *ch 3, sk 2 sts, sc in next st; rep across until you reach corner, in corner work sc, ch 3, sc; rep around. Join with sl st. This forms consistent spacing for scallops. (Spacing round)
Round 2 (Scallops) :
Ch 1, sc in same st, *in next ch-3 sp work: (sc, hdc, 3 dc, hdc, sc) to form a 5-shell scallop; sc in next sc to anchor; rep around; in corners work same scallop centered across corner ch-3 to keep wrap-around balance. Join with sl st. (This produces full scallops around the rectangle.)
Info :
For a deeper scallop repeat Round 2 one more time working scallops centered on previous scallops; otherwise fasten off and weave in ends. The photo shows a single-row scallop with clear shell definition.
Round 3 (Optional Deep Scallop) :
Working into the outer edge of each scallop from Round 2, make (sc, 2 hdc, 5 dc, 2 hdc, sc) centered on each previous scallop to create a layered border. Join and fasten off. Weave in all ends. (Optional layered scallops give more texture.)
Info :
For optimum results, block runner flat after completing scallops. Pin carefully to keep scallop shapes. Steam or lightly spritz and allow to dry fully. This will flatten any small waves and ensure a polished finished piece.
— Final Finishing Rounds & Details :
Round 1 :
Weave in all ends on the wrong side using a tapestry needle, hiding tails under nearby stitches or along seam lines. Trim close. If any join looks loose, reinforce with a few secure invisible whip stitches through both motifs and background at 1/4" intervals.
Round 2 :
Add small pearl beads to the centers of each star motif if you like using a matching small hand stitch and secure knot on the wrong side; this adds the little bright center point visible in the photo. Beads should be sewn through with a fine needle and the knot secured with fabric glue if desired for longevity.
Info :
Care instructions: hand wash gently or machine wash on delicate in a mesh bag, reshape while damp, and dry flat. Avoid tumble drying to preserve scallops.
Round 3 :
Final press: On the RS, use a dry press cloth and a warm iron to gently press motifs flat if desired, or leave textured as-is for a more dimensional look. Ensure any beads are heat-safe first.
Info :
Estimated finished length: approximately 36-48" depending on motif size and number. Width: approx. 9-11". You can lengthen the runner by making more motifs and repeating the joining and border sequence.
Completing this runner is such a joyful process — every star square comes together to form a cozy, vintage-inspired holiday accent. The contrast of cream with deep red and green gives it a classic seasonal feel that looks beautiful on any table. Blocking and the scalloped border really elevate the finished piece, making it look polished and professional. 🧶✨ Place candles or a vase on top and enjoy how handmade charm transforms your dining space! 🎄