🧢 Beautiful ✨ Detailed πŸ’ Adorable

Field of Daisies Crochet Blanket Pattern

Field of Daisies Crochet Blanket Pattern
4.2β˜… Rating
12-15 Hours Time Needed
4.0K Made This
βœ‚οΈ

Beginner Friendly Level

Perfect for those just starting their crochet journey, with clear instructions and simple techniques

⏱️

Multi-Day Project

A rewarding 12+ hour journeyβ€”perfect for dedicated crafters who love detailed work.

πŸ€—

Soft Hug

Gentle, plush, and full of warmth, creating a sense of comfort and coziness wherever they find a home.

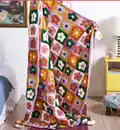
About This Field of Daisies Crochet Blanket Pattern

This pattern creates a cozy, colorful blanket made from 5Β½" floral motifs assembled into a large field of daisies. You will make multiple motif color combinations and sew them together through back loops for a textured join. The design finishes with a neat triple-row edging and four fluffy flower pompoms at the corners.

Field of Daisies Crochet Blanket Pattern crochet pattern - detailed view of completed project

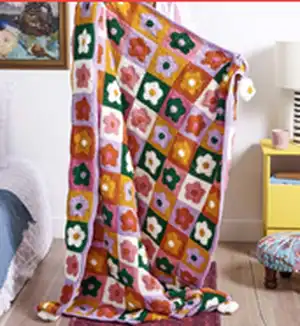
Detailed motif instructions, an assembly diagram, and edging rounds are included to make construction straightforward. Suitable for beginners who want a rewarding multi-day crochet project.

Why You'll Love This Field of Daisies Crochet Blanket Pattern

I absolutely love this pattern because it turns simple crochet stitches into a joyful floral mosaic that brightens any room. I enjoy how making each motif feels like a small, satisfying project while the full blanket grows quickly as you assemble them. The color combinations are playful and allow for a lot of creativity, which keeps the process fun and engaging. The corner flower pompoms are my favorite finishing touch β€” they add personality and make the blanket feel handmade and heartfelt.

Field of Daisies Crochet Blanket Pattern step 1 - construction progress Field of Daisies Crochet Blanket Pattern step 2 - assembly progress Field of Daisies Crochet Blanket Pattern step 3 - details and accessories Field of Daisies Crochet Blanket Pattern step 4 - final assembly and finishing

Switch Things Up

I love customizing this pattern by changing color palettes to suit seasons or gifts; swapping the bright palette for pastels gives a soft nursery blanket look.

You can make the blanket smaller or larger by adding or removing motifs in the assembly gridβ€”just multiply motifs to increase size or reduce rows for a baby blanket.

If you want a chunkier blanket, use a bulkier yarn and a larger hook to create a squishier, warmer throw that works up faster.

Try substituting a textured stitch for the final edging round to add a unique border treatment that contrasts with the smooth motif joins.

For a modern look, use monochrome centers with a bold contrasting round for each motif so the flower shapes pop against a neutral background.

I sometimes embroider tiny accents on the flower centers or add a button to the center for an extra decorative detail that personalizes each motif.

Make mini versions as keychains by using lighter yarn and smaller hooks to create adorable, portable flower motifs to gift or sell.

Change the Flower Pompom corners to simple tassels or crocheted balls if you prefer a flatter finish that stores easier for travel or crib use.

Try joining motifs with a visible contrasting join color for a graphic grid effect, or use the back-loop join as written for a subtle seam that lets the motifs shine.

If you enjoy stitch variation, replace some motif rounds with puff or bobble stitches to add texture and visual interest across the blanket.

Common Mistakes & How to Fix Them

βœ— Skipping stitch markers during motif joins can cause uneven alignment; place markers on corners and key join points to keep rows straight. βœ— Forgetting to break Color 1 after joining Color 2 leaves extra yarn tails to weave; cut and fasten off Color 1 as instructed and weave in ends as you go. βœ— Not working joins through the back loops only will change the textured look of the blanket; sew motifs together through back loops only for the intended finish. βœ— Overstuffing the Flower Pompoms makes them bulky and hard to close; stuff lightly and gradually before completing the final petal to maintain shape. βœ— Using inconsistent tension across motifs results in wavy or uneven blanket edges; maintain even tension and check gauge often to ensure square motifs. βœ— Ignoring the note about chain counts at round starts can change stitch counts; remember that ch 2 at beg of rnd does not count and ch 3 counts as dc where specified.

Field of Daisies Crochet Blanket Pattern

Create a bright, floral blanket made from charming daisy motifs that snap together for a cheerful finish. This pattern guides you through each motif, the joining method, edging, and adorable corner flower pompoms. Perfect for adding a handmade, colorful accent to any room or gifting to someone who loves flowers.

Beginner Friendly 12-15 Hours

Materials Needed for Field of Daisies Crochet Blanket Pattern

β€” Main Fabric

  • 01
    Red Heart Super Saver (7 oz/198 g; 364 yds/333 m) - main base yarn
  • 02
    Contrast A Carrot (0256) - 2 balls or 545 yds/498.5 m
  • 03
    Contrast B Gold (0321) - 2 balls or 545 yds/498.5 m
  • 04
    Contrast C Paddy Green (0368) - 2 balls or 545 yds/498.5 m
  • 05
    Contrast D Pale Plum (0579) - 2 balls or 665 yds/608 m
  • 06
    Contrast E Soft White (0316) - 2 balls or 620 yds/567 m
  • 07
    Contrast F Light Raspberry (0774) - 2 balls or 545 yds/498.5 m
  • 08
    Fiberfill stuffing for corner Flower Pompoms (small amount)

β€” Tools Required

  • 01
    Crochet hook size U.S. H/8 (5 mm) Susan Bates Silvalume or size needed to obtain gauge
  • 02
    Susan Bates yarn needle
  • 03
    Scissors
  • 04
    Stitch markers
  • 05
    Fiberfill stuffing for Flower Pompoms
  • 06
    Pins for assembly (optional)

Progress Tracker

0% Complete

β€” Motifs :

Motif 1 :

With A as Color 1, F as Color 2, and E as Color 3 - make 20 Motifs.

Motif 2 :

With B as Color 1, E as Color 2, and C as Color 3 - make 20 Motifs.

Motif 3 :

With C as Color 1, D as Color 2, and B as Color 3 - make 20 Motifs.

Motif 4 :

With D as Color 1, C as Color 2, and F as Color 3 - make 20 Motifs.

Motif 5 :

With E as Color 1, B as Color 2, and A as Color 3 - make 20 Motifs.

Motif 6 :

With F as Color 1, A as Color 2, and D as Color 3 - make 20 Motifs.

Info :

See Diagram.

Round 1 :

With Color 1, ch 4. Join with sl st to first ch to form ring. Ch 3. 9 dc in ring. Join Color 2 with sl st to top of beg ch 3. Break Color 1. 10 dc.

Round 2 :

With Color 2, ch 3. 1 dc in first dc. *2 dc in next dc. Rep from * around. Join with sl st to beg of ch 3. 20 dc.

Round 3 :

Skip first dc. *(1 dc, 1 tr) in next dc. 3 tr in next dc. (1 tr, 1 dc) in next dc. Sl st in next dc. Rep from * around, ending by joining with sl st to top of ch-3. Fasten off.

Round 4 :

Join Color 3 with sl st to any centre tr of 3-tr group. Ch 1. 1 sc in same sp as sl st. *1 hdc in next tr. 1 dc in each of next 2 sts. 1 tr in same st as sl st from previous (3rd) rnd. 1 dc in each of next 2 sts. 1 hdc next tr. 1 sc in next tr. Rep from * around, omitting last sc and joining with sl st to first sc.

Round 5 :

Ch 1. 1 sc in same sp as sl st. *1 hdc in next st. 1 dc in next st. 2 dc in next st. (1 tr, Ch 1, 1 tr) in next st (corner made). 2 dc in next st. 1 dc in next st. 1 hdc in next st. 1 sc in each of next 3 sts. Rep from * around, ending with 1 sc in each of last 2 sts. Join with sl st to first sc. Fasten off.

β€” Flower "Pompoms" :

Flowers (make 2 for each Pompom) :

With B, ch 4. Join with sl st to first ch to form ring.

Round 1 :

Ch 3. 9 dc in ring. Join E with sl st to top of beg ch 3. Break B. 10 dc.

Round 2 :

With Color 2, ch 3. 1 dc in first dc. *2 dc in next dc. Rep from * around. Join with sl st to beg of ch 3. 20 dc.

Round 3 :

Skip first dc. *(1 dc, 1 tr) in next dc. 3 tr in next dc. (1 tr, 1 dc) in next dc. Sl st in next dc. Rep from * around, ending by joining with sl st to top of ch-3. Fasten off.

Round 4 :

Join Color 3 with sl st to any centre tr of 3-tr group. Ch 1. 1 sc in same sp as sl st. *1 hdc in next tr. 1 dc in each of next 2 sts. 1 tr in same st as sl st from previous (3rd) rnd. 1 dc in each of next 2 sts. 1 hdc next tr. 1 sc in next tr. Rep from * around, omitting last sc and joining with sl st to first sc.

Round 5 :

Ch 1. 1 sc in same sp as sl st. *1 hdc in next st. 1 dc in next st. 2 dc in next st. (1 tr, Ch 1, 1 tr) in next st (corner made). 2 dc in next st. 1 dc in next st. 1 hdc in next st. 1 sc in each of next 3 sts. Rep from * around, ending with 1 sc in each of last 2 sts. Join with sl st to first sc. Fasten off.

β€” Assembly :

Info :

Sew Motifs tog through back loops only as shown in Assembly diagram on page 3.

β€” Edging :

Round 1 :

(RS). Join D with sl st to any corner. Ch 2. Work 1 rnd of hdc evenly around all sides, working 3 hdc in each corner. Join with sl st to first hdc.

Round 2 :

Ch 2. 1 hdc in each hdc around, working 3 hdc in each corner hdc. Join with sl st to first hdc. Fasten off.

Round 3 :

Skip first dc. *(1 dc, 1 tr) in next dc. 3 tr in next dc. (1 tr, 1 dc) in next dc. Sl st in next dc. Rep from * around, ending by joining with sl st to top of ch-3. Fasten off.

β€” Flower Pompom Assembly :

Info :

With 2 Flowers held WS tog, join with sl st anywhere around edge.

Round 1 :

Working through both thicknesses and back loops only, sl st around Flowers, stuffing lightly before completing 5th petal. Fasten off.

Info :

Sew one Flower Pompom to each corner of Blanket.

Assembly Instructions

  • Sew motifs together through back loops only following the assembly diagram on page 3 to create a 10 x 12 arrangement of motifs.
  • Join motifs row by row, aligning petals and centers, and sew adjacent motifs with a whipstitch or mattress stitch through back loops only for a clean join.
  • Attach the edged border by joining D at any corner, working 1 rnd of hdc evenly around with 3 hdc in each corner, then work the following rounds as instructed.
  • Make 4 Flower Pompoms (2 Flowers joined per pompom) and sew one Flower Pompom to each corner of the finished blanket, stuffing lightly before completing each pompom.

Important Notes

  • πŸ’‘Ch 2 at beg of rnd does not count as st; follow pattern notes for counting chain starts correctly.
  • πŸ’‘Ch 3 at beg of rnd counts as dc; adjust stitch counts accordingly when joining rounds.
  • πŸ’‘Check your gauge: 12 sc and 15 rows = 4" [10 cm] and motif = 5Β½" [14 cm] square to ensure correct blanket dimensions.
  • πŸ’‘Sew motifs through back loops only to achieve the textured seam shown in the assembly diagram.

This Field of Daisies blanket pattern combines classic granny-style motifs with cheerful floral centers for a joyful handmade throw. Whether you make it in the original palette or choose your own colors, each square brings a little garden to life. Perfect for gifting or brightening your own space. 🧢🌼

You ask,

we answer.

FAQs

What size will the finished piece be?

The finished blanket measures approximately 57" x 68" [145 x 173 cm] when using the recommended yarn and hook size.

Can I use different yarn weights for this pattern?

Yes, but changing the yarn weight will affect the final size and gauge; be sure to swatch and adjust hook size to match gauge.

Do I need prior crochet experience for this pattern?

This pattern is rated beginner friendly, so basic knowledge of single crochet, half double crochet, double crochet, and treble crochet is recommended.

How long does this project typically take to complete?

Most crocheters complete this project in 12-15 hours spread over multiple sessions, depending on speed and experience.

How are the motifs joined together?

Motifs are sewn together through the back loops only, following the assembly diagram on page 3 for correct placement and alignment.