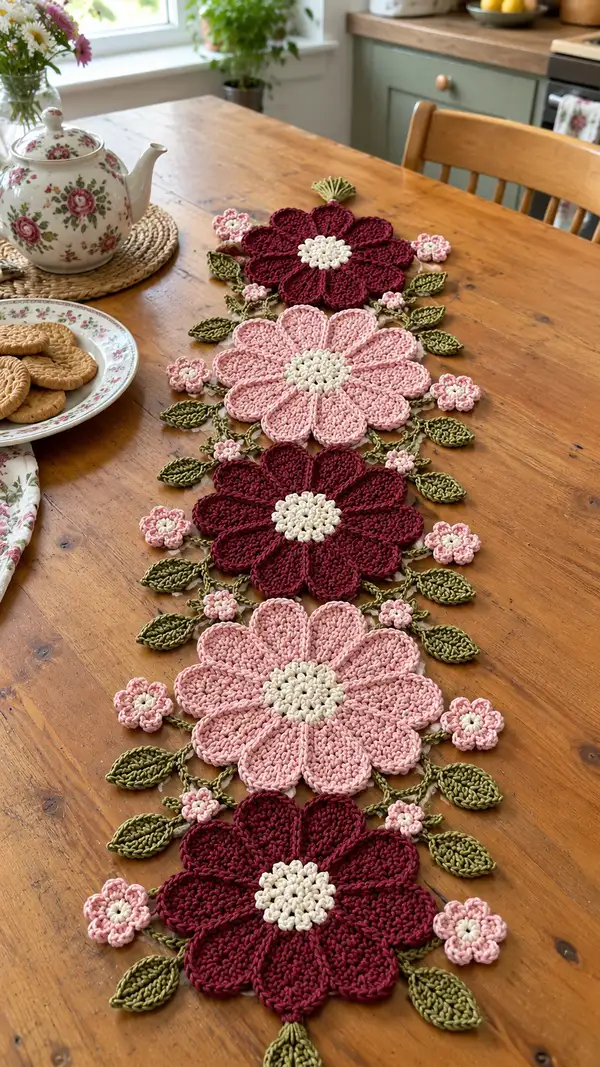
Create a charming floral table runner made from large daisy motifs, leafy vines and tiny blossom accents. This pattern uses cotton/ply yarn in deep burgundy, soft pink, cream centers and olive green leaves to form a long runner full of texture and dimension. The motifs are made separately and joined by crocheted vines for a delicate, hand-stitched finish. Perfect to decorate a farmhouse table, dresser or shelf, this runner combines simple crochet stitches with structured petal shaping for a striking result.
Progress Tracker
0% Complete
— Overview :
Info :
This pattern creates a modular floral table runner made up of four large daisy motifs, multiple small 6-petal flowers, and many layered leaves joined by crocheted vines. Work each motif flat, block lightly, then join. The instructions are given per motif; where groups are required you will find repetition notes. Use a 3.5mm hook for a firm fabric; adjust if you want a looser or denser fabric.
Gauge :
Large flower finished center disk measures approximately 6.5cm across; full assembled large daisy measures approximately 20cm diameter when petals are attached, using recommended yarn and hook. Gauge will vary by yarn and tension.
— Materials & Prep :
Info :
Prepare yarn bobbins for each color (burgundy, blush pink, cream, olive green). Keep stitch marker for round starts. Lightly press center disks after blocking to flatten before attaching petals. Number of motifs: 4 large daisy motifs (alternate colors), 12 small blossom motifs, 20 leaves (approx — adjust as you like), vines to join motifs in a linear runner configuration. Make extras of leaves and small flowers for balance.
— Large Daisy - Center Disk :
Round 1 :
Make a magic ring, 6 sc in magic ring (6)
Round 2 :
Inc in each st around (12)
Round 3 :
(1 sc, inc) x 6 (18)
Round 4 :
(2 sc, inc) x 6 (24)
Round 5 :
(3 sc, inc) x 6 (30)
Round 6 :
(4 sc, inc) x 6 (36)
Round 7 :
(5 sc, inc) x 6 (42)
Round 8 :
(6 sc, inc) x 6 (48)
Info :
Fasten off cream/center color if switching to petal color now. Block center disk flat to create a stable base for petal attachment. Keep long tail for sewing if you prefer to join petals by whip stitch rather than crocheting around later.
— Large Daisy - Petal Motif (Make 8 petals per large daisy) :
Info :
Each petal is worked as a separate flat motif and then sewn onto the center disk around its circumference. Work petals in the large flower color (burgundy or blush pink). You will make 8 petals and sew them evenly around the center; mark eight anchor points on the center disk at approximately every 6 stitches (48/8=6) to space petals evenly.
Petal - Round 1 :
Make a magic ring, 6 sc in magic ring (6)
Petal - Round 2 :
Inc in each st around (12)
Petal - Round 3 :
(1 sc, inc) x 6 (18)
Petal - Round 4 :
(2 sc, inc) x 6 (24)
Petal - Round 5 :
1 sc in each st around (24)
Petal - Round 6 :
Work in BLO: 1 sc in each st BLO (24)
Info :
Rounds 1-6 build a small circular base. This will be folded and extended into a shaped petal by working a petal height section next. Keep markers to ensure petals match in height and curve.
Petal - Round 7 :
Ch 1, sc in next 4 sts, hdc in next 4 sts, 3 dc in next 4 sts (this is the center bulge of the petal), hdc in next 4 sts, sc in next 4 sts — (24 sts total per round across the petal face). Sl st to join. (24)
Petal - Round 8 :
Ch 1, 1 sc in each st around the petal curve, working 3 sc in each point where two rows meet to round the tip (24 with 3-st increases distributed evenly to maintain shape = 28). Note: when you work extra 3-sc clusters at the tip you will create small increases; overall petal will widen slightly. (28)
Petal - Round 9 :
Working in FLO across this round, 1 sc in each st around (28)
Petal - Round 10 :
Ch 2, *sk 1 st, sc in next st; ch 2* repeat across the petal curve to make small picot-like scallops (approx 14 sc and 14 ch2 loops). Sl st to join. (14 sc)
Info :
Fasten off leaving a 20-25cm tail for sewing. Make 8 identical petals for each large daisy. If you prefer to crochet petals directly onto center disk, you may slip stitch into marked center stitches instead; the separate motif approach gives clean, dimensional petals.
Petal Assembly - Round 11 :
Pin each petal to the center disk at the marked anchor points (every 6th stitch around the center). Use the long tail to whip stitch through the center disk and the inner ring of each petal, sewing with even tension so the petals are snug against the center. Repeat for all 8 petals. (No stitch count)
Info :
When sewing petals, align the petal base so that the petal curve flows outward. Use small, neat stitches and weave the tail back through the base once secured to avoid loose ends showing on the right side.
— Large Daisy - Petal Ridge & Edge Definition (worked after attaching petals) :
Round 12 :
With petal color, join yarn at base between petal 1 and petal 2 anchor. Ch 1, sc evenly around the inside base where petal meets center across each petal base (work ~3 sc into each petal base seam to anchor) — overall you will work approximately 8 x 3 = 24 sc around center base. (24)
Round 13 :
1 sc in each st around (24)
Round 14 :
Working in BLO across the row that covers petal bases, 1 sc in each st BLO (24)
Info :
This ridge anchors petals and creates a shadowed channel that visually separates center and petals. If you prefer a smoother join, work only Round 12 and leave it.
Round 15 :
Switch to a decorative outer edge: join yarn at outermost seam of a petal, ch 1, *sc, ch 2, sk 1* across the petal edge to create scallops; when you reach the valley between petals, work 3 sc to anchor. Repeat across all petals and slip stitch to join. (This will create approx 8 scallops of 5-7 stitches each)
Info :
Fasten off and weave ends. Block the entire large daisy lightly to set shape: pin petals into a gentle curved position and spray lightly with water, allow to dry flat.
— Small 6-Petal Flower (Make 12) :
Round 1 :
Make a magic ring, 6 sc in magic ring (6)
Round 2 :
Inc in each st around (12)
Round 3 :
(1 sc, inc) x 6 (18)
Round 4 :
Switch to blossom color for petals. Ch 3, *in next st work (sc, hdc, 3 dc, hdc, sc) into same st; sl st into next stitch to anchor* repeat around to make 6 petals (each petal uses one anchor stitch). After petals complete, sl st to join. Approx final petal-counting: 6 petal clusters, anchor spaced evenly. (No single total st count because petals are clusters)
Round 5 :
Work 1 sc in each stitch of the petal rounds across exposed clusters to secure edges and slightly flatten petals. Fasten off leaving tails for sewing. (Estimate 18-24 sc depending on cluster distribution)
Info :
Make 12 small flowers in total; these will be used to decorate the spaces between large daisies and to create leafy junctions. Block lightly if desired.
— Leaf Motif (Make approx 20 leaves) :
Info :
Leaves are worked flat from a chain base to create an elongated leaf. Each leaf is worked in olive green and uses alternating increases at tips to form the shape. Make as many leaves as needed to balance runner; typical runner in photo uses around 18-22 leaves for spacing.
Round 1 :
Ch 14, sc in 2nd ch from hook and across to last ch (13 sc). Turn. (13)
Round 2 :
Ch 1, sc in first 3, hdc in next 3, dc in next 3, hdc in next 2, sc in last 2. Turn. (13)
Round 3 :
Work down the opposite side of the foundation chain: sc in first 2, hdc in next 2, dc in next 3, hdc in next 3, sc in last 3. Sl st into the first sc to join and form a leaf outline. (13)
Round 4 :
Working in FLO across Round 3, 1 sc in each st around the leaf perimeter to give a crisp edge; work 3 sc into the tip to create a rounded tip (resulting in approx 16 sc around perimeter). (16)
Round 5 :
Surface ribbing: using the back post of the centre dc sts, work 1 hdc in each of the 3 back post dc sts to create a central ridge. Fasten off leaving tails for sewing. (3 hdc ridge)
Info :
Make a matched set of leaves for each side of the runner as pictured. Vary direction (pointing left or right) for a natural arrangement. Block lightly if needed to open the leaf ridges.
— Connecting Vine Chains & Joining Motifs :
Info :
Vines are simple chains with small picot anchor points used to attach leaves and small flowers. Use olive green for vines and leaves. The runner connects large daisies in alternating colors with vines and small flowers between them. Plan spacing: on the example runner, each large daisy is approximately 20cm center-to-center. Adjust number of vine chains accordingly.
Vine - Round 1 :
With olive green, join yarn at edge of large daisy where you want vine to start. Ch 20 (for a short connecting vine between a petal and a leaf). Sl st back into the same anchoring slip stitch to create a loop for stability. (Chains are length as needed; ch20 is an example)
Vine - Round 2 :
Along the chain, create small leaf or flower anchor points: *ch 3, sl st into chain 6 from last anchor to make a loop; ch 1, sc into chain to secure* repeat as desired. Use these chain loops to sew on small flowers or to secure leaf bases by whip stitching through the loop and leaf base. (No total stitch count)
Info :
When connecting two large daisies, measure the distance between their outer petal tips and chain accordingly — you can always add more leaves or small flowers along the vine to lengthen it. Keep vines slightly loose so motifs lay flat but with slight drape.
— Joining Strategy (Comprehensive) :
Info :
Work entirely with motifs blocked and flattened. Lay motifs on a flat surface in desired order. Start in the center of the runner and work outward or start from one end — whichever you prefer. Use long tails from motifs to invisibly whip stitch. To connect two large daisies: align petal valleys, attach vine chain to valley slip-stitches on each daisy using sl st or whip stitch; anchor leaves along vines at intervals. Sew small flowers to chain loops.
Joining Step 1 :
Pin two large daisies with their petals overlapping or with the desired valley spacing. Mark three anchor points across the valley area (left, center, right). Using a long tail from one motif, sew these points with a ladder or whip stitch through both motifs' inner rounds, then weave tail back through 5cm and trim. Repeat for all joins to create a stable, flat seam.
Joining Step 2 :
Attach vines by slip stitching into the seam area on the back of a daisy and chain out to the next join point. Secure vine end by weaving through stitches of the next motif and tying a small secure knot and weaving tail. Invisible sewing is preferred for a clean front appearance.
Info :
Pin leaves in place along the vine before sewing: alternate leaf directions for a natural look. Sew each leaf base to the vine loop using the leaf's tail or with a separate strand. Add small flowers at junctions where vines meet petals to replicate the decorative clusters in the photo.
— Decorative Edging and Finishing Touches :
Round 1 :
Once all motifs are joined, work a decorative edging along the entire runner if desired. With olive green, join yarn at one edge, ch 1, sc evenly along the outer edge of petals and leaves, working 3 sc into valleys to keep edging flat. Work all the way around the runner for a unified border. (Stitch count varies with runner length)
Round 2 :
Optional scallop: *ch 3, skip 2 sc, sl st into next sc* around for a delicate scallop. Fasten off and weave all ends neatly to the wrong side. Block lightly again to set the final shape. (Scallop counts vary)
Info :
Weave in ends by threading the yarn needle through several stitches of the same color on the wrong side; avoid surface pulls. Trim close. Use a small dab of fabric glue at knots if the yarn is particularly slippery and you want extra security.
— Alternate Assembly Options & Tips :
Info :
If you want a reversible runner, use more careful finishing and hide joins on both sides, or crochet a backing strip to sew across seam lines. To make the runner shorter or longer, add or remove large daisy motifs and adjust vine chains between them. Keep symmetry in mind when arranging motifs for a balanced look.
Final Care :
Hand wash gently in cool water with mild detergent and lay flat to dry. Block back into shape while damp. Avoid high heat to prevent shrinkage or distortion of cotton fibers.
This floral table runner brings handmade charm and botanical beauty to any table setting. Each layered daisy and leaf is carefully shaped to add texture and warmth to your home. I hope creating it gives you as much joy as arranging it on your table. 🌸🧶 Add seasonal colors or personalize with ribbon and make it a signature piece for your dining space! ✨