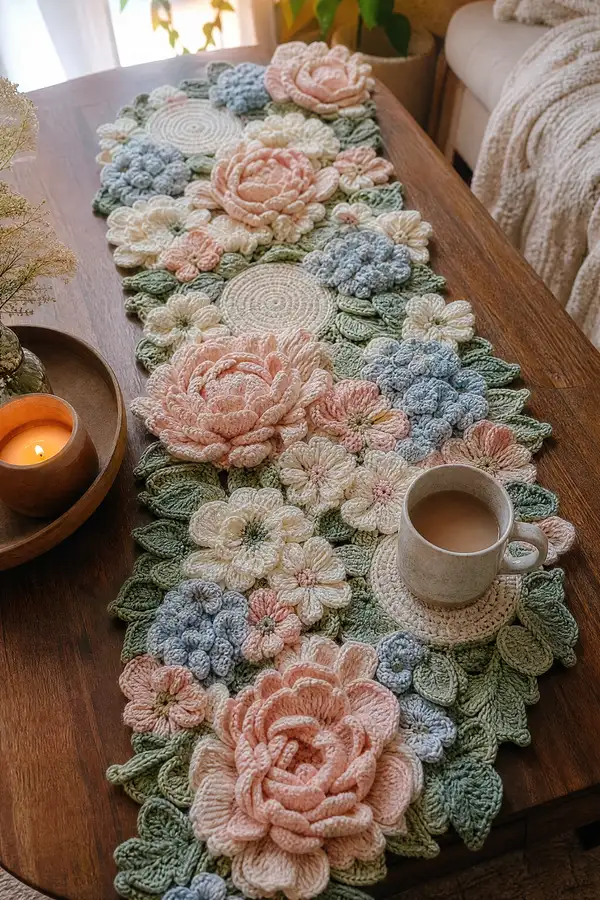
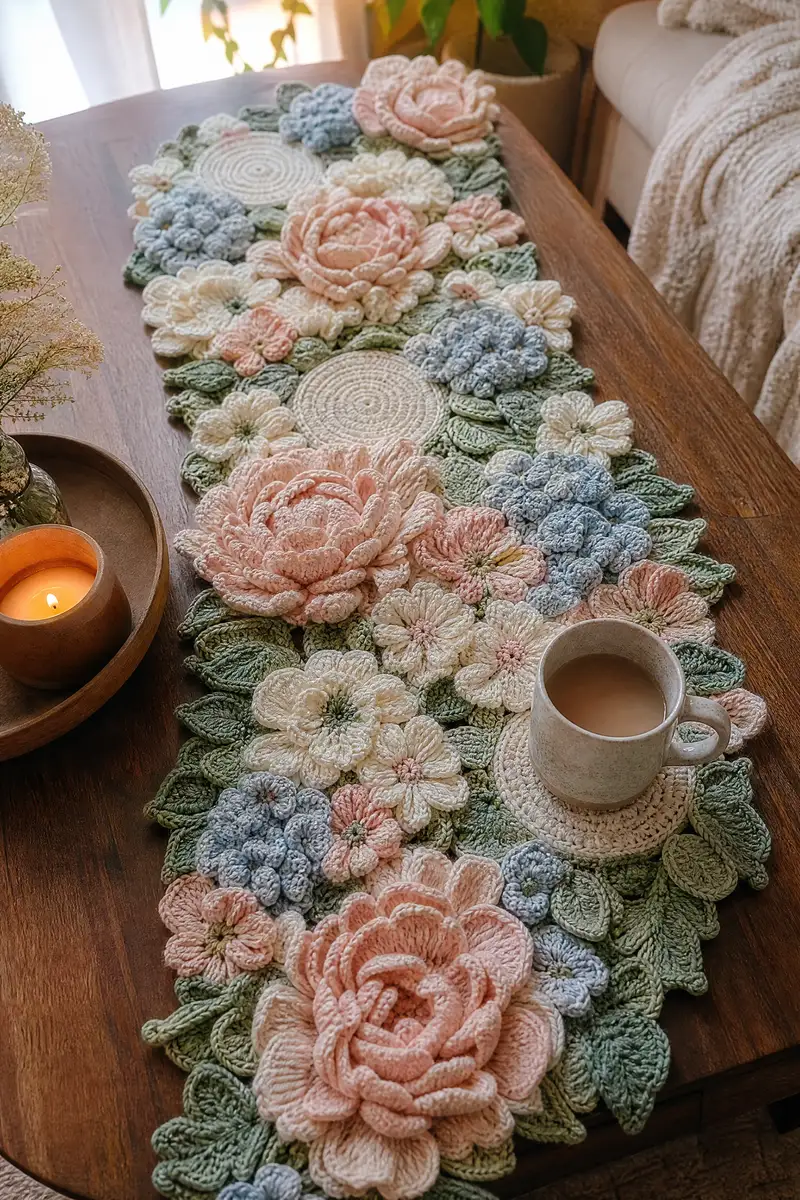
Create a lush floral table runner inspired by peonies and hydrangeas. This pattern uses layered petals, puff stitches and textured leaves to form a dimensional, romantic centerpiece. Soft blush, cream and blue motifs are joined to create an elegant runner perfect for dining tables, sideboards, or seasonal décor.
Progress Tracker
0% Complete
— Overview & Techniques :
Info :
This runner is composed of circular base discs, layered peony 'roses' made from coiled petal strips, clustered hydrangea motifs made of puff petals, medium five-petal flowers, small five-petal flowers, and three sizes of leaves. Work each motif flat and block them before assembly. Use stitch markers for round starts. Puff stitch: yarn over, insert hook, yarn over pull up loop (repeat according to puff count), yarn over pull through all loops on hook and ch1 to secure.
— Base Circle Disc (make 6-8 for runner bases) :
Round 3 :
(1 sc, inc) x 6 (18)
Round 4 :
(2 sc, inc) x 6 (24)
Round 5 :
(3 sc, inc) x 6 (30)
Round 6 :
(4 sc, inc) x 6 (36)
Round 7 :
(5 sc, inc) x 6 (42)
Round 8 :
(6 sc, inc) x 6 (48)
Round 9 :
1 sc in each st (48)
Info :
These discs create the flat coaster-like centers you see among the flowers. Work tightly so discs lie flat; if disc cups, block flat with steam and pin.
Round 10 :
1 sc in each st BLO (48) to create a subtle ridge (optional) (48)
Round 11-12 :
1 sc in each st (48)
Info :
Fasten off leaving a 20 cm tail for sewing to other motifs. Block discs flat so they sit and align under layered flowers.
— Large Layered Peony Rose (make 3-4 large roses) :
Round 3 :
(1 sc, inc) x 6 (18)
Round 4 :
(2 sc, inc) x 6 (24)
Round 5 :
(3 sc, inc) x 6 (30)
Info :
This small central disc becomes the foundation for the coiled petal strip. Fasten off, weave tail long (approx 1m) - you'll use this tail to anchor the coiled strip to the center.
Coil Base Strip Setup :
Create a long petal strip that will be worked in rows and then sewn in a spiral to form the peony bloom. Work the strip in rows turning. Start each row with ch1 (not counted) unless otherwise stated.
Petal Strip Row 1 :
Ch 35, 1 sc in 2nd ch from hook and across (34)
Petal Strip Row 2 :
Ch1, turn, 1 sc in each st (34)
Petal Strip Row 3 :
Ch1, turn, 1 sc in next 3 sts, *1 hdc in next st, 1 dc in next 2 sts, 1 hdc in next st, 1 sc in next 4 sts* rep across to create alternating taller petal bumps (34)
Info :
These alternating stitch heights create a scalloped petal texture when the strip is coiled. Adjust strip length (ch count) if you want a larger or smaller bloom. Keep edges tidy by maintaining stitch count each row.
Petal Strip Row 4-8 :
Repeat Row 3 for a total of 6 rows of textured petal ridges, ending with a final row of sc to create a firm base (34)
Row 9 (edge finishing) :
Ch1, turn, sc across (34). Then 1 sc in each st around the long edge (run along side edge) to create neat border; aim for same stitch count along edge.
Info :
Fasten off leaving long tail to sew; do not cut into petals. For a two-tone flower, change to a lighter inner shade at Row 3 to mimic the image's subtle gradient.
Coiling & Assembly :
Starting from one short end of your strip, lay the central disc down and begin coiling the strip around the disc, using the long tail to sew through the center disc and the bottom of the strip with whip stitch every 4-6 cm so coil remains flat and layered. Coil so petal ridges face outward and slightly overlap to create fullness.
Info :
Pin the coil in place as you sew to achieve consistent spacing between layers. For extra height, allow each new coil to sit slightly above the last; for flatter peonies, keep coils flush.
Finishing Coil Rounds (as you stitch coil)
Each wrap around the coil equates to an assembly round rather than crochet round; aim for 8-12 wraps depending on strip width and desired fullness. Secure end of strip underneath coil with several whip stitches and weave tail on back.
Info :
For the most realistic peony look, create two petal strips slightly different widths and layer the narrower coil inside the wider coil. Block lightly by misting petals and pinning open to dry.
— Hydrangea Cluster Motif (make 4-6 clusters) :
Hydrangea Center Disc Round 1 :
6 sc in mr (6)
Round 3 :
(1 sc, inc) x 6 (18)
Info :
This small center will hold the puff petals around it. Fasten off leaving a short tail for later seaming if desired; alternatively leave attached for direct petal work.
Hydrangea Petal (make 10-14 petals per cluster): Round 1 :
Ch 6, sl st into 2nd ch from hook, sc into next, hdc into next, dc into next, tr into last ch to form long petal, sl st back into base to fasten (this forms one petal) (petal base = 1)
Round 2 :
Repeat petal creation around the center disc, inserting sl st into each available st on the center disc to attach; aim for 10-14 petals evenly spaced
Hydrangea Puff Petal Option :
For puff petals: attach yarn to center disc, *yarn over, insert hook in base, yarn over pull up loop (repeat 3 times for 3-loop puff), yarn over pull through all loops, ch1 to secure*, sl st to next base st. Repeat 10-14 times to create clustered puff texture.
Info :
Use the puff version to replicate the dense clustered look in the photo. Work tightly so puffs sit close. Slight color variation across petals adds natural depth.
Hydrangea Cluster Finishing :
Once petals/puffs are attached, fasten off and weave ends to the back. Steam block lightly to shape puffs slightly outward if desired.
— Medium Five-Petal Flower (make 8-10 medium flowers) :
Round 3 :
Ch3 (counts as dc), *skip 1 st, sl st in next st* rep around to make 6 loops (6 loops)
Round 4 (petal)
In each loop work: (sc, hdc, 3 dc, hdc, sc) then sl st to base to secure (each petal completed). Repeat for 6 petals (6 petals)
Info :
For a fuller look mimic the picture by working petals slightly taller (add one extra dc in center cluster) or add a second round of petals offset between the first for layered effect.
Round 5 :
Optionally add a small central puff: attach yarn, *3-loop puff stitch in center, ch1 to secure*, then fasten off (center puff)
Info :
Fasten off leaving tail for sewing. Block petals flat and slightly concave for natural flower shape.
— Small Five-Petal Flower (make 12-16 small flowers) :
Round 2 :
Ch 2, *sl st, ch2* around to make 6 little loops for petals (6 loops)
Round 3 (petals) :
Into each loop work (sc, hdc, 2 dc, hdc, sc). Fasten off leaving tail for sewing (6 petals)
Info :
These little flowers are great for filling gaps between larger motifs. Use a contrasting center color for a tiny pop like the pale peach or light yellow in the photo.
— Leaves (Large, Medium, Small) :
Large Leaf Round 1 :
Ch 15, sc into 2nd ch from hook and across (14)
Round 2 :
Ch1, turn, 1 sc in next 4 sts, 1 hdc in next 2 sts, 1 dc in next 2 sts, 1 hdc in next 2 sts, 1 sc in last 4 sts (14)
Round 3 :
Without turning, work along long edge: sc in next 3 sts, hdc, dc in center 3 to create leaf tip (3 dc cluster), then hdc, sc along edge to base. Fasten off. Mirror by rejoining yarn to base and repeat on other side to create a symmetric leaf if desired.
Info :
Alternatively work leaf in one flat piece by increasing to the center and decreasing after center for classic leaf shape. Add fpdc ridges along leaf for vein texture.
Medium Leaf :
Ch 11, sc across (10). Row 2: 1 sc x3, hdc x2, dc x2, hdc x1, sc x2. Edge sc to finish. Fasten off (10)
Small Leaf :
Ch 8, sc across (7). Row 2: 1 sc x2, hdc x2, dc x1, hdc x1, sc x1. Fasten off (7)
Info :
Work leaf veins by embroidering a running stitch with yarn needle and contrasting green, or by working fpdc rows in the leaf before fastening off for more texture. Block leaves with slight curve for realism.
— Edge Filler Motifs (mini rounds and joins) :
Mini Round Motif 1 :
6 sc in mr, sl st to join, fasten off (6)
Mini Ring Motif :
Ch 12, sl st into first to form ring, work 12 sc around ring, sl st to join, fasten off (12)
Info :
Use tiny motifs to fill in small gaps and soften runner edges. These knit the outer silhouette into a pleasing organic line.
— Joining & Final Border :
Info :
Layout all motifs on a blocking mat and pin according to image composition: alternating large peonies with hydrangea clusters and discs offset for balance. Aim for a runner length that fits your table—this pattern describes approximate layout for a 90-110 cm runner. Blocks should overlap slightly like petals in a bouquet.
Joining Step 1 :
Place two motifs adjacent, right sides up. Using long tails from motifs, whip stitch through back loops of both motifs at spacing of approx every 4-6 stitches to attach. Use matching yarn color for invisible joins. Continue joining motifs, adding small leaf motifs and minis to fill gaps as you go.
Info :
Pin motifs thoroughly and step back to check composition. If an area looks sparse, add a small flower or leaf. If too busy, remove a filler and re-pin.
Joining Step 2 (Edge Seam)
Once core motifs are joined, add mini leaf edging by sewing leaves around runner border. Overlap leaf bases into seam and sew down with small invisible stitch so leaves flare outward. Alternate leaf sizes for natural silhouette.
Border Round 1 :
Using cream yarn, sc around entire runner edge picking up both loops of motifs and leaves evenly. Where gaps occur, work 3 sc in gap to round out shape. Continue until border sits uniformly (st count varies)
Border Round 2 :
Work 1 sc in each st BLO to create a subtle ridge, then sl st to finish. Fasten off and weave ends neatly on back.
Info :
Edge rounds use flexible stitch count; aim for visually pleasing continuity rather than strict counts. For a scalloped edge, replace every 10th sc with (ch3, sl st) to form tiny scallops.
— Final Blocking & Finishing :
Info :
Once fully assembled, steam-block the runner layered on a flat surface, pinning petals open as desired. Allow to dry fully. Weave in all tails on the back; trim excess. If runner will be used under direct centerpieces, consider ironing a thin piece of felt behind the larger discs for stability (hand-sew felt to back).
Care :
Hand wash gently in cool water, reshape while damp, air dry flat. Avoid heavy abrasion or machine washing to protect puff and layered petals.
You did it — a gorgeous Peony Hydrangea table runner that brings a soft, garden-inspired statement to your table! Each stitch, petal and leaf builds into a lush, dimensional centerpiece you'll be proud to display. Take a cup of tea, admire your handiwork, and enjoy the floral charm you created by hand. 🧶🌸✨