Make a charming Flower Pouch using granny squares and simple joining techniques. This pattern guides you step-by-step to create a stylish floral pouch with a sturdy oval base and neat handle. Perfect for gifting or keeping small items organized, you will enjoy turning colorful squares into a functional accessory you can be proud of.
Progress Tracker
0% Complete
— Preliminary :
Info :
Greetings from us Tutorial Rajut.Id... Thank you for purchasing this Crochet Flower Pouch pattern. This is the simplest pattern! Learn how to turn a granny square into a pouch with this very easy tutorial. Our hope is that this pattern can be understood and practiced easily. Happy Crochetting... If you find it difficult, I put the Video tutorial link at the end of this PDF... ==================== Thank you ====================
— Definition :
Info :
A crochet pouch is such a darling idea with so many uses. You can take it with you when you are traveling, you can use it as a gift pouch for jewelry, cosmetics, ear plugs, money or handkerchief, basically any small item can be stored in this very cute and very easy crochet pouch. The resulting of Crochet Flower Pouch is approximately : Bag Bottom Width 18.5x3.5 cm / 7.28"x1.38". Height 13.5 cm /5.31"
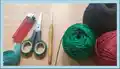
— Tools and Materials Needed :
Info :
1) Paintbox Yarn Baby DK (45% Acrylic, 55%Nylon), Light DK weight yarn 485 yards or 444 meters in length a. Black 279 yards / 255 meter b. Red 138 yards / 126 meter c. Green 68 yards / 63 meter 2) Hook 4/0(2.5mm) or 5/0 (3.0mm) 3) Scissors 4) Matches 5) Meter 6) Stitch Marker
— Basic Stitch that Used :
Info :
In making this Flower Pouch, several basic stitches are used, including : 1) Chain (CH) 2) Magic Ring (MR) 3) Single Crochet (SC) 4) Half Double Crochet (HDC) 5) Half Double Crochet Increase (HDC Inc) 6) Half Double Crochet Front Loop Only (HDC - FLO) 7) Double Crochet (DC) 8) Slip Stitch (SL-ST) 9) Popcorn Stitch
— To Make a Popcorn Stitch :
Info :
1. Work 5 double crochet stitches in the same stitch. 2. Drop the loop from your hook. 3. Insert your hook from front to back under the top 2 loops of the first double crochet of the group. 4. Grab the dropped loop with your hook and pull it through the stitch. 5. One front popcorn stitch is complete.
— To Make a Front Loop Only (FLO) and Back Loop Only (BLO) :
Info :
Front loop and back loop explanation: The front loop is the loop closest to you on the stitch top, the back loop is the loop farthest from you. Work HDC front loop only or back loop only as instructed to create textured edges.
— Maintenance :
Info :
In caring for knitted/crochetted work there are several things that must be considered : 1) Wash by hand using soft detergent and warm water at 40°c 2) If there is a stubborn stain, you can brush it with a soft brush with the help of soap. 3) Don't use bleach product. 4) Drying should not be exposed to direct sunlight, just let it dry.
— Granny Square :
Round 1 :
MR + 12SC And make a slip stitch in first SC (12sts)
Round 2 :
4CH + (1DC + 1CH)11x And make a slip stitch in the 3rd chain (24sts)
Round 3 :
Slip stitch in space 1 chain And then, (1 Popcorn stitch and 1DC in same stitch + 2CH)12x Make a slip stitch in the last step. Cut the yarn and tidy up (36sts)
Round 4 :
Follow the steps below : Start from space 2 CH. 3DC + 2CH + 3DC. (3HDC in the next 2CH Space)2x. Repeat steps 2-3 to completed. Make a slip stitch and then cut the yarn & tidy up. (56sts)
Info :
Make 5 more Granny Square with the same pattern (make total 6 granny squares)
— Bottom of the pouch :
Round 2 :
3HDC Inc + 39HDC + 5HDC Inc + 39HDC + 2HDC Inc (88sts)
Round 3 :
(2HDC Inc)3x + 39HDC + (2HDC Inc)5x + 39HDC + (2HDC Inc)2x (98sts) Pattern of Corner section : (2HDC Inc)5x
Round 4 :
(2HDC Inc + 1HDC)3x + 39HDC + (2HDC Inc + 1HDC)5x + 39HDC + (2HDC Inc + 1HDC)2x (108sts) Pattern of Corner section : (2HDC Inc + 1HDC)5x
— Body of the pouch :
Row 3 - 8 :
Odd Row pattern: 108DC. Even Row pattern: 108HDC. And make a slip stitch on the first HDC in the 8th row. Then, cut the yarn and tidy up.
— Combine Granny Square with Body :
Info :
To Combine Granny square with body, we combined the basic techniques of Chain, Double Crochet, and Slip Stitch. Change the yarn with the base color of the bag and follow the written pattern below :
Step 1 :
(3DC + 2CH + 3DC) in the Corner of Granny Square
Step 2 :
(3DC in the next between HDC and DC space)3x
Step 3 :
3DC first in the next corner of granny Square
Step 4 :
1CH + Slip Stitch in the corner body + 1CH
Step 5 :
3DC in the same corner of granny square, Skip 3sts on the body section and slip stitch on the 4th stitch
Step 6 :
(3DC in the next between HDC and DC space), then Skip 2sts on the body section and slip stitch on the 3rd stitch 3x
Step 7 :
(3DC + 1CH) in the corner first, then skip 3sts on the body section and slip stitch on the 4th stitch
Step 8 :
(1CH + 3DC in the same corner of granny square)
Step 9 :
Continue until finished with the pattern below : a. (3DC in the next between HDC and DC space)3x b. (3DC + 2CH + 3DC) in the Corner of Granny Square Then, cut the yarn and tidy up. repeat the steps above until all the Granny Squares are attached to the body of pouch
Step 10 :
(3DC + 2CH + 3DC) in the Corner of Granny Square
Step 11 :
(3DC in the next between HDC and DC space)3x
Step 12 :
(3DC + 1CH) in the corner first
Step 13 :
Slip stitch in the corner of first Granny square, then (1CH + 3DC in the same corner of second Granny Square) and Slip stitch between HDC and DC space of first Granny square
Step 14 :
(3DC in the next between HDC and DC space of second Granny square) and slip stitch in the next between HDC and DC space of first Granny square. Repeat until the next corner of Granny Square. Then, make (3DC + 1CH) first in the Corner of Granny Square
Step 15 :
First slip stitch in the corner of first Granny square and second slip stitch in the next body section.
Step 16 :
(1CH + 3DC in the same corner of granny square) and Skip 3sts on the body section and slip stitch on the 4th stitch
Step 17 :
(3DC in the next between HDC and DC space), then Skip 2sts on the body section and slip stitch on the 3rd stitch) 3x
Step 18 :
(3DC + 1CH) in the corner first, then skip 3sts on the body section and slip stitch on the 4th stitch
Step 19 :
(1CH + 3DC in the same corner of granny square)
Step 20 :
Continue until finished with the pattern below : a. (3DC in the next between HDC and DC space)3x b. (3DC + 2CH + 3DC) in the Corner of Granny Square Then, Cut the yarn and Tidy up. repeat the steps above until all the Granny Squares are attached to the body of pouch
— Making the Edge and Handle :
Row 1 :
make HDC around starting from 3 stitches before the corner of the pouch. Then, slip stitch front loop only for end this row (102sts)
Row 2 :
in this 2nd row, I will also make the handle. follow the steps below : 1. 6HDC Front Loop Only 2. (1TCH + 6HDC)40x 3. (1TCH + 6HDC Back Loop Only) 4. HDC Around and slip stitch in the first HDC
Row 3 :
make SC around (102sts)
Row 4 :
Make Slip Stitch around Then, Cut the yarn and tidy up
Info :
to make it more beautiful, give Lining to the pouch and label.
— NB :
Info :
This is link Tutorial Video Flower Pouch : https://youtu.be/uArYJo2ula0 =================== Good Luck ===================
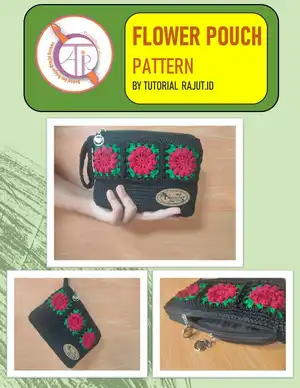
— The Final Result :
Info :
Final photos and presentation of the completed Flower Pouch as reference for placement of squares, zipper, and handle.
This Flower Pouch pattern turns pretty granny squares into a functional and stylish accessory you will love to carry or give as a gift. The combination of popcorn petals, a neat oval base, and a sturdy handle makes this project both decorative and practical. Add lining and a zipper to make it ready for everyday use. 🧶🌸✨