🧢 Beautiful ✨ Detailed πŸ’ Adorable

Fox Hat Crochet Pattern

Fox Hat Crochet Pattern
4.5β˜… Rating
2-3 Hours Time Needed
1.8K Made This
βœ‚οΈ

Beginner Friendly Level

Perfect for those just starting their crochet journey, with clear instructions and simple techniques

⏱️

Bite-Sized Project

Finishes in 2-4 hoursβ€”perfect for an afternoon of creative relaxation.

🧣

Snug Essential

Everyday comfort with practical charm, designed for both functionality and style through changing seasons.

About This Fox Hat Crochet Pattern

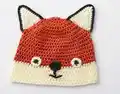
This Fox Hat crochet pattern creates a cozy, fox-themed beanie with built-in ears and a contrasting muzzle panel for a playful look. The pattern includes sizes for 6/12 months through 6/8 years, and is worked mostly in half double crochet for quick progress. Youll use Caron Simply Soft yarn and two hook sizes to achieve the textured, snuggly finish.

Fox Hat Crochet Pattern crochet pattern - detailed view of completed project

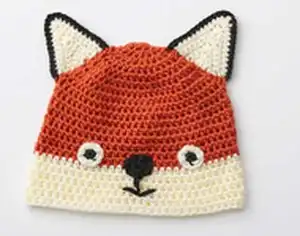
Clear, step-by-step rounds and row instructions make following the pattern straightforward for beginners. The finishing notes explain how to assemble the ears, eyes, and nose to match the pictured fox look.

Why You'll Love This Fox Hat Crochet Pattern

I absolutely love this pattern because it turns a simple beanie into a whimsical, wearable piece kids adore. I enjoy how fast the hat grows with half double crochet, so you see results quickly and stay motivated. The contrasting face panel and ears give so much character with only a few added pieces, making it a fun finishing touch. I also love that the pattern includes multiple child sizes, so I can make matching hats for siblings and friends.

Fox Hat Crochet Pattern step 1 - construction progress Fox Hat Crochet Pattern step 2 - assembly progress Fox Hat Crochet Pattern step 3 - details and accessories Fox Hat Crochet Pattern step 4 - final assembly and finishing

Switch Things Up

I love tweaking this pattern to give each hat a new personality by switching colors; try a pastel muzzle or ombre yarn for a unique look.

I sometimes use bulkier yarn and a larger hook to create a chunky, extra-warm version that works well for winter outings.

I also make mini versions for keychains by using lighter yarn and a smaller hook; they become adorable miniature fox charms.

I often embroider eyelashes, freckles, or eyebrows to change the expression and mood of the fox for different kids.

For a more rustic feel I substitute a wool blend yarn and add a fleece lining for extra warmth and softness against little ears.

I add pompom tassels or earflap ties to make the hat more playful and secure on windy days.

To personalize, I change ear shapes (rounder or pointier) and adjust inner ear contrast color to match outfits or themes.

I sometimes embellish the face with small crocheted glasses or a tiny felt bow to create character variations like a classy fox or a sporty fox.

If I want a washable, toddler-friendly version I use a machine-washable acrylic and sew all pieces tightly with extra reinforcement stitches.

I recommend experimenting with positioning of eyes and nose before sewing them on permanently because small shifts can dramatically alter the hat's expression.

Common Mistakes & How to Fix Them

βœ— Skipping the chain-2 at the beginning of rounds; remember the pattern note that Ch 2 at the beginning of rounds does not count as a hdc so follow counts accordingly. βœ— Failing to check gauge before starting; measure 13 hdc and 11 rows = 4" with the larger hook and adjust hook size to match the gauge for correct fit. βœ— Not keeping track of color changes when joining Contrast A; label and change colors at the end of the specified round to maintain the face panel placement. βœ— Forgetting to line up ears symmetrically when sewing; pin both ears in place and count stitches to ensure equal spacing before sewing securely. βœ— Crocheting too tightly around increases causing puckering; maintain an even, relaxed tension during increases and place stitches evenly around the circle. βœ— Not counting stitches after each increase round; always count at the end of the round to confirm totals and avoid shaping errors later on.

Fox Hat Crochet Pattern

Create a charming fox hat for babies and kids with this easy, photo-guided crochet pattern. Youll make a cozy beanie with adorable fox ears and a contrasting face panel using Caron Simply Soft yarn. The pattern includes multiple sizes so you can customize the fit for toddlers and young children. Perfect for a quick, thoughtful handmade gift or playful accessory for chilly days.

Beginner Friendly 2-3 Hours

Materials Needed for Fox Hat Crochet Pattern

β€” Main Fabric

  • 01
    Caron Simply Soft (6 oz/170.1 g; 315 yds/288 m) - Main Color Pumpkin (9765) - 1 ball (all sizes)
  • 02
    Caron Simply Soft - Contrast A Off White (9702) - 1 ball
  • 03
    Caron Simply Soft - Contrast B Black (9727) - 1 ball

β€” Tools Required

  • 01
    Crochet hook size U.S. G/6 (4 mm)
  • 02
    Crochet hook size U.S. H/8 (5 mm)
  • 03
    Smaller hook for details (use G/6 or as specified for Inner Ear and details)
  • 04
    Scissors
  • 05
    Yarn needle for sewing and weaving in ends
  • 06
    Stitch markers
  • 07
    Pins for assembly (optional)

Progress Tracker

0% Complete

β€” Hat :

Infos :

To fit head circumference: 6/12 mos 17" [43 cm] 18/24 mos 18" [45.5 cm] 4 yrs 19" [48 cm] 6/8 yrs 19 19 19

Info :

GAUGE: 13 hdc and 11 rows = 4" [10 cm] with larger hook.

Info :

The instructions are written for smallest size. If changes are necessary for larger sizes the instructions will be written thus ( ). Numbers for each size are shown in the same color throughout the pattern. When only one number is given in black, it applies to all sizes.

Info :

Note: Ch 2 at beg of rnds does not count as hdc.

Round 1 :

With larger hook and MC, ch 4. Join with sl st to first ch to form a ring. Ch 2. 8 hdc in ring. Join with sl st to first hdc. 8 hdc.

Round 2 :

Ch 2. 2 hdc in first hdc. *2 hdc in next hdc. Rep from * around. Join with sl st to first hdc. 16 hdc.

Round 3 :

Ch 2. 2 hdc in first hdc. *1 hdc in next hdc. 2 hdc in next hdc. Rep from * to last hdc. 1 hdc in last hdc. Join with sl st to first hdc. 24 hdc.

Round 4 :

Ch 2. 2 hdc in first hdc. *1 hdc in each of next 2 hdc. 2 hdc in next hdc. Rep from * to last hdc. 1 hdc in each of last 2 hdc. Join with sl st to first hdc. 32 hdc.

Round 5 :

Ch 2. 2 hdc in first hdc. *1 hdc in each of next 3 hdc. 2 hdc in next hdc. Rep from * to last 3 hdc. 1 hdc in each of last 3 hdc. Join with sl st to first hdc. 40 hdc.

Round 6 :

Ch 2. 2 hdc in first hdc. *1 hdc in each of next 4 hdc. 2 hdc in next hdc. Rep from * to last 4 hdc. 1 hdc in each of last 4 hdc. Join with sl st to first hdc. 48 hdc.

Round 7 :

Sizes 6/12 mos only: Ch 2. 2 hdc in first hdc. *1 hdc in each of next 11 hdc. 2 hdc in next hdc. Rep from * to last 11 hdc. 1 hdc in each of last 11 hdc. Join with sl st to first hdc. 52 hdc.

Round 7 :

Sizes 18/24 mos, 4 yrs and 6/8 yrs only: Ch 2. 2 hdc in first hdc. *1 hdc in each of next 5 hdc. 2 hdc in next hdc. Rep from * to last 5 hdc. 1 hdc in each of last 5 hdc. Join with sl st to first hdc. 56 hdc.

Round 8 :

Sizes 4 yrs and 6/8 yrs only: Ch 2. 2 hdc in first hdc. (1 hdc in each of next 27 (13) hdc. 2 hdc in next hdc) 1 (3) time(s). 1 hdc in each hdc to end of rnd. Join with sl st to first hdc. 58 (60) hdc.

Round 9 :

All sizes: Next rnd: Ch 2. 1 hdc in each hdc around. Join with sl st to first hdc. Rep last rnd until Hat from beg measures 5 (55 1/2-5 1/2-6)" [12.5 (14-14-15) cm]. Join with A at end of last rnd. Break MC.

Round 10 :

With A, rep last rnd until Hat from beg measures 7 (7 1/2-8-8 1/2)" [18 (19-20.5-21.5) cm]. Fasten off.

β€” Ears :

Info :

Make Inner Ear and Outer Ear pieces, then join and edge with B as written.

Row 1 :

Inner Ear: With smaller hook and A, ch 2. 1st row: (RS). 5 sc in 2nd ch from hook. Turn.

Row 2 :

Ch 1. 1 sc in each of first 2 sc. 3 sc in next sc. 1 sc in each of next 2 sc. Turn. 7 sc.

Row 3 :

Ch 1. 1 sc in each of first 3 sc. (1 sc. 1 hdc. 1 dc. 1 hdc. 1 sc) in next sc. 1 sc in each of next 3 sc. Turn.

Row 4 :

Ch 1. 1 sc in each of next 5 sts. (1 sc. 1 hdc. 1 dc. 1 hdc. 1 sc) in next sc. 1 sc in each of next 5 sc. Turn.

Row 5 :

Ch 1. 1 sc in each of next 7 sts. (1 sc. 1 hdc. 1 dc. 1 hdc. 1 sc) in next sc. 1 sc in each of next 7 sc. Turn.

Row 6 :

Ch 1. 1 sc in each of next 9 sts. (1 sc. 1 hdc. 1 dc. 1 hdc. 1 sc) in next sc. 1 sc in each of next 9 sc. Fasten off.

Info :

Outer Ear: With smaller hook and MC, make as given for Inner Ear.

Info :

Join Ears: With WS of Inner Ear and Outer Ear facing each other, and RS of Inner Ear facing, using smaller hook join B with sl st to first sc.

Row 1 :

Ch 1. Working through both thicknesses, 2 sc in first sc. 1 sc in each of next 10 sts. 3 sc in next sc. 1 sc in each of next 10 sts. 2 sc in last sc.

β€” Nose :

Info :

With smaller hook and B, ch 2.

Round 1 :

(3 sc. 1 hdc. 1 dc. 1 tr. 1 dc. 3 hdc. 1 dc. 1 tr. 1 dc. 1 hdc) all in 2nd ch from hook. Join with sl st to first sc. Fasten off.

β€” Eyes :

Info :

Make 2.

Round 1 :

With smaller hook and B, ch 2. 6 sc in 2nd ch from hook. Join A with sl st to first sc. Break B.

Round 2 :

With A, ch 1. 2 sc in each sc around. Join with sl st to first sc. Fasten off.

β€” Finishing :

Info :

Sew Eyes, Ears and Nose to Hat as shown in picture. With 2 strands of B, embroider mouth with straight stitch as shown in picture.

Assembly Instructions

  • Sew Eyes to the face area of the hat using the photo as a guide; place them evenly across the front panel and sew securely with matching yarn.
  • Sew the Nose to the center of the contrasting face panel, positioning it between the eyes and securing with tight stitches so it does not shift.
  • Join the Inner Ear and Outer Ear pieces with WS together, then edge and join with B; position each ear on top of the hat and sew through both layers for a sturdy attachment.
  • Embroider the mouth with 2 strands of B using a straight stitch, following the picture for the curve and length of the mouth.
  • Pin the ears in place and check symmetry before final sewing; count stitches from the center to ensure equal spacing on both sides.

Important Notes

  • πŸ’‘Use stitch markers to mark the beginning of rounds, especially when working in continuous rounds, to keep track of your rounds accurately.
  • πŸ’‘Measure gauge and adjust hook sizes as necessary before starting to ensure the hat fits the intended head circumference.
  • πŸ’‘When changing colors join and break yarn as instructed and weave in ends securely to avoid loose tails showing on the right side.

This adorable Fox Hat is a quick, delightful project that adds playful character to winter wardrobes. The contrasting muzzle and perky ears make it a favorite for photos and cozy playtime. Perfect for gifting to little ones or making a set for siblings. 🧢🦊

You ask,

we answer.

FAQs

What size will the finished piece be?

The pattern includes sizes to fit head circumferences: 6/12 mos (17" [43 cm]), 18/24 mos (18" [45.5 cm]), 4 yrs (19" [48 cm]), and 6/8 yrs (19.5" [49.5 cm]).

Can I use different yarn weights for this pattern?

Yes, but changing yarn weight will affect the final size; adjust your hook accordingly and check gauge (13 hdc and 11 rows = 4" with recommended hook) to maintain fit.

Do I need prior crochet experience for this pattern?

This pattern is beginner friendly, but familiarizing yourself with half double crochet, increases, and sewing simple pieces will help you achieve the best result.

How long does this project typically take to complete?

Most crocheters finish this hat in about 2-3 hours, though time can vary depending on the size chosen and your pace.