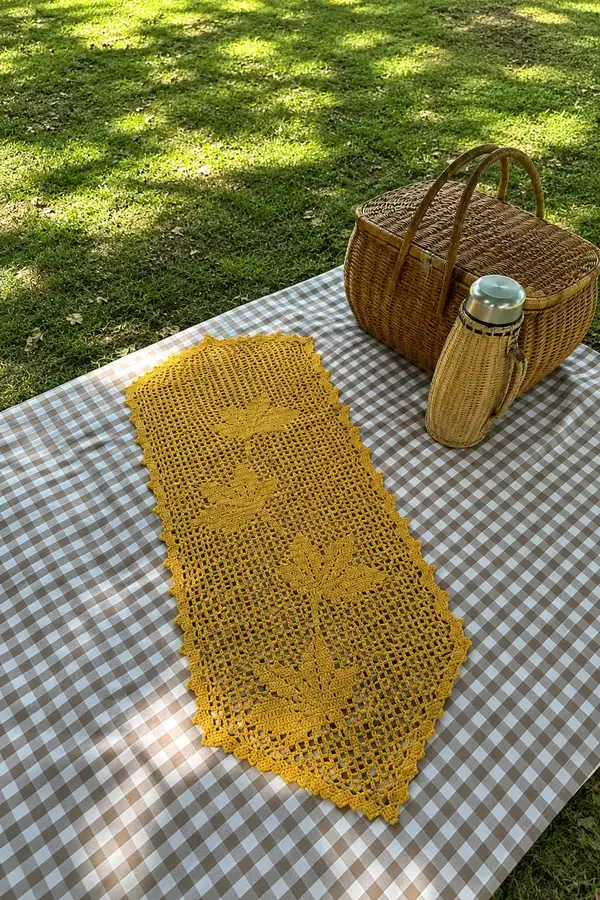
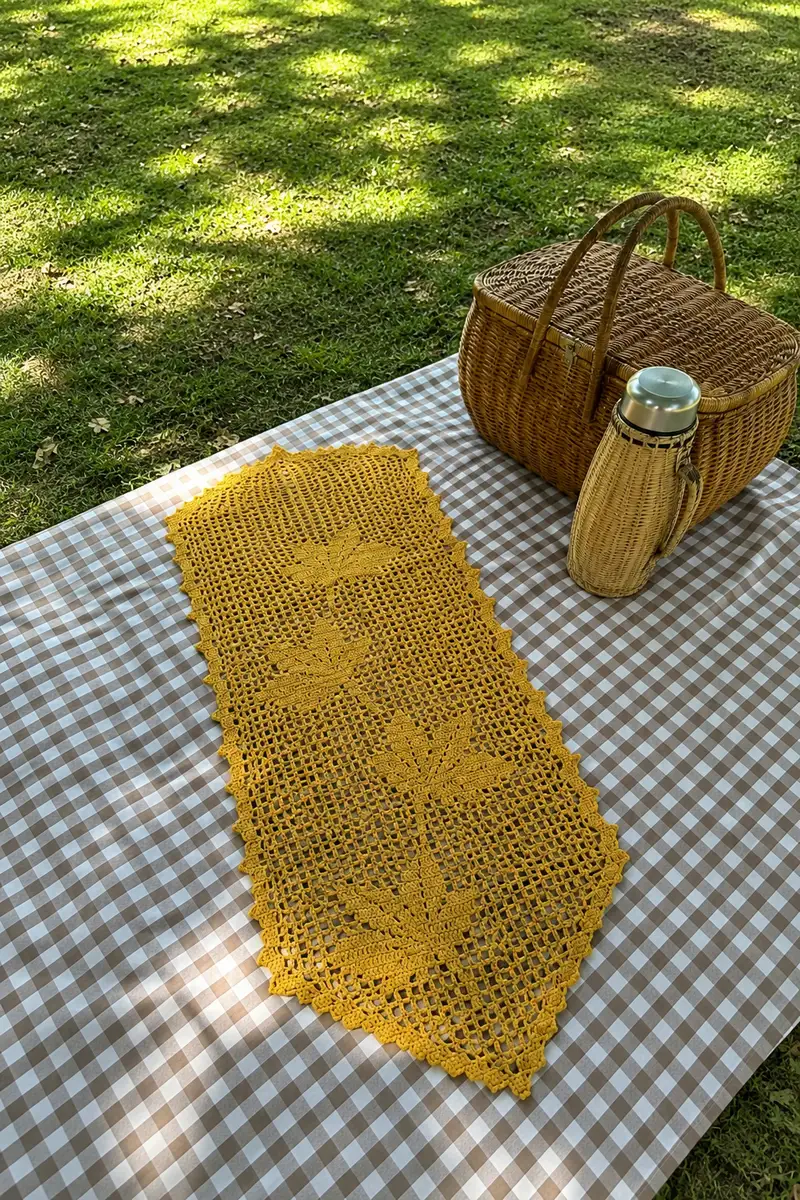
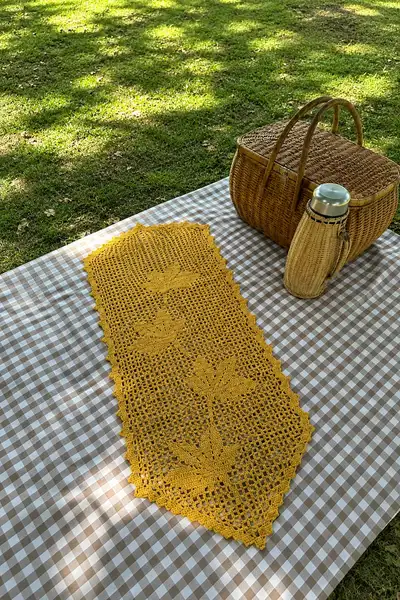
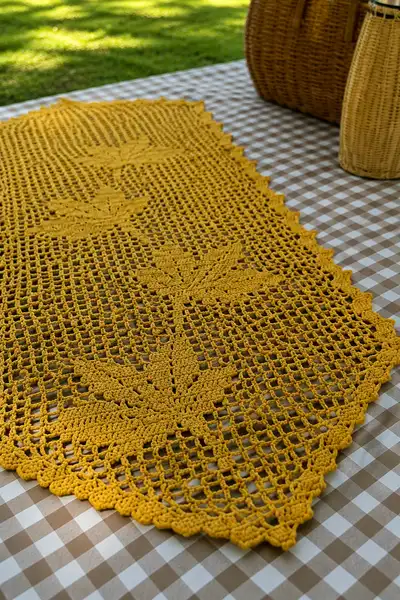
This warm, golden filet table runner showcases three stylized maple leaf motifs worked in open mesh and solid filet stitches. The long, narrow runner has pointed ends with a scalloped edging and is ideal for a dining table or picnic display. Worked in mercerized cotton for crisp stitch definition, it lays beautifully flat after blocking and adds a handmade autumnal touch to any table. Clear row-by-row instructions and charted motif placement make this a rewarding intermediate project.
Progress Tracker
0% Complete
— Notes & Gauge :
Info :
This runner is worked in filet mesh across a fixed number of meshes (72 meshes wide). One mesh = dc + ch2 (open) or solid mesh = 3 dc worked into the mesh space. Foundation chain formula: (number of meshes x 2) + 3 chains for turning. Stitch counts are given as mesh counts (72) and are mathematically consistent across all rows. The written rows correspond to charted symbol filet where 'O' = open mesh and 'X' = solid mesh.
Info :
Gauge is not critical for width if you maintain stitch multiples; however for reference, with a 3.5mm hook and chosen yarn, 10 open meshes (across) measure approximately 4.5-5 inches after blocking. Adjust hook for desired density.
— Foundation Chain & Base Rows :
Round 1 :
Ch 147. (This creates 72 meshes: 72 x 2 + 3 = 147 chains). Turn - this chain forms the foundation for all subsequent rows (72 meshes).
Round 2 :
DC in 4th ch from hook (counts as first dc), *ch2, sk 2 ch, dc in next ch; rep from * across until 1 ch remains, end with dc in last chain. (72 meshes)
Info :
Row 2 establishes the open mesh grid. Keep loose chains consistent. Place a stitch marker in the 36th mesh top to mark center column if you prefer chart alignment.
Round 3-8 :
For Rows 3 through 8 work: ch3 (counts as dc), turn, dc in same space or top of previous dc as directed, *ch2, sk next ch2 space, dc in next dc; rep from * across ending with dc. (72 meshes each row)
Info :
These even rows create a stable baseline before the first leaf begins. Maintain even tension; if edges tighten, try using a slightly larger hook for the turning chains only.
— Preparing for Motif Placement :
Round 9-20 :
Continue working open mesh rows as Round 3. These 12 rows create an even field above the start edge and give breathing space before the first leaf motif. (72 meshes each row)
Info :
Mark the central mesh column (36th mesh) with a removable marker or scrap yarn — maple leaf motifs will center on this column so exact centering makes motif work easier.
— First Maple Leaf Motif (Lower Leaf) - Setup :
Round 21 :
Work open mesh rows for 2 more rows to reach the motif start. (72 meshes)
Round 22 :
Open mesh across (72). Prepare to begin the lower leaf motif over the central 21 meshes (meshes 27-47 inclusive). The leaf will use solid meshes and shaping rows; the rest of the panel remains open mesh.
Info :
For clarity: meshes are numbered 1 to 72 left to right. The leaf base will be centered on mesh 36. The leaf 'foot' occupies meshes 27-47 (21 meshes wide). Keep the rest of the row open mesh to keep the leaf isolated.
— Leaf - Row by Row (Lower Leaf) :
Round 23 :
Row 23: Work open mesh until mesh 26 (left of leaf base) = 26 open meshes, then begin leaf: solid mesh x3 (3 solid meshes), open mesh x1 between lobes as chart, solid mesh x6 (center column), open mesh x1, solid mesh x3; finish with open mesh across remaining columns to reach 72 meshes. (72)
Round 24 :
Row 24: Open mesh across all 72 meshes to set the leaf in relief. (72)
Round 25 :
Row 25: Work open mesh to mesh 25, then increase leaf solid area: solid mesh x5, open mesh x1, solid mesh x8 (center thicker row), open mesh x1, solid mesh x5, then open mesh to finish. (72)
Info :
A solid mesh is represented by 3 dc worked into the ch2 sp of the mesh below. Open mesh is represented by (dc, ch2) worked into the mesh below.
Round 26 :
Row 26: Open mesh across (72). This is a spacer row to define the leaf. (72)
Round 27 :
Row 27: Open mesh to mesh 24, then solid mesh x6, open mesh x1, solid mesh x10 (center), open mesh x1, solid mesh x6, then open mesh across remaining columns. (72)
Round 28 :
Row 28: Open mesh across (72). (72)
Round 29 :
Row 29: Open mesh to mesh 23, then solid mesh x8, open mesh x1, solid mesh x10, open mesh x1, solid mesh x8, open mesh to finish. (72)
Info :
At peak fullness rows the center column will be the widest solid area. Use the stitch marker to ensure center alignment and count meshes often in these shaping rows.
Round 30 :
Row 30: Open mesh across (72).
Round 31 :
Row 31: Begin the leaf taper: open mesh to mesh 24, solid mesh x6, open mesh x1, solid mesh x8, open mesh x1, solid mesh x6, open mesh to finish. (72)
Round 32 :
Row 32: Open mesh across (72).
Round 33 :
Row 33: Open mesh to mesh 25, solid mesh x5, open mesh x1, solid mesh x6, open mesh x1, solid mesh x5, then open mesh to end. (72)
Round 34 :
Row 34: Open mesh across (72).
Round 35 :
Row 35: Open mesh to mesh 26, solid mesh x3, open mesh x1, solid mesh x4, open mesh x1, solid mesh x3, open mesh to finish. (72)
Round 36 :
Row 36: Open mesh across (72).
Round 37 :
Row 37: Open mesh to mesh 27, solid mesh x1, open mesh x1, solid mesh x2, open mesh x1, solid mesh x1, then open mesh to the end. This completes the lower leaf tip shaping. (72)
Info :
Check that the solid area resolves to a leaf shape: bottom fuller rows progressing to taper rows then single central solids before returning to an open mesh field. If the leaf looks off-center, do not worry — small counting adjustments on any of the leaf rows will center it; ensure symmetry by comparing left and right counts.
— Middle Mesh Space between Leaves :
Round 38-56 :
Rows 38–56: Continue open mesh rows for 19 rows to space the first and second leaf. (72 meshes each)
Info :
Spacing between leaves helps the runner breathe visually. You can lengthen or shorten this section to make the runner longer or more compact — simply add or subtract entire open-mesh rows in multiples of 1.
— Second Maple Leaf Motif (Center Leaf) :
Round 57 :
Row 57: Open mesh across (72) - set row directly before the center leaf begins. (72)
Round 58 :
Row 58: Begin center leaf using the same 21-mesh wide footprint centered on mesh 36: open mesh to mesh 26, solid mesh x3, open mesh x1, solid mesh x6, open mesh x1, solid mesh x3, then open mesh to finish. (72)
Round 59 :
Row 59: Open mesh across (72)
Round 60 :
Row 60: Increase solid area: open to mesh 25, solid x5, open x1, solid x8, open x1, solid x5, open to finish. (72)
Round 61 :
Row 61: Open mesh across (72)
Round 62 :
Row 62: Open to mesh 24, solid x6, open x1, solid x10, open x1, solid x6, then open to end. (72)
Round 63 :
Row 63: Open mesh across (72)
Round 64 :
Row 64: Open to mesh 23, solid x8, open x1, solid x10, open x1, solid x8, open to finish. (72)
Round 65 :
Row 65: Open mesh across (72)
Round 66 :
Row 66: Begin taper: open to mesh 24, solid x6, open x1, solid x8, open x1, solid x6, open to finish. (72)
Round 67 :
Row 67: Open mesh across (72)
Round 68 :
Row 68: Open to mesh 25, solid x5, open x1, solid x6, open x1, solid x5, open to end. (72)
Round 69 :
Row 69: Open mesh across (72)
Round 70 :
Row 70: Open to mesh 26, solid x3, open x1, solid x4, open x1, solid x3, open to finish. (72)
Round 71 :
Row 71: Open mesh across (72)
Round 72 :
Row 72: Open to mesh 27, solid x1, open x1, solid x2, open x1, solid x1, open to finish. (72)
Info :
The center leaf follows the same shaping as the lower leaf but will visually sit centered within the runner. Compare left/right mirror counts as you work to maintain symmetry.
— Center to Third Leaf Spacing :
Round 73-91 :
Rows 73–91: Continue open mesh rows for 19 rows to make space between center leaf and upper leaf. (72 meshes)
Info :
Lengthen or shorten this spacer block to change runner final length; each row adds approximately 0.5-0.6 inches depending on tension.
— Third Maple Leaf Motif (Upper Leaf) :
Round 92 :
Row 92: Open mesh across (72)
Round 93 :
Row 93: Begin upper leaf on same 21-mesh footprint centered on mesh 36: open to mesh 26, solid x3, open x1, solid x6, open x1, solid x3, open to finish. (72)
Round 94 :
Row 94: Open mesh across (72)
Round 95 :
Row 95: Open to mesh 25, solid x5, open x1, solid x8, open x1, solid x5, open to finish. (72)
Round 96 :
Row 96: Open mesh across (72)
Round 97 :
Row 97: Open to mesh 24, solid x6, open x1, solid x10, open x1, solid x6, open to finish. (72)
Round 98 :
Row 98: Open mesh across (72)
Round 99 :
Row 99: Open to mesh 23, solid x8, open x1, solid x10, open x1, solid x8, open to finish. (72)
Round 100 :
Row 100: Open mesh across (72)
Round 101 :
Row 101: Begin taper for upper leaf: open to mesh 24, solid x6, open x1, solid x8, open x1, solid x6, open to finish. (72)
Round 102 :
Row 102: Open mesh across (72)
Round 103 :
Row 103: Open to mesh 25, solid x5, open x1, solid x6, open x1, solid x5, open to finish. (72)
Round 104 :
Row 104: Open mesh across (72)
Round 105 :
Row 105: Open to mesh 26, solid x3, open x1, solid x4, open x1, solid x3, open to finish. (72)
Round 106 :
Row 106: Open mesh across (72)
Round 107 :
Row 107: Open to mesh 27, solid x1, open x1, solid x2, open x1, solid x1, open to finish. (72)
Info :
Upper leaf completes at Row 107. Check that all three leaves align visually (compare rows 23–37 vs 58–72 vs 93–107 for symmetry). If one leaf seems high or low, you can add/subtract one open-mesh row before or after it to rebalance spacing.
— Final Mesh Field & Transition to End Panel :
Round 108-116 :
Rows 108–116: Work 9 open mesh rows to transition to final pointed end shaping. (72 meshes each)
Info :
We will now shape the runner into a pointed end on both extremities by reducing the outermost meshes progressively on alternating rows to create angled points. Keep the center column intact while shaping edges symmetrically.
— Pointed End Shaping (Upper Point) :
Round 117 :
Row 117: To begin shaping, work the row as follows: Start row as usual, but when you reach the first and last mesh positions, replace the first open mesh with a solid termination cluster to stabilize the edge: at left edge work dc in turning ch, ch2, sk next ch2 space, dc in next dc until you reach the 70th mesh; at the far right end work to last stitch as usual. (72 meshes)
Round 118 :
Row 118: Row of open mesh across but now remove the outermost mesh at each side visually by working the first available mesh as a dc into the previous row's dc (making the outer chain space unused). Practically, treat the first ch2 space at each edge as a closed space by working a dc over two stitches at the opposite side. (72 effective mesh count remains for interior space)
Info :
It is easiest to form pointed ends by gradually decreasing open meshes at each outer side by converting edge open mesh into small solid shells or skipping a chain2 sp on alternating rows; the instruction above keeps the interior meshes count consistent while shaping the edge silhouette. If this feels abstract, you can instead work the panel rectangle in full and create pointed ends separately as triangular extensions sewn on later; both methods yield acceptable results.
Round 119-124 :
Rows 119–124: Continue shaping rows by decreasing 1 outer mesh on each side every two rows. Practically: work open mesh across until 3 stitches before the outermost mesh, then work a short cluster (3 dc) into the last available mesh to give a denser edge, ch2, skip next outer space. Mirror on right side. Repeat this pattern to form a subtle taper. (72 interior meshes)
Round 125 :
Row 125: After six shaping rows, you should have a gentle point beginning. Work an open mesh row to even out tension across the panel. (72)
Info :
If you prefer a sharply pointed end like the photo, continue shaping until the outer edge reduces to a narrow tip by repeating the decrease step every other row. If you prefer a rounded end, stop shaping and prepare for scalloped edging.
— Scalloped Border & Point Finishing :
Round 126 :
Row 126: With RS facing, attach yarn at far right corner or join with sl st; ch1, sc evenly across the top of the final row into each dc and into ch2 spaces to create a firm edge. Aim for one sc per mesh unit across the full panel. (approx 144 sc across if counting both dc and ch2 spaces)
Round 127 :
Row 127: Work scallop round: *skip next st, (5 dc cluster in next st), skip next st, sl st in next; rep from * across to form small scallops. Place a slightly larger scallop on each pointed tip to accentuate the point. Fasten off and weave ends. (scallop count will be consistent with mesh count across)
Info :
The scallop edging in the photo looks like small shells formed from clusters of dc. If you prefer a tighter edge, substitute 3-dc shells. For a delicate finish, use a 3.0mm hook for the scallops.
— Finishing the Opposite End :
Round 128-134 :
Rows 128–134: Repeat the identical shaping sequence for the opposite (lower) pointed end of the runner so both ends mirror each other. Maintain the same number of shaping rows and scallop round to ensure symmetry. (72 interior meshes)
Round 135 :
Row 135: Final sc round around entire runner edge if you prefer a continuous border; sc evenly into side mesh tops as you go to join the scallops into a continuous edging. (edge sc count equals perimeter stitch count)
Round 136 :
Row 136: Work one final finishing round of slip-stitches or small single-crochet picots between scallops to cleanly finish the edge; weave in ends. (finish)
Info :
Weave in all ends neatly on the WS using a yarn needle. Trim close to work but not so close that ends work free. For extra stability at the tips, weave tails back and forth through several stitches.
— Blocking & Final Care :
Round 137 :
Info : Wet block the runner to final dimensions. Lay flat on blocking mats or a bed of towels, pin points and scallops to sharp, even lines. Use rust-proof pins and allow to dry fully before removing pins.
Round 138 :
Info : If the runner will be used on a table without a protective pad, consider lining with a thin felt pad to protect the underside. Machine washability depends on yarn choice — use mercerized cotton with gentle laundering and low-heat pressing if required.
Info :
Optional variations: to alter size, add or subtract full open-mesh rows in the spacer sections or change foundation chain by multiples of 1 mesh (2 ch). To add colorwork, substitute one or more rows of open mesh with another color, carrying yarn along the WS and catching it every 6-8 meshes to avoid long floats.
Info :
For durability in daily use, run a light starch during blocking to give the runner extra body. If table placement will have hot items, place trivets as cotton is flammable at high temps like any textile.
This golden maple leaf runner is a lovely mix of classic filet crochet and seasonal charm. Each leaf motif is built with careful solid and open meshes, giving the runner a delicate openwork look that still reads clearly on a table. Blocking is the final magic step that makes the motifs pop — and the scalloped points add a handmade flourish you'll be proud to display. 🧶🍁 Whether for a picnic or an autumn table, this runner brings warm, handcrafted cheer. Enjoy every stitch and the glow it brings to your home! 😊