๐Ÿงถ Beautiful โœจ Detailed ๐Ÿ’ Adorable

GrannySquare Baby Blanket with shell boarder Pattern

GrannySquare Baby Blanket with shell boarder Pattern
4.1โ˜… Rating
5-7 Hours Time Needed
1.9K Made This
โœ‚๏ธ

Beginner Friendly Level

Perfect for those just starting their crochet journey, with clear instructions and simple techniques

โฑ๏ธ

Weekend Treat

Takes 5-7 hours, making it an enjoyable project to finish over a couple of days.

๐Ÿค—

Soft Hug

Gentle, plush, and full of warmth, creating a sense of comfort and coziness wherever they find a home.

About This GrannySquare Baby Blanket with shell boarder Pattern

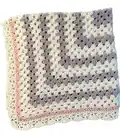
This pattern creates a classic corner-to-corner granny square baby blanket with alternating colours and a shell border for a delicate finish. You will work from the centre out in rounds, changing yarn colours to create soft stripes and complete the blanket with a decorative v-stitch and shell edging. The finished blanket measures approximately 34" x 34" and is perfect for a nursery or as a thoughtful handmade gift.

GrannySquare Baby Blanket with shell boarder Pattern crochet pattern - detailed view of completed project

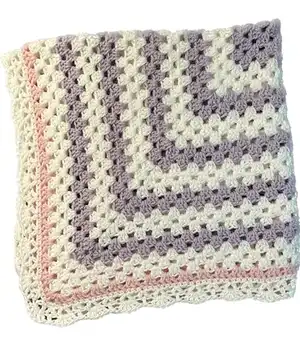
The pattern uses Paintbox Aran yarn and a 5mm hook for a soft, cozy fabric. Clear photos and friendly instructions are included to help you through each stage of the blanket.

Why You'll Love This GrannySquare Baby Blanket with shell boarder Pattern

I absolutely love this pattern because it combines the timeless charm of the granny square with a pretty shell border that elevates the whole look. I enjoy how easily the colour changes create a soft striped effect without complicated shaping or seams. It is forgiving and relaxing to make, perfect for listening to music or watching a show while you crochet. This blanket always feels special to gift, and I love seeing the different colour combinations crafters choose.

GrannySquare Baby Blanket with shell boarder Pattern step 1 - construction progress GrannySquare Baby Blanket with shell boarder Pattern step 2 - assembly progress GrannySquare Baby Blanket with shell boarder Pattern step 3 - details and accessories GrannySquare Baby Blanket with shell boarder Pattern step 4 - final assembly and finishing

Switch Things Up

I love customizing this blanket by changing the colour sequence; try muted neutrals for a modern nursery or bright contrasts for a playful look.

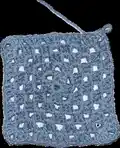
You can make the blanket larger by repeating more rounds; add equal numbers of rounds to each colour sequence to keep the square even.

I sometimes use a heavier aran or bulky yarn and a larger hook to create a chunky, cozy version that works up faster.

For a dainty mini version, use DK or sport weight yarn with a smaller hook to create a tiny lovey or stroller blanket.

I often swap the shell border for a picot edge or reverse single crochet for a different finish depending on the look I want.

Try variegated or ombre yarn for the rounds to get subtle colour shifts without changing yarns every few rounds.

I like to add a small crocheted flower or button to one corner as a decorative touch and to help personalize each gift.

To make a coordinating set, create matching booties, hat, or a small toy using similar colours to make a charming baby bundle.

I recommend blocking the finished blanket gently to even out stitches and open up the shell border for a polished result.

When changing colours, I carry the unused yarn along the edge or weave it in as I go to keep the back neat and reduce end weaving at the end.

Common Mistakes & How to Fix Them
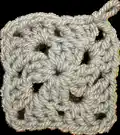
โœ— Starting the centre ring too tightly can make the square resistant to opening up; make a slightly looser slip knot and loosen the first ring to allow the square to lie flat. โœ— Forgetting to make corner spaces correctly will distort the square shape; always work the full corner cluster (3 dc, ch2, 3 dc) into each corner ch-sp to maintain square geometry. โœ— Not changing yarn neatly when switching colours can leave bulky joins; attach the new colour at a corner and weave in ends or carry yarn along the back where possible for a neater finish. โœ— Skipping the slip stitch into the ch3 at the end of rounds will create uneven edges; always ss into the 3rd ch of the starting ch3 to finish the round evenly.
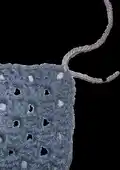
 โœ— Overtightening stitches during the shell border will make the scallops look small and misshapen; maintain relaxed, even tension when working v-stitches and shells for a consistent scallop. โœ— Not sewing in ends as you go leads to a long finishing session; fasten off and sew ends in as you complete colour changes and after border rounds to keep the finishing quick and tidy.

GrannySquare Baby Blanket with shell boarder Pattern

Make a sweet, squishy granny square baby blanket with a delicate shell border you will love to gift or keep. This pattern walks you through a classic corner-to-corner granny square, color changes, and a pretty shell edging so your blanket looks finished and professional. Designed to be approachable, it includes clear step-by-step rounds and photos to guide you as you crochet your own cozy 34" x 34" blanket.

Beginner Friendly 5-7 Hours

Materials Needed for GrannySquare Baby Blanket with shell boarder Pattern

โ€” Main Fabric

  • 01
    Paintbox Aran yarn (Aran weight) - used as main yarn throughout
  • 02
    Paintbox Aran - Paper white (used for striping and border)
  • 03
    Paintbox Aran - Dusty rose (used in rounds and border accent)
  • 04
    Paintbox Aran - Candyfloss pink (used for final pink round)
  • 05
    Yarn amount: use enough Aran yarn to make an approximate 34" x 34" blanket (amount will vary by tension and colour distribution)

โ€” Tools Required

  • 01
    Crochet hook size 5.0mm (UK/US 5mm)
  • 02
    Scissors
  • 03
    Yarn needle (tapestry needle) for sewing in ends

Progress Tracker

0% Complete

โ€” Making the ring :

Info :

With dusty rose yarn make a slip knot and chain 3 ss in to first chain You have now made the ring :)

โ€” Rounds :

Round 1 :

ch 3 (this counts as first dc) 2dc into ring, ch2 3dc in to ring, ch 2 (do this 2 more times) ss in to 3rd ch You should now have 4 clusters of dc with a chsp in between each one You should have 4 corners

Round 2 :

ch 3 (this counts as first dc) 2dc in to chsp [3dc, ch 2, 3dc] in to next chsp (this makes your corner) [3dc, ch2, 3dc] in to next chsp (this makes another corner) [3dc, ch2, 3dc] in to next chsp (this makes another corner) 3dc in to first chsp, ch2 then ss in to third ch

Round 3 :

ch 3 (this counts as first dc) 2dc into chsp 3dc in to next chsp [3dc, ch2, 3dc] in to next chsp (forms corner) 3dc in to next chsp [3dc, ch2, 3dc] in to next chsp (forms corner) 3dc in to next chsp [3dc, ch2, 3dc] in to next chsp (forms corner) 3dc in to next chsp 3dc in to first chsp, ch2 then ss in to third ch

Round 4 :

ch 3 (this counts as first dc) 2dc in to chsp 3dc in to next chsp 3dc in to next chsp [3dc, ch2, 3dc] in to next chsp (forms corner) 3dc in to next chsp 3dc in to next chsp [3dc, 2ch, 3dc] in to next chsp 3( forms corner) 3dc in to next chsp 3dc in to next chsp [3dc, 2ch, 3dc] in to next chs (forms corner) 3dc in to next chsp 3dc in to next chsp 3dc in to first chsp, ch2 then ss in to third ch

Round 5 :

ch 3 (this counts as first dc) 2dc in to chsp 3dc in to next chsp (4 times) in to corner chsp [3dc, ch2, 3dc] 3dc in to next chsp (4 times) in to next corner chsp [3dc, ch2, 3dc] 3dc in to next chsp (4 times) 3dc in to first chsp, ch2 then ss in to third ch and fasten off

โ€” Changing yarn :

Info :

Attach the white yarn to any corner

โ€” Continue the blanket :

Info :

Continue with rounds starting with: ch3, 2dc and putting 3dc in every chsp 3dc,ch2, 3dc in to every corner 3dc, ch2, ss into 3rd ch into the starting corner

Info :

Repeat [3 rounds of white and 2 rounds of dusty rose] 4 times

โ€” Finishing off :

Info :

Once you have completed your rounds, do 3 more rounds of white, fasten off

Info :

Attach pink yarn and do one round, fasten off

โ€” Shell boarder :

Info :

Attach white yarn ch1, 1sc in to every stitch 3sc in to every corner sc in to ch1

Info :

Now we are back at the first corner we can now do a v-stitch round: ch2, skip 1 (1dc, ch1, 1dc in to same stitch). This makes your v-stitch

Info :

Work [skip 2, (1dc, ch1, 1dc in to same stitch)] until you get to the corner.

Info :

As you come to your corner [skip1, (1dc, ch1, 1dc in to same stitch)] until the corner is finished. continue with v-stitch until you get back to the first corner

Info :

At the first corner, dc into same stitch as ch3, ch 1 then ss in to 3rd ch

โ€” Shell boarder final round :

Info :

Now let\'s do the shell boarder :) ch3 [5dc into v-stitch, 1dc into next v-stitch] repeat until back at ch3

Info :

Once you are back to the ch3, ss in to 3rd ch

Info :

Fasten off and sew in all ends

โ€” Blanket complete :

Info :

Blanket measures approximately 34" x 34"

Assembly Instructions

  • Attach white yarn to any corner to begin the main colour rounds and work evenly around the square to maintain symmetry.
  • Fasten off and attach pink yarn for the final pink round, then fasten off and weave in ends securely using a yarn needle.
  • For the shell border, work 1 sc into every stitch and 3 sc into every corner before working the v-stitch round to create an even foundation for the shells.
  • Work the v-stitch round (ch2, skip 1, 1dc, ch1, 1dc in same stitch) around, making sure to work corner v-stitches to keep edges square.
  • Work the shell round by placing [5dc into v-stitch, 1dc into next v-stitch] repeatedly around, finish with ss into the 3rd ch of the starting ch3, fasten off and sew in all ends.

Important Notes

  • ๐Ÿ’กThis is a beginner friendly pattern; follow photos and take your time with corner clusters to keep the square even.
  • ๐Ÿ’กAttach new colours at a corner and weave in ends as you go to keep the back tidy and reduce finishing work.
  • ๐Ÿ’กWork the shell border with relaxed tension so the shells look soft and scalloped rather than tight and small.
  • ๐Ÿ’กFasten off and sew in all ends after finishing the border to ensure your blanket looks neat and professional.

This lovely granny square baby blanket is an easy, heartwarming project you can finish in a weekend. ๐Ÿงถ The pattern blends classic granny clusters with a soft v-stitch and scalloped shell border for a polished result. โœจ Perfect as a baby gift or a cozy addition to your home, handmade with care.

You ask,

we answer.

FAQs

What size will the finished piece be?

The finished blanket measures approximately 34" x 34" when using Paintbox Aran yarn and a 5mm hook.

Can I use different yarn weights for this pattern?

Yes, but changing yarn weight will change the final size; choose an appropriate hook for your yarn and check the gauge by making a small square.

Do I need prior crochet experience for this pattern?

This pattern is rated beginner friendly, so basic knowledge of chain, double crochet, and slip stitch is all you need to complete it.

How long does this project typically take to complete?

Most crocheters complete this project in about 5-7 hours, though time may vary depending on experience and how many colour changes you make.