🧢 Beautiful ✨ Detailed πŸ’ Adorable

Grindstone Tote Bag Pattern

Grindstone Tote Bag Pattern
4.6β˜… Rating
5-7 Hours Time Needed
1.9K Made This
βœ‚οΈ

Intermediate Level

Ideal for those with basic crochet experience, featuring slightly more advanced stitches and techniques to expand your skills.

⏱️

Weekend Treat

Takes 5-7 hours, making it an enjoyable project to finish over a couple of days.

✨

Stylish Touch

An elegant detail to elevate any look, combining traditional techniques with contemporary design sensibilities.

About This Grindstone Tote Bag Pattern

This pattern creates a roomy, slouchy tote worked from panels with a built-in strap and button closure. It uses bulky weight yarn for a sturdy, textured finish and a quick make. The pattern includes step-by-step stitch instructions, strap construction, and clear assembly directions to help you finish a polished bag.

Grindstone Tote Bag Pattern crochet pattern - detailed view of completed project

Make two front/back panels and a long side/bottom/strap panel that join to form the bag. Adjust strap length or yarn to change the finished size and style.

Why You'll Love This Grindstone Tote Bag Pattern

I absolutely love this pattern because it combines simple stitches into a textured, modern tote that stitches up quickly. I enjoy how versatile it isβ€”changing yarn weight or hook size instantly alters the bag's look and feel. The strap and side panel worked as one piece makes assembly straightforward and satisfying. I also love how the button loop detail adds both function and charm to the finished piece.

Grindstone Tote Bag Pattern step 1 - construction progress Grindstone Tote Bag Pattern step 2 - assembly progress Grindstone Tote Bag Pattern step 3 - details and accessories Grindstone Tote Bag Pattern step 4 - final assembly and finishing

Switch Things Up

I love changing yarns to transform the personality of this tote; try a cotton rope or a subtle tweed for a sturdier market bag.

Want a smaller or larger bag? I change hook size and yarn weight β€” bulky yarn and a larger hook for a bigger slouchy tote, or worsted weight for a smaller profile.

I sometimes double a DK yarn held together to mimic bulky yarn while using a slightly smaller hook for a denser fabric.

Adjust the strap by adding or subtracting rows between rows 53 and 149 to make the strap longer for crossbody wear or shorter for shoulder carry.

Swap the button and loop for a magnetic snap or zipper closure if you prefer more security; just stitch the hardware into the same placement area.

Add a fabric lining and interior pockets for structure and to keep small items organized; I like to sew the lining before final seaming for a neat finish.

Play with color blocking by changing color at the seam join or every set of repeats to create horizontal stripes on the front and back panels.

For a beach-ready bag, use a raffia or linen blend and consider leaving the bottom unlined for quick drying and sand release.

Embellish with tassels, pom-poms, or an attached small pouch to add personality and practical storage options to your tote.

I also experiment with embroidered details on the front panel after blocking to personalize each bag for gifting or market sales.

Common Mistakes & How to Fix Them

βœ— Skipping stitch markers at the bottom center can make strap placement difficult later; place markers in the two center stitches as instructed to keep alignment accurate. βœ— Using the same hook for all panels may give poor shaping and tension; switch to the larger hook for front/back panels and the smaller hook for the side/strap to match the pattern gauge. βœ— Counting rows incorrectly when repeating rows 6-9 can shift the pattern sequence; mark your repeats and count carefully after each set of repeats to ensure correct row numbers. βœ— Crocheting with inconsistent tension produces uneven panels and seams; maintain steady, moderate tension and check gauge before starting the panels to avoid size differences. βœ— Failing to place stitch markers at both ends of row 50 and row 150 will make aligning the strap ends tricky; add markers at both ends as soon as instructed for easy assembly.

Grindstone Tote Bag Pattern

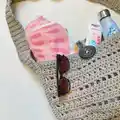
Create a stylish, slouchy tote with the Grindstone Tote Bag pattern. This versatile bag is designed for bulky weight yarn and features a comfortable strap, charming button closure, and textured stitch details. You can customize the size, yarn, and strap length to make a bag that's uniquely yours. Perfect for market days, beach trips, or everyday use.

Intermediate 5-7 Hours

Materials Needed for Grindstone Tote Bag Pattern

β€” Main Fabric

  • 01
    Bernat Maker Home Dec (bulky #5) - approximately 470 yards (pattern recommended for sample bag)
  • 02
    Option: Worsted weight yarn (#4) - will yield a smaller bag (yardage will vary)
  • 03
    Option: Super bulky (#6) - will give you a larger bag (yardage will vary)
  • 04
    Tester yarn examples: Mondial Mantra - 490 yards (tester)
  • 05
    Tester yarn examples: Deramores Studio Chunky - 430 yards (tester)
  • 06
    Tester yarn examples: Bernat Softee Cotton (double strand) - 367 yards of each color (tester)
  • 07
    Tester yarn examples: Bernat Maker Home Dec - 350 yards (tester)
  • 08
    Tester yarn examples: Bernat Maker Home Dec - 460 yards (tester)
  • 09
    Tester yarn examples: Lily Sugar & Cream - 370 yards (tester)
  • 10
    Tester yarn examples: Red Heart Stripes - 360 yards (tester)
  • 11
    Tester yarn examples: Fibra Natura Raffia - 280 yards (tester)

β€” Tools Required

  • 01
    Crochet hook size 7.0mm (used for front/back panels)
  • 02
    Crochet hook size 6.0mm (used for side/bottom/strap panel)
  • 03
    Additional hook sizes as testers used (4.5mm-8mm) depending on yarn choice
  • 04
    6 locking stitch markers (safety pins can be used as substitutes)
  • 05
    Large button for front closure
  • 06
    Scissors
  • 07
    Yarn/tapestry needle for sewing and weaving ends
  • 08
    Measuring tape or ruler (to check gauge and finished size)
  • 09
    Pins for assembly (optional)
  • 10
    Stitch markers

Progress Tracker

0% Complete

β€” Basic Information :

Infos :

Pattern is written in US crochet terms. Yarn: Approximately 470 yards of Bernat Maker Home Dec, or other bulky (5) weight yarn. The bag can be made with any sturdy yarn. Worsted weight (4) will give you a smaller bag, while super bulky (6) will give you a larger bag. Yardage will vary based on yarn chosen. See last 2 pages of pattern for tester photos, yarns, and yardage. Hook: Two hooks - one larger and one 1mm smaller. I used 7mm and 6mm with Bernat Maker Home Dec. Choose hooks that give you a tight tension on the side panel and a slightly looser tension on the front/back panels. You will need 6 locking stitch markers for assembly. Safety pins make a great substitute! Finished size: Varies based on yarn chosen. Gauge: For Bernat Maker Home Dec - Approximately 10 sts by 6 rows = 4" (front/back panels) and 8 sts by 5 rows = 2" (side panel/strap). Gauge will vary depending on yarn chosen.

β€” Abbreviations and Symbols :

Infos :

Ch - chain. Ch sp - chain space. Sk - skip. St - stitch. Sl st - slip stitch. Sc - single crochet. Dc - double crochet. Sc2tog - single crochet 2 together (decrease). 2dc - 2 double crochet in the same stitch (increase). * * - Repeat this section.

β€” Notes :

Infos :

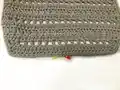
Bag is made with two nearly identical front/back panels, and the strap and side/bottom panels are worked as one piece. Ch 2 at the beginning of the row does NOT count as a stitch. Rows 4, 8, and repeats use a crossed double crochet stitch. You will skip one stitch, and then make a double crochet in the next stitch as normal. Then, work a second double crochet into the skipped stitch. When working into skipped stitches, cross in front of the previous stitch.

β€” Pattern :

Front/Back Panels (make 2) :

With 7mm hook (or larger hook)

Row 1 :

Ch 30, 2dc in 3rd ch from hook, dc across until 1 ch remains, 2dc in last ch. (30)

Row 2 :

Ch 2, turn, 2dc in 1st st, *ch 1, sk 1, dc 1* across until 1 st remains, 2dc in last st. (32)

Row 3 :

Ch 2, turn, 2dc in 1st st, dc across, placing a dc in every st and ch sp until 1 st remains, 2dc in last st. (34)

Row 4 :

Ch 2, turn, 2dc in 1st st, *sk 1 st, dc 1, dc in sk st* across until 1 st remains, 2dc in last st. (36)

Row 5 :

Ch 2, turn, 2dc in 1st st, dc across until 1 st remains, 2dc in last st. (38)

Row 6 :

Ch 2, turn, dc in 1st st, *ch 1, sk 1, dc 1* across until 1 st remains, dc in last st. (38)

Row 7 :

Ch 2, turn, dc in every st and ch sp across. (38)

Row 8 :

Ch 2, turn, dc in 1st st, *sk 1, dc 1, dc in sk st* across until 1 st remains, dc in last st. (38)

Row 9 :

Ch 2, turn, dc across. (38)

Info :

Repeat rows 6-9 two more times.

Front Panel Row 18 :

ch 1, turn, sc across. Do not fasten off.

Back Panel Row 18 :

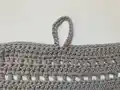
(includes button loop): ch 1, turn, sc 19, ch 18, sc 19. (38 sc, 18 ch) Do not fasten off. (If you'd prefer a bag with no button, make two of the front panel!)

Info :

Continue sc around the outside edges of the panel, placing 1sc in the end of the sc rows, 2 sc in the end of each dc row, and 1 sc in each st of the foundation chain. Fasten off.

Info :

Place a stitch marker in each of the two center stitches at the bottom of each panel.

Side/Bottom/Strap Panel :

Switch to 6mm hook (or smaller hook)

Row 1 :

Ch 11, sc in 2nd ch from hook, sc across. (10)

Row 2 :

Ch 1, turn, sc across. (10)

Rows 3-50 :

Repeat row 2. Place stitch markers at both ends of row 50.

Row 51 :

Ch 1, turn, sc2tog, sc in next 6 sts, sc2tog. (8)

Row 52 :

Ch 1, turn, sc across (8)

Rows 53-149 :

repeat row 52.

Row 150 :

Ch 1, turn, 2sc in 1st st, sc across until 1 st remains, 2sc in last st. (10) Place stitch markers at both ends of row 150.

Row 151 :

Ch 1, turn, sc across. (10)

Row 152-200 :

repeat row 151.

Info :

**For longer or shorter strap, add or subtract rows between rows 53 and 149.**

β€” Assembly :

Step 1 :

With right sides facing - Using the st markers placed at row 50 and 150 of strap, attach the strap panel to the top corners of one of the bag panels.

Step 2 :

Using the stitch markers at the bottom center of the bag panel, attach the ends of the strap to the bag panel.

Step 3 :

Starting at the bottom center, sc the panel and strap together, continuing around the edge of the strap and down the other side of the panel. Sl st into 1st st to join. Fasten off.

Info :

Repeat for the other side panel.

Info :

Using tail, sew the bottom of the bag closed. I used a mattress stitch, but any seaming method will work.

Finishing :

Weave in all ends. Sew a large button onto the top center of the front panel.

Info :

Enjoy your new tote!!!

Assembly Instructions

  • Attach the strap panel to the top corners of one bag panel using the stitch markers placed at row 50 and row 150 of the strap, with right sides facing, aligning markers for accurate placement.
  • Using the stitch markers placed at the bottom center of the bag panel, attach the ends of the strap to the bottom center of the panel and secure with pins or temporary stitches.
  • Starting at the bottom center, single crochet the panel and strap together around the edge of the strap and down the other side of the panel; slip stitch into the first stitch to join and fasten off.
  • Repeat the same seam process for attaching the other side panel to the strap panel so both front and back are joined to the strap.
  • Using the yarn tail, sew the bottom of the bag closed with a mattress stitch (or any preferred seaming method) to create a neat, flat bottom.
  • Weave in all ends and sew a large button onto the top center of the front panel to align with the button loop on the back panel.

Important Notes

  • πŸ’‘Use stitch markers to mark the two center bottom stitches of each panel and the ends of rows 50 and 150 on the strap to ensure correct alignment during assembly.
  • πŸ’‘Switch hook sizes as instructed: a larger hook for the front/back panels and a slightly smaller hook for the side/strap panel to achieve the recommended tension and shape.
  • πŸ’‘Work the crossed double crochet as described for rows 4, 8, and repeats: skip one stitch, crochet in the next stitch, then crochet into the skipped stitch crossing in front of the previous stitch.
  • πŸ’‘Do not count the ch-2 at the beginning of rows as a stitch; the pattern is written with ch-2 not counting as a stitch for row counts and shaping.
  • πŸ’‘Try the bag together with stitch markers and pinning before final seaming to ensure the strap length and panel placement match your preferred finished look.

This Grindstone Tote Bag pattern is made to be versatile and stylish for everyday use. Customize yarn, hook, and strap length to make it truly yours. Take it to the market, beach, or a casual day outβ€”this tote is ready to be loved. πŸ§ΆπŸ‘œ

You ask,

we answer.

FAQs

What size will the finished piece be?

The finished bag size varies depending on yarn and hook used; tester finished sizes ranged roughly from 9x12" up to 13.5x17" when using different yarns and hook combinations.

Can I use different yarn weights for this pattern?

Yes, you can substitute yarn weights, but this will change the finished size; worsted (#4) gives a smaller bag, bulky (#5) is recommended, and super bulky (#6) will yield a larger bagβ€”adjust hook sizes accordingly.

Do I need prior crochet experience for this pattern?

This pattern is rated intermediate due to the crossed double crochet rows, switching hook sizes, and assembly steps; basic knowledge of single crochet, double crochet, increases, and decreases is recommended.

How long does this project typically take to complete?

Most crocheters finish this tote in about 5-7 hours, though time will vary depending on experience level, yarn choice, and how much customization you add.