🧢 Beautiful ✨ Detailed πŸ’ Adorable

Groot Amigurumi Pattern

Groot Amigurumi Pattern
4.5β˜… Rating
5-7 Hours Time Needed
2.9K Made This
βœ‚οΈ

Intermediate Level

Ideal for those with basic crochet experience, featuring slightly more advanced stitches and techniques to expand your skills.

⏱️

Weekend Treat

Takes 5-7 hours, making it an enjoyable project to finish over a couple of days.

🧸

Cute Companion

An adorable friend to cherish, handcrafted with love to bring comfort and joy for years to come.

About This Groot Amigurumi Pattern

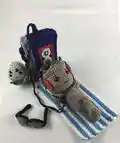
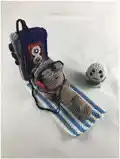
This pattern shows you how to crochet a cute Groot amigurumi complete with crown, embroidered decorations, a smile, and tiny headphones. Each section is broken down into precise rounds for legs, body, head, arms and accessories. The instructions include placement notes for eyes and tips for stuffing so your Groot keeps a smooth shape.

Groot Amigurumi Pattern crochet pattern - detailed view of completed project

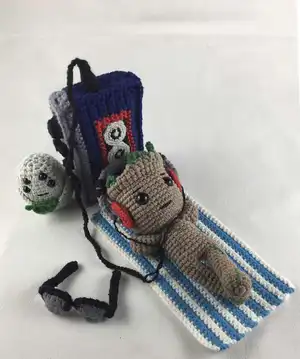
You will work mostly in single crochet with simple increases and decreases and a few front/back loop variations. The pattern is photographed to help with assembly and finishing details.

Why You'll Love This Groot Amigurumi Pattern

I absolutely love this pattern because it brings a tiny, expressive Groot to life using simple techniques and clever detailing. I enjoyed designing the crown and embroidered vines β€” they add personality without complicated stitching. The headphones and tiny smile make this amigurumi playful and unique, which always makes me smile while I work. I love that the pattern is modular so you can easily customize colors or add accessories to create your own version.

Groot Amigurumi Pattern step 1 - construction progress Groot Amigurumi Pattern step 2 - assembly progress Groot Amigurumi Pattern step 3 - details and accessories Groot Amigurumi Pattern step 4 - final assembly and finishing

Switch Things Up

I love how easy it is to customize this Groot by changing colors; try pastel browns and mint greens for a cute variant.

You can make a miniature keychain version by using fingering weight yarn and a smaller hook for a tiny result.

I often swap the headphones color to metallic yarn or embroider tiny logos for a themed look.

Want a chunkier, cuddlier Groot? Use a bulkier yarn and a larger hook to scale up the doll for huggable size.

I like to add wire to the arms if I want them to be poseable; insert a thin, flexible wire and sew it in place before stuffing.

For a more realistic bark texture, experiment with back loop only rows or surface slip stitches to add ridges.

Try different eye sizes or embroidered eyes for a softer, more handmade expression instead of safety eyes.

Add accessories like a tiny scarf, leaf cape, or a crocheted pot for Groot to sit in for added personality.

I recommend changing the green embroidery placement to create different β€˜growth’ patterns on the body for unique characters.

Mix yarn fibers β€” cotton for crisp stitches, acrylic for durability β€” to achieve different finishes and handleability.

Lastly, don't be afraid to remix the pattern: remove the headphones, enlarge the crown, or add tiny flowers β€” each change creates a whole new personality.

Common Mistakes & How to Fix Them

βœ— Skipping stuffing during construction leads to a floppy or misshapen body; stuff progressively as instructed to keep consistent shape and support. βœ— Failing to place safety eyes at the correct round can make the face look off-centered; insert eyes in the specified row (row 37) with the correct spacing of 5 SC between them. βœ— Not counting stitches after increases and decreases causes mismatch between rounds; always count your stitches at the end of each round to confirm the numbers match the pattern. βœ— Pulling the yarn too tightly when sewing parts can distort the body or head; use gentle, even tension when stitching on arms, headphones, and crown to preserve shape.

Groot Amigurumi Pattern

Make your own tiny Groot amigurumi with this step-by-step crochet pattern. You will enjoy assembling a sweet, poseable character complete with crown, embroidered details, and tiny headphones. The pattern is full of clear rounds and helpful notes so you can follow along with confidence. Perfect for gifting or keeping as a whimsical handmade companion.

Intermediate 5-7 Hours

Materials Needed for Groot Amigurumi Pattern

β€” Main Fabric

  • 01
    Yarn brown - #2 fine (55% cotton + 45% acrylic, 180 yds / 1.76 oz)
  • 02
    Yarn green - #2 fine (for decorations and small leaves)
  • 03
    Yarn red - #2 fine (for headphone accents)
  • 04
    Yarn black - #2 fine (for smile and headphone cords)
  • 05
    Yarn blue - #2 fine (accessory details if desired)
  • 06
    Yarn gray - #2 fine (headphone bands)
  • 07
    Yarn light gray - #2 fine (headphone details)
  • 08
    Yarn white - #2 fine (small highlights)
  • 09
    Yarn azure - #2 fine (accessory or additional accents)

β€” Tools Required

  • 01
    Crochet hook size 2.5mm
  • 02
    Small hook 1.40mm (for fine embroidered smile)
  • 03
    Needle for sewing and embroidery
  • 04
    Scissors
  • 05
    Polyester filler / stuffing
  • 06
    Two 9mm black plastic safety eyes
  • 07
    Four 6mm black plastic safety eyes
  • 08
    Stitch markers
  • 09
    Pins for assembly

Progress Tracker

0% Complete

β€” Legs :

Round 1 :

1)- 6sc in MR;

Round 2 :

2)- 6inc (12);

Round 3 :

3)- 12sc BLO (crochet in the back loop of the stitches) (12);

Round 4-5 :

4-5)- 12sc (2row);

Round 6 :

6)- dec, 4sc, dec, 4sc (10);

Round 7 :

7)- dec, 8sc (9);

Round 8-14 :

8-14)- 9sc (7rows);

Round 15 :

15)- 8sc, slst;

Info :

Do not forget to fill the toy with filler while knitting. We do not cut the threads from the second leg, we continue to knit the body.

β€” Body :

Round 16 :

16)- 2ch, attach the first leg 9sc, 2sc by ch, 9sc on the second leg, 2sc by ch (22);

Round 17-25 :

17-25)- 22sc (9rows);

Round 26 :

26)- (3sc, dec)*4, 2sc (18);

Round 27 :

27)- (1sc, dec)*6 (12);

Round 28 :

28)- 12sc;

Info :

Do not forget to fill the toy with filler while knitting. We continue to knit the head.

β€” Head :

Round 29 :

29)- 12inc (24);

Round 30 :

30)- (1sc, inc)*12 (36);

Round 31-32 :

31-32)- 36sc (2row);

Round 33 :

33)- (5sc, inc)*6 (42);

Round 34-41 :

34-41)- 42sc (8rows);

Info :

Insert eyes in row 37, 5sc between the eyes. Check that everything is exactly and you like it and only then put on the puck. Do not forget to fill the toy with filler while knitting.

Round 42 :

42)- (5sc, dec)*6 BLO (36);

Round 43 :

43)- (4sc, dec)*6 (30)

Round 44 :

44)- (3sc, dec)*6 (24)

Round 45 :

45)- (2sc, dec)*6 (18)

Round 46 :

46)- (1sc, dec)*6 (12)

Round 47 :

47)- 6dec.

Info :

Cut and hide the thread.

β€” Crown :

Info :

Crown: brown. We return to the 42nd row, FLO (crochet in the front loop of the stitches).

Round 43 :

43)- 2ch, 42hdc, slst (42);

Round 44 :

44)- ch, 11sc, 4hdc, 6dc, 2ch, slst into the next stitch, 2ch, 3dc, 1hdc, 16sc, slst (41);

Info :

Tie and hide excess threads.

Info :

Insert the green thread into the 17th loop of the 44th row of the crown.

Round 45 :

45)- 2ch, 2dc, 1hdc. Tie and hide excess threads.

Info :

Insert the thread again in the 44th row in the 22nd loop from the beginning of the row.

Round 45 :

45)- 2ch, 1hdc, 1sc. Cut and hide the threads.

Info :

Once again, insert the thread now into the 29th loop of the 44th row of the crown.

Round 45 :

45)- 2ch, 1hdc, 1sc. Tie and hide excess threads.

β€” Arms :

Round 1 :

1)- 5sc in MR;

Round 2 :

2)- 5sc;

Round 3 :

3)- inc, 4sc (6);

Round 4 :

4)- 6sc;

Round 5 :

5)- inc, 5sc (7);

Round 6 :

6)- 7sc;

Round 7 :

7)- inc, 6sc (8);

Round 8-14 :

8-14)- 8sc (7rows);

Info :

Fill the lower part of the arm to the 8th row, then fold and hold the 8th row to fill the upper part of the arm.

Round 15 :

15)- fold the edges together and knit 3sc.

Info :

Cut off the thread, leaving 4 inch for sewing. With another thread of the same color, sew the 8th row, tie and hide the extra threads.

Info :

Sew on arms in row 26, tie and hide excess threads.

β€” Face details and finishing :

Info :

Divide a large piece of yarn into two thinner threads. Mark and embroider eyebrows.

Smile :

Divide a large piece of yarn into two thinner threads. Then divide the thin thread into two more thin threads. We knit with the thinnest single thread. Hook 1.40mm. 1)- 5ch. Cut off the thread, leaving 4 inch for sewing. Sew on a smile in the 33rd row, tie and hide the extra threads.

β€” Decorations :

Info :

Decorations: green. Divide a large piece of yarn into two thinner threads. Embroider the decoration as shown in the pictures. Then one of the separated threads is divided again into two thinner threads. Use a single thread to embroider thin jewelry as shown in the pictures.

β€” Headphones :

Info :

Headphones: start black.

Round 1 :

1)- 6sc in MR

Round 2 :

2)- at the beginning change color to red 6inc (12)

Round 3 :

3)- (1sc, inc)*6 (18)

Round 4 :

4)- 18sc

Round 5 :

5)- (1sc, dec)*6 (12)

Round 6 :

6)- 6dec. Cut and hide the threads.

Info :

Headphones part 2: gray. 1)- 33ch, turn; 2)- 32sc, ch, turn (32); 3)- 32sc. Cut off the thread, leaving 8 inch for sewing. Fold the first row to the third and sew along the entire length. Then sew the second part of the headphones to the first and to the head. Do as shown in the pictures.

Info :

Insert the thread into the rim of the headphones and embroider about 0.3 inches. Then tie and hide the extra threads.

β€” Assembly :

Info :

Pin and sew the hands to the head as shown in the pictures. Sew ears / headphone pieces to the sides, embroider decorations and vines, and secure all threads by tying and hiding them as shown.

Assembly Instructions

  • Sew on arms in row 26, tie and hide excess threads so the arms sit symmetrically at the sides.
  • Insert safety eyes in row 37 with 5 SC between the eyes, then secure the eyes and hide the back washers.
  • Pin and sew the hands to the head as shown in the pictures, matching left and right placement for symmetry.
  • Sew the headphone earcups to the head and attach the gray band around the crown, hiding ends and tying off securely.
  • Embroider the green decorations and vines on the crown and body using divided thinner threads for a delicate look.
  • Add the smile and eyebrows using the thinnest single thread and a 1.40mm hook or fine needle, then tie off and hide excess threads.

Important Notes

  • πŸ’‘Use stitch markers to keep track of the start of rounds, especially when working increases and decreases.
  • πŸ’‘Stuff the toy gradually during construction to maintain even shape; do not overstuff as it may distort the stitches.
  • πŸ’‘Hide and secure all thread ends properly after sewing parts together to prevent unraveling and ensure a clean finish.
  • πŸ’‘When embroidering decorations use divided thinner threads as instructed for finer details that match the photographs.

This Groot amigurumi pattern is a delightful blend of simple shaping and charming details that bring character to life. Whether you are gifting or keeping him, you will love the tiny crown, embroidered vines, and little headphones. Happy crocheting and may this little tree-friend brighten your day! 🌱🧢

You ask,

we answer.

FAQs

What size will the finished piece be?

The finished amigurumi will be a small handheld doll; size varies with yarn and hook, but using the recommended #2 fine yarn and 2.5mm hook will yield the proportions shown in the photos.

Can I use different yarn weights for this pattern?

Yes, you can change yarn weight to alter final size, but adjust your hook accordingly and be aware that safety eye sizes and stuffing amounts may need to change.

Do I need prior crochet experience for this pattern?

This pattern is rated intermediate, so basic knowledge of single crochet, increases, decreases, and working in the round is recommended for best results.

How long does this project typically take to complete?

Most crocheters complete this project in 5-7 hours, though time may vary based on experience level, customization, and finishing details.