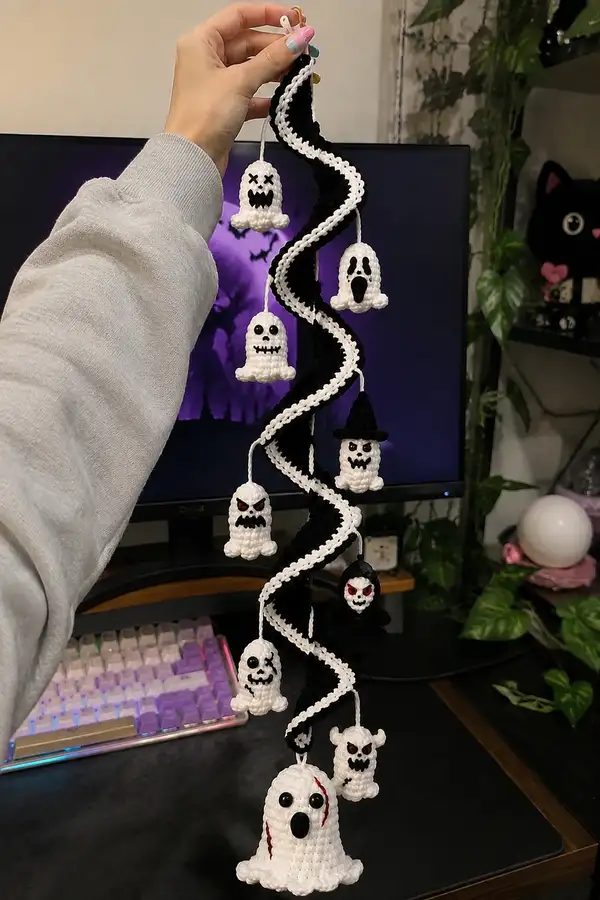
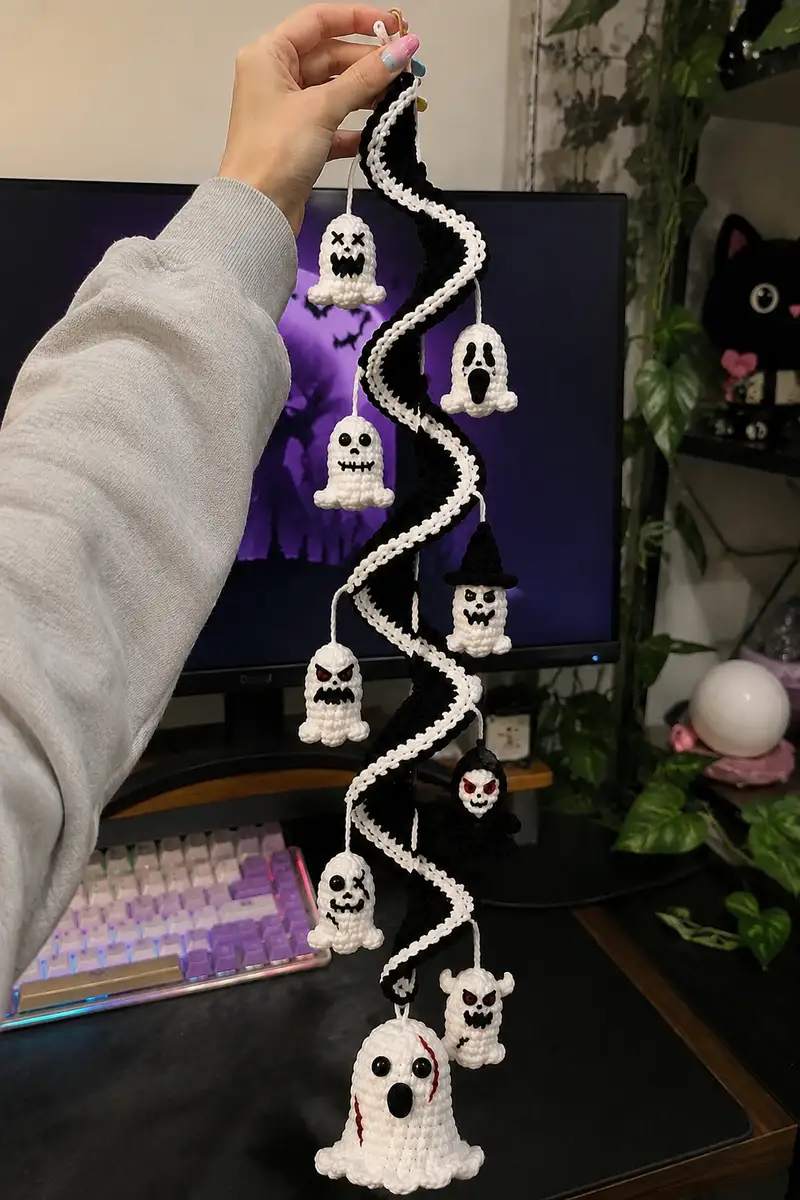
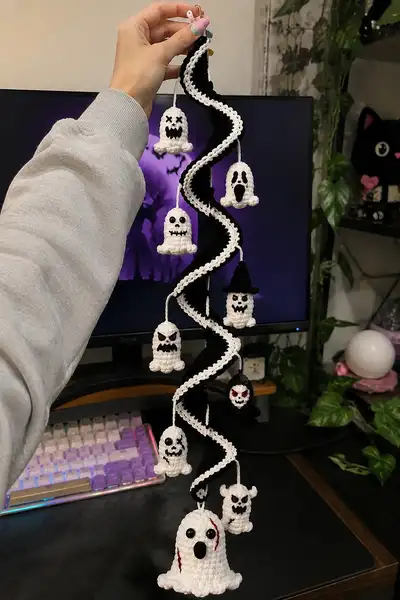
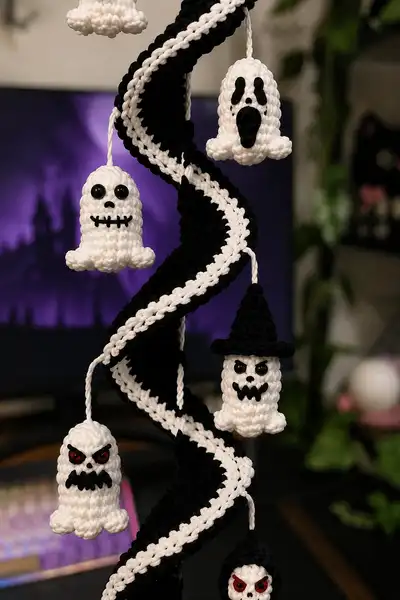
Make a spooky, swirly hanging garland of tiny crocheted phantoms and one large ghost with a dramatic black spiral. This pattern includes a long spiral tube with a contrast white ridge and nine unique mini ghosts — stitched faces, a witch hat, and a hooded grim face. Perfect for Halloween décor, a doorway hanger, or a gift for a ghostly friend. Uses simple amigurumi shaping, surface embroidery, and a few accessory techniques to personalize each phantom.
Progress Tracker
0% Complete
— Spiral Tube (Body/Spine) :
Overview :
This long spiral is constructed as a narrow amigurumi tube worked in continuous rounds in black, then given a white spiral ridge by crocheting an attached chain and single crochet edge as you go. To keep the spiral stable, we recommend inserting a length of flexible floral wire inside the tube or crocheting the tube around a cord. The tube finished length is approximately 70-85 cm depending on tension; you can lengthen or shorten by adding or subtracting rounds. This section includes 120 continuous rounds (long) to make the full spiral length; trim or extend to your desired finished height.
Round 1 :
6 sc in magic ring (6)
Round 3 :
(1 sc, 1 inc) x 6 (18)
Round 4 :
(2 sc, 1 inc) x 6 (24)
Round 5 :
(3 sc, 1 inc) x 6 (30)
Round 6 :
(4 sc, 1 inc) x 6 (36)
Round 7 :
(5 sc, 1 inc) x 6 (42)
Info :
At the end of round 7 your tube circumference is 42 sts which gives a sturdy narrow spiral tube. If you prefer a slightly thinner spiral, stop increases at round 6 (36 sts). If you plan to insert floral wire, push it through the opening now so it runs up the center while you crochet.
Round 8 :
1 sc in each st (42)
Round 9-120 :
1 sc in each st (42) — work even for desired length (for reference work 112 rounds even after round 8 for a long spiral)
Info :
Every 10 rounds add an Info check: press the tube flat to ensure even work and that the optional wire is centered. If carrying the wire, leave an extra 10 cm protruding at the top for shaping the hanging loop later.
Round 121 :
For closure of the bottom: (5 sc, 1 dec) x 6 (36)
Round 122 :
(4 sc, 1 dec) x 6 (30)
Round 123 :
(3 sc, 1 dec) x 6 (24)
Round 124 :
(2 sc, 1 dec) x 6 (18)
Round 125 :
(1 sc, 1 dec) x 6 (12)
Info :
Leave a long tail (30-40 cm) for sewing and attach a small felt base or continue stuffing lightly if you want the spiral bottom closed. Fasten off and weave tail inside tube. If you inserted wire, tuck the wire end back inside the tube and secure with a couple of stitches.
White Ridge Edge - Continuous Spiral :
To create the white spiral ridge that winds up the black tube, we’ll crochet a long chained cord in white along the length and attach it with slip stitches to the outer surface in a spiral. You can work the white ridge as you go or add after the tube is complete. Instructions below assume the tube is complete.
Info :
Mark a starting point at the top of the tube. Starting from the top, we will work a 4-chain loop and join with sl st to the outside of the tube, then crochet a 1-row cord across and continue spiralling downward. This ridge is decorative and stabilizes the tube profile.
Ridge Step 1 :
With white yarn, at top of tube: ch 4, sl st into the side of the tube (this anchors the ridge)
Ridge Step 2 :
Ch 1, *sc into next ch, ch 1, sc into next ch* — work down the chain to make a narrow cord (3 sc in chain); sl st to the next outer loop of the tube to anchor; continue ch 4, sc along, anchor every 6-8 black tube rounds to create even spiral spacing. Repeat until you reach bottom.
Info :
To make the ridge look textured, after anchoring the white cord with sl sts, work 1 sc around the white cord from the tube side (pulling the white slightly to one side) creating a raised edge. You can also work 1 sc BLO along the edge for a ridge effect.
Final Ridge Finish :
When you reach the bottom, fasten off and weave ends into the tube for a tidy finish. If desired, block lightly by shaping the spiral and letting it rest around a dowel or object that enforces the helical shape until the yarn relaxes.
— Big Base Ghost (Large Ghost at Bottom) :
Overview :
This big ghost is the largest phantom at the bottom — worked from top to bottom in continuous rounds and left open at the bottom with a scalloped bell edge. It uses more rounds (28) to create height and a fuller skirt. Use safety eyes 8mm and surface embroidery for details.
Round 1 :
6 sc in magic ring (6)
Round 3 :
(1 sc, 1 inc) x 6 (18)
Round 4 :
(2 sc, 1 inc) x 6 (24)
Round 5 :
(3 sc, 1 inc) x 6 (30)
Round 6 :
(4 sc, 1 inc) x 6 (36)
Round 7-12 :
1 sc in each st (36) — work even to make tall head/body (6 rounds)
Info :
Place safety eyes between rounds 9-10 approximately 8-10 stitches apart based on desired expression. If using felt mouth/eyes, leave until after stuffing. Embroidered scars (red) are added at the end and should be marked now with pins if desired.
Round 13 :
(4 sc, 1 dec) x 6 (30)
Round 14 :
(3 sc, 1 dec) x 6 (24)
Info :
Begin light stuffing in the head section so face remains round; do not overstuff the skirt bottom section — we want the ruffle to hang freely.
Round 15 :
(2 sc, 1 dec) x 6 (18)
Round 16 :
(1 sc, 1 dec) x 6 (12)
Round 17 :
6 sc (12) — continue without decreasing to form a short neck before bell
Round 18 :
Change to bottom bell shaping: (1 sc, 1 inc) x 6 (18)
Round 19 :
1 sc in each st (18)
Round 20 :
(1 sc, 1 inc) x 9 (27)
Round 21 :
1 sc in each st (27)
Round 22 :
(2 sc, 1 inc) x 9 (36)
Round 23 :
1 sc in each st (36)
Round 24 :
Shell border — *skip 1 st, (5 dc in next st), skip1, sl st into next* rep around (creates scalloped skirt). Note stitch counts will vary due to shells; work to visual fit (approx 12 shells)
Info :
Stuff skirt lightly from the top down and press the scallops into shape. Use small balls of fiberfill to support shell tips if you want more lift. Fasten off leaving long tail for hanging cord if desired.
Round 25 :
Fasten off and weave ends. Add safety eyes (8mm) now if not already set. Embroider mouth as large oval in black yarn or attach black felt oval for open scream; add red embroidered scars if desired.
— Small Ghost Template (Make 9 with personal faces) :
Overview :
Small bell ghosts are identical in basic shape — each worked the same rounds with small variations for faces. Make 9 small ghosts; sample faces are provided as variations (X eyes, stitched mouth, open scream, horned, witch hat, hooded grim). Each small ghost uses 16 rounds and a 5-6 st scalloped base. Use safety eyes 6mm or black embroidery depending on look.
Round 1 :
6 sc in magic ring (6)
Round 3 :
(1 sc, 1 inc) x 6 (18)
Round 4 :
(2 sc, 1 inc) x 6 (24)
Round 5 :
(3 sc, 1 inc) x 6 (30)
Round 6-9 :
1 sc in each st (30) — work 4 rounds even for body height
Info :
Place 6mm safety eyes between rounds 7-8 approx 6-8 sts apart depending on expression. For stitched eyes, mark with pins and embroider after stuffing. Start light stuffing at round 8 and continue as you finish the body.
Round 10 :
(3 sc, 1 dec) x 6 (24)
Round 11 :
(2 sc, 1 dec) x 6 (18)
Round 12 :
(1 sc, 1 dec) x 6 (12)
Round 13 :
6 sc (12) — short neck round to prepare for scalloped base
Round 14 :
(1 sc, 1 inc) x 6 (18)
Round 15 :
Shell round — *skip 1 st, 5 dc in next st, skip1, sl st* repeat around to make 6 scallops; join with sl st and fasten off (approx 6 shells)
Round 16 :
Weave in tails; embroider facial details or attach felt; add hanging cord by tying a small length of white yarn at top and weaving ends inside head and knotting out of sight
Info :
Stuff the bell firmly at the scalloped edge so the scallops hold shape. For tiny horns or ears, use small extra stitches attached to side rounds (see horned ghost below).
— Ghost Face Variations (Apply to each small ghost) :
Variant A - X Eyes :
Use black embroidery yarn. Mark two eye positions between rounds 7-8. Stitch an X for each eye using satin stitch or long cross stitch. For mouth, embroider small jagged smile with black yarn across 6-8 stitches.
Variant B - Scream Face (long oval mouth) :
Attach a black felt oval or embroider an elongated oval starting round 8 centered below eyes. Add two small teardrop shapes above as eye shadows using black felt or tight satin stitch.
Variant C - Stitched Smile :
Sew 6 small vertical stitches to simulate stitched mouth. Use black yarn and a simple backstitch. Add small felt round eyes or safety eyes for extra expression.
Variant D - Angry Eyes (red accent) :
Use small red embroidery thread to make thin slanted eyes. Attach black pupil beads in the center. Embroider a jagged mouth with black yarn for a fierce look.
Variant E - Witch Hat Ghost :
Make a small hat and place it on top of the ghost head (hat pattern below). Secure with a few sewing stitches through the top rounds. Place eyes slightly lower to show brim.
Variant F - Hooded Grim Face :
Crochet a tiny hood in black and slip over the top rounds of the ghost, leaving face exposed. Embroider skull-like features in black and red for eyes.
— Witch Hat (Accessory for 1 ghost) :
Overview :
Small witch hat constructed in black in continuous rounds. Works up quickly and is sewn to a single ghost. Make brim then cone.
Round 1 :
6 sc in magic ring (6)
Round 3 :
(1 sc, 1 inc) x 6 (18)
Round 4 :
Work even 18 sc (18)
Round 5 :
Brim — ch 6, sl st into same stitch, rotate and make 12 sl st around (creates small flat brim). Fasten off leaving long tail for sewing.
Info :
For a taller cone, pick up stitches at center and work 6-8 rounds decreasing slightly for a witchy point, then sew brim to cone and attach to ghost top.
— Hood (Accessory for Grim Hooded Ghost) :
Round 1 :
6 sc in magic ring (6)
Round 3 :
(1 sc, 1 inc) x 6 (18)
Rounds 4-7 :
1 sc in each st (18) — work 4 rounds to create hood depth
Round 8 :
Fold in half and seam the back with sl st or sew leaving front open to expose face; fasten off and weave tail for attachment
Info :
Pin the hood onto the ghost before sewing — you can roll the front edge slightly for a dramatic shaded face. Use a few stitches at the sides to secure.
— Horned Mini Ghost (1 variant) :
Horn (Make 2) Round 1 :
4 sc in magic ring (4)
Round 2 :
(1 sc, 1 inc) x 2 (6)
Round 3 :
1 sc in each st (6)
Round 4 :
Decrease round (1 sc, dec) x 2 (4) — fasten off leaving tail to sew horn to side rounds of ghost near rounds 7-8
Info :
Attach horns symmetrically to either side of face at the same round; sew through several stitches for security because horns will be handled when hanging.
— Hooded Grim (Black Cloaked Mini) :
Body :
Work small ghost template Rounds 1-13 in black to create a cloaked hooded body. At round 10, reduce eyes and leave mouth area exposed by not adding safety eyes; instead embroider face in white thread.
Info :
To make the skeletal face, use white yarn to embroider round eyes and mouth; add red accents to make it more sinister. Sew the separate hood piece over the top and tack in the back.
— Hanging Cord & Assembly Loops :
Round 1 :
Make a braided cord: ch 40 with white yarn, fasten off and braid 3 strands for strength (or twist a 3-strand cord). Alternatively crochet ch 40 and sl st back for a tidy cord.
Info :
Attach a small loop at the top of the spiral for hanging. If your spiral has floral wire protruding at the top, bend the wire into a small loop and wrap with yarn to cover metal before adding a sewn cord for hanging.
Small Ghost Cord Attachment :
Sew a 10-12 cm white cord into the top center of each small ghost and knot on the inside. Use a long tail and attach by pulling the knot inside the head and securing with a couple of whip stitches. Vary lengths when attaching to the spiral to create staggered hanging positions.
Info :
Test each hanging length by pinning the spiral to a vertical surface and adjusting distance to avoid ghost overlap; aim for 5-7 cm vertical separation between adjacent ghosts depending on final spiral pitch.
— Face Embroidery & Felt Pieces :
Info :
For precise faces, cut small felt shapes (ovals for open mouths, teardrops for Scream eyes) and glue them using fabric glue, then secure with a few hand stitches. Embroidered details should be done with a sharp yarn needle and short, tidy stitches; tie knots on the inside and hide tails through at least 4 rounds.
Embroidered Mouth Option :
Use black yarn to backstitch a mouth following the curvature of round 9-10. For a stitched mouth style, work vertical tiny satin stitches across 6-8 stitches then secure ends inside with a neat knot and weave.
Info :
If using safety eyes instead of embroidery, insert them between rounds 7-9 before stuffing fully and lock washers securely. For felt or glued pieces on items destined for children, avoid glue and opt for tightly sewn felt embroidery instead.
— Putting It All Together (Detailed Assembly Instructions) :
Info :
Lay the spiral flat and decide ghost positions visually before sewing. Use pins to mark each spot. When satisfied, thread the hanging cord of each ghost through an outer stitch of the white ridge or sew cord to the black tube at the selected round, then knot and hide the knot inside the tube by tucking under a couple of rounds.
Info :
For a stable layout, attach the largest ghost at the very bottom center and balance the small ghosts along the spiral so heavier-looking pieces (hats, hoods) are distributed evenly. If using wire inside the spiral, make sure wire ends are trimmed and tucked away before finalizing attachments.
Final Details :
Once all ghosts are attached, lightly press the spiral into its desired helix and let it rest over a rounded object for 24 hours to set. Add any last embroidery touches and trim stray fibers. Check all sewn connections and reinforce as needed.
Info :
Optional: spray with a small amount of yarn-safe starch if you want the spiral more rigid (test on a scrap). Let dry fully before hanging.
This haunting spiral garland is a charmingly spooky fusion of small, expressive ghosts and a dramatic black-and-white helix — a fun project with instant seasonal impact. Each tiny phantom has its own personality, and the whole piece comes together with satisfying, quick little finishes. Make one for your front door, over a mantle, or as a Halloween gift — it's playful, spooky, and utterly addictive to stitch! 🎃👻