🧢 Beautiful ✨ Detailed πŸ’ Adorable

Hanging Plant Pot Amigurumi Pattern

Hanging Plant Pot Amigurumi Pattern
4.5β˜… Rating
2-3 Hours Time Needed
2.8K Made This
βœ‚οΈ

Intermediate Level

Ideal for those with basic crochet experience, featuring slightly more advanced stitches and techniques to expand your skills.

⏱️

Bite-Sized Project

Finishes in 2-4 hoursβ€”perfect for an afternoon of creative relaxation.

🏑

Cozy Accent

A warm touch for your space that transforms ordinary corners into inviting nooks filled with handmade charm.

About This Hanging Plant Pot Amigurumi Pattern

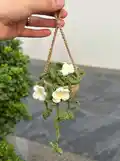
This pattern creates a small hanging plant pot amigurumi with a crocheted pot, a circular soil top, multiple vines with leaves, and tiny flowers. It uses simple rounds and building blocks like single crochet, half double crochet and double crochet to create texture and shape. The pattern includes clear step-by-step rows and photographic guidance for assembly and finishing. Ideal for adding a handmade botanical accent to your home.

Hanging Plant Pot Amigurumi Pattern crochet pattern - detailed view of completed project

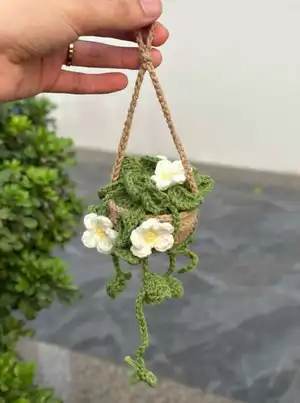
Includes materials list, full abbreviations and detailed assembly steps for sewing the circle into the pot and attaching vines and flowers. Make 5-8 flowers and 5-6 vine lengths to create a lush hanging arrangement.

Why You'll Love This Hanging Plant Pot Amigurumi Pattern

I absolutely love this pattern because it turns a few simple crochet stitches into a delightful hanging plant that adds life to any room. I enjoy how easy it is to customize with different yarn colors and vine lengths to match your decor. The small scale means you can finish it quickly and still have a polished handmade piece to gift or display. Making the little flowers and leaves is so satisfying and gives you a chance to practice shaping stitches in a playful way.

Hanging Plant Pot Amigurumi Pattern step 1 - construction progress Hanging Plant Pot Amigurumi Pattern step 2 - assembly progress Hanging Plant Pot Amigurumi Pattern step 3 - details and accessories Hanging Plant Pot Amigurumi Pattern step 4 - final assembly and finishing

Switch Things Up

I love how easily this pattern adapts to different yarns and scales; try sport weight yarn with a 2.5mm hook for a slightly smaller pot or use a thicker yarn for a chunkier look.

I often change color combinations β€” use variegated yarn for the soil or a neutral pot with bright green vines to make the leaves pop.

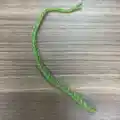
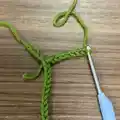
You can lengthen or shorten vine chains to create a dramatic cascade or a compact cluster; experiment with 15ch to 60ch vine lengths for varied effects.

I sometimes embroider veins on each leaf using a contrasting yarn for extra detail and texture that makes the leaves look more lifelike.

For a whimsical look, add tiny beads to vine tips or thread a small bell onto the hanging chain for a playful finish.

I like to make tiny removable outfits for the pot (like a mini moss mat) by crocheting small rounds to tuck under the green circle for seasonal variations.

Try combining different leaf stitch patterns β€” alternate larger and smaller leaves along a single vine for a more organic appearance.

If you want a more durable decor item, use cotton yarn and secure all joins with hidden weaving and fabric glue for reinforcement.

I sometimes add a loop inside the pot and a small eye-hook to hang it securely on nail or hook; this gives a cleaner hanging option for display.

Finally, I recommend photographing each color variation you try so you can recreate your favorite combinations in future projects β€” I keep a small swatch book with notes for each version.

Common Mistakes & How to Fix Them
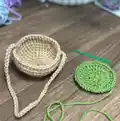
βœ— Skipping the magic ring and starting with chains can leave a visible hole at the center; always start the pot and circle base with a magic ring to close the center neatly. βœ— Forgetting to count increases precisely will change the pot circumference; count stitches at the end of each increase round to ensure correct stitch counts. βœ— Cutting the yarn too early from the pot body will prevent making the hanging chain; keep the yarn attached until you finish row 11 and make the hanging chain as instructed. βœ— Not stuffing the pot base enough can make the final piece collapse; add polyester stuffing gradually and shape as you sew the circle into the pot to maintain structure.

Hanging Plant Pot Amigurumi Pattern

Make a charming hanging plant pot with trailing vines, delicate leaves and tiny flowers. This pattern guides you through crocheting the pot, a round soil base, leaves, vines and flowers with clear step-by-step instructions. Perfect for gifting or decorating shelves and windowsills, this sweet hanging plant brings a touch of handmade greenery to any space.

Intermediate 2-3 Hours

Materials Needed for Hanging Plant Pot Amigurumi Pattern

β€” Main Fabric

  • 01
    Supper fine yarn 1.8 oz (50 g) - beige (pot)
  • 02
    Supper fine yarn 1.8 oz (50 g) - light green (vines, leaves)
  • 03
    Supper fine yarn 1.8 oz (50 g) - white (flowers)
  • 04
    Supper fine yarn 1.8 oz (50 g) - yellow (flower centers)

β€” Tools Required

  • 01
    Crochet hook 2.5-3.0 mm
  • 02
    Stitch marker
  • 03
    Sewing needle
  • 04
    Scissors
  • 05
    Cotton/polyester filling
  • 06
    Yarn needle for weaving ends

Progress Tracker

0% Complete

β€” Pots :

Round 1 :

Magic ring, chain 1, 10 single crochet, slip stitch end row 1. (10 stitches)

Round 2 :

chain 1, (1 single crochet, 1 increase) 5 times, slip stitch end row 2. (15 stitches)

Round 3 :

chain 1, (2 single crochet, 1 increase) 5 times, slip stitch end row 3 (20 stitches)

Round 4 :

chain 1, (3 single crochet, 1 increase) 5 times (25 stitches)

Round 5 :

chain 1, (4 single crochet, 1 increase) 5 times (30 stitches)

Round 6 :

chain 1, (5 single crochet, 1 increase) 5 times (35 stitches)

Round 7 :

chain 1, (6 single crochet, 1 increase) 5 times (40 stitches)

Round 8-11 :

40 single crochet (40 stitches)

Info :

*do not cut yarn* sl st end row 11 and chain 60 make a hanging

β€” Circle Base :

Round 1 :

Magic ring, chain 1, 10 half double crochet. (10 stitches)

Round 2 :

10 half double crochet increase. (20 stitches)

Round 3 :

(1 half double crochet, 1 increase) 10 times. (30 stitches)

Round 4 :

(2 single crochet, 1 increase)*10 (40 stitches)

β€” Leaf (Part 1) :

Info :

Before make leaf, make the vines by 30ch, 25ch and 20ch. (make 5-6)

Info :

- start crochet the Leaf - *every vines crochet 1 - 5 leaf*

Leaf Step 1 :

Slip knot and yarn over in chain stitch(vines), chain 7, 1 single crochet in 3rd stitches

Leaf Step 2 :

2 half double crochet, 1 double crochet, chain 3 and slip stitch in next stitches

Leaf Step 3 :

Continue forming leaf shapes along vine as shown in photos, repeating shaping stitches across the chain as needed

β€” Leaf (Part 2) :

Leaf Step 4 :

1 slip stitch into the opposite row, chain 3 , 1 double crochet in next sts, 1 double crochet, 2 half double crochet, 1 single crochet

Leaf Step 5 :

slip stitch in the first sts and cut yarn to finish the leaf.

β€” Flower (MAKE 5-8) :

Flower Yellow :

(ylloew) hook in the vines a magic ring β€’ 5 single crochet (5stitches) β€’ Cut yarn.

Flower White :

(white) chain 2, 2 double crochet in same sts, chain 2 and hook in same stitches (all in one stitches)

Flower Step :

Slip titch in next stitch and do the same do

Flower Finish :

After 5 petals have been completed, slip stitch in first sts to end row and cut yarn.

β€” Assembly :

Info :

Use needle : sewing the circle inside the pot and stuffing inside the pot to finish

Info :

Next step : sew every vines on the green circle

Info :

Arrange leaves and flowers and sew them securely to the vines and pot edge as shown in photos

Assembly Instructions

  • Sew the green circle (circle base) inside the pot using a sewing needle, aligning stitches and closing any gaps for a neat finish.
  • Stuff the pot lightly with cotton filling before completely closing the circle to give the plant body a rounded shape and stability.
  • Make the hanging chain by slip stitching the yarn at the end of row 11 and chaining 60, then secure and hide ends inside the pot.
  • Position and sew each vine onto the green circle evenly, arranging leaves and flowers for a balanced cascading look.
  • Secure flowers onto vine tips or desired positions, using a yarn needle and small stitches so they sit flush against leaves and vines.

Important Notes

  • πŸ’‘Keep yarn attached until you complete the hanging chain at the end of the pot (do not cut yarn prematurely).
  • πŸ’‘Use stitch markers to mark the start of rounds and important placement points for eyes, vines or flower positions.
  • πŸ’‘Stuff the pot gradually to maintain shape and avoid overstuffing, which can distort the final form.
  • πŸ’‘Pin vines and leaves in place before sewing to ensure symmetrical placement and a pleasing drape.

This sweet hanging plant pot pattern brings a bit of handmade greenery to any space with charming detail and tiny flowers.🌿 The finished piece makes a lovely gift or a cozy shelf accent that you can customize by color and vine length.🧢 Thank you for making and sharing your handmade plants β€” enjoy every stitch!

You ask,

we answer.

FAQs

What size will the finished piece be?

The finished hanging plant measures approximately 8-12 cm across depending on yarn tension and hook size; vine lengths vary depending on the chains you make.

Can I use a different yarn weight for this pattern?

Yes, you can use a different yarn weight, but this will affect final size; adjust your hook size accordingly and make test gauges to ensure desired proportions.

Do I need to know advanced stitches to follow this pattern?

This pattern is rated intermediate because it uses basic stitches (sc, hdc, dc) plus assembly and shaping; basic crochet experience is recommended for best results.

How long does it typically take to complete?

Most crocheters finish this project in about 2-3 hours, depending on experience and how many leaves and flowers you make.