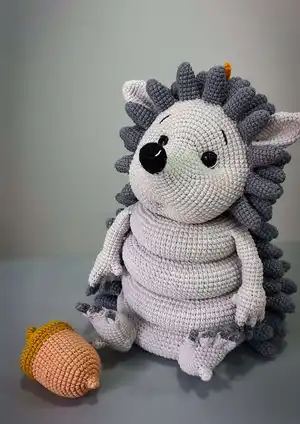
Make a charming hedgehog stacking toy with this detailed crochet pattern. You will create a cuddly hedgehog with removable rings, needles (spines), legs, arms, ears, an acorn and an oak leaf. The pattern includes step-by-step rounds, photos guidance, and assembly tips so you can finish a beautiful handcrafted toy. Perfect for gifting or keeping as a whimsical home accent.
Progress Tracker
0% Complete
— Base :
Round 4 :
(1 sc; inc)*6 (18)
Round 7 :
(2 sc; inc)*6 (24)
Round 11 :
(3 sc; inc)*6 (30)
Round 16 :
(4 sc; inc)*6 (36)
Round 22 :
(5 sc; inc)*6 (42)
Round 29 :
(6 sc; inc)*6 (48)
Round 37 :
(7 sc; inc)*6 (54)
Round 46 :
(8 sc; inc)*6 (60)
Round 47 :
FLO (9 sc; inc)*6 (66)
Round 48 :
5 sc; inc; (10 sc; inc)*5; 5 sc (72)
Round 49 :
(11 sc; inc)*6 (78)
Round 50 :
6 sc; inc; (12 sc; inc)*5; 6 sc (84)
Round 51 :
(13 sc; inc)*6 (90)
Round 52 :
7 sc; inc; (14 sc; inc)*5; 7 sc (96)
Round 53 :
(15 sc; inc)*6 (102)
Round 54 :
8 sc; inc; (16 sc; inc)*5; 8 sc (108)
Round 55 :
(17 sc; inc)*6 (114)
Round 57 :
44 sc; BLO 70 sc (114)
Round 59 :
47 sc; BLO 65 sc; 2 sc (114)
Round 61 :
44 sc; BLO 70 sc (114)
Round 63 :
(17 sc; dec)*6 (108)
Round 64 :
8 sc; dec; (16 sc; dec)*5; 8 sc (102)
Round 65 :
(15 sc; dec)*6 (96)
Round 66 :
7 sc; dec; (14 sc; dec)*5; 7 sc (90)
Round 67 :
(13 sc; dec)*6 (84)
Round 68 :
6 sc; dec; (12 sc; dec)*5; 6 sc (78)
Round 69 :
(11 sc; dec)*6 (72)
Round 70 :
5 sc; dec; (10 sc; dec)*5; 5 sc (66)
Round 71 :
(9 sc; dec)*6 (60)
Round 72 :
connect round 71 with round 47 (BLO) with 60 sc (60) fill with stuffing as you go, then continue to work in rounds.
Round 73 :
(8 sc; dec)*6 (54)
Round 74 :
(7 sc; dec)*6 (48)
Round 75 :
(6 sc; dec)*6 (42)
Round 76 :
(5 sc; dec)*6 (36)
Round 77 :
(4 sc; dec)*6 (30)
Round 78 :
(3 sc; dec)*6 (24)
Round 79 :
(2 sc; dec)*6 (18)
Round 80 :
(1 sc; dec)*6 (12)
Round 81 :
6 dec (6) cut the yarn, pull off hole, hide a tail.
Infos :
NEEDLES make 41 pieces. Round 1. 6 sc in MR (6). Round 2. (2 sc; inc)*2 (8). Round 3. (3 sc; inc)*2 (10). Round 4-9. 10 sc (10) fill with stuffing, cut the yarn, leave a tail for sewing.
Info :
Sew the needles as you can see in the pictures: in round 57 - 14 needles, in round 59 - 13 needles; in round 61 - 14 needles. Needles for the base - 41 pieces.
— Legs :
Info :
LEGS (make 2). There will be 3 kinds of toes, let's call them "long"(2), "short"(2) and "tiny"(1)
"Tiny" toe (make 1) :
Start with light gray yarn Round 1. 6 sc in MR (6). Round 2. 6 sc (6). Round 3. 3 sc (3) cut the yarn, leave a tail for sewing.
"Long" toes (make 2) :
Start with dark gray yarn Round 1. 3 sc in MR (3). Round 2-3. 3 sc (3) change to light gray. Round 4. 3 inc (6). Round 5-7. 6 sc (6) fasten off.
"Short" toes (make 2) :
Start with dark gray yarn Round 1. 3 sc in MR (3). Round 2-3. 3 sc (3) change to light gray yarn. Round 4. 3 inc (6). Round 5-6. 6 sc (6) fasten off. Don't cut the yarn in one of the "short" toes, because with its help we'll connect other toes and form the foot.
— Feet :
Round 1 :
Connect toes: "short" toe + 3 sc in a first "long" toe + 3 sc in a 2nd "long" toe + 6 sc in 2nd "short" toe + 3 sc in a 2nd "long" toe + 3 sc in a first "long" toe + 6 sc in 2nd "short" toe (24)
Round 7 :
2 sc; (sew "tiny" toe with 3 sc like in the photo); make 3 sc in the outer side of the "tiny" toe; 19 sc in the foot (24)
Round 8 :
24 sc (24) continue to crochet in rows
Round 9.2 :
skip 1 sc; 11 sc; turn (11)
Round 9.3 :
skip 1 sc; 10 sc; turn (10)
Round 9.4 :
skip 1 sc; 9 sc; turn (9)
Round 9.5 :
skip 1 sc; 8 sc (8) put marker in the last sc, continue to crochet in rounds, round will start from this point.
Round 10 :
2 sc in the side of the heel; 12 sl st in the front part; 2 sc in the other side of the heel; 8 hdc in the back (24)
Round 11 :
16 sc; 8 hdc (24)
Round 12 :
(1 sc; dec)*8 (16) fill with stuffing, cut the yarn, leave a long tail for sewing.
Info :
Sew the legs to the base of the body from the front like in the pictures below (pin it before sewing, it really helps:)
— Large Ring :
Round 1 :
60 ch; slst in 1st ch (60)
Round 2 :
(9 sc; inc)*6 (66)
Round 3 :
5 sc; inc; (10 sc; inc)*5; 5 sc (72)
Round 4 :
(11 sc; inc)*6 (78)
Round 5 :
6 sc; inc; (12 sc; inc)*5; 6 sc (84)
Round 6 :
(13 sc; inc)*6 (90)
Round 7 :
7 sc; inc; (14 sc; inc)*5; 7 sc (96)
Round 8 :
(15 sc; inc)*6 (102)
Round 10 :
42 sc; BLO 60 sc (102)
Round 12 :
45 sc; BLO 55 sc; 2 sc (102)
Round 14 :
42 sc; BLO 60 sc (102)
Round 16 :
(15 sc; dec)*6 (96)
Round 17 :
7 sc; dec; (14 sc; dec)*5; 7 sc (90)
Round 18 :
(13 sc; dec)*6 (84)
Round 19 :
6 sc; dec; (12 sc; dec)*5; 6 sc (78)
Round 20 :
(11 sc; dec)*6 (72)
Round 21 :
5 sc; dec; (10 sc; dec)*5; 5 sc (66)
Round 22 :
(9 sc; dec)*6 (60)
Info :
Sew round 22 with round 1, fill with stuffing as you go.
Info :
Sew the needles as you can see in the pictures: in round 10- 12 needles, in round 12 - 11 needles; in round 14 - 12 needles. Needles for the large ring - 35 pieces.
— Middle Ring :
Round 1 :
48 ch; slst in 1st ch (48)
Round 2 :
(7 sc; inc)*6 (54)
Round 3 :
4 sc; inc; (8 sc; inc)*5; 4 sc (60)
Round 4 :
(9 sc; inc)*6 (66)
Round 5 :
5 sc; inc; (10 sc; inc)*5; 5 sc (72)
Round 6 :
(11 sc; inc)*6 (78)
Round 7 :
6 sc; inc; (12 sc; inc)*5; 6 sc (84)
Round 8 :
(13 sc; inc)*6 (90)
Round 10 :
40 sc; BLO 50 sc (90)
Round 12 :
45 sc; BLO 45 sc (90)
Round 14 :
40 sc; BLO 50 sc (90)
Round 16 :
(13 sc; dec)*6 (84)
Round 17 :
6 sc; dec; (12 sc; dec)*5; 6 sc (78)
Round 18 :
(11 sc; dec)*6 (72)
Round 19 :
5 sc; dec; (10 sc; dec)*5; 5 sc (66)
Round 20 :
(9 sc; dec)*6 (60)
Round 21 :
4 sc; dec; (8 sc; dec)*5; 4 sc (54)
Round 22 :
(7 sc; dec)*6 (48)
Info :
Sew round 22 with round 1, fill with stuffing as you go. Sew the needles the same way as in the large ring: in round 10- 10 needles, in round 12 - 9 needles; in round 14 - 10 needles. Needles for the middle ring - 29 pieces.
— Arms :
Info :
ARMS (make 2). There will be 2 kinds of fingers, let's call them "long"(3) and "short"(1)
"Short" finger (make 1) :
Start with light gray yarn Round 1. 6 sc in MR (6). Round 2. 6 sc (6) cut the yarn, leave a tail for sewing.
"Long" fingers (make 2) :
Start with dark gray yarn Round 1. 3 sc in MR (3). Round 2-3. 3 sc (3) change to light gray. Round 4. 3 inc (6). Round 5-6. 6 sc (6) fasten off. Don't cut the yarn in one of the "long" fingers, because with its help we'll connect other fingers and form the hand.
With light gray yarn :
Round 1. Connect fingers: "long" finger + 3 sc in a 2nd "long" finger + 6 sc in 3rd "long" finger + 3 sc in a 2nd "long" finger + 6 sc in 1st "long" finger (18)
Round 4 :
Sew "short" finger with 3 sc (like in the photo); make 3 sc in the outer side of the "short" finger; 15 sc in the hand (18)
Round 6 :
(1 sc; dec)*6 (12)
Round 14 :
6 sc; 2 dec; 2 sc (10)
Round 15 :
1 sc; 2 inc; 7 sc (12)
Round 16-20 :
12 sc (12) fold in half, connect both sides, closing the hole with 6 sc.
— Small Ring :
Round 1 :
36 ch; slst in 1st ch (36)
Round 2 :
(5 sc; inc)*6 (42)
Round 3 :
3 sc; inc; (6 sc; inc)*5; 3 sc (48)
Round 4 :
(7 sc; inc)*6 (54)
Round 5 :
4 sc; inc; (8 sc; inc)*5; 4 sc (60)
Round 6 :
(9 sc; inc)*6 (66)
Round 7 :
5 sc; inc; (10 sc; inc)*5; 5 sc (72)
Round 8 :
(11 sc; inc)*6 (78)
Round 10 :
38 sc; BLO 40 sc (78)
Round 12 :
43 sc; BLO 35 sc (78)
Round 14 :
38 sc; BLO 40 sc (78)
Round 16 :
(11 sc; dec)*6 (72)
Round 17 :
5 sc; dec; (10 sc; dec)*5; 5 sc (66)
Round 18 :
(9 sc; dec)*6 (60)
Round 19 :
4 sc; dec; (8 sc; dec)*5; 4 sc (54)
Round 20 :
(7 sc; dec)*6 (48)
Round 21 :
3 sc; dec; (6 sc; dec)*5; 3 sc (42)
Round 22 :
(5 sc; dec)*6 (36) Sew round 22 with round 1, fill with stuffing as you go.
Info :
Sew the arms in round 10 from both sides next to needles. Needles for the small ring - 23 pieces.
— Head (nose and head) :
Head - Nose Round 1 :
With black yarn start to crochet nose Round 1. 6 sc in MR (6)
Round 3 :
(3 sc; inc)*3 (15)
Round 6 :
(3 sc; dec)*3 (12)
Round 7 :
6 dec (6) change to light gray yarn
Head - Continue Round 8 :
(1 sc; inc)*3 (9)
Round 9 :
(2 sc; inc)*3 (12)
Round 10 :
(3 sc; inc)*3 (15)
Round 11 :
(4 sc; inc)*3 (18)
Round 12 :
(5 sc; inc)*3 (21)
Round 13 :
(6 sc; inc)*3 (24)
Round 14 :
(7 sc; inc)*3 (27)
Round 15 :
(8 sc; inc)*3 (30)
Round 16 :
(9 sc; inc)*3 (33)
Round 17 :
(10 sc; inc)*3 (36)
Round 18 :
(5 sc; inc)*6 (42)
Round 19 :
(6 sc; inc)*6 (48)
Round 20 :
(7 sc; inc)*6 (54)
Round 21 :
(8 sc; inc)*6 (60)
Round 22 :
15 sc; 10 inc; 35 sc (70)
Round 26 :
15 sc; (1 sc; inc)*10; 35 sc (80)
Round 32 :
5 sc; "crochet in" 12 needles*5 sc; 15 sc (80) make 5 sc, put marker in the last sc, from now we'll start counting rounds from this point.
Round 33 :
60 sc; 18 ch (skip 18 sc); 2 sc (80)
Round 35 :
3 sc; "crochet in" 11 needles*5 sc; 22 sc (80)
Info :
As for the head I "CROCHETED IN" needles, this way is better for those who doesn't like sewing needles. For the head we need 80 needles. Insert safety eyes between rounds 23 and 24, 19 sc apart.
Round 38 :
1 sc; "crochet in" 12 needles*5 sc; 19 sc (80)
Round 40 :
(14 sc; dec)*5 (75)
Round 41 :
"crochet in" 13 needles*5 sc; 10 sc (75)
Round 42 :
(13 sc; dec)*5 (70)
Round 43 :
(12 sc; dec)*5 (65)
Round 44 :
"crochet in" 13 needles*5 sc (65)
Round 45 :
(11 sc; dec)*5 (60) fill with stuffing as you go.
Round 46 :
(4 sc; dec)*10 (50)
Round 47 :
"crochet in" 10 needles*5 sc (50)
Round 48 :
(3 sc; dec)*10 (40)
Round 49 :
(2 sc; dec)*10 (30)
Round 50 :
"crochet in" 6 needles*5 sc (30)
Round 51 :
(3 sc; dec)*10 (40)
Round 52 :
(2 sc; dec)*10 (30)
Round 53 :
"crochet in" 3 needles*5 sc (30) cut the yarn, close off the hole, hide a tail.
— Continue Head (from hole between rounds 32 and 33) :
Round 33.1 :
BLO 36 sc (36)
Round 33.3 :
(4 sc; dec)*6 (30)
Round 33.5 :
(3 sc; dec)*6 (24)
Round 33.7 :
(2 sc; dec)*6 (18)
Round 33.9 :
(1 sc; dec)*6 (12)
Round 33.10 :
6 dec (6) close off the hole.
— Ears :
Round 1 :
With light gray yarn 6 sc in MR (6)
Round 2 :
(1 sc; inc)*3 (9)
Round 3 :
(2 sc; inc)*3 (12)
Round 4 :
(3 sc; inc)*3 (15)
Round 5 :
(4 sc; inc)*3 (18)
Round 13 :
(4 sc; dec)*3 (15)
Round 14 :
(3 sc; dec)*3 (12)
Info :
Sew the ears, and eyebrows as in the pictures below. You can also add some personality for your Hedgehog with some needle sculpting of the face, using tips in the pictures, it's up to you.
— Acorn :
Round 1 :
Start with brown yarn 6 sc in MR (5)
Round 4 :
(1 sc; inc)*6 (18)
Round 5 :
(2 sc; inc)*6 (24)
Round 6 :
(3 sc; inc)*6 (30)
Round 8 :
(4 sc; inc)*6 (36)
Round 9-17 :
36 sc (36) change to the light brown color
Round 18 :
(5 sc; inc)*6 (42) fill with stuffing as you go.
Round 19 :
3 sc; inc; (6 sc; inc)*5; 3 sc (48)
Round 21 :
(6 sc; dec)*6 (42)
Round 22 :
(5 sc; dec)*6 (36)
Round 23 :
(4 sc; dec)*6 (30)
Round 24 :
(3 sc; dec)*6 (24)
Round 25 :
(2 sc; dec)*6 (18)
Round 26 :
(1 sc; dec)*6 (12)
Round 32 :
1 inc; 2 sc; dec; 1 sc (6)
Round 33-34 :
6 sc (6) close off the hole, hide a tail.
— Oak Leaf :
Row 1 :
With yellow (or red) yarn 21 ch, continue to crochet in rounds
Round 2 :
3 sc; 6 hdc; 10 dc; 5 sc in the first ch; 10 dc; 6 hdc; 3 sc (43) + 5 ch, turn
Round 3 :
6 sc; 1 hdc; 3 dc in one; 3ch; 1 sc (in the same sc where we made 3 dc); 1 sc; 1 hdc; 1 dc; 3 trc; 4 ch; 1 sc (in the same sc where we made 3 trc); 2 sc; 1 hdc; 1 dc; 4 trc; 4 ch; 1 sc (in the same sc where we made 4 trc); (skip 1 sc); 5 trc in 1 sc; (skip 1 sc); 4 ch; 4 trc (in the same sc where 4 ch was made); 1 dc; 1 hdc; 3 sc; 4 ch; 4 trc (in the same sc where 4 ch was made); 1 dc; 1 hdc; 3 sc; 4 ch; 3 trc (in the same sc where 4 ch was made); 1 dc; 1 hdc; 2 sc; 3 ch; 3 dc (in the same sc where 3 ch was made); 1 hdc; 2 sc; sl st.
Info :
You may also make a maple leaf or a different kind of oak leaf using scheme below, or no leaf at all, it's up to you. You may sew the leaf to the head and an acorn to the hands or use sewable snap buttons, so acorn will be easily come off, it all depends on your preferances and the age of a child.
Info :
This fellow has 208 needles in total (summary of needles: base 41 + large ring 35 + middle ring 29 + small ring 23 + head 80 = 208).
This hedgehog stacking toy pattern gives you a playful, tactile project you can treasure or gift. It includes rings, needles, legs, arms, ears, an acorn and a decorative oak leaf for lots of creative assembly. Enjoy the process of building each part and stitching them together into a cuddly companion. 🧶🧵