🧢 Beautiful ✨ Detailed πŸ’ Adorable

Plush Backpack Frog Amigurumi Pattern

Plush Backpack Frog Amigurumi Pattern
4.8β˜… Rating
5-7 Hours Time Needed
2.8K Made This
βœ‚οΈ

Intermediate Level

Ideal for those with basic crochet experience, featuring slightly more advanced stitches and techniques to expand your skills.

⏱️

Weekend Treat

Takes 5-7 hours, making it an enjoyable project to finish over a couple of days.

🧸

Cute Companion

An adorable friend to cherish, handcrafted with love to bring comfort and joy for years to come.

About This Plush Backpack Frog Amigurumi Pattern

This pattern creates a plush backpack frog worked mainly in single crochet using super bulky velvet yarn for a soft, cuddly texture. It includes instructions for the backpack body, flap, straps, handle and cord, plus the frog head, eyes, tummy, forelegs and hind legs. The pattern features step-by-step rounds and helpful photos to guide assembly and finish details.

Plush Backpack Frog Amigurumi Pattern crochet pattern - detailed view of completed project

Intermediate skill level is required with knowledge of working in rounds and rows. The finished backpack measures approximately 21 cm wide and 24 cm high.

Why You'll Love This Plush Backpack Frog Amigurumi Pattern

I absolutely love this pattern because the plush velvet yarn creates a wonderfully soft and tactile finish that kids adore. I enjoy designing pieces that are both cute and functional, and this backpack frog is a perfect blend of toy and accessory. I appreciate how the construction separates into clear parts β€” flap, body, straps and frog pieces β€” making assembly satisfying and manageable. I also love the little details like the tummy patch, big eyes and wooden button which give the frog personality and charm.

Plush Backpack Frog Amigurumi Pattern step 1 - construction progress Plush Backpack Frog Amigurumi Pattern step 2 - assembly progress Plush Backpack Frog Amigurumi Pattern step 3 - details and accessories Plush Backpack Frog Amigurumi Pattern step 4 - final assembly and finishing

Switch Things Up

I love how easy it is to customize this frog by changing colors; try pastel shades for a softer look or bright greens for a classic frog.

I sometimes substitute the super bulky yarn for a slightly thinner yarn and a smaller hook to make a petite keychain-sized version.

I add embroidered eyelashes or a small felt tongue to change the frog's expression and personality.

I swap the wooden button for a decorative shaped button or a magnetic snap for easier closure, depending on use.

I often lengthen or shorten the straps to fit different sized kids by adding or removing chains when making the straps.

I like to sew a small interior pocket inside the backpack for tiny treasures or a name tag for personalization.

I recommend experimenting with different eye sizes (for example 10–12 mm) if you want a less-protruding eye look, but ensure safety for children.

I sometimes use a contrasting color for the tummy patch or embroider patterns to give the backpack a unique look.

I like to add wire into the limb seams for optional posability if the backpack is for display rather than young children.

I often finish edges with a single crochet border in a contrasting color to make the stitching pop and add a neat professional look.

Common Mistakes & How to Fix Them

βœ— Forgetting to use a marker at the beginning of rounds causes lost stitch counts; place a marker or a contrasting thread at the start of every round to track progress. βœ— Overstuffing the head or legs makes seams and shapes look uneven; stuff gradually and shape as you go, adding small amounts until you reach the desired firmness. βœ— Skipping stitch counts when working increases and decreases will distort shaping; count stitches at the end of each round and mark rounds where shaping happens. βœ— Pulling the velvet yarn too tightly creates stiff fabric and visible striping; keep an even, relaxed tension to preserve the plush texture. βœ— Changing hook size mid-project without adjusting pattern changes the final size; if you change yarn or hook, make a gauge swatch and adjust stitch counts or finished expectations accordingly.

Plush Backpack Frog Amigurumi Pattern

Make a cuddly plush backpack frog using super bulky velvet yarn. This pattern guides you through crochet pieces like the flap, backpack body, straps, handle, cord and frog parts with clear step-by-step rounds. Perfect as a gift or a special handmade backpack for a child, the finished piece has delightful eyes, a tummy patch and a button closure. You will enjoy the plush texture and simple assembly to create a lovable frog companion.

Intermediate 5-7 Hours

Materials Needed for Plush Backpack Frog Amigurumi Pattern

β€” Main Fabric

  • 01
    Super Bulky / Super Chunky / 14ply velvet yarn HIMALAYA DOLPHIN BABY - 2 skeins green color
  • 02
    Cream color yarn - approximately 1/5 of a skein for tummy and eye centers
  • 03
    Small amount of pink yarn for cheeks (few grams)
  • 04
    Pink chenille thread for embroidering the cheeks (optional)

β€” Tools Required

  • 01
    Crochet hook size 3.75 mm (Clover)
  • 02
    Sewing needle for sewing pieces
  • 03
    Wooden button 2 mm
  • 04
    Safety eyes 14 mm (2 pieces)
  • 05
    Stuffing toy material (polyester fiberfill)
  • 06
    Scissors
  • 07
    Stitch marker or contrasting thread
  • 08
    Cotton thread (matching color) if plush yarn is crumbly

Progress Tracker

0% Complete

β€” Notes :

Info :

Work in continuous rounds, in rows and in a spiral. The size of the backpack - 21 cm wide (8.2 "), 24 cm high (9.4 "). At the beginning of the round, use a marker or thread of a different color so that you can see where the beginning of the round is.

Infos :

Abbreviations: ch - chain. MR - magic ring. sc - single crochet. inc - increase. dec - decrease. sl st - slip stitch. BLO - back loops only. t-ch - turning chain. (....) * n - repeat instruction in brackets N times. (...) - number of loops in a row / round.

Info :

Tip: If plush yarn is crumble, use cotton thread matching color to sew on pieces.
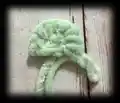
β€” FLAP :

Round 1 :

ch2, crochet 5 sc into the 2nd ch from the hook. Do not pull the ring. Turn. (5)

Round 2 :

t-ch, 1 sc, inc * 4, turn (9)

Round 3 :

t-ch, (sc, inc) * 4, 1 sc, turn (13)

Round 4 :

t-ch, (2 sc, inc) * 4, 1 sc, turn (17)

Round 5 :

t-ch, (3 sc, inc) * 4, 1 sc, turn (21)

Round 6 :

t-ch, (4 sc, inc) * 4, 1 sc, turn (25)

Round 7 :

t-ch, (5 sc, inc) * 4, 1 sc, turn (29)

Round 8 :

t-ch, (7 sc, inc) * 3, 5 sc, turn (32)

Round 9 :

t-ch, (8 sc, inc) * 3, 5 sc (35)

Round 10 :

t-ch, (9 sc, inc) * 3, 5 sc (38)

Info :

Do not turn. Work along the top of the flap.

Round 11 :

t-ch, 21 sc, turn (21)

Round 12-18 :

t-ch, 21 sc, turn (6 rows)

Round 19 :

t-ch, 21 sc (21). Do not turn.

Info :

Then work in rounds.

Round 20 :

t-ch, 26 sc, 3 ch, skip 3 stitches, 25 sc, turn (54)

Round 21 :

t-ch, 53 reverse sc (53), sl st
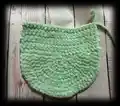
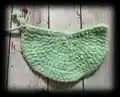
β€” BACKPACK :

Info :

Crochet with green yarn. Ch20. Start on the second chain from the hook:

Round 1 :

18 sc, 3 sc in the last chain, on the other side of the chain: 17 sc, inc, inc into t-ch (42)

Info :

Place a marker.

Round 2 :

inc, 15 sc, (inc, 1 sc) * 2, inc, 17 sc, (inc, 1 sc) * 2 (48)

Round 3 :

inc, 1 sc, inc, 15 sc, (inc, 1 sc) * 4, inc, 15 sc, (inc, 1 sc) * 3 (58)

Round 4 :

inc, 1 sc, inc, 16 sc, (inc, 3 sc) * 3, inc, 18 sc, (inc, 3 sc) * 2 (66)

Round 5 :

inc, 3 sc, inc, 18 sc, (inc, 4 sc) * 3, inc, 17 sc (inc, 4 sc) * 2 (74)

Round 6 :

74 sc (74)

Round 7 :

BLO 74 sc (74)

Round 8-16 :

74 sc (9 rounds)

Round 17 :

32 sc, dec, 35 sc, dec, 3 sc (72)

Round 18-36 :

72 sc (19 rounds)

Info :

Join the flap in the next round.

Round 37 :

1 sc, 23 sc with the flap, 48 sc (72), sl st.

β€” STRAPS (two pieces) :

Info :

Crochet with green yarn. Work in rows.

Round 1 :

ch71, start from the second chain on the hook: 70 sc, turn (70)

Round 2-4 :

t-ch, 70 sc (3 rows)

Info :

You can make the straps longer or shorter. Make more or less chains. My straps are 50 cm long. Cut the yarn. Leave the end for sewing pieces. Sew the straps at the bottom of the backpack between rounds 7 and 11, at the top of the backpack between rounds 32 and 36. Distance between straps 12 sc.

β€” HANDLE :

Info :

Crochet with green yarn. Work in rows.

Round 1 :

ch21, start from the second chain on the hook: 20 sc, turn (20)

Round 2-3 :

t-ch, 20 sc (20 rows)

Info :

Cut the yarn. Leave the end for sewing pieces. Sew on the handle.

β€” CORD :

Info :

Crochet with green yarn.

Round 1 :

Ch150. Step back at the top of the backpack 2 rounds and stretch the cord between the stitches, after folding the backpack, as shown in the photo. Make knots at the ends.

Info :

Sew a button between rounds 23 and 27.

β€” FROG :

Info :

Crochet with green yarn.

β€” HEAD :

Round 1 :

ch2, crochet 6 sc into the 2nd ch from the hook (6)

Round 2 :

inc * 6 (12)

Round 3 :

(1 sc, inc) * 6 (18)

Round 4 :

1 sc, inc, (2 sc, inc) * 5, 1 sc (24)

Round 5 :

(3 sc, inc) * 6 (30)

Round 6 :

2sc, inc, (4 sc, inc) * 5, 2 sc (36)

Round 7-10 :

36 sc (4 rounds)

Round 8 :

2 sc, dec, (4 sc, dec) * 5, 2 sc (30)

Round 9 :

(3 sc, dec) * 6 (24)

Info :

Stuff the head. Leave the end for sewing pieces.

β€” EYES (two pieces) :

Info :

Crochet with cream yarn.

Round 1 :

6 sc in MR (6)

Round 2 :

inc *6 (12)

Info :

Change color to green. Cut the cream yarn.

Round 3 :

(3 sc, inc) * 3 (15)

Round 4 :

BLO 15 sc (15)

Round 5 :

15 sc (15)

Round 6 :

(3 sc, dec) * 3 (12)

Info :

Stuff the eye.

Round 7 :

dec * 6 (6)

Info :

Cut the yarn. Tighten the hole, weave in the yarn ends. Attach the green yarn to the front loops of round 4 and work 15 sl st. Cut the yarn. Leave the yarn tail for sewing.

β€” TUMMY :

Round 1 :

6 sc in MR (6)

Round 2 :

inc *6 (12)

Round 3 :

(sc, inc) * 6 (18)

Round 4 :

1 sc, inc, (2 sc, inc) * 5, 1 sc (24)

Round 5 :

(3 sc, inc) * 6 (30)

Round 6 :

2 sc, inc, (4 sc, inc) * 5, 2 sc, sl st (36)

Round 7 :

(5 sc, inc) * 6 (42)

Round 8 :

3 sc, inc, (6 sc, inc) * 5, 3 sc (48)

Round 9 :

(7 sc, inc) * 6 (54), sl st.

Info :

Cut the yarn. Leave the yarn tail for sewing.

β€” FORELEGS (make 2) :

Info :

Crochet with green yarn.

Round 1 :

ch2, crochet 6 sc into the 2nd ch from the hook (6)

Round 2 :

inc * 6 (12)

Round 3 :

(3 sc, inc) * 3 (15)

Round 4-5 :

15 sc (2 rounds)

Round 6 :

(3 sc, dec) * 3 (12)

Round 7 :

(2 sc, dec) * 3 (9)

Info :

Stuff the lower foreleg.

Round 8-12 :

9 sc (5 rounds)

Info :

Fold it in half and crochet 4 sc through both sides. Cut the yarn. Leave the yarn tail to sew pieces.

β€” HIND LEGS (make 2) :

Info :

Crochet with green yarn.

Round 1 :

ch2, crochet 6 sc into the 2nd ch from the hook (6)

Round 2 :

inc * 6 (12)

Round 3 :

(2 sc, inc) * 4 (16)

Round 4-5 :

16 sc (2 rounds)

Round 6 :

(2 sc, dec) * 4 (12)

Round 7 :

(2 sc, dec) * 3 (9)

Info :

Stuff the lower leg.

Round 8-13 :

9 sc (6 rounds)

Info :

Fold it in half and crochet 4 sc through both sides. Cut the yarn. Leave the yarn tail to sew pieces.

β€” ASSEMBLY :

Step 1 :

Sew the eyes between rounds 6 and 10 of the head at a distance of 5 sc.

Step 2 :

Mouth: attach the green yarn to the stitch between rounds 6 and 7, work between the rounds 11 sc, sl st. Cut the yarn. Weave in the yarn ends.

Step 3 :

Using a pink chenille thread, embroider the cheeks between rounds 3 and 7.

Step 4 :

Sew the head to the flap of the backpack.

Step 5 :

Sew on the tummy to the backpack.

Step 6 :

Sew the forelegs between rounds 25 and 28.

Step 7 :

Sew on the hind legs between rounds 8 and 12.

Assembly Instructions

  • Sew the eyes between rounds 6 and 10 of the head at a distance of 5 sc.
  • Attach the mouth by attaching green yarn to the stitch between rounds 6 and 7, then work between the rounds 11 sc, sl st; cut and weave in ends.
  • Using a pink chenille thread, embroider the cheeks between rounds 3 and 7 for a soft blushed look.
  • Sew the head to the flap of the backpack aligning the base of the head with the flap seam and secure firmly with small stitches.
  • Sew the tummy patch to the center front of the backpack, aligning it visually with the flap and head placement.
  • Attach the forelegs between rounds 25 and 28 on the front lower sides, spacing them evenly and securing firmly.
  • Sew the hind legs between rounds 8 and 12 on the lower back area so they hang naturally.

Important Notes

  • πŸ’‘Use a stitch marker or contrasting thread to mark the beginning of each round, especially when working in continuous spirals.
  • πŸ’‘Stuff pieces gradually to achieve an even shape and avoid overstuffing which can distort seams.
  • πŸ’‘Pin and arrange parts in position before sewing to check symmetry and placement for a balanced finished piece.
  • πŸ’‘Weave in yarn ends as you go to keep finishing tidy and reduce time on final assembly.

This adorable Plush Backpack Frog brings a playful touch to everyday adventures and makes a charming handmade gift. The soft velvet yarn and friendly frog face are sure to win hearts and become a favorite companion. Enjoy sewing the pieces together and personalizing details like cheeks and button accents. 🧢🐸

You ask,

we answer.

FAQs

What size will the finished piece be?

The finished backpack measures approximately 21 cm wide and 24 cm high when using the recommended super bulky velvet yarn and 3.75 mm hook.

Can I use different yarn weights for this pattern?

Yes, you can substitute yarn weights but this will change the final size; choose an appropriate hook size and expect different stitch counts and finished dimensions.

Do I need prior crochet experience for this pattern?

This pattern is rated intermediate and requires knowledge of working in rounds, increases and decreases, and basic assembly techniques.

How long does this project typically take to complete?

Most crocheters complete this project in 5-7 hours, though time may vary based on experience level and how much time you spend on assembling and finishing details.