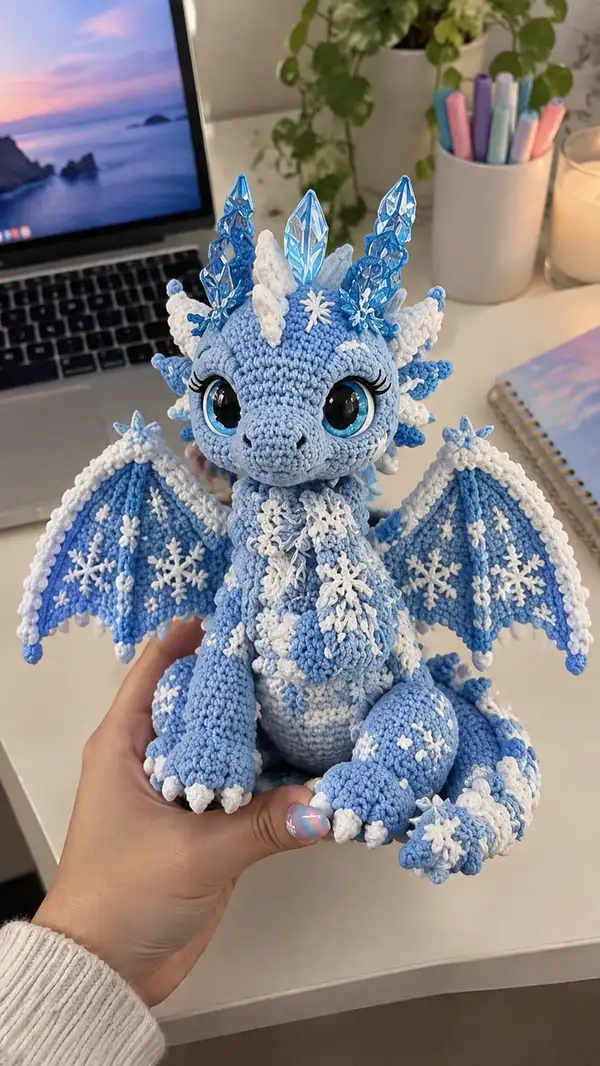
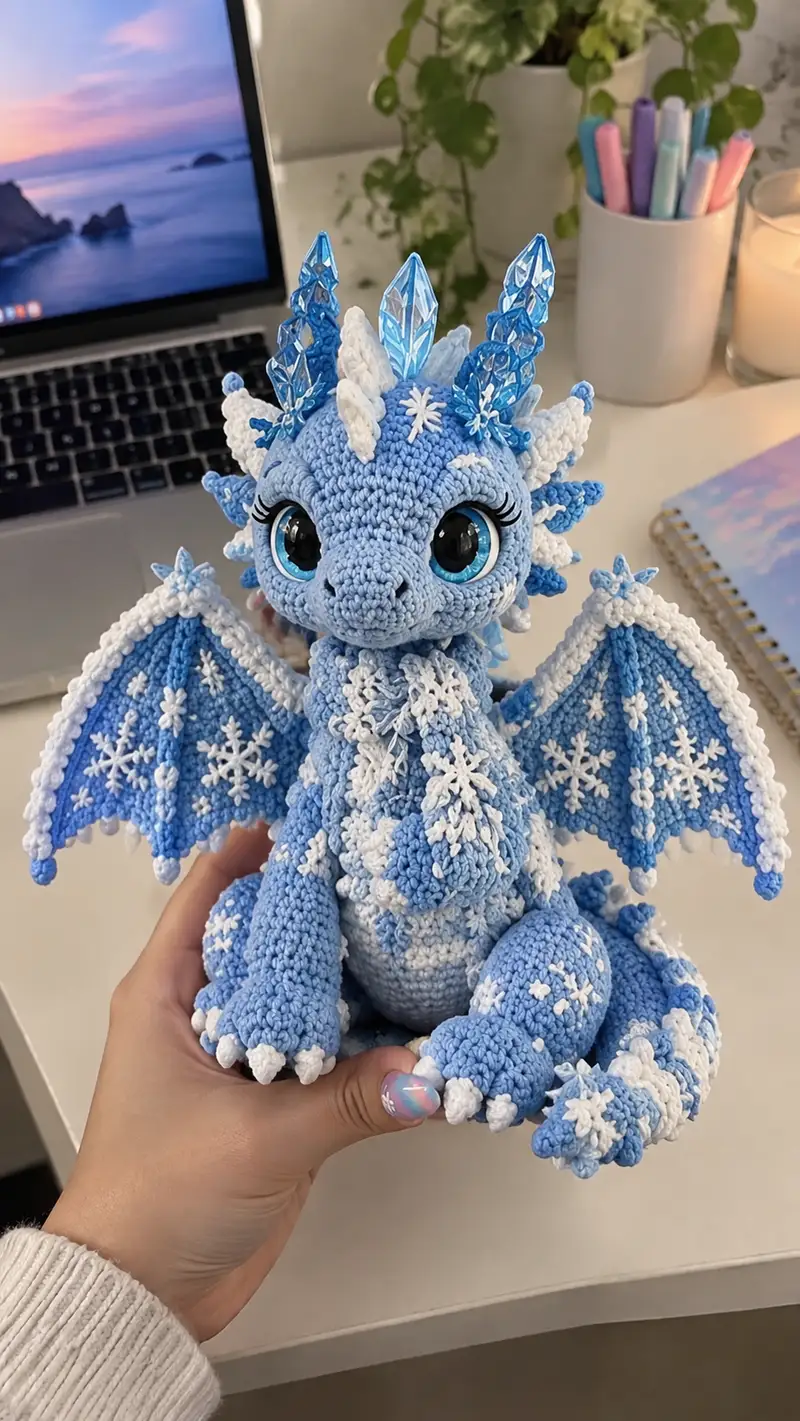
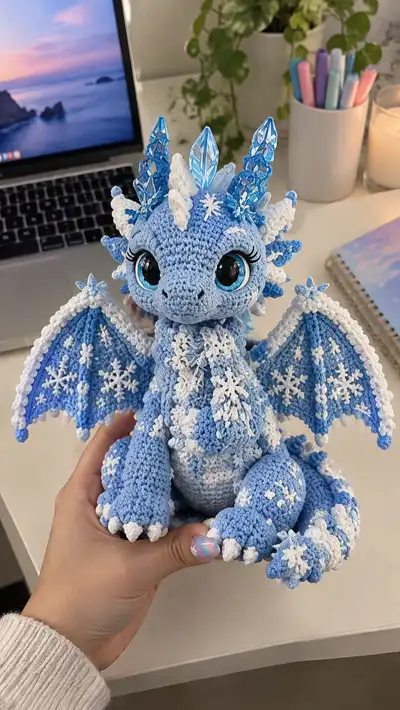
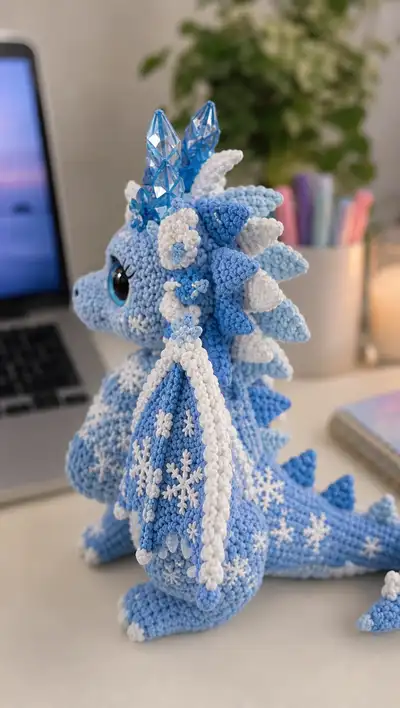
Create a magical ice dragon with icy blue and white motifs, ornate spikes, embroidered snowflakes, and crystalline crown accents. This plush dragon features expressive safety eyes, scalloped wing edges, textured frills and a curled tail. Perfect as a display piece or a treasured handmade gift, the pattern gives step-by-step construction, finishing and assembly guidance for a richly detailed winter dragon.
Progress Tracker
0% Complete
— Notes :
Info :
This pattern is written in continuous rounds for amigurumi; do not join unless stated. Use a stitch marker to mark the first stitch of each round and move it up after each round. Gauge is not critical but tension should be tight enough so stuffing doesn't show. Colors used in photos: light baby blue (Main), bright white (Accent), pale aqua for eye rims. Adjust hook size to get firm fabric.
— Head :
Round 1 :
6 sc in magic ring (6)
Round 3 :
(1 sc, inc) x 6 (18)
Round 4 :
(2 sc, inc) x 6 (24)
Round 5 :
(3 sc, inc) x 6 (30)
Round 6 :
(4 sc, inc) x 6 (36)
Round 7 :
(5 sc, inc) x 6 (42)
Round 8 :
(6 sc, inc) x 6 (48)
Round 9 :
1 sc in each st (48)
Round 10 :
1 sc in each st (48)
Info :
Place safety eyes between rounds 13 and 14, about 10-12 stitches apart (adjust for desired expression). Mark both eye center stitches to ensure symmetry. If embroidering, plan placement now. Leave small safety eye backs off until you are ready to secure.
Round 11-12 :
1 sc in each st (48)
Round 13 :
1 sc in next 5 sts, place first eye centered here then continue 1 sc in each till next eye placement (48)
Round 14-15 :
1 sc in each st (48)
Round 16 :
(6 sc, inc) x 6 (54)
Info :
For fuller cheeks, add two rounds even (rounds 14-15) before final increase. If you want a more oval head, skip round 16 and go directly to even rounds. Start stuffing lightly now to support eye placement and cheek shaping; do not overstuff yet.
Round 17-20 :
1 sc in each st (54)
Round 21 :
(7 sc, inc) x 6 (60)
Round 22-24 :
1 sc in each st (60)
Info :
Begin shaping the muzzle area: we'll form a short snout by working short decreases and a small protruding nose later. Keep the front (where eyes are) slightly more stuffed than the crown to create forward tilt.
Round 25 :
(7 sc, dec) x 6 (54)
Round 26 :
(6 sc, dec) x 6 (48)
Round 27 :
(5 sc, dec) x 6 (42)
Info :
Start stuffing the head firmly now. Use small amounts and sculpt the cheeks and eye sockets with your fingers. Work the stuffing into the front to give the snout definition as you decrease.
Round 28 :
(4 sc, dec) x 6 (36)
Round 29 :
(3 sc, dec) x 6 (30)
Round 30 :
(2 sc, dec) x 6 (24)
Round 31 :
(1 sc, dec) x 6 (18)
Info :
Fasten off leaving a long tail for sewing to the body. Finish stuffing through the opening making sure the eye sockets remain rounded and the snout protrudes slightly. We'll add nostrils with embroidery or a tiny black yarn later.
Round 33 :
Using main color, construct snout piece separately: ch 2, 5 sc in second ch from hook (5). R1: inc x5 (10). R2: (1 sc, inc) x5 (15). R3: 1 sc in each st (15). R4: (4 sc, dec) x3 (12). R5: (2 sc, dec) x3 (9). Fasten off leaving tail for sewing.
Info :
Sew snout to front center of head between rounds 25-28, stuffing the snout lightly before closing. Add two small embroidered nostrils using black yarn and a sharp tapestry needle. Use tiny French knots or short satin stitch for nostrils.
— Face Details :
Info :
Attach safety eyes: insert washers now while head is slightly open. Add embroidered eyelashes using black embroidery thread: three long curved stitches from upper eyelid outward. Embroider a small white highlight in the eye rim with pale blue to mimic inner iris ring if desired.
Round 34 :
Add small star/flake appliques on temples: make 2 small snowflake motifs by chaining 4 and forming tiny loops, then sew centered between eye and ear positions.
Info :
Leave head aside while you work body and spikes; we'll attach crown crystals later for best balance. Keep head stuffing firm but not rock-hard so you can sew pieces together cleanly.
— Body :
Round 1 :
6 sc in magic ring (6)
Round 3 :
(1 sc, inc) x 6 (18)
Round 4 :
(2 sc, inc) x 6 (24)
Round 5 :
(3 sc, inc) x 6 (30)
Round 6 :
(4 sc, inc) x 6 (36)
Round 7-8 :
1 sc in each st (36)
Info :
Change to white yarn for snow belly pattern: carry blue inside or fasten off and rejoin white where indicated. We'll create embroidered snowflake rows later; for now work main shaping in blue, with two rounds of white stripe across the chest (Rounds 9-10).
Round 9 :
Change to white, 1 sc in each st (36)
Round 10 :
1 sc in each st (36)
Round 11 :
Change to blue, 1 sc in each st (36)
Round 12 :
(4 sc, inc) x 6 (42)
Round 13-16 :
1 sc in each st (42)
Info :
If making a seated dragon with stable bottom, add extra rounds keeping the base flat by working even rounds until the piece measures approx 10-12 cm from base to where neck joins. We'll shape the top for neck attachment with decreases starting round 17.
Round 17 :
(5 sc, dec) x 6 (36)
Round 18 :
(4 sc, dec) x 6 (30)
Round 19 :
(3 sc, dec) x 6 (24)
Info :
Begin stuffing the body firmly but keep base slightly softer so the dragon sits naturally. Stuff in small amounts to avoid lumps and ensure the top where head will attach remains slightly under-stuffed so you can shape neck join.
Round 20 :
(2 sc, dec) x 6 (18)
Round 21 :
(1 sc, dec) x 6 (12)
Info :
Fasten off leaving a long tail for sewing. Leave opening slightly open until head is placed to check fit, then sew head to body using long tail and mattress or whip stitch. Ensure midline of head aligns with front center of body and sew evenly around.
— Arms (Make 2) :
Round 1 :
6 sc in magic ring (6)
Round 3 :
(1 sc, inc) x 6 (18)
Round 4 :
1 sc in each st (18)
Info :
Start shaping paw by increasing a little for a rounded hand. We'll create small white claws as separate tiny cones to sew on later. Stuff the hand area firmly to maintain shape.
Round 5 :
(2 sc, inc) x 6 (24)
Round 6-8 :
1 sc in each st (24)
Round 9 :
(3 sc, dec) x 6 (18)
Round 10-12 :
1 sc in each st (18)
Info :
If you want poseable arms, insert a thin floral wire now: push it through the center of the arm and fold the end back to secure. Stuff around the wire so wire does not poke through stitches. If not poseable, stuff lightly, leaving the top open for sewing.
Round 13 :
(2 sc, dec) x 6 (12)
Round 14-16 :
1 sc in each st (12)
Round 17 :
(1 sc, dec) x 4 (8)
Round 18-20 :
1 sc in each st (8)
Info :
Fasten off leaving long tail for sewing. Add 3 small claw cones each made with ch2, 5 sc in 2nd ch, R1 inc x5 (10), R2 (1 sc, dec) x3 (7), R3 dec x2 (3), fasten off leaving tail and sew to hand front spaced evenly. Make claws in white for contrast.
— Legs (Make 2) :
Round 1 :
6 sc in magic ring (6)
Round 3 :
(1 sc, inc) x 6 (18)
Round 4 :
(2 sc, inc) x 6 (24)
Round 5 :
(3 sc, inc) x 6 (30)
Round 6-8 :
1 sc in each st (30)
Info :
Feet of seated dragon are rounded and slightly flattened on the sole. To flatten the sole later, add a small felt or crochet oval and sew it inside. We'll add white toe spikes and embroidered snowflake spots on the foot tops.
Round 9 :
(4 sc, inc) x 6 (36)
Round 10-13 :
1 sc in each st (36)
Round 14 :
(4 sc, dec) x 6 (30)
Round 15 :
(3 sc, dec) x 6 (24)
Round 16-18 :
1 sc in each st (24)
Round 19 :
(2 sc, dec) x 6 (18)
Round 20 :
(1 sc, dec) x 6 (12)
Info :
Before closing, stuff feet firmly, especially toes. Sew a white triangular claw at the top of each toe (three small cones per foot made as in arms). Fasten off leaving long tail for sewing legs securely to base of body, spaced so the dragon sits upright without tipping.
— Tail :
Round 1 :
6 sc in magic ring (6)
Round 3 :
(1 sc, inc) x 6 (18)
Round 4 :
1 sc in each st (18)
Round 5 :
(2 sc, inc) x 6 (24)
Round 6-9 :
1 sc in each st (24)
Info :
Spiral tail formed by gradually decreasing while stuffing firmly and rotating the piece. We'll attach alternating small spikes along top edge — make approx 10-12 spikes (see Spike section) and sew them in a staggered pattern along tail.
Round 10 :
(3 sc, dec) x 6 (18)
Round 11-13 :
1 sc in each st (18)
Round 14 :
(2 sc, dec) x 6 (12)
Round 15-18 :
1 sc in each st (12)
Round 19 :
(1 sc, dec) x 4 (8)
Round 20-22 :
1 sc in each st (8)
Round 23 :
Decrease to finish tip gradually: dec x4 (4)
Round 24 :
Fasten off leaving long tail for sewing. Stuff tail moderately firm and shape into a soft spiral; attach to back lower body between rounds 6-10 for natural seated pose.
— Dorsal Spikes (Make 12-14) :
Round 1 :
Magic ring, 4 sc (4)
Round 3 :
(1 sc, inc) x4 (12)
Round 4 :
1 sc in each st (12)
Round 5 :
(2 sc, dec) x3 (9)
Round 6 :
(1 sc, dec) x3 (6)
Info :
Alternate colors white and blue for spikes to match photo. Make 12-14 spikes of varying sizes: for larger central spikes, work one additional round even (Round 8: 1 sc in each st) before fastening. Slightly stuff each spike with a tiny bit and flatten base when sewing.
Round 8 :
Optional extra round 1 sc in each st for larger spikes (12)
Info :
Sew spikes along the center back from head to tail, spacing about 4-6 stitches apart. For the head crest, place smaller spikes around crown and temples. Use whip stitch at base, sewing through base stitches and into head/body to secure.
— Horns / Crown Crystals :
Round 1 :
Small horn base: 6 sc in magic ring (6)
Round 3 :
(1 sc, inc) x2, 2 sc (8)
Round 4 :
1 sc in each st (8)
Info :
For crown, attach three crystal beads with a sewn base. Sew horn bases in a small triangle near forehead then glue or tie beads to centers. Use white yarn rosettes and star appliques to finish crown. Alternatively use transparent sewing thread for clean attachment.
— Wings (Make 2) :
Round 1 :
Ch 11, starting in 2nd ch from hook: 10 sc across (10)
Round 2 :
Ch1, turn, inc in first st and last st to create curve: (inc, 8 sc, inc) (12)
Round 3 :
Ch1, turn, (1 sc, inc) x3, 6 sc, (inc, 1 sc) x3 (16)
Round 4 :
1 sc in each st (16)
Round 5 :
(2 sc, inc) x4 (20)
Round 6-7 :
1 sc in each st (20)
Info :
Work increases to fan out wing membrane. Maintain left-right symmetry. We'll shape scalloped white edging and add jump stitches for membrane ribs. Add a center ridge with FLO in next steps to create a raised rib look.
Round 8 :
Work 1 sc in each st BLO to form ridge (20)
Round 9-11 :
1 sc in each st (20)
Round 12 :
Work scalloped border in white: *skip 1 st, 5 dc in next st, skip 1 st, sl st in next* rep around to create scallops. Adjust to end neatly at tip and base.
Info :
After scalloped edge, embroider snowflake motifs onto wing membrane using white yarn. Use a long-tentacle style star: stitch center then 6 spokes radiating, add small loop stitches between spokes to form snowflake arms. See Snowflake Embroidery section for exact stitch counts and placement.
Round 13 :
Fasten off leaving long tail for sewing to body. Sew wings to upper back sides between body rounds 12-18. Pin in place, making sure underside tips match.
— Snowflake Embroidery (Wing & Body) :
Info :
Snowflake motif: bring needle up at center point, make 6 straight stitches radiating evenly (approx 5-8 mm long depending on wing size). At midpoint of each spoke, make a small detached loop (picot): ch2, sl st into midpoint stitch to create a mini arm. Between spokes, add tiny diagonal stitches to form a delicate star look. Use white yarn and a sharp tapestry needle. For large snowflake center on body, increase spoke length and add 2 stacked picots on each arm.
Round 1 :
Place 5 small embroidered snowflakes across each wing: center one near wing tip, two along inner membrane, two small ones near base. Count stitches to ensure symmetrical placement. Use tail ends to knot securely underneath membrane.
— Frill and Neck Spines :
Round 1 :
Create 10 small frill triangles: ch2, 5 sc in 2nd ch (5), R1 inc x5 (10), R2 (1 sc, dec) x3 (6), fasten off leaving tail. Sew frills along neck at head junction alternating white/blue.
Info :
Stagger frills and spikes around the neck so they frame the face. For extra texture, embroider small white dots around each frill and glue tiny beads if desired.
— Small Decorative Snow Discs (Make 8) :
Round 1 :
6 sc in magic ring (6)
Round 3 :
Fasten off leaving tail. Use this disc as base for star embroidery and sew across body and wing tips as pictured.
Info :
Place discs on chest and tail loops and stitch snowflake embroidery on top. This layering creates dimensional snowflake clusters seen in the photo.
— Claws (Make 6 small cones for toes and 6 for hands) :
Round 1 :
Ch2, 5 sc in 2nd ch from hook (5)
Round 3 :
(1 sc, dec) x3, 1 sc (7)
Info :
Stuff minimally and sew cones on top of toes and hand tips. Use white yarn to contrast with blue feet. Blanket stitch around base when sewing for secure join.
— Assembly Steps :
Info :
Pin all major pieces in place before sewing. Place the head so facial midline lines with body center. Use long tails and ladder stitch or whip stitch to join for invisible seams. Sew dorsal spikes first while head and tail loose so you can shape the back pre-attachment.
Round 1 :
Sew head to body by inserting neck portion into body opening and using mattress stitch around; adjust fill as you close for smooth neck join.
Round 2 :
Sew arms to sides of body about 10-12 stitches down from neck join; pin and count so arms are symmetrical.
Round 3 :
Sew legs to bottom edge of body spaced so dragon sits evenly; flatten base slightly by tacking a few inside stitches toward center to prevent tipping.
Round 4 :
Sew wings onto upper back between rounds 12-18; secure each wing with several passes of a tapestry needle through body rounds and wing base for stability.
Round 5 :
Sew spikes along dorsal midline from crown of head to tail tip, spacing evenly. Use small whip stitches at base and secure with knot inside body. Add frill pieces and small discs after spikes to layer the look.
Round 6 :
Attach crystal beads to crown by sewing through bead holes to horn base and knotting on inside. Add glue if necessary for extra security. Tuck and weave any visible tails into nearby stitches.
Info :
After assembly, go back and stitch snowflake embroidery on body and tail using patterns described earlier. For large snowflakes, mark centers with a washable pen for precise placement. Use short, even stitches for a delicate look.
— Finishing Touches :
Info :
Weave in all ends securely. If using safety eyes, ensure washers are tight. Trim excess threads and hide tails inside body. Add optional blush with fabric paint or chalk to cheeks. Block wings gently with pins if needed to open scallops.
Round 1 :
Use clear nail polish or glue to secure any tricky beads. If the dragon will be handled frequently, stitch an extra reinforcement X under each wing and spike base.
Info :
Final inspection: check symmetry, ensure spikes are straight and secure, and that the dragon sits well. Adjust stuffing by adding small amounts where needed to keep shape consistent.
This icy dragon amigurumi brings frosty charm and sculptural detail together in one enchanting project. Every stitch contributes to its personality — from embroidered snowflakes to alternating spikes and crystal crown accents. It makes a magical gift or a beautiful display piece that will delight anyone who loves fantasy and handmade treasures. 🧶❄️✨