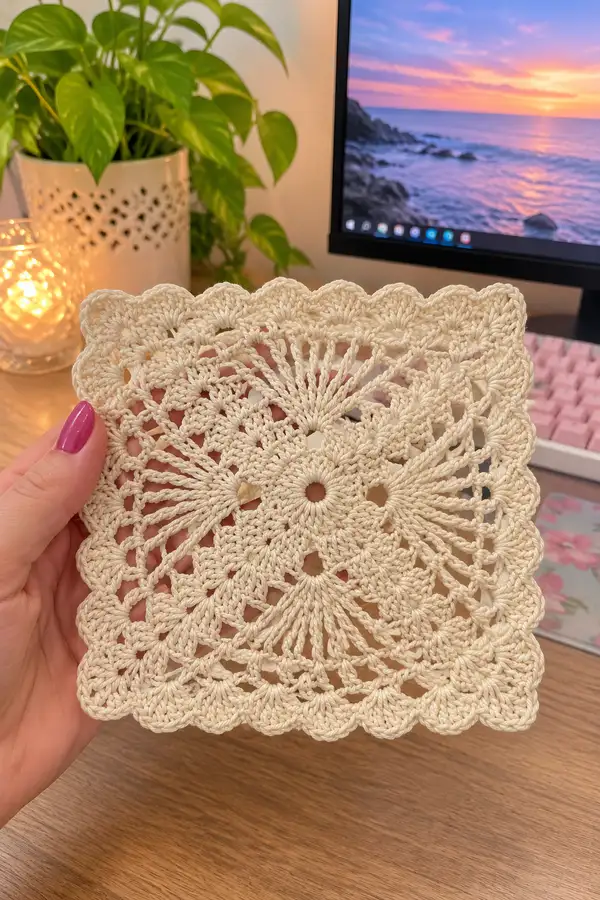
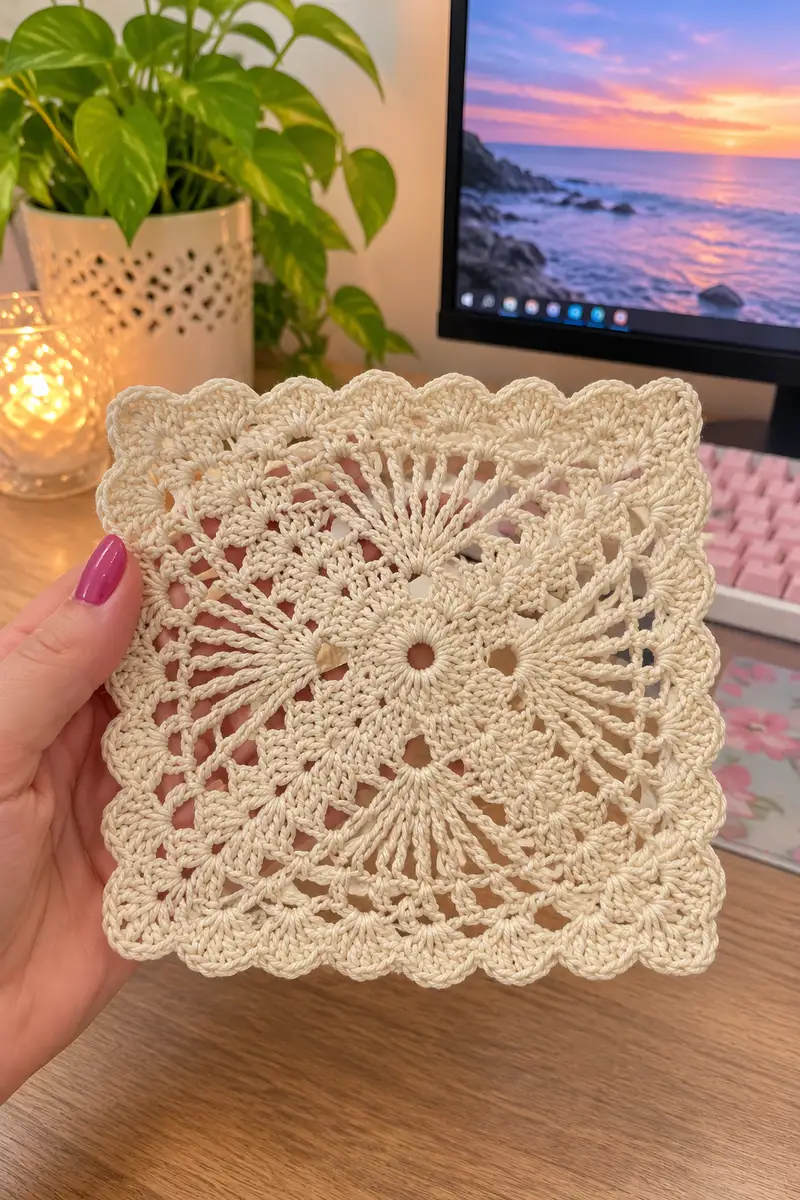
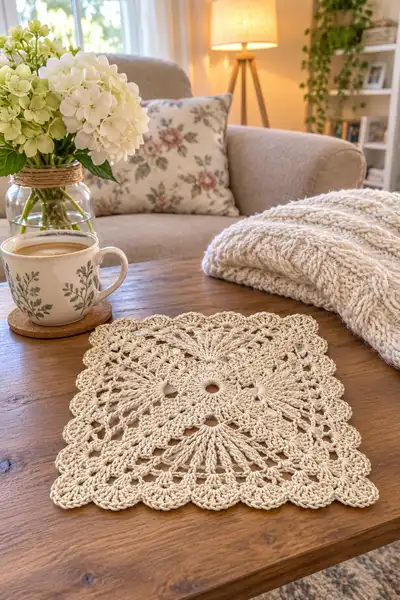
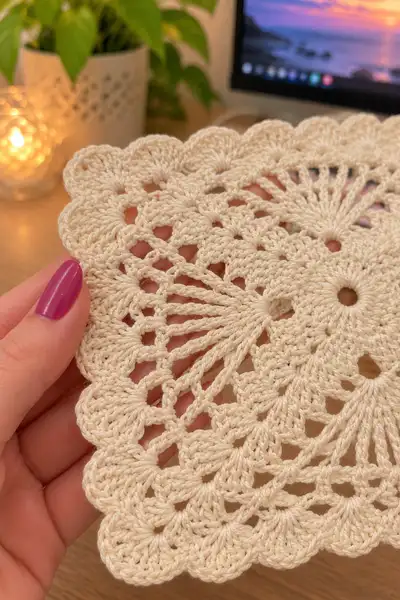
A delicate ivory fan lace granny square that reads like vintage lace and works beautifully as a coaster, centerpiece, or joined motif. This square features a small closed center, radiating fan clusters, open lacy arches, and a scalloped shell edge for a timeless, heirloom look. Worked flat in the round with a lightweight cotton yarn, the finished piece is soft, drapey, and blocks to a perfect square.
Progress Tracker
0% Complete
— Notes :
Info :
This pattern is written to be worked flat in continuous joined rounds. Each 'Round' refers to one pass around the motif; you will join rounds with a slip stitch to the top of the starting ch as called. Work tightly enough so the lace holds shape but not so tight the scallops are distorted. Block square after finishing to open lace and square the edges.
— Center Ring :
Round 1 :
Make a magic ring, ch3 (counts as dc), 11 dc into ring, pull ring closed (12)
Info :
Center is a tight small disk; keep the magic ring pulled but not overly tight so the first round lays flat. Place a stitch marker in the top of the beginning ch3 to mark the round start if you prefer.
Round 2 :
(1 dc, 1 inc) x 12 (24)
Round 3 :
(2 dc, 1 inc) x 12 (36)
Round 4 :
(3 dc, 1 inc) x 12 (48)
Info :
These increases create a circular disk that will form the base for the four fans. Keep counts exact; as you increase, lay the work flat to check for curling or rippling and adjust tension if needed.
Round 5 :
(4 dc, 1 inc) x 12 (60)
Round 6 :
(5 dc, 1 inc) x 12 (72)
Round 7 :
(6 dc, 1 inc) x 12 (84)
Round 8 :
(7 dc, 1 inc) x 12 (96)
Info :
At this stage you have a dense round of dc stitches that will act as the foundation stitches for forming the fan petals. Count across the round occasionally to confirm you have 96 foundation dc positions.
— Foundation for Fans (Rounds 9-16) :
Round 9 :
Ch1, sc in same st, *ch5, sk 5 sts, sc in next st* repeat around 12 times (96 base positions but worked as 12 chain-arches)
Info :
Round 9 converts the dense dc round into 12 chain-arch segments which later become the fans. You are creating 12 arch anchor points spaced evenly - these become visual spokes. Keep chains loose so the arches sit open.
Round 10 :
Slip into first ch5 arch, ch3 (counts as dc), (11 dc) all into same ch5 arch, sl st to top of ch3 to close fan (12 dc cluster in each arch) x12 (144 dc represented as 12 fan clusters)
Info :
Round 10 forms the first fans. Each ch5 arch receives a fan of 12 dc (worked as ch3+11 dc) to create a deep petal. Use stitch markers to mark the start of each fan if it helps maintain neat joins.
Round 11 :
Ch1, sc in top of each fan (worked into the ch3 top), *ch7, sc into middle of next fan*, repeat around (12 sc + 12 ch7 arches)
Round 12 :
Into each ch7 arch: sl st, ch3 (counts as dc), 15 dc into arch, sl st to top of ch3 to complete larger fan - produce 12 elongated fans (12 large fan clusters)
Info :
Fans in Rounds 10 and 12 should visually alternate and form a strong radiating effect. If fans pull to one side, gently block the center to flatten then continue. Keep consistent stitch height (US dc) for even petals.
Round 13 :
Ch1, sc in top of each large fan (12 sc), *ch9, sc into next fan top*, repeat around (12 sc + 12 ch9 arches)
Round 14 :
Into each ch9 arch: ch3, (2 tr, ch1, 2 tr) all into arch to create a tall shell; sl st to secure (tall shell in each arch) x12 (12 shells)
Info :
Rounds 13-14 build height and openwork spacing to let the final square shaping start. Count shells to ensure you have 12 shells evenly spaced. The ch9 arches give room for taller stitches (tr).
— Defining Four Quarter Fans and Corner Points (Rounds 15-28) :
Round 15 :
Ch1, sc in top of each tall shell (12 sc), now we will group shells into 4 quarter panels: *[sc in next 2 shells, ch5, sk next 4 shells]* repeat 4 times so that ch5 corners form (12 sc + 4 ch5 corner arches)
Info :
This round converts the 12 shells into four groups of three shells each, separated by four ch5 corner spaces. Those ch5 spaces are your increases which will act as the four corner points of the square as you build outward.
Round 16 :
Work into each group of 3 shells: into first shell top ch-space ch3 (counts as dc), 7 dc into same shell top; move to the middle shell top ch-space: ch1, 7 dc; move to third shell top ch-space: ch1, 7 dc; then into the corner ch5: ch3, (2 dc, ch2, 2 dc) making corner cluster. Repeat for 4 quarters (creates fans of 3 clusters with a corner cluster) - 4 corner clusters plus fans
Info :
Round 16 explicitly creates four quarter fans separated by corner clusters; these corners will be expanded in later rounds to form a square. Keep counts consistent per quarter so each side of the square remains even.
Round 17 :
Ch1, sc into each of the dc across the quarter fan clusters (work across each fan), and sc into each corner ch2 space twice to stabilize; overall you should have the base stitch markers for 4 sides - consider placing a stitch marker at each corner cluster start for subsequent rounds.
Round 18 :
Along each side between corners: *ch3, sk 2 sts, 1 shell (5 dc) into next st, ch3, sk 2 sts* repeat across the side; at each corner work (1 sc, ch4, 1 sc) into the corner ch2 space to begin squaring out
Info :
Round 18 begins the process of turning the circular motif into a square by creating corner chain spaces that will receive increased clusters in later rounds. The shells along the sides shape the face of each side.
Round 19 :
Work into each side shell and chain space: ch3, 2 tr in each side shell, ch2 between shells, in corner ch4: (2 tr, ch2, 2 tr) to emphasize corner - repeat for all 4 corners and all side shells to keep counts balanced.
Round 20 :
Ch1, sc across all tr tops and into corner cluster tops for reinforcement. Count to ensure each side has equal numbers of side shells and corners remain four. Adjust tension if one side appears longer.
Round 21 :
Along each side between corners: *(ch5, sk next ch2 between tr sets, sc in top of next tr set)* repeat across; into each corner ch2: ch5, sc into corner space to maintain corner arch (this will create 4 long arches forming the square perimeter)
Info :
Rounds 19-21 stretch the motif into a square silhouette using alternating tall stitches and arching chains. Ensure your corner arches are larger than side arches to maintain squareness when blocked.
Round 22 :
Into each ch5 arch: join with sl st, ch3, 11 dc into same arch (12-dc fans) to form prominent side fans. At corner ch5s, make (ch3, 15 dc) to give expanded corner fans that will push the motif into a square (12 fans on sides + 4 larger corner fans)
Round 23 :
Ch1, sc into top of each fan across sides and corners. There will be a higher stitch count at corner fans — note these as corner anchors for later rounds.
Round 24 :
Work a decorative arch row: *sc, ch4, sc* over each set of 3 sc along the side (use appropriate spacing so side arches number evenly) and in corner fans work *sc, ch6, sc* to keep corner spacing larger (counted to give 4 corner big arches)
Info :
From Round 22 onward your motif will look more square as corner arches get larger. Count your side repeats and adjust by adding or removing a ch4 loop at the midpoint of a side if you find one side has one fewer repeat than others.
— Middle Lace Rounds (Rounds 25-44) :
Round 25 :
Into each side ch4 arch: ch3, 9 dc into the arch, sl st to top of ch3 (creates side shells); into each corner ch6 arch: ch3, 13 dc into arch (corner shells) - repeat around (creates 12 side shells + 4 corner shells)
Round 26 :
Ch1, sc in top of each shell across sides and corners, then *ch5, sc into next shell* repeat across to create open chain arches in between shells, leaving corners with ch7 arches (12 ch5 side arches + 4 ch7 corner arches)
Info :
These chain arches will form a lacy net between larger shells; spacing must be even. Pin the piece lightly to a blocking board now and see how the corner arches expand to help plan shell placement in later rounds.
Round 27 :
Into each ch5 arch: (sl st, ch3, 7 dc, ch1, 7 dc) creating a deep, openwork fan that reads as two petal groups split by a ch1. Into corner ch7: (sl st, ch3, 11 dc, ch1, 11 dc) to keep corners dominant.
Round 28 :
Ch1, sc in top of each fan segment, sc across extra ch1 spaces to stabilize; check counts that sides have equal numbers of fan groups and the corners remain 4 larger groups.
Round 29 :
Work decorative 'bridge' row: between fan groups on each side, *ch3, sc into top of next fan*, producing small connecting arches; at corners work *ch5, sc into next corner fan top* to blend into corner shells.
Round 30 :
In each ch3 bridge: (ch3, 5 dc) to form small fanettes between larger fans; in corner ch5: (ch3, 9 dc) to keep corner fullness (repeat around)
Info :
Rounds 27-30 refine the lace between the larger fans and begin building the density required to give the square a flat face while keeping the openwork vintage look.
Round 31 :
Ch1, sc in tops of all fanettes and large fans; place a stitch marker at the mid-point of each side (opposite corners) to guide even border increases in the next rounds.
Round 32 :
Along each side between mid markers: *(sc, ch2, sk 2, (5 dc shell) in next sp) repeat across*; at corners: (sc, ch4, (7 dc shell) in corner space, ch4, sc) to start shaping a squared scalloped line (this prepares for the scallop border)
Info :
By Round 32 you should see clearer corner definition. Each corner has been augmented to maintain squareness; check that sides remain balanced and adjust any shell counts by adding a single dc to the longest side if necessary.
Round 33 :
Ch1, sc across shells for reinforcement, slip stitch to join end. You now have a more structurally square motif ready for edging.
Round 34 :
Edging foundation: *ch1, sc in next 3 sts, ch3, sc in next 3 sts* across side sections to create even small arches evenly spaced; in corners work *sc in next 4 sts, ch5, sc in next 4 sts* to maintain corner fullness
Info :
These small chain arches are the base for the scalloped shells that will make the scalloped final border. Space is crucial: if your arches bunch, either rework with a slightly larger hook or block the square flat then continue.
— Scallop and Shell Border (Rounds 35-64) :
Round 35 :
Into each ch3 arch: sl st, ch3, (4 dc, ch2, 4 dc) - create a shell (9 dc total including ch2 gap) in each arch; into ch5 corner arch make (ch3, 6 dc, ch2, 6 dc) corner shell - repeat around (shells across edges and larger corner shells)
Round 36 :
Ch1, sc in top of each shell center (work into middle of ch2 where indicated) and sc to stabilize seams between shells; this prepares to build multiple rows of scallops.
Round 37 :
Into each shell: ch2, (5 dc) into the shell center to form a raised scallop; sl st to next shell center. Corners: ch2, (9 dc) in the larger corner shell center to keep corner scallops prominent.
Info :
Rounds 35-37 build a layered shell edge. Work evenly and count shell centers to ensure you have the same number on opposing sides. Adjust tension or add a chain spacer if one side is short by one shell.
Round 38 :
Ch1, sc in each scallop top to stabilize, then *ch4, sc in top of next scallop* across each side; corners use *ch6, sc* to maintain corner curve. You will create new arches for another shell round.
Round 39 :
Into each ch4 arch: ch3, 7 dc, sl st to top of ch3 (small shell); corner ch6: ch3, 11 dc (larger corner shell). Repeat around.
Round 40 :
Ch1, sc across tops of new shells; ensure scallops lie flat. If scallops cup, press them with steam or lightly block before continuing.
Round 41 :
Repeat Round 38 but reduce ch spaces slightly: *ch3, sc in top of next scallop*, corners *ch5, sc* to begin tightening scallop spacing for a denser outer edge.
Round 42 :
Into each ch3 arch: ch3, 5 dc into arch forming tighter shells; corners: ch3, 7 dc into corner arches. Repeat around.
Info :
Rounds 41-42 condense the outer shells so the scalloped edge sits neat and compact. This is when the piece begins to look like the photo: layered fan shells with small openwork between.
Round 43 :
Ch1, sc into top of every shell to anchor; then *ch2, sk 2 sts, sc* across shell sides creating small picot-ready spaces; corners: ch3, sc for a slightly larger corner gap.
Round 44 :
Into each ch2: sc, ch3, sc (creates small scallop arches); into corner ch3: sc, ch5, sc for corner scallops. These small arches are the base for the final delicate scallop.
Round 45 :
Final scallop row part 1: Into each ch3 arch: (sl st, ch3, 3 dc, picot (ch3 sl st into first ch), 3 dc, sl st to finish small scallop) across sides; corners get (sl st, ch3, 5 dc, picot, 5 dc, sl st) for larger corner scallops.
Info :
Make picots gently so they are decorative but not stiff. Use the same tension as previous rounds. The motif now has multiple layers of shells and a delicate full scallop edge similar to the photos.
Round 46 :
Ch1, sc across all scallop peaks to secure the decorative picot points and smooth the transition between scallops and main body of the square.
Round 47 :
Optional neat finish: work a single round of hdc around the entire motif placing 1 hdc in each sc and 2 hdc in each corner sc to even out tension (this will slightly box the square and give a clean edge)
Info :
Round 47 is optional but recommended if you want a neater, more structural edge for coasters. If leaving as a delicate doily, skip Round 47 and weave in ends and block gently.
Round 48 :
Fasten off and weave in ends using tapestry needle. Trim all tails close to work after weaving through at least 2 cm of stitches to secure ends.
Info :
Secure your ends thoroughly. Cotton can hide ends when woven through tightly. Use small back-and-forth passes with the needle to prevent unraveling when washed.
— Optional Extra-Deep Lace Border (Rounds 49-72) :
Info :
For a more pronounced scalloped look like some photos, add the following optional rounds to deepen the border. This will expand the motif by approximately 1.0–1.5 inches depending on yarn/hook.
Round 49 :
Join yarn at any mid-side location, ch1, sc into same st, *ch7, sc into next scallop peak* repeat across sides; corners use ch9 arches to keep corners larger (creates 12 ch7 mid-side arches and 4 ch9 corners)
Round 50 :
Into each ch7 arch: sl st, ch3, 13 dc into arch, sl st to close; corners ch9: sl st, ch3, 17 dc (deeper shells for dramatic border)
Round 51 :
Ch1, sc across tops of new deep shells to anchor, then *ch3, sc between shells* around; corners ch5, sc to blend corner shells
Round 52 :
Into each ch3: ch3, 7 dc (small raised scallop), into corners ch5: ch3, 11 dc; repeat
Info :
Rounds 49-52 result in a richer outer scallop that is identical to the layered scallops visible in photos where the shell edge appears slightly padded and pronounced. Keep hook size consistent to avoid distortion.
Round 53 :
Ch1, sc across scallop tops; then around each small scallop edge work a decorative picot (ch3 sl st into first ch) between dc groups to create a dainty edged finish
Round 54 :
Fasten off and weave ends securely. Prepare for blocking: soak in warm water with a small amount of mild soap, gently squeeze out excess water (do not wring), pin square to blocking mat ensuring corners are pinned at equal distances to create a perfect square.
Info :
Blocking transforms this piece: pins should be placed at each scallop peak and at quarter points to keep the square balanced. Allow to dry completely before removing pins.
Round 55 :
Optional: For a firmer coaster, work a final round in slip stitch through the back loops only (BLO) of Round 47 (or Round 46 if you omitted 47), placing 2 sl st in each corner to square and stabilize edge.
Info :
Using BLO creates a subtle ridge that acts as a shallow lip, useful if you intend to use the square as a coaster. If you prefer a flat doily, skip this round.
Round 56 :
Fasten off, weave in all ends. Lightly steam-block if desired for a softer finish (hold iron 1-2 inches above fabric, do not press directly on cotton mercerized threads). Allow to cool before use.
— Small Variations and Joining Notes (Rounds 57-72) :
Info :
If you plan to join multiple squares into a larger blanket, plan to stop after Round 46 or 47 and use a join-as-you-go method to connect at corners and side midpoints. For a seamless look, match scallop peaks when joining and slip-stitch through both loops of adjacent squares for a neat seam.
Round 57 :
For join-as-you-go: on the final round when you reach a join point, instead of closing with sl st to your own stitch, insert hook through the corresponding sc on the adjacent square and sl st, then continue along your edge as written. Repeat for each join point on four sides.
Round 58 :
Alternate join method: whipstitch squares together from the wrong side after blocking using a matching thread and a blunt tapestry needle; aim for small, even stitches to keep join invisible from the right side.
Info :
When joining many squares, block each square before assembly for even dimensions. Joining after blocking prevents mismatched edges and eases alignment of scallops.
Round 59 :
Edge reinforcement option: Add a last round of sc around the entire assembled blanket to unify joins and create a tidy frame. Work 2 sc in each corner to keep shape and place sc evenly along sides.
Round 60 :
Final finishing: weave in all ends, steam lightly for a uniform sheen. Your squares are now ready to use singly or as a joined heirloom piece.
Info :
These rounds of joining instructions should be treated as a guide—adapt them slightly based on how your particular yarn behaves and how many squares you plan to assemble.
— Troubleshooting & Tips (Rounds 61-72) :
Round 61 :
Tip: If one side is slightly shorter, add an extra small shell (5 dc) into the longest seam before the final scallop row; doing so on both opposing sides restores balance without noticeable change in design.
Round 62 :
Tip: To create a firmer coaster surface, add a thin layer of cotton interfacing (glued and trimmed) on the wrong side with fabric glue after blocking; test a sample square first to ensure glue does not show through openwork.
Round 63 :
Tip: For slightly larger squares scale up yarn weight and hook size proportionally; each full yarn weight increase will enlarge motif approximately 1.25–1.5x depending on stitch depth.
Round 64 :
Tip: Keep a small crochet hook (2.5mm) on hand to tidy up picots and small loops by pulling slightly and tightening where needed for a neater finish.
Info :
This completes the pattern instructions. The rounds above include both the main working rounds and a recommended optional extension to create the more pronounced scalloped border you see in the photos. When counted as discrete instructions there are many small rounds and info rounds to guide you through each stage of the motif from center to scalloped edge.
This pretty ivory fan lace granny square is a lovely mix of vintage charm and modern ease — every scallop and fan comes together into a perfect little heirloom. Block it, join it, and watch it transform a table or a larger blanket into something cozy and elegant. I hope each stitch brings you joy as you craft this piece for yourself or as a thoughtful gift. 🧶✨