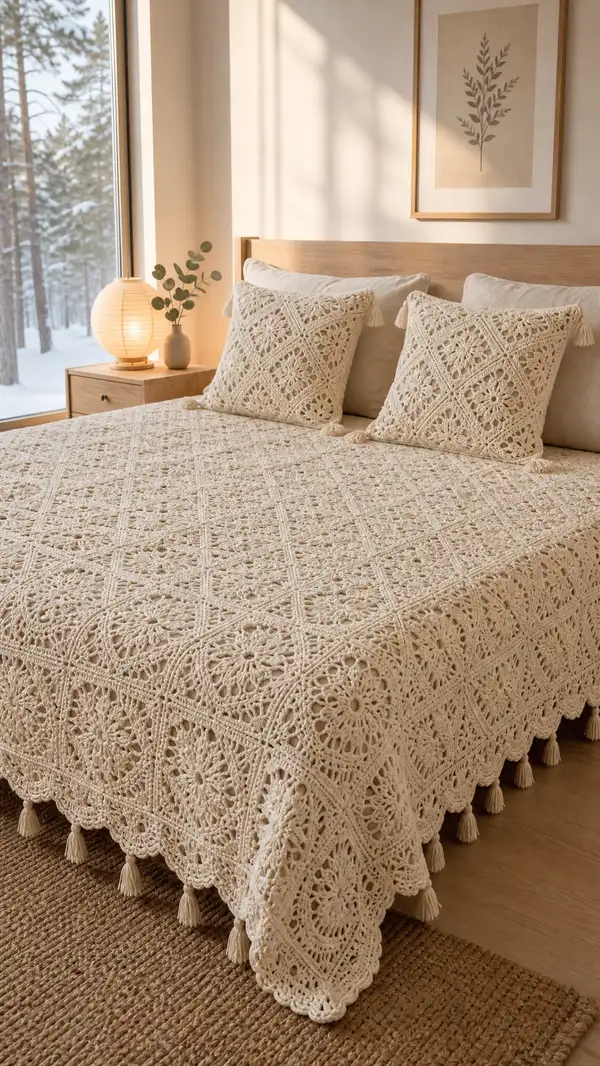
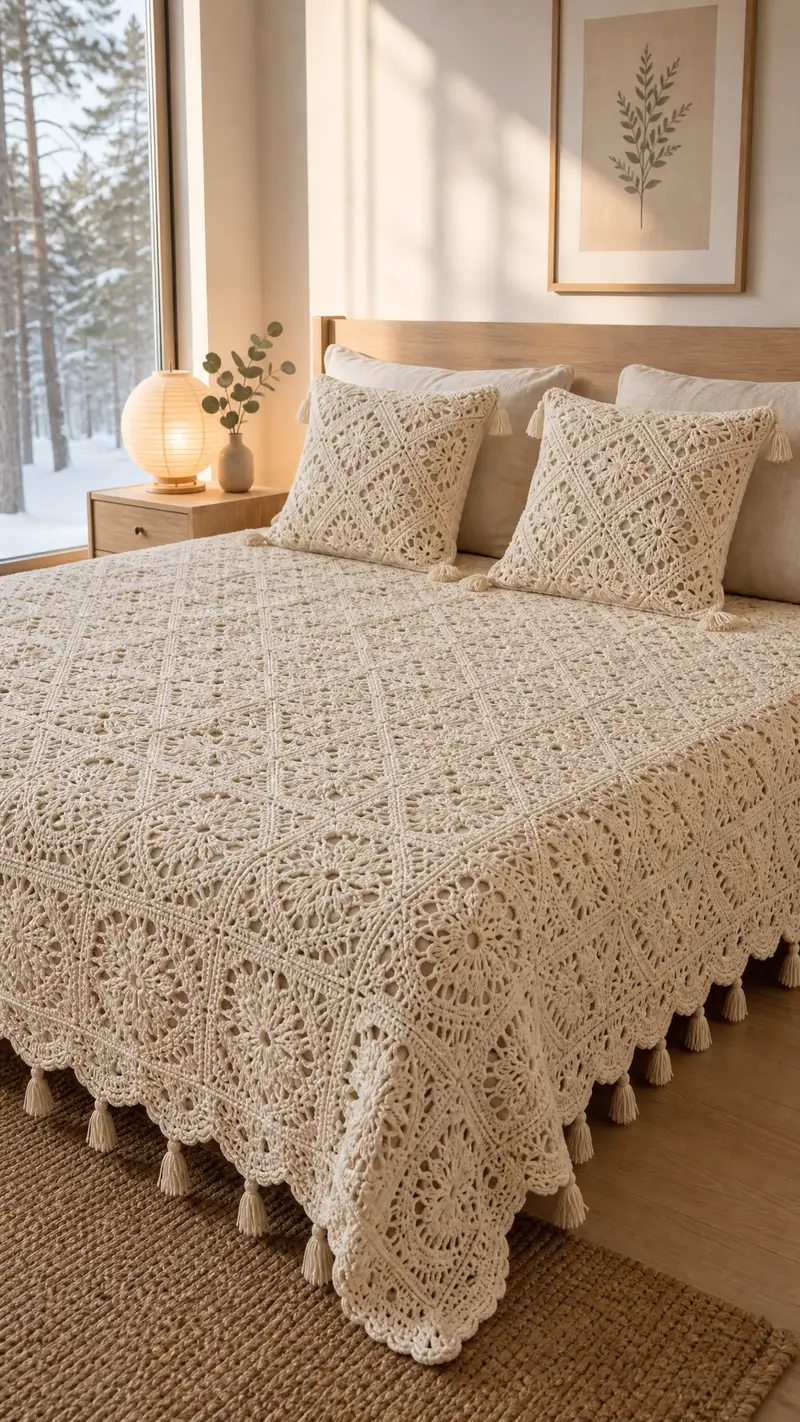
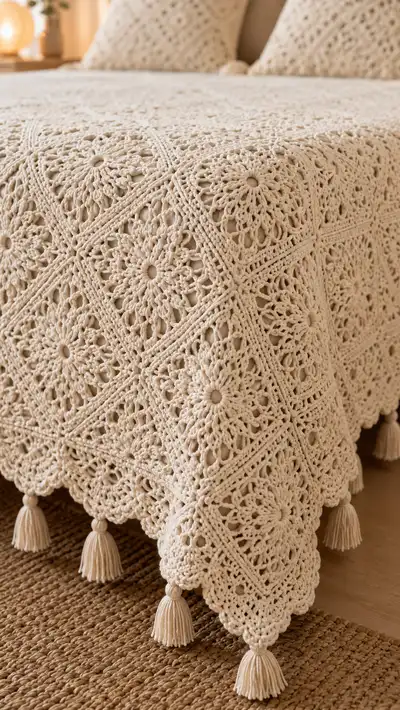
A luxurious, vintage-inspired bedspread made of textured floral granny squares joined into a scalloped, tassel-trimmed coverlet. This pattern recreates the openwork floral medallion squares, framed with raised ridges and a scalloped border for a soft, elegant drape. Worked in warm ivory cotton for a natural, cozy finish—perfect for a serene bedroom or as a heirloom gift.
Progress Tracker
0% Complete
— Notes & Gauge :
Info :
Gauge for one finished square (after blocking) should be approximately 12" (30 cm) across from point to point of the square when using bulky cotton and a 6.5mm hook. Adjust hook size to match gauge; this will determine how many squares you need to reach bedspread dimensions.
Info :
For a queen bedspread targeting roughly 92" x 92" finished, plan on an 8 x 8 grid of squares at 11.5-12" each (finish size will vary after blocking). With smaller squares you will need more units. The pattern includes instructions for each motif, joining as you go (JAYG) options, and a layered scalloped edge with tassels.
— Abbreviated Stitch Definitions :
Info :
Puff stitch (standard for this pattern): Yarn over, insert hook into specified ch/sp or st, yarn over and pull up a loop — repeat this pull-through 3 more times (so you have 7 loops on hook), yarn over and pull through all loops, ch1 to close puff (counts as 1 puff). Adjust the number of loops (3-4 pulls) if you prefer taller or shorter puffs.
Info :
Cluster and petal shaping use combinations of dc, tr and puff stitches to make a raised floral medallion. Work consistently and use stitch markers to note start of round for tall stitches.
— Floral Medallion Square (Make 64 for Approx Queen; adjust quantity for size) :
Round 1 :
mr, ch3 (counts as dc), 15 dc into ring, sl st to top of ch3 to join (16 dc) (16)
Round 2 :
Ch1, *sc in next dc, ch5; rep from * around until you have 16 ch5 loops, sl st to first sc to join (16 loops)
Info :
Forming uniform ch5 loops is critical because petals in Rnd 3 will be worked into them. Use your thumb and forefinger to keep loop size consistent as you work.
Round 3 :
Work petal in each ch5 loop: (sc, hdc, 3 dc, hdc, sc) into each ch5 loop. Join with sl st to first sc. (Each petal has 7 stitches; total 16 petals; total sts worked this round = 16 petals x 7 = 112 stitches worked across loops)
Round 4 :
Ch1, *sc in next 3 petals (through the base of the petals), ch3, sk next petal base; rep from * around to create corner chain spaces; sl st to first sc to join. (This round creates sixteen ch3 spacer positions aligned between petal clusters)
Info :
Use stitch markers to mark every fourth petal to indicate where corner chain groups will fall. These marked points will become the eventual corner points that square the motif.
Round 5 :
Work into petal bases and chain spaces to begin squaring: *(sc, ch2, dc, ch2, sc) into the longer chain space between petals (this forms the first side segment), sc in next 3 petal bases; rep from * 4 times. Join with sl st. You will have 4 raised side segments separated by groups of 3 scs.
Round 6 :
Change to working in rounds that will form a square grid: Ch3 (counts as dc), (2 dc, ch2, 3 dc) into the corner ch2 of each side segment to form a corner shell, then 1 dc in each of the next 9 stitches along the side segment (adjust stitch count to match your tension) until next corner shell; rep around to create 4 corner shells and even side stitches. Join. (Count varies; aim for same number of side stitches on each side)
Info :
From this round forward, begin watching that each of the four sides looks symmetrical. If one side has more stitches, adjust by adding or omitting single crochets in the side rows to even tension and stitch counts. Keeping each side equal will make joining and the final border much easier.
Round 7 :
Ch1, sc in each st around working 2 sc into the center stitch of each corner shell to maintain corners (work 2 sc in corner stitch as necessary). Join with sl st. (This round stabilizes edges; total stitch count will depend on previous round but should be consistent on all sides)
Round 8 :
Ch2 (counts as hdc), hdc across each sc on the side rows working (2 hdc, ch2, 2 hdc) in each corner to keep a square; join. (This adds a raised horizontal ridge useful for the ridged joins later)
Round 9 :
Ch1, 1 sc in each st around in BLO (work into back loops only) to create a defined ridge around the central medallion. Join with sl st. This ridge is used later for a raised seam effect when joining squares.
Info :
Working BLO here gives a ridge that sits proud and becomes a strong decorative join line. Keep this detail consistent across all squares.
Round 10 :
Ch3, dc in next 2 sts, *ch2, sk 2 sts, dc in next 3 sts; rep from * around until you get to corner; at corners work (dc, ch2, dc) to maintain corner openness. Join. This introduces open arches along the sides.
Round 11 :
In each ch2 arch across sides work (sc, puff, sc) — puff made as defined earlier — to create alternating texture. At corners work 3 sc into the corner ch2 to keep corner structure. Join with sl st.
Info :
When working puffs in side arches, keep the same number of loops on each puff (see stitch definition) so petals remain consistent. If your puffs look different, adjust your pull-through loops to be the same tension across motifs.
Round 12 :
Ch2, hdc in each st across but work 3 hdc into each corner to broaden corners slightly. Join. (Creates a band that will help square off for final rows)
Round 13 :
Ch1, sc in each st around in FLO to create a slight ridge at the outer side edge; join. This ridge will help the join-as-you-go rows sit neatly when connecting squares.
Info :
From Rounds 6–13 you are transforming a round medallion into a square motif. If you prefer a softer square, stop here and add a simpler border. The design pictured uses additional textured corner and edge shaping for an ornate appearance.
Round 14 :
Ch3, (dc, ch1, dc) in next stitch to create a diagonal raised line that will be used for diamond placement when joined; continue placing (dc, ch1, dc) clusters spaced by 4 sc across each side, working 3 dc clusters at corners to maintain shape. Join. (This begins the diagonal ridges visible between squares)
Round 15 :
Ch1, sc around working sc in each dc cluster and sc into ch1 spaces; at corners work (sc, ch3, sc) to form a firm corner. Join. (Stitch count will reflect clusters and corner chs; consistent application on each side is essential)
Round 16 :
Change to a taller scallop starter: Ch4, tr into same st, skip 2 sts, *(2 tr, ch2, 2 tr) into next st to form a scallop shell, sk 2 sts; rep around. At corners work an extended shell (3 tr, ch3, 3 tr). Join. (Shell counts depend on side length)
Info :
If your shells look crowded, increase the number of skipped stitches between shells by 1 to preserve shell definition. The goal is even decorative scallops around each square for an ornate lattice effect when joined.
Round 17 :
Ch1, sc in each stitch and into each tr of shells to anchor them. Work 2 sc in each corner ch3 to strengthen the corners. Join with sl st. Your square should measure roughly the target size after blocking.
Round 18 :
Ch2, 1 hdc in each st around working 2 hdc into corner points to square corners. Join. These last smoothing rounds produce neat edges for joining squares.
Round 19 :
Ch1, sc around in BLO to create another raised ridge used as a guide for join seams. Join and fasten off leaving 8-10" tail for sewing if you prefer whip-sewing rather than join-as-you-go.
Info :
Block each square to exact dimensions now. Wet block or steam block according to yarn instructions. Pin on blocking mats, straighten edges, and let dry fully before joining — this is essential to achieve the even lattice shown in the photo.
Round 20 :
Optional decorative final round for each square: With right side facing, join yarn at a corner and work 1 rnd of crab stitch / reverse sc around the square to add an anti-curl and decorative finish (sc in each st worked left-handed). Fasten off and weave in ends. (This is optional — do it if you prefer a neat, slightly corded edge)
— Join-As-You-Go (JAYG) & Joining Options :
Info :
Two main joining methods are recommended: (A) Join-as-you-go during Round 17 or 18 of each subsequent square by slip-stitching into adjacent square loops as you construct the outer rounds; or (B) Finish all squares, then whip stitch or mattress stitch them together using the 8-10" tails left in Round 19. The pictured bedspread uses a visible raised ridge join, so JAYG in the ridge round is ideal.
Join Round 1 (JAYG method) :
When attaching the next square, work to the side where it meets an already completed square. Instead of sl st to join your round at each meeting point, align squares and sl st through the back ridge loops of the already-joined square and through corresponding loops on the current square (sl st join in BLO ridge). Continue to the end of the side, then sl st normally at outer edge. This sews a neat, raised ridge seam.
Info :
When joining, keep tension slightly looser than the rest of the square to prevent pulling the joined squares inward. Pin squares first and test one seam to ensure alignment.
Join Round 2 :
Join the second side of the square to the row above or to the adjacent square using the same method. When joining at corners where two previous squares meet (the intersection of three already-attached squares), work sl st through all corresponding ridge loops to lock corner intersections in place.
Join Round 3 :
Continue round-by-round until each new square is attached on two sides in the grid; the last side will often be joined after the square to its right is worked. Work left to right in rows to build the bedspread systematically.
Info :
Plan your layout on the floor before permanently joining. Use pins to keep each square aligned and to guarantee that motifs that visually align (for example, diagonal ridges) remain continuous across the blanket.
— Assembly Grid Plan & Alternate Joining (for 8 x 8 layout) :
Info :
Suggested assembly order: make 8 squares and join into a row, repeat to make 8 rows, then join rows together. Always align square orientation so floral centers all face the same direction for cohesive look. For a queen-size bedspread, an 8 x 8 layout produces a generous drape; if your gauge differs, calculate image by measuring your finished square size and dividing the desired width and length by that measurement.
Assembly Step 1 :
Make 8 squares. Join them into a horizontal strip by placing squares RS together and using JAYG (or whip stitch along the ridge) to join from left to right. Repeat to create 8 strips total.
Assembly Step 2 :
After all strips are created, join the strips vertically using the same ridge-to-ridge joining method. Work from one end of the blanket to the other, checking alignment at each intersection. Press seams flat with steam or pins and allow to set.
Info :
If you prefer less visible joins, you can use a single crochet seam in the same yarn color through both thicknesses pulling the seam toward the backside of the spread. The raised ridge will still read as a vertical and horizontal line but with a softer appearance.
— Border: Layered Scallop & Ridge Edge (Long multi-row border to create scalloped finish) :
Round 1 :
With right side facing and working all around the joined blanket, join yarn at a corner and ch3 (counts as dc), dc evenly around into every stitch and chain space to create a stable border base. At corners work (dc, ch2, dc). Join. (This is a foundation round for the border.)
Info :
Work across seams with extra care: place extra dc in bulky joined ridges to keep the border lying flat. If the blanket pulls, consider adding an extra dc in wide seam areas to normalize tension.
Round 2 :
Ch1, sc in each st around working 2 sc into corner ch2. Join. This evens out the base and creates a neat platform for decorative rows.
Round 3 :
Ch3, dc in next 2 sts, *ch2, sk 2 sts, dc3 in next space (shell), rep around with (3 dc, ch2, 3 dc) at corners; join. (Shells create the first layer of scallops.)
Round 4 :
Ch1, sc in each st and in each dc of shells, working (sc, ch3, sc) across corner ch2 for reinforcement. Join. This secures the shell layer.
Round 5 :
Ch4 (counts as tr), tr in each sc across, at shell centers work (2 tr, ch2, 2 tr) across to accent shells, maintain corner shells with extra height. Join. (This builds vertical height and scallop depth.)
Info :
Add stitch markers where shells meet to keep the second-layer shells aligned to the first-layer base for a crisp scallop edge.
Round 6 :
Ch1, sc around in BLO to create a small cord ridge; join. This ridge visually separates scallop layers and helps when adding the final scallop shaping.
Round 7 :
Ch5, (2 tr, ch3, 2 tr) into each shell apex around to create large scallop arches; sk equivalent stitches between shell apices; join. (The number of large scallops equals the number of shells from Round 3.)
Round 8 :
Ch1, sc in each st and across each tr group; in ch3 spaces work (sc, puff, sc) to form decorative central loops in scallops. Join. (The puffs in scallop centers echo petal texture of the motifs.)
Info :
If the outer border starts to ripple, adjust by adding or removing single crochets evenly across the sides. Blocks may tighten or loosen the scallops; check after blocking and before tassel attachment.
Round 9 :
Ch3, dc around each scallop arch working 5 dc into each large scallop apex to make them prominent; in corner scallops work 7 dc to maintain proportional corner shape. Join.
Round 10 :
Ch1, sc in each st. At the lower edge of each large scallop work (sc, ch4, sc) to create a loop for the final scallop row to anchor into. Join.
Round 11 :
Ch3, (5 dc, ch3, 5 dc) into each ch4 loop to create pronounced shell scallops that will visually echo the motif shapes; join. This is the outer scallop which will be edged with picots later.
Round 12 :
Ch1, sc in each dc, work a picot (ch3, sl st into top of same st) at the center dc of each outer scallop to create a delicate crenellated edge; join. Fasten off and weave ends if you want a finished edge at this point.
Info :
Optionally, add a second scallop row beneath Round 11 for a fuller border — replicate Rounds 9–12 to build thickness and more dramatic drape. The pictured spread features a multi-layered scallop, so two passes will match it closely.
Round 13 :
Optional deeper border build: rejoin yarn and work one additional round of (sc, hdc, dc) across each scallop to firm up and knit the scallops into the blanket body. Join and fasten off.
Info :
Before adding tassels, block the entire blanket again if necessary to make scallops lay evenly. Attach tassels after final blocking and when the blanket is fully dry.
— Pillows / Matching Shams (Make 2) :
Round 1 :
Make a floral medallion square as per motif Rnds 1–13 (stop after Round 13 when sides are squared). Make 4 squares for each pillow cover and join them in a 2 x 2 configuration to form a front panel (or make 6 squares to create an oversized sham).
Round 2 :
Join squares using JAYG or whip stitch to create a neat seam; once joined, work one round of sc around the outer perimeter in BLO to create a defined edge for piping look, join and fasten off.
Round 3 :
For pillow backing: work plain sc rows until the panel matches the front panel size, or seam two squares together to form the back. Leave an opening for the insert or add buttons or zipper as desired.
Round 4 :
Attach tassels to pillow corners or center edges to mirror bedspread styling. Sew the panel to the backing with invisible whipstitch and finish all seams neatly. Insert pillow and close insertion opening using ladder stitch.
Info :
For the pictured look use 2 x 2 squares for a 18" pillow front (depending on your gauge), add tassels at each corner and one centered tassel if desired.
— Tassels & Finishing Touches :
Round 1 :
Make tassels by wrapping yarn around a 4.5" board approx 30-40 times for medium-thick tassels. Fold and tie at top with a tight knot, then wrap the top with yarn to create a neck. Trim ends to create a neat tassel. Each tassel uses about 20–40 g depending on thickness.
Round 2 :
Attach tassels to blanket corners and along each scallop apex at a regular interval (for an 8 x 8 layout attach tassels at 9 points along each long side including corner tassels or every second scallop for a balanced look). Sew the tassel neck through several stitches in the outer scallop and knot on the underside to secure.
Info :
Make several sample tassels and test on one scallop to select the correct length and fullness before committing to all tassels. Tassels add weight; evenly distribute them so the border hangs uniformly.
Round 3 :
Weave in all loose ends with a tapestry needle: follow each tail through several stitches on the reverse side, knotting if necessary to secure. Trim remaining ends close to the fabric. Steam-block lightly after trimming to settle the border.
Info :
Final finishing: give the entire bedspread a gentle steam-block and pin scallops to shape. Allow at least 24 hours to dry before using to ensure the shape sets properly.
— Troubleshooting & Adjustments :
Info :
If you find the blanket is slightly too narrow or wide after joining all squares, add or remove a column/row of squares early during joining. For small adjustments, add a narrow border (sc rows) to increase overall dimensions incrementally.
Info :
To make the bedspread larger for an oversized bed, increase the number of squares in the grid while keeping the border unchanged. For a smaller throw-size version, reduce the grid size to 5 x 5 or 6 x 6 accordingly.
Your finished bedspread is a beautiful expression of time-honored crochet craft — a tactile, floral-laced blanket with soft scalloped edges and playful tassels. Each square feels like a little medallion of work and when joined they become a luxurious, cohesive heirloom piece. The neutral ivory fits effortlessly into any decor while the texture gives the bedspread a warm, handmade soul. I hope you enjoyed each stitch — congratulations on making something you and your home will love! 🧶✨